
Page 1 of 6
SAVIOR OF THE WORLD: His Birth and Resurrection
Costumes
The following costume description is based on the production as shown at the Conference Center
Theater in Salt Lake City, Utah. Please adapt the information to fit the needs of your production.
Simplicity in costuming will enhance the spirit of the production by allowing the characters to
take prominence.
OVERALL DESIGN
Costuming for Savior of the World was inspired by the paintings of Carl Bloch (see “The Life of
Christ: Painted by Carl Bloch (1834-90)” article in the Ensign, January 1991, 30–50; see also
pictures 200, 217, 222, 224, 225, 229, and 231 in the Gospel Art Kit, available from Church
Distribution Services). The desired look was the flow and folds of fabrics that Bloch captured in
his paintings.
Costumes also helped create a marked difference between the representation of earth and heaven.
The feel of earthly costumes was one of encumbrance, being weighed down and entangled by
earthly matters—basic robes layered with drapes and other articles. In contrast, the angel
costumes were simple and flowing, without encumbrance or entanglement.
Color Palette
Colors for Act I were soft and pastel, a spring palette. The colors used for lead roles in Act II
were deeper and slightly darker. The chorus wore the same costume in both acts. Nearly every
robe in the show was dyed with color then over dyed with tan or taupe to create a soft, worn
look.
Adapting Costuming
Each costume director will create a basic approach that fits the needs and resources of their
individual production. Many different approaches are possible. Simple biblical costumes give a
sense of timelessness and can be easily created in a variety of ways. If modern white clothing is
used for chorus members or angels, sensitivity to the guidance of the Spirit will assist costume
directors in avoiding anything suggestive of temple attire.
BASIC COSTUMING
Every cast member had four basic costume pieces: a robe, a drape, a belt, and
sandals. The majority of the cast members also had an angel robe worn over
their basic costume for chorus scenes in which they represent heavenly beings.
Robes
The basic robe was a modified T-shaped garment made from rustic materials.
Some fabrics that worked well were monk’s cloth, linen or linen looks, raw
silks, textured cottons and rough woolen looks. Robes were worn about ankle
length. Sleeve length was at or slightly above the wrist.
Youth in Basic Costume

SAVIOR OF THE WORLD: His Birth and Resurrection
Costumes
Page 2 of 6
Drapes
Drapes were rectangular lengths of fabric, about 2 1/2 to 4 1/2 yards long, wrapped around the
body over the basic robe. Fabrics used included rayon, upholstery (without backings), wool,
linen, antique satins, and chiffons. Carl Bloch’s paintings greatly influenced the design and use
of drapes. The way a drape wraps around the body helps create the feeling of encumbrance in
mortality. Therefore, actors and directors should pay special attention to the use of drapes and
how they are worn.
Belts
Belts were made mostly from rope, fabric scraps and gimp (upholstery) trims. Many belts used
combinations of these elements braided together.
Sandals
Sandals resembled Jewish styles of the period. Some modern styles, such as thick soles, are not
appropriate. Sources for the sandals were found through research on the Internet.
Beards and Head Coverings
If the men in the cast had time and it did not interfere with
school or employment, they grew out their beards and hair.
Head coverings were used to give variety to scenes and to
cover short or blonde hair on both men and women (see
picture).
ADDITIONAL COSTUMING NOTES
Angel Robes
Cast members representing the heavenly hosts wore a second robe over
their basic robe. Drapes were not worn with the angel robe. Angel robes
were made in a variety of styles and from more refined looking fabrics,
such as lightweight drapery, chiffon, dupioni, and crepes. Colors used
included light tans, creams and pale yellows. These colors appear white in
stage lighting, whereas pure white becomes brilliant and reflective under
stage lights and therefore was reserved for depicting angelic messengers
and the Savior on stage (see Gabriel and Angelic Messengers
and
Depicting the Savior on Stage below). If considering other approaches to
costuming angels, please see note above about Adapting Costuming.
Gabriel and Angelic Messengers
Angelic messengers who descend from the colonnade to the stage floor, such as the angels to
Joseph and the shepherds, the angels at the tomb, and the ascension angels, were given specific
costumes to distinguish them from the chorus members in angel robes. These costumes were
more tailored than a basic robe and included a large belt around the waist and a cowled neckline.
Bo
y
in An
g
el Robe
Exam
p
les of Head Coverin
g
s

SAVIOR OF THE WORLD: His Birth and Resurrection
Costumes
Page 3 of 6
Gabriel appears to Mary
Gabriel wore the most fitted costume. His
robe had set-in sleeves and was floor
length. The drape had pleats across the
shoulders that started in the belt at the
waistline and spread out in a V shape to
the shoulders. The belt gathered at the
waist and fell in soft folds over the hips.
It looked as if it were tied in the front with
ties hanging nearly to the floor. Because
he only appeared on the colonnade, the
angel to Nephi simply wore an angel robe
over his basic costume.
Mary in Act I
Inspiration for Mary’s costume was taken directly from Carl Bloch’s painting Mary and the
Angel (see “The Life of Christ: Painted by Carl Bloch (1834-90)” article in the Ensign, January
1991, 30–50). Her costume had the most vivid color: her robe was a cranberry red and her
drape an evening blue. The fabrics for both pieces were soft and flowed well. Mary’s robe was
hemmed long so that the robe could puddle slightly on the floor. The costume colors for the
members of Mary’s family complimented and blended with hers.
Mary in Act II
To look older, Mary wore a different costume in the second act. Her robe and drape for the
second act were of similar colors but in grayed tones, and the fabrics were heavier with more
body. Mary also wore a wimple to cover her head and shoulders. Her hair that was exposed was
grayed, and she wore aged makeup.
Angel to Shepherds
Youn
g
Mar
y
in Act I Mary Magdalene (left) with
Older Mary in Act II

SAVIOR OF THE WORLD: His Birth and Resurrection
Costumes
Page 4 of 6
Temple Priests
Nephi
Unlike the rest of the prophets who were generally cast as mature men,
Nephi was portrayed by a young man. He was also given a unique costume,
inspired by Arnold Frieberg’s painting Nephi Subdues His Rebellious
Brothers. Nephi wore an off-white, knee-length, short-sleeved robe with a
cowl neckline. Over his robe he wore a leather-like sheath. He also wore a
headband, gauntlets, a large belt similar to the one in the Frieberg painting,
and sandals that laced up his legs.
Pregnancy Pads
Pregnancy pads are used by Elisabeth and Mary in Act I Scenes 2.3 and 3.3.
These pieces were worn underneath their regular costumes and must be
easy to get into and out of as there is little time for the actresses to add
them between scenes.
Priests and Temple Boys
Priests wore a tabard-like drape over the left shoulder. The drape was
pleated at the shoulder line and was held in place by a sash tied around
the waist. Both drapes and sashes were made from tightly woven,
smooth surfaced fabric in a muted grape color. Sashes were also
trimmed with gold. Sashes were tied by placing the center on the belly
button, crossing the ends behind the back, and bringing the ends
forward to be tied in a square knot.
Head coverings were made from 1-yard squares of fabric folded
diagonally. The bias fold was placed across the forehead with the ends
twisted and knotted in back. The tails from the knot were twisted,
crossed, and brought to the front of the head and secured. The
remaining corners on the back of the head were separated, twisted, and
tacked onto the knot on the back.
Temple boy’s tabards and belts were made from the same fabric. The tabards were rectangular
pieces of fabric with a hole cut in the center for the boy’s head. Temple boys also wore sashes at
the waist to hold their tabards in place.
Prophets
To distinguish prophets who speak from the colonnade—Malachi, Abinadi,
Micah, Luke, and Samuel the Lamanite—from the ensemble, prophets wore
off-white drapes over the basic robes, rather than wearing an angel robe.
Costuming all prophets except Nephi (see note above) in this way unified
their appearance, while the flexibility of how each drape was used still
created individuality among them.
Nephi Costume
Pro
p
het on Colonnade

SAVIOR OF THE WORLD: His Birth and Resurrection
Costumes
Page 5 of 6
Roman Statesman
She
p
herds
Roman Statesman and Soldiers
The Roman statesman wore a robe with a jumper over it, then a large drape
around the body, and a drape over his shoulders that matched the soldiers.
Roman soldiers wore knee-length robes with elbow-length sleeves. Their
drapes were a cranberry red and were worn with cowl-like folds of drape in
the front, while the ends of the drape fell from the shoulders down their
backs. They also wore distinctive belts.
Shepherds
Shepherd costumes were created mostly in browns and
greens. Robes and drapes were very rough, worn and
frayed. Shepherd robes were shorter, from mid calf to
below the knee. Pants were worn under the robe, laced
to the lower legs with rope, shoelaces, or leather strips.
Wedding Scene
In the wedding scene Mary’s mother and Anna replace
Mary’s light blue drape with an off-white drape and
place a veil on her head. Prayer shawls—rectangles of
off-white fabric with tassels on the corners—were worn by the adult men in the scene. The four
boys who carry the canopy had smaller shawls of similar color but without tassels. Wedding
wraps and prayer shawls are also noted on the props list because these items were added to the
actors’ basic costumes while on stage.
DEPICTING THE SAVIOR ON STAGE
Costuming for the man representing the Savior was the only
instance in which bright white colors were used deliberately to
reflect the stage lighting. The actor wore a long white robe,
hemmed long to puddle slightly on the floor. The sleeves were
hemmed at the wrist so that the hands would be visible. He
also wore a belt over the robe. Over this he wore a sleeveless
coat with a lightweight fabric drape attached horizontally
across the neckline. This drape was pulled over the head as a
hood, and the ends fell freely down the front. A second
rectangular drape was attached to one shoulder on the bias so
that the drape hung diagonally across the body in front and
back, falling to about the knees.
In the Conference Center production, the entrances and exits of
the man representing the Savior were disguised so that his appearances were unexpected. Cape-
Appearance in Upper Room

SAVIOR OF THE WORLD: His Birth and Resurrection
Costumes
Page 6 of 6
like disguise cloaks were used to cover his costume so that he could
walk in with the other Apostles at the beginning of the scene segment.
The actor would hide behind a pillar until time for his entrance. He
would then drop the cloak and walk onto stage. When he left the
stage, he walked behind another pillar and put on a second cape that
had been preset. Three disguise cloaks were required to make the two
entrances and exits. The cloaks were made out the same fabrics as the
Apostles’ robes so as to blend in with the other actors in the scene.
Each cape had a drape attached at the neckline that was used to hide
the face.
For more information about casting and direction when depicting the
Savior on stage, see Portraying the Savior and Angelic Messengers
under Production Helps.
Front View of Costume
Page 1 of 7
SAVIOR OF THE WORLD: His Birth and Resurrection
Instructions for Creating Basic Costumes
The following instructions explain how to create basic costume robes similar to those used in the
Conference Center Theater production of Savior of the World. These garments are a modified T-
shape with the slope of the shoulder cut into the garment (a regular T-shape garment does not
include the shoulder slope). Because the directions below use measurements as the cutting guide,
the resulting robe will be customized to a specific individual. If preferred, basic sizes like small,
medium, large, and extra-large could be established and patterns created from the following
guidelines so that robes could be constructed by size.
Key to Figures:
In the following illustrations, dotted lines are guide lines. Fabric is cut on the solid lines.
Measurements
Constructing a customized robe requires the following measurements:
Circumference of head
Circumference of neck at base
Shoulder width between base of neck at shoulder and top of shoulder above the arm
Chest or Bust circumference
Waist circumference
Hip circumference (if hips are of extreme proportion to waist)
Shoulder to floor
Length of arm from shoulder to wrist
Fabric Requirements
Using 45- to 60-inch wide fabric, each robe will need two times the shoulder-to-floor
measurement plus 4 to 6 inches. Depending upon the width of the fabric, extra yardage may also
be needed for sleeves and neckline facings.
Prewashing
Prewashing the fabric eliminates potential shrinkage problems and adds to the warm, worn look
of the costumes. If desired, fabric can also be over-dyed with tan, taupe, or cream to further
enhance this softer appearance. Dyeing can also be done after the garment is constructed.
Layout of Fabric
Fold fabric lengthwise matching selvage edges. Then fold the fabric in quarters matching fold
lines and selvages. This will enable you to cut both front and back pieces simultaneously. Before
cutting, you will need to determine whether the sleeves are cut separately—Style A (see Figure
A)—or as part of the basic robe—Style B (see Figure B). You may also wish to measure and
mark all guide lines before actually cutting the fabric.

SAVIOR OF THE WORLD: His Birth and Resurrection
Instructions for Creating Basic Costumes
Page 2 of 7
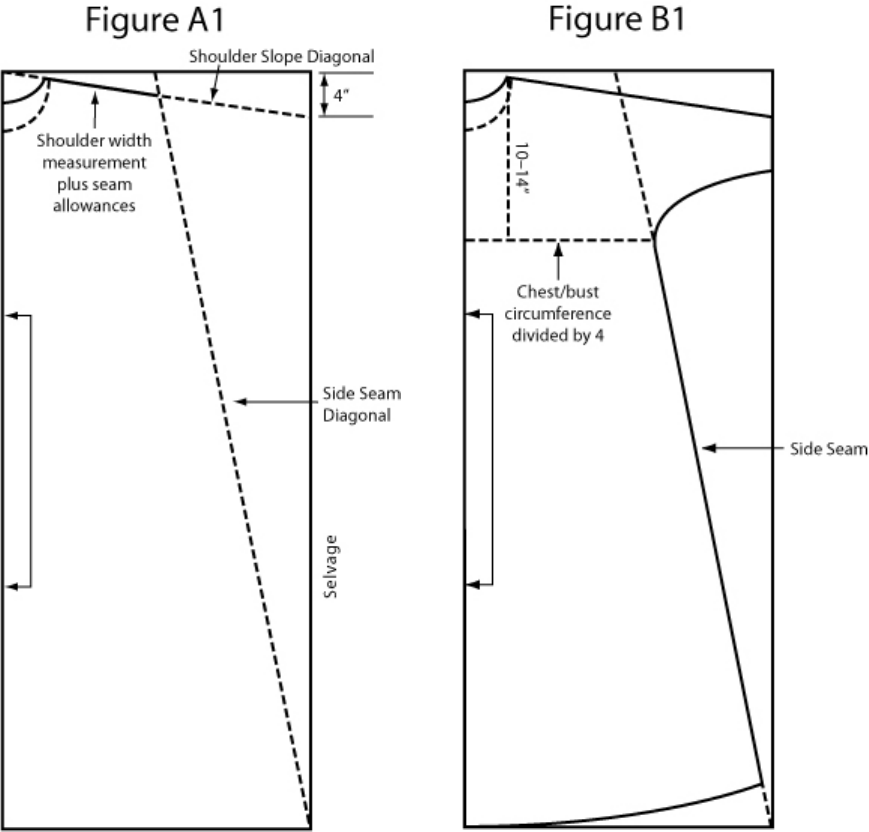
Shoulder and Neckline
The shoulder slope is cut from the center fold of the fabric quarters on a diagonal that drops
down 4 inches at the selvage edge (see Figure A1). If the sleeves are set into the robe as in Style
B, you can simply cut this entire line from center fold to selvage. If the sleeves are separate
pieces (Style A), you should mark the shoulder slope but wait to cut it until you have determined
the side seam diagonal. Then, when cutting the shoulder, be sure that the length from neckline to
side seam is at least the individual’s shoulder width measurement plus
seam allowances. You may also choose to cut the shoulder longer to
created a dropped shoulder seam.
After cutting the shoulder, cut the neck openings, beginning with the
back neckline—the higher neckline. Make sure the opening is wide
enough to go over the individual’s head. Then separate the two pieces
of fabric, and cut only one lower, front neckline (see picture).
Necklines of Robe
SAVIOR OF THE WORLD: His Birth and Resurrection
Instructions for Creating Basic Costumes
Page 3 of 7
Side Seam
The side seam is cut on a diagonal from the shoulder to the full width of the fabric at the hemline
(see Figure A1). Before cutting, make certain there is enough width to cover the fullest part of
the chest/bust. To do this, measure from the fold across the chest/bust area to the side seam
diagonal. (On most adults, the fullest part of the chest/bust falls 10–14 inches below the shoulder
point, where the shoulder meets the base of the neck. An average of 12 inches works well as a
guide. If you are working with a particularly large or small person, it may be helpful to take this
measurement.) From the fold to the side seam diagonal should be at least 2 inches larger than
the individual’s chest/bust circumference divided by 4 (see Figure B1). This provides for seam
allowances and additional ease in the robe. If necessary, adjust the side seam diagonal outward to
accommodate. Usually if there is enough width for the chest, the diagonal will also accommodate
the stomach and hips. If working with an extremely small or large individual, you may also wish
to check the hip measurement against the diagonal in the same manner.

SAVIOR OF THE WORLD: His Birth and Resurrection
Instructions for Creating Basic Costumes
Page 4 of 7
Length
To determine length of the robe, take the individual’s shoulder to floor measurement and add
shoulder seam and hem allowances. Measure this length parallel to the fold from the high point
of the shoulder. At the appropriate length, draw a straight line perpendicular from the fold to the
selvage. Then mark a point on the selvage 3” above this baseline and draw a gradual curve from
baseline to selvage. This creates the curve at the hem line (see Figure A2).
Sleeves
Style A uses a flat sleeve that is set in, while the
sleeve in Style B is cut as part of the robe. The
choice of fabric, its weave, and any shrinkage may
necessitate adaptations in how the sleeves are cut and
constructed.
Style A
The set-in sleeve is cut as shown in Figure A. The
sleeve’s length is determined by the individual’s
length of arm measurement plus seam allowances.
Sleeve width should allow plenty of ease through the
upper arm and is tapered from the armhole to the
wrist, with enough room for the hand to fit through
the opening plus seam allowances. If the sleeve is cut
as laid out in Figure A, you will need to seam the
sleeve along the selvage edge and therefore should
also include a seam allowance for the selvage edge in
the width. This same sleeve could be cut out on a
fold where it would not require additional fabric for
that seam allowance.
Style B
If the fabric is wide enough, you can easily cut the
sleeve right into the body of the robe, as in Figure B.
This is done by continuing the shoulder slope
diagonal out to the selvage edge. This line creates the
top of the sleeve. The underarm of the sleeve should
start at the chest/bust measurement or slightly above
(see Figure B2). Allow enough ease for the upper
arm and taper toward the selvage edge, leaving
enough room for the hand to fit through the wrist
opening. Depending upon the size of the person, you
may need to add a sleeve extension to provide extra
length.

SAVIOR OF THE WORLD: His Birth and Resurrection
Instructions for Creating Basic Costumes
Page 5 of 7
Sewing the Robe
Once the fabric is cut, sewing the robe is simple. For Style A, sew back to front at shoulder
seams. If sleeves were cut as in Figure A, seam the top of each sleeve. Then set the sleeves,
matching the shoulder seam with the center of the sleeve cap (see Figure A3). Sew underarm
and side seams as one continuous seam. For Style B, sew back to front at the shoulder seams
(which includes top of sleeves) and side seams (which includes underarm seams). For both
styles, hem the sleeves and bottom of robe to fit the individual, and finish the neckline as desired.
Finishing the Neck
The neck can be finished in many ways. The easiest way is with a bias strip. Facings can also be
used and can be made in all sorts of shapes and sizes. Facings may be turned to the inside or lie
on the outside of the garment with a decorative finishing stitch. If the neck opening is not large
enough, a slit can be made down the center of the front or back of the garment to allow it to be
pulled over the head. These slits can be finished with bias or a facing. They can be laced closed,
or snaps or other fasteners can be used. All necklines can easily be finished and/or filled in so

SAVIOR OF THE WORLD: His Birth and Resurrection
Instructions for Creating Basic Costumes
Page 6 of 7
that temple garments can be worn underneath the costume. Creativity and detailing will add to
the individualism of each costume (see pictures below).
Angel Robes
For the Conference Center Theater production,
angel robes were constructed in a manner similar
to that of basic robes with three differences.
First, they were most often cut shorter than
robes. Sometimes they were cut with a deep
scallop on the hem line (see Figure C). Second,
the sleeves were cut in a bell shape. Rather than
tapering to a narrow wrist as in the basic robe,
the sleeves on angel robes were wider at the
wrist (see Figure D). Finally, all necklines were
finished with a bias and were kept very neat.
Examples of Finishing Details

SAVIOR OF THE WORLD: His Birth and Resurrection
Instructions for Creating Basic Costumes
Page 7 of 7
To create greater individuality, additional details such as cowls and streamers were added to
some of the angel robes. Cowls were made from strips of fabric cut on the bias (see Figure E,
dimensions are approximate). The two pieces were hemmed or serged on top and bottom and
then pleated into the shoulder seams of the robe. Some angel robes had cowls in front and back.
Other robes had streamers that fell from the shoulders down the back. These were made by using
bias strips about 12–14 inches wide and 3–4 feet long. The strips were hemmed on three sides,
leaving one short side to be pleated into the shoulder seam. The longest streamers were used on
the tomb and ascension angels’ costumes (see picture below).
Examples of Cowls on Angel Robes
Act II Scene 1.1 - two angels roll the stone
away from the tomb entrance
