

2
About this manual
Be sure to read this manual before using. This manual includes important
information that you must understand before using rekordbox.
• In this manual, name of buttons and menus displayed on rekordbox are indicated
with brackets. (e.g. [BPM], [Collection] window)
• Please note that depending on the operating system version, web browser
settings, etc., operation may differ from the procedures described in this manual.
• Please note that the language on the rekordbox screen described in this manual
may differ from the language on your screens.
• This manual describes functions and operations for rekordbox ver. 6.0 or later. If
you use an earlier rekordbox version than ver. 6.0, please download the suitable
manual from the FAQ on the rekordbox website.
• For details about preparations for using rekordbox, such as installing rekordbox,
creating an account, contracting a subscription plan, and creating library files,
refer to “rekordbox Introduction” on the rekordbox website.
• Please note that the specification, design, etc. of rekordbox may be modified
without notice and may differ from the descriptions in this manual.
The contents of this manual are as follows:
“[Collection]” (page 7)
This explains how to import music files and how to create playlists to be used for DJ
performances.
“EXPORT mode” (page 48)
This explains how to operate the EXPORT mode.
“PERFORMANCE mode” (page 104)
This explains how to operate the PERFORMANCE mode.
Depending on your subscription plan, some functions may not be available.
“Others” (page 186)
This has notes and disclaimers on using rekordbox, and legal information such as
the software license agreement.

3
Refer to this manual in the following situations:
|
When exporting music files to a device for DJ performances with
CDJ/XDJ series, etc., or using the PRO DJ LINK feature with DJ
equipment connected via LAN for DJ performances
See “EXPORT mode” (page 48).
|
When using DJ application features for DJ performances with a DJ
controller or CDJ/XDJ series, etc.
See “PERFORMANCE mode” (page 104).
|
When using the following functions in the PERFORMANCE mode
Refer to each Operation Guide on the rekordbox website. Please note that the
screen, specifications, etc. may differ from the descriptions in some manuals.
rekordbox.com/en/download/#manual
• video
• dvs
• lyric
• MIDI LEARN
• Pad Editor
• PHRASE EDIT
• LIGHTING mode
• Cloud Library Sync
The following usage guides are also available.
• Default keyboard shortcut
• Connection for PERFORMANCE mode
• Music files from a streaming service
• PRO DJ LINK setup
|
When you want information on a specific topic or feature
Use the search feature in PDF to see what you want to know.
How to use this manual
4
Contents
About this manual .................................................................................................................................................. 2
Introduction................................................................................................................................. 6
[MY PAGE] window................................................................................................................................................ 6
[Collection] .................................................................................................................................. 7
About the [Collection] window ................................................................................................................................ 7
Adding a track ...................................................................................................................................................... 13
Management ........................................................................................................................................................ 21
Editing track information....................................................................................................................................... 25
Searching for a track............................................................................................................................................ 27
Using a Playlist..................................................................................................................................................... 34
Using mobile devices to prepare for DJ performance .......................................................................................... 46
Using tracks on other computers and mobile devices.......................................................................................... 47
EXPORT mode .......................................................................................................................... 48
About the EXPORT mode screen ........................................................................................................................ 48
Preparing for DJ performance.............................................................................................................................. 66
Using with DJ equipment (PRO DJ LINK)............................................................................................................ 67
Playing tracks....................................................................................................................................................... 71
Using the LAN connection.................................................................................................................................... 93
Mixing ([2 PLAYER] mode) .................................................................................................................................. 98
Recording........................................................................................................................................................... 101
PERFORMANCE mode ........................................................................................................... 104
About the PERFORMANCE mode screen ......................................................................................................... 104
Preparing for DJ performance............................................................................................................................ 126
Using with DJ equipment ................................................................................................................................... 127
Playing tracks..................................................................................................................................................... 132
Recording........................................................................................................................................................... 155
Using effect features .......................................................................................................................................... 159
Using the sampler deck...................................................................................................................................... 168
Using a sequencer ............................................................................................................................................. 173
5
Using a slicer...................................................................................................................................................... 177
Extracting a section from a track (CAPTURE) ................................................................................................... 180
Using ACTIVE CENSOR.................................................................................................................................... 183
Others ...................................................................................................................................... 186
[MY PAGE] window............................................................................................................................................ 186
[Preferences] window......................................................................................................................................... 187
Menu list............................................................................................................................................................. 203
System requirements ......................................................................................................................................... 207
Communications environment on the computer................................................................................................. 209
File formats that can be loaded and played ....................................................................................................... 210
Supported media (file system) ........................................................................................................................... 212
Online support site ............................................................................................................................................. 213
Disclaimer .......................................................................................................................................................... 214
Copyright warning .............................................................................................................................................. 215
Software end user license agreement................................................................................................................ 216
Trademarks and licenses ................................................................................................................................... 221

6
Introduction
rekordbox is a composite software that manages music files and DJ performance.
With this music management software, you can manage music files in computers
and mobile devices (this includes analysis, changing settings, creating files, and
saving playback histories). It allows you to produce great DJ performances by
combining music files managed by rekordbox and DJ equipment produced by
Pioneer DJ.
Depending on your subscription plan, some functions may not be available. For
details on subscription plan, refer to the rekordbox website.
[MY PAGE] window
Click [MY PAGE] in the upper-right of the screen. The [MY PAGE] window will be
displayed, and you can check and configure information related to rekordbox
([INFORMATION]), your subscription plan ([PLAN]), Cloud Library Sync settings
([LIBRARY SYNC]), and KUVO settings ([KUVO]).
For more details, refer to “rekordbox Introduction” on the rekordbox website.

7
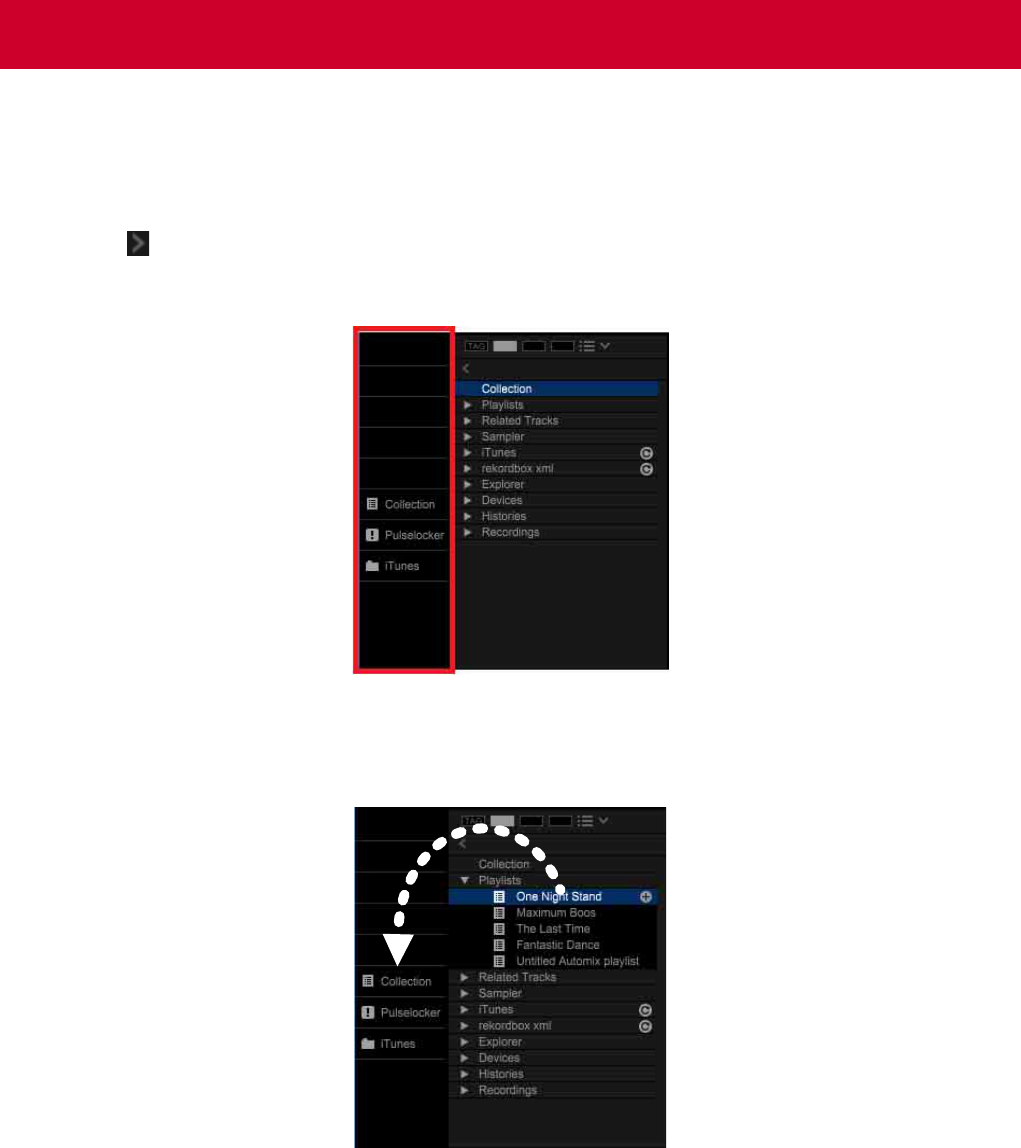
[Collection]
[Collection] is a list of all tracks organized by rekordbox.
Tracks will be analyzed and added (imported) to [Collection] for use.
If you have used an earlier rekordbox version than ver. 6.0, you need to convert the
library in the [Collection] to be imported. For details, refer to “rekordbox Introduction”
on the rekordbox website.
Depending on your subscription plan, tracks can be added from not only your
computer, but also a streaming service (PERFORMANCE mode) and Cloud Library
Sync. For details, refer to “Streaming Service Usage Guide” and “Cloud Library
Sync Operation Guide” on the rekordbox website.
About the [Collection] window
1.
Shortcuts (page 10)
2.
Tree View (page 13)
3.
Menu
4.
Column (page 9)
5.
Artwork (page 26)
6.
Category filter (page 28)
7.
Track filter (page 30)
8.
Search filter (page 27)

[Collection]
9
For the columns shown on the upper side of the track list, you can customize the
column display. Also, after selecting a column, the order of the columns in the track
list will be changed.
1 Right-click the column on the header.
The column list is displayed.
2 Click the column to display on the header.
The header is changed.
3 Drag and drop the column on the header to move to the left or right.
The order of columns is changed.
Changing columns shown in the track list and
their ordering
[Collection]
10
Shortcuts can be created for a folder or playlist in the tree view. Click a shortcut to
select a folder or playlist.
• Up to 8 shortcuts can be created.
1 Click in the tree view.
The shortcut window is displayed.
2 Drag and drop the folder or playlist in the tree view to the empty field in the
shortcut window.
The shortcut for the folder or playlist is created.
If you drag and drop the folder or playlist to a field with an existing shortcut, that
shortcut is overwritten.
3 Click the shortcut you have just created.
The folder or playlist is selected and highlighted.
Creating a shortcut

[Collection]
11
|
To delete a shortcut
Right-click the shortcut, and then select [Delete Shortcut]. (When a shortcut is
deleted, its corresponding folder or playlist is not deleted.)
Hint
• Drag and drop the shortcut upward or downward to change its position.
• Drag and drop a track to the playlist shortcut to add the track to the playlist (page 34).

[Collection]
12
While using the browser, you can open Sub Browser that shows another tree view
to display [Collection] and playlists.
In Sub Browser, tree view items excluding Explorer can be displayed.
In Sub Browser, you can drag and drop a track or playlist easily. To open Sub
Browser, click on the right of the browser window.
To close Sub Browser, click again.
Displaying Sub Browser

[Collection]
13
Adding a track
To use music files saved on the computer, add them to [Collection]. Also, you can
use a library saved in the rekordbox xml format or a library in another music
applications.
Tracks can also be added from streaming, cloud, and mobile devices.
In the PERFORMANCE mode, video files can be added as well. For details, refer to
“rekordbox video Operation Guide” on the rekordbox website.
1 Click [Collection] in the tree view.
The list of files in [Collection] is displayed as a track list.
When [All Audio] and [All Videos] are in the tree view, click [All Audio] to display
only music files or click [All Videos] to display only video files. Make sure the
[Enable Video Function] checkbox is checked to display [All Audio] and [All
Videos]. Open the [Preferences] window > [Video] tab, and then click [Enable
Video Function].
2 Open the Finder or Windows Explorer, and then drag and drop files or folders
to the track list.
Tracks are added to [Collection], and their tag information is loaded and
displayed.
Hint
• When tracks in [Collection] are displayed in the track list, right-click the column and make sure
that [Attribute] is selected. With [Attribute] selected, you can click to display only tracks which
meet the conditions selected in respective category.
Note
• When a WAVE file is added to [Collection], its tag information may not be displayed. Displayable
tag information of music files are ID3 tag (v1, v1.1, v2.2.0, v2.3.0, and v2.4.0) of MP3 and AIFF
files, the meta tag of M4A files, RIFF INFO of WAVE files, and Vorbis Comment of FLAC files.
[Collection]
14
Analysis of music files
For settings on analysis, see page 192.
• There are two modes of this analysis, [Normal] and [Dynamic]. If you select
[Normal], specify the BPM range to be analyzed.
• When the [Preferences] window > [Analysis] tab > [Track Analysis] > [Auto
Analysis] is set to [Enable], analysis of the music file starts after adding the file to
[Collection]. The progress status is displayed on the left of the music file name. If
[Auto Analysis] is set to [Disable], select a track to be analyzed, and then select
[Analyze Track] by clicking [Track] menu or right-clicking the track (page 77). In
addition, you can analyze a track which has already been analyzed.
When analysis is completed, the waveform information is displayed on [Preview]
of the browser panel (page 63) (page 125).
• To specify the information to be analyzed, open the [Preferences] window >
[Analysis] tab > [Track Analysis] > [Track Analysis Setting], and select [BPM /
Grid], [KEY] and/or [Phrase].
• Cues are automatically set at the first beat of each track, and saves them. Open
the [Preferences] window > [Analysis] tab > [Track Analysis], and select [Set
Memory Cue at the first beat of track when analyzing]. Cues are set automatically
when importing and re-analyzing.
Hint
• [?] may appear for tracks analyzed by older version of rekordbox. This means information of the
track is insufficient or old. Right-click the track, and then select [Add New Analysis Data] to
update the information. [?] then disappears.
[Collection]
15
1 Select [Import] from the [File] menu on the upper screen.
2 Select [Import Track] to select a music file, or [Import Folder] to select a folder.
3 Select a music file or folder.
A track is added to [Collection], then its tag information is loaded and displayed.
If Auto Analysis is turned on, analysis starts.
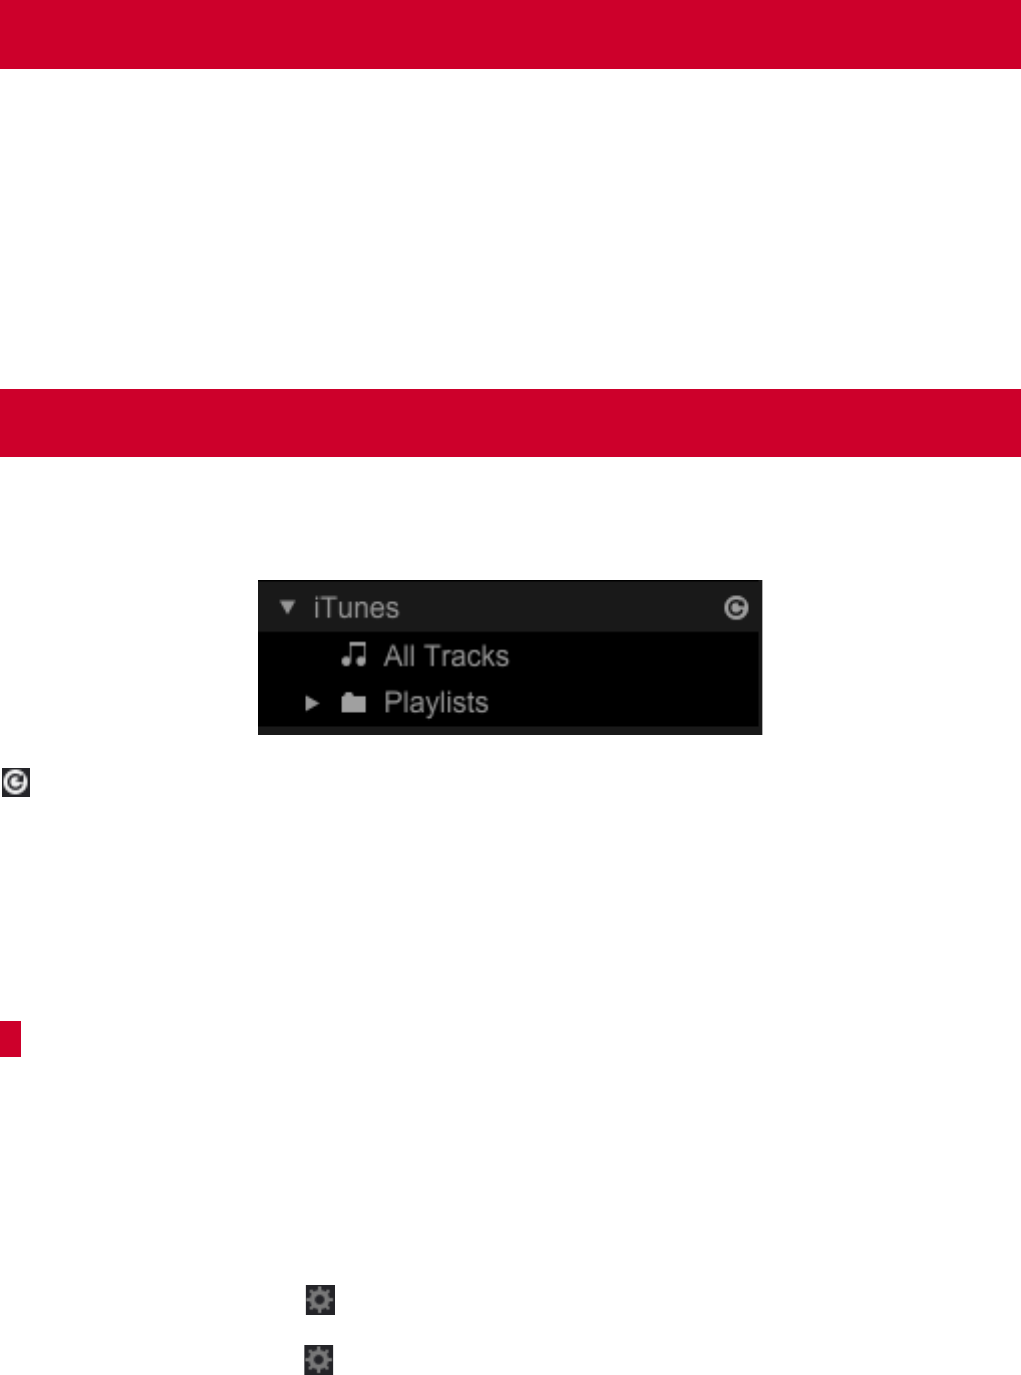
If iTunes is installed on your computer and the iTunes library XML is shared with
other applications, the iTunes library can be used with rekordbox.
: Update the iTunes library for its latest status.
Note
• For macOS Catalina and later, iTunes service is not available. This section is for customers who
use iTunes on an operating system other than macOS Catalina and later, including Windows.
For instructions on importing a library from the Apple Music app, see page 16.
|
If the iTunes library is not displayed
Set up the following.
1 Check the [Share iTunes Library XML with other applications] checkbox of
[Advanced Preferences] in iTunes.
2 Restart iTunes and rekordbox.
3 On rekordbox, click , [View] tab > [Layout] and select [iTunes].
4 On rekordbox, click , [Advanced] tab > [Database] tab > [iTunes] and set up
[iTunes Library File].
Adding files or folders
Using the iTunes library

[Collection]
16
|
To add a track from the iTunes library
Music files can be added to rekordbox from the iTunes library.
1 Double-click [iTunes] in the tree view, and then click [All Audio].
iTunes music files are displayed in the track list.
2 Drag and drop an iTunes music file to [Collection].
Hint
• In the [iTunes] track list, is shown on the track added to [Collection]. Also, waveforms,
artworks, BPM, and keys analyzed by rekordbox are shown. For Auto Analysis, see “Analysis
of music files” (page 14).
• To import a playlist from the iTunes library, see “Importing a playlist from iTunes” (page 36).
|
To update information of the iTunes library
Right-click the track, and then select [Get info from iTunes]. The iTunes library
information is updated.
Hint
• When the iTunes library information is updated, all information which has been changed in the
[Information] window is replaced (page 36).
|
Using the Apple Music app
On the Apple Music app, you can create a library XML to be imported into
rekordbox.
1 In Music, click [File] > [Library] > [Export Library...].
2 Enter the information of the library XML you are creating, and then click [Save].
3 Click , [Advanced] tab > [Database] tab > [iTunes], and then click the
[Browse] button in [iTunes Library File].
4 Select the library XML you created.
Tracks and playlists from Music will be displayed in [iTunes] in the tree view.

[Collection]
17
Tracks downloaded from Inflyte can be added as rekordbox tracks. Also, when
Automatic Sync is on, all tracks will be imported to Dropbox automatically.
: Update the track list of Inflyte for its latest status.
If [Inflyte] is not displayed in the tree view
Configure the following setting.
• Click , [View] tab > [Layout] and select the [Inflyte].
|
To add tracks from Inflyte
1 Click the [Log in] button of [Inflyte] in the tree view.
2 Enter your Inflyte login information, and then click [SIGN IN].
Your web browser will launch to download the track list of [Promo Locker].
The following icons will be displayed in the [Download] column in the track list
of [Promo Locker].
• : tracks set as Favorite in Inflyte
• : tracks downloaded to [Downloaded] using Automatic Sync
• : tracks you can download
Hint
• To set the location to store tracks, click the [Preferences] window > [Advanced] tab > [Others]
tab > [Inflyte].
Using Inflyte

[Collection]
18
|
To log out
Right-click [Inflyte] in the tree view, and then select [Log out].
You can upload a folder or tracks from the computer to [Collection].
1 Double-click [Explorer] in the tree view.
Folders on the computer are displayed in the tree view.
2 Select a folder in [Explorer].
Tracks in the folder are displayed in a track list.
Note
• If [Explorer] is not displayed in Step 1, click , [View] tab > [Layout] and select [Explorer].
|
To add a file from the computer
1 Select a folder in [Explorer].
Tracks in the folder are displayed in a track list.
2 Drag & drop a track from the track list to [Collection].
Hint
• In the track list of [Explorer], the track added to [Collection] is displayed with . The waveform,
artwork, and analysis information such as BPM, key by rekordbox are also displayed. For Auto
Analysis, see “Analysis of music files” (page 14).
• Folders in the computer or USB storage devices can be used as a playlist. For details, see
“Using a folder in the computer or USB storage devices” (page 36).
Using a folder or tracks on the computer or
USB storage devices
[Collection]
19
After importing files in the rekordbox xml format, they are displayed in the rekordbox
xml library.
: Update the rekordbox xml library for its latest status.
If the rekordbox xml library is not displayed
Set up the following.
• Click , [View] tab > [Layout] and select [rekordbox xml].
• Click , [Advanced] tab > [Database] tab > [rekordbox xml] and set up [Imported
Library].
|
To add a track from the rekordbox xml library
Music files can be added to rekordbox from the rekordbox xml library.
1 Double-click [rekordbox xml] in the tree view, and then click [All Tracks].
rekordbox xml music files are displayed in the track list.
2 Drag and drop the music file in the track list to [Collection].
Hint
• To import a playlist from the rekordbox xml library, see “Importing from rekordbox xml” (page 36).
Double-click [Histories] in the tree view to display a list of tracks which can be played
for 1 minute or more in the PERFORMANCE mode or LINK EXPORT as a history
file.
• PERFORMANCE mode: [HISTORY yyyy-mm-dd]
• LINK EXPORT: [LINK HISTORY yyyy-mm-dd]
Right-click a history file to copy to the playlist, or to store files.
Using rekordbox xml
Using [Histories]

[Collection]
20
When a track is removed from [Collection], the music file is not deleted from the
computer.
1 Select a track to be removed in [Collection].
2 Press the [Delete] key on the computer keyboard.
3 Click [OK].
The music file is removed from [Collection].
Hint
• A track can be also removed by right-clicking the track and selecting [Remove from Collection].
• You can choose to just remove a track in Inflyte from [Collection], or completely delete the file
from the computer.
Removing a track from [Collection]

[Collection]
21
Management
Regularly backing-up is recommended to prevent data from being lost due to
computer failure or other disasters.
Data in rekordbox such as [Collection], playlists, analysis data and music files can
be backed up. The backup function can also be used for migrating data from the
current computer to a new one. Data backed up for Mac can be restored in Windows
and vice versa.
Note
• If a lot of music files exist in [Collection], it may take a long time to back them up, depending on
the computer’s performance.
1 Click [Library] from the [File] menu on the upper screen, and then click [Backup
Library].
2 Click [OK].
[Do you want to back up music files as well?] is displayed.
3 Select [Yes] or [No].
Backing up your music files is recommended when you migrate data from your
current computer to a new one. Music files are backed up in the
[rekordbox_bak] folder, to be restored in the same path as specified in the
backed up files.
4 Specify a path to store the backup data, and then click [Save].
The backup starts.
Once the backup is completed, [Collection was backed up.] is shown.
5 Click [OK].
Saving data using the backup function

[Collection]
22
Your data is replaced with the backed up data.
Note
• If the backup data consists a lot of music files, it may take a long time to restore them, depending
on the computer’s performance.
1 Click [Library] from the [File] menu on the upper screen, and then click [Restore
Library].
2 Click [OK].
3 Select the backup data (.zip or .edb), and then click [Open].
Replacement of the present data with the backup data starts.
Once the process is completed, [Collection was restored.] is shown.
4 Click [OK].
Hint
• You can replace the present data with the backup data in .edb files from old rekordbox versions.
• To restore data with music files, the backup music files (rekordbox_bak folder) must be placed
at the same path as the backup data.
Using the Restore function

[Collection]
23
rekordbox manages information on where music files are stored (file paths). If file
and folder names are changed or if files or folders are moved or deleted, it may no
longer be possible to play the music file. ([!] is displayed to the left of missing music
files.) rekordbox can find missing files and relocate their directories automatically.
|
Relocate automatically
1 Click the [Preferences] window > [Advanced] tab > [Datebase] tab > [Auto
Relocate Search Folders] and select file types ([Music] and/or [Movie]).
2 Click the [User specified folders] checkbox, click [Add], and then select the
directory folder and drive containing the files.
Click [Add] again to select multiple folders.
To search in desktop, select [Desktop].
To delete the set folders, display the folder you want to delete, and then click
[Del].
3 Click [File] on the upper screen, and select [Display All Missing Files].
A list of all missing files is displayed.
4 Click [Auto Relocate].
The files are deleted from the list after all relocating is completed.
If file cannot be detected because it has been deleted from your computer, it
remains on the list. In that case, click [Delete] to remove it from [Collection].
Hint
• Right-click on the track or video marked with [!] in [Collection], and select [Auto Relocate] to
automatically relocate it. Also, you can select multiple tracks and videos to automatically
relocate at the same time. You can also select [Auto Relocate] from the [Track] menu on the
upper-left of the screen.
Updating the file paths of missing music files

[Collection]
24
|
Relocate manually
1 Click [File] on the upper screen, and select [Display All Missing Files].
This displays a list of all missing files.
2 Select a track to modify its file path, and click [Relocate].
3 Go to the folder containing the music file, select the file name, and click [Open].
The file path is modified.
Hint
• You can also modify the file path by right-clicking a track or video marked with [!] in [Collection]
and selecting [Relocate].
• You can select multiple tracks at once when using [Relocate]. Doing this will automatically
relocate all selected tracks to the file path of the first track to be relocated.
Note
• Be careful not to select the wrong file when selecting the new file path for [Relocate].

[Collection]
25
Editing track information
You can edit track information, add an artwork image, and reload updated tag
information.
1 Click [Collection] in the tree view.
Tracks in [Collection] are displayed in the track list.
2 Select a track to be edited, and then click .
The track information window is displayed on the right side of the track list.
3 Click the [Info] tab.
4 Edit information from your computer keyboard.
5 Click to close the track information window.

[Collection]
26
A JPEG (.jpg or .jpeg) or PNG (.png) format file can be added as an artwork image.
1 Click the [Artwork] tab on the track information window.
2 Drag and drop an image from the Finder or Windows Explorer.
The artwork image is added to the track.
To update tag information which has been changed using another application, you
need to reload tag information. Click on the right side of the track information
window.
Hint
• Tag information can be also reloaded by right-clicking the track and selecting [Reload Tag].
Note
• After reloading tag information, edited track information is replaced with the reloaded
information.
Adding an artwork image
Reloading tag information

[Collection]
27
Searching for a track
You can search for a track by following procedures.
• “Using the search filter” (page 27)
• “Using the category filter” (page 28)
• “Sorting track information” (page 28)
• “Using My Tag” (page 29)
• “Using RELATED TRACKS” (page 31)
Using playlists, you can organize tracks and select a track easily. For more
information, see “Using a Playlist” (page 34).
1 Click [Collection] in the tree view.
Tracks in [Collection] are displayed in the track list.
2 Click in the search filter.
Searchable columns are displayed.
3 Select a column.
4 Enter characters in the search filter from your computer keyboard.
To return to the previous view, delete the characters you have entered or click
.
Using the search filter

[Collection]
28
1 Click [Collection] in the tree view.
Tracks in [Collection] are displayed in the track list.
2 Click on the upper side of the track list.
Category columns ([Genre], [Artist], [Album]) are displayed.
3 Select a category.
Tracks, which are under the conditions selected in respective category
columns, are displayed.
1 Click [Collection] in the tree view.
Tracks in [Collection] are displayed in the track list.
2 Click a column to be sorted.
The track order is changed.
Each time you click the column, the ascending / descending orders are
switched.
3 Enter characters from your computer keyboard (Alphabet Search).
Tracks, whose names start with the characters entered, are highlighted and
selected.
You can enter multiple characters.
Note
• In the PERFORMANCE mode, Alphabet Search cannot be used. Instead, use the keyboard
shortcut function. The keyboard shortcut function can be set on the [Preferences] window
(page 198).
Using the category filter
Sorting track information

[Collection]
29
You can refine your search by creating tags on tracks.
Browsing can be customized by creating tags to define the tracks’ features that will
enhance on your DJ performance.
• The My Tag attached to the track is displayed in the My Tag column.
• You can refine your search using a My Tag filter by setting My Tag as the search
criteria.
Click on the right side of the screen to display the My Tag configuration window.
1.
Category name: You can change to a category name of your choice.
2.
My Tag checkbox: Attach or remove the track’s tag.
3.
My Tag: A tag to attach to the track and can be changed to a name of your
choice.
4.
Adding My Tag: Click this to create a new tag to My Tag.
|
To change a category name
Click the category name, enter new category name from your computer keyboard,
and then press the [Enter] key.
|
To change a My Tag name
Select My Tag, enter new tag name from your computer keyboard, and then press
the [Enter] key.
Using My Tag

[Collection]
30
|
To attach My Tag to a track
Select a track, and then click My Tag checkboxes. You can attach multiple My Tags
at once.
To show My Tag in [Comments] of the track list, click , [Advanced] tab > [Browse]
tab > [My Tag] and select [Add “My Tag” to the “Comments”].
|
To delete a My Tag
Right-click a tag in a My Tag, and then select [Delete].
|
To search for a track using My Tag (Track Filter)
1 Click on the left side of the search filter.
The track filter is displayed. In addition to My Tag, you can refine your search
by [BPM], [KEY], [RATING], and [COLOR].
2 Click the required category checkboxes, and then select values, a tag, etc.
When selecting [BPM] or [KEY], click and turn on [MASTER PLAYER] or
[MASTER DECK]. The value is set as the [BPM] or [KEY] of the track loaded
on the Master Player at that time.
Hint
• Multiple My Tags can be selected. Select [AND] and [OR] for your desired search conditions.
• When multiple My Tags are selected, tracks containing all selected My Tags are displayed in the
track list.
• To cancel conditions set by My Tag filters, click [RST].

[Collection]
31
You can display a list of tracks related to the loaded track. This helps you to select
a track easily. The relation can be set with [BPM], [Key], [Matching], [Tracks in the
same genre], [Ratings], My Tag, etc.
1.
RELATED TRACKS conditions
• You can create, edit, or delete a list of RELATED TRACKS.
• In [Track Suggestion], there are lists with the recommended criteria.
2.
Search target
Select a folder or playlist for searching RELATED TRACKS.
3.
[Rank]
Tracks are ranked in the relevant order based on the conditions.
4.
Track selection
Select a deck loaded with the track, which is based for RELATED TRACKS to
be displayed.
5.
Customizing the criteria
The criteria items are displayed, and then customize them.
Hint
• In the [2 PLAYER] mode of the EXPORT mode, or 2 deck mode of the PERFORMANCE mode,
click to register 2 tracks loaded as related tracks ([Matching]).
• In the PERFORMANCE mode, click on the right side of the horizontal waveform or on
the bottom side of the vertical waveform to display .
Using RELATED TRACKS

[Collection]
32
|
Using a folder
When you create multiple RELATED TRACKS condition, you can use folders to
organize conditions.
1 Right-click [Related Tracks] on the tree view, and then select [Create New
Folder].
[Untitled Folder] is added under [Related Tracks].
2 Enter the folder name using the computer keyboard, and then press the [Enter]
key.
3 Drag & drop the RELATED TRACKS condition into the created folder.
The RELATED TRACKS condition is moved into the created folder.
Hint
• To delete a folder, right-click the folder, and then select [Delete Folder]. You can also delete a
folder by pressing the [Delete] key on the computer keyboard. All RELATED TRACKS conditions
and folders included on the folder are deleted.
|
Creating a new RELATED TRACKS condition
1 Click [+] on the right side of [Related Tracks] or the RELATED TRACKS folder
in the tree view.
A new RELATED TRACKS condition is added under [Related Tracks], and then
the criteria setting screen is displayed.
2 Customize the criteria.
3 Click [OK].
Hint
• To delete a RELATED TRACKS condition, right-click the condition, and then select [Delete
"Related Tracks"]. You can also delete a condition by pressing the [Delete] key on the computer
keyboard.

[Collection]
33
|
Using the Subpanel
Click to display the RELATED TRACKS Subpanel. You can display tracks of the
collection or playlist on the track list with displaying Related Tracks on the Subpanel.
1.
Search target
Select a folder or playlist for searching RELATED TRACKS.
2.
Current RELATED TRACKS condition
To switch the RELATED TRACKS condition, click to display a list of conditions,
and then select the condition.
3.
Track selection
[LIST]: Display RELATED TRACKS based on the track selected on the track list.
[MASTER], [1] to [4], [A] to [B]: Select a deck loaded with the track, which is
based for RELATED TRACKS to be displayed.
4.
Customizing the criteria
The criteria items of the current RELATED TRACKS are displayed, and then
customize them.
Hint
• You can also display the RELATED TRACKS Subpanel by right-clicking the RELATED TRACKS
condition and selecting [Display on Subpanel].

[Collection]
34
Using a Playlist
You can organize tracks on rekordbox by creating playlists.
In the PERFORMANCE mode, you can also operate Automix playback using
playlists. See “Using Automix playlists” (page 148).
In the PERFORMANCE mode, video files can be added as well. For more details,
refer to “rekordbox video Operation Guide” on the rekordbox website.
1 Click on the right side of the playlist or playlist folder in the tree view.
A new playlist ([Untitled Playlist]) is added under [Playlists].
2 Enter the playlist name from your computer keyboard, and then press the
[Enter] key.
3 Click [Collection] in the tree view.
Tracks in [Collection] are displayed in the track list.
4 Drag and drop a track to the playlist.
The track is added to the playlist.
Hint
• You can add tracks to the playlist from [iTunes], [Tag List], or other playlists.
• To delete a playlist, right-click the playlist, and then select [Delete Playlist]. Alternatively, you can
delete a playlist by selecting the playlist, and then pressing the [Delete] key on the computer
keyboard.
Creating a new playlist

[Collection]
35
• To remove a track from the playlist, right-click the track in the playlist, and then select [Remove
from Playlist]. Alternatively, you can remove a track from the playlist by selecting the track in the
playlist, and then pressing the [Delete] key on the computer keyboard.
|
Using the created playlist in other applications
You can save the created playlist in “.txt” or “.m3u8” format, and export it to other
music applications.
1 Right-click the playlist.
2 Select [Export a playlist to a file].
3 Select [Export a playlist to a file for KUVO (*.txt)] or [Export a playlist to a file for
music apps (*.m3u8)], and then save the playlist.
Playlist file formats M3U (.m3u), M3u8 (.m3u8), and PLS (.pls) can be imported.
1 From the [File] menu on the upper screen, select [Import] > [Import Playlist].
2 Select a file name from a folder stored with playlist files, and then click [Open].
The selected playlist is added to [Playlists].
Tag information of the music files, which are contained in the playlist, is
displayed.
If [Auto Analysis] is set to [Enabled], analysis of the music files begins. For
details, see “Analysis of music files” (page 14).
Importing a playlist file

[Collection]
36
You can import playlists from the iTunes library to rekordbox.
Note
• For macOS Catalina and later, iTunes service is not available. This section is for customers who
use iTunes on an operating system other than macOS Catalina and later, including Windows.
1 Double-click [iTunes] in the tree view, and then double-click [Playlists].
iTunes playlists are displayed in the tree view.
2 Drag and drop an iTunes playlist under [Playlists].
The iTunes playlist is added to rekordbox, and tracks in the playlist are also
added to [Collection].
Drag and drop a folder on [Explorer] in the tree view to [Playlists]. A playlist is
created with the dropped folder name.
You can import a playlist from the rekordbox xml library to rekordbox.
1 Double-click [rekordbox xml] in the tree view, and then double-click [Playlists].
rekordbox xml playlists are displayed in the tree view.
2 Drag and drop a rekordbox xml playlist under [Playlists].
The rekordbox xml playlist is added into [Playlists].
Importing a playlist from iTunes
Using a folder in the computer or USB storage
devices
Importing from rekordbox xml

[Collection]
37
SYNC MANAGER can bring your iTunes playlists to the latest status and easily
export iTunes or rekordbox playlists to USB storage devices in the updated status.
Synchronize with the iTunes library
After synchronizing with the iTunes library, you can use the iTunes library
information on rekordbox seamlessly.
The synchronized iTunes playlist is always displayed on [iTunes] in the tree view
with the latest status.
Analysis of tracks in the synchronized playlist automatically begins. The artwork and
waveform are displayed.
Note
• For macOS Catalina and later, iTunes service is not available. This section is for customers who
use iTunes on an operating system other than macOS Catalina and later, including Windows.
Synchronize with a device (USB storage device or SD memory card)
After synchronizing with a device, the selected playlist is exported to the device in
the latest status.
Also, you can get Cues, beat positions, and ratings updated from a DJ player back
to rekordbox.
Using SYNC MANAGER (EXPORT mode)

[Collection]
38
|
To synchronize with an iTunes playlist
1 Click [SYNC MANAGER] at the bottom of the tree view.
2 Click the [Synchronize iTunes playlists] checkbox.
3 Select an iTunes playlist to synchronize with rekordbox.
4 Click the arrow on the right side of iTunes playlists.
The playlist with the check mark is synchronized.
When the synchronizing is completed, the playlist is displayed in the tree view
of [SYNC MANAGER].
Hint
• If iTunes playlists are synchronized with rekordbox, iTunes playlists with check marks are
updated automatically when starting rekordbox.
• If [All Playlist] is set, playlists added in iTunes will be synchronized automatically.

[Collection]
39
|
To synchronize a playlist on a device
1 Insert a USB storage device or an SD memory card to the computer.
2 Click [SYNC MANAGER] at the bottom of the tree view.
3 Double-click [Device], and then select the device.
Playlists in the selected device are displayed.
4 Click the [Synchronize playlists with a device] checkbox.
5 Select a playlist in rekordbox to be synchronized with the device.
6 Click the arrow on the left side of [Device].
The playlists with check marks are synchronized with the device.
If the device is synchronized, selected playlists are exported to the device in the
latest status.
Track information in playlists is also updated to the latest status.
Hint
• If a device is synchronized, playlists with check marks are exported to the device automatically
when starting rekordbox and clicking the device in the tree view.

[Collection]
40
|
To return Cue, beat positions, and ratings updated by a DJ player
1 Insert a USB storage device or an SD memory card synchronized with
rekordbox to the computer.
2 Click [SYNC MANAGER] at the bottom of the tree view.
3 Double-click [Device], and then select the device.
4 Click the arrow on the left side of [Device].
Information of tracks on the device is sent back to rekordbox.
The same results are expected if you select a device in the tree view and select
[Update Collection].
Note
• You cannot send information of tracks, which have been exported from another computer or
deleted from [Collection], back to rekordbox.

[Collection]
41
When creating or importing multiple playlists, you can organize playlists for each
folder.
1 Right-click [Playlists] in the tree view, and then select [Create New Folder].
[Untitled Folder] is created under [Playlists].
2 From your computer keyboard, enter a folder name, and then press the [Enter]
key.
3 Drag and drop a playlist to the created folder.
The playlist is moved into the created folder.
Hint
• To delete a folder, right-click the folder, and then select [Delete Folder]. Or, you can delete a
folder by pressing the [Delete] key on the computer keyboard. The folder and playlists contained
in that folder are deleted.
The supported formats for artwork image files are JPEG (.jpg or .jpeg) and PNG
(.png).
1 Right-click a playlist, and then select [Add Artwork].
2 Select an image file, and then click [Open].
The artwork image is added to the playlist.
Hint
• The added artwork image can be displayed by right-clicking the playlist.
With Playlist Palette, you can easily refine your search and select tracks.
After assigning playlists to Playlist Palette, you can display up to 4 playlists and edit
them.
Using a folder
Adding an artwork image
Using Playlist Palette

[Collection]
42
|
About Playlist Palette
Click to display the playlist palette, and then click to display up to 4 playlists
in the palette.
1.
TAG LIST palette
2.
Track lists in the palette
3.
Menu window (page 43)
4.
Playlist Palette
Hint
• Click a playlist name in the palette to be selected and highlighted in the tree view.
|
To assign a playlist to a palette
Drag and drop a playlist from the tree view to a palette. If another playlist has been
already assigned to the palette, it is overwritten with the new playlist.
|
To add a track to a list in a palette
Drag and drop a track from the track list to a list in the palette.
When adding a track to the [blank list] palette, [Untitled Playlist] is created as a new
playlist. Enter the playlist name from your computer keyboard.
Hint
• You can change a playlist name by double-clicking the list name in the palette.

[Collection]
43
|
To add a track in the palette to another palette
Drag and drop a track from the palette to another palette.
Hint
• You can add a track to the playlist by dragging and dropping a track in the palette to another
playlist.
|
To load a track in the palette
Drag and drop a track from the palette to the player or deck.
|
To sort a track in the palette
1 Click on the right side of the list name.
2 Select [Sort], and then select an item.
The track order is changed.
While sorting, is displayed on the right side of the list name column.
3 Click .
The track order is changed to ascending or descending.
|
To change the track order in the palette
You can change the track order by dragging and dropping a track up or down the
palette.
Note
• The track order can be changed only if tracks are sorted by track number.
|
To remove a playlist from the palette
1 Click on the right side of the list name.
2 Click [Remove from Palette].
The playlist is removed from the palette.

[Collection]
44
|
To change the order of playlists in the palette
Drag and drop a playlist from the palette to another playlist in the palette. The order
of 4 playlists can be changed.
You can create a list to be added with tracks which pass filters.
|
To create an Intelligent Playlist
1 Right-click [Playlists] in the tree view, and then select [Create New Intelligent
Playlist].
The condition setup window is displayed.
2 Select a filter to refine the search.
Using Intelligent Playlists

[Collection]
45
3 Set the filter.
• [=]: List music files having information such as an album name, which fully
matches the text or value you enter.
• [≠]: List music files having information such as an album name, which does
not match the text or value you enter.
• [>]: List music files having information such as a BPM value, which is larger
than the value you enter.
• [<]: List music files having information such as a BPM value, which is smaller
than the value you enter.
• [contains]: List music files having information such as an album name, which
contains the text you enter.
• [does not contain]: List music files having information such as an album
name, which does not contain the text you enter.
• [starts with]: List music files having information such as an album name,
which starts with the text you enter.
• [ends with]: List music files having information such as an album name, which
ends with the text you enter.
• [is in the range]: List music files having information such as a BPM value,
which is in the range of the 2 values you enter.
• [is in the last]: List music files having information such as a release date,
which is within the last days or months from the current date you enter.
• [is not in the last]: List music files having information such as a release date,
which is not within the last days or months from the current date you enter.
4 Specify the condition for the filter you have selected.
Enter a text or a value from your computer keyboard if the drop-down menu is
not shown.
5 Click [+] to add another filter.
A new filter is added to the one you set.
Select [Match all of the following conditions] or [Match any of the following
conditions] filters.
6 Enter the Intelligent Playlist name (List Name) from your computer keyboard.
7 Click [OK].
The Intelligent Playlist is added under [Playlists] in the tree view by the
condition, and then is displayed.

[Collection]
46
Delete a filter
Right-click an Intelligent Playlist in the tree view, and then select [Delete Playlist].
Alternatively, you can delete an Intelligent Playlist by pressing the [Delete] key on
the computer keyboard.
Hint
• You can edit the filter by right-clicking an Intelligent Playlist in the tree view and then selecting
[Edit the Intelligent Playlist] to display the Intelligent Playlist setting window.
Using mobile devices to prepare for DJ
performance
You can export analyzed tracks, created playlists, My Settings, etc. to a mobile
device (such as iPhone and Android™ device) by wireless LAN. Also, music data
that has been edited on the mobile device can be copied to rekordbox.
Note
• rekordbox must be installed on the mobile device. The mobile device version of rekordbox can
be downloaded from websites such as App Store and Google Play™.
• For connecting to a wireless LAN, refer to the operating instructions of your mobile device,
computer, and wireless LAN device.
Computer
Wireless LAN
Mobile device

[Collection]
47
On [Devices] in the tree view of the browser panel, rekordbox music files can be
transferred not only to USB storage devices and SD memory cards, but also to
mobile devices (e.g. iPhone, Android™ devices) that support wireless LAN (Wi-
Fi®).
Set the mobile version of rekordbox on the mobile device to the communications
standby mode, and then click [SEARCH MOBILE] at the bottom of the tree view.
After this, connect the mobile device to the computer by following the instructions
on the screen.
Hint
• For instructions and details on rekordbox functions on the mobile device, refer to the rekordbox
website.
Using tracks on other computers and
mobile devices
By using the Cloud Library Sync function, tracks and playlists from other computers
and mobile devices can be synced to your computer via a cloud storage service.
For more details, refer to “Cloud Library Sync Operation Guide” on the rekordbox
website.
Connecting a mobile device supporting
wireless LAN (Wi-Fi®)


EXPORT mode
50
[1 PLAYER] mode
[2 PLAYER] mode
1.
Operation panel (page 51)
2.
Select the EXPORT mode, PERFORMANCE mode (page 104), or LIGHTING
mode.
3.
Switch between screen modes.
4.
Display the recording panel. (page 62)
5.
Playback track information panel (page 52)
6.
Setting panel (page 53)
7.
Function panel ([1 PLAYER] mode) (page 59)
8.
Enlarged waveform panel (page 58)
9.
Playback track sub-information panel (page 54)
Player panel
21 3 4 5
78
9
6
21 3 4 5
5
8 9
6
10

EXPORT mode
51
10.
Function panel ([2 PLAYER] mode) (page 61)
|
Operation panel
[1 PLAYER] mode
[2 PLAYER] mode
1.
Move to the beginning of the track (track search). ([1 PLAYER] mode)
• : Move to the next track.
• : Move to the beginning of the track currently playing. Click twice to move
to the previous track.
2.
Jump to a different playback position. ([1 PLAYER] mode)
• : Jump forward from the current playback position.
• : Jump backward from the current playback position.
3.
Set the beat count or bar to jump from the current playback position when or
is clicked. ([1 PLAYER] mode)
4.
Set the Cue position. (page 78)
5.
Start or pause playback.

EXPORT mode
52
6.
Adjust the audio mix balance of outputs from Players A and B (crossfader). ([2
PLAYER] mode)
|
Playback track information panel
[1 PLAYER] mode
[2 PLAYER] mode
1.
The artwork image of the track is displayed.
2.
The title and artist of the track is displayed.
3.
The remaining time of the current track is displayed.
4.
The elapsed time of the current track is displayed.
5.
The key of the track is displayed.
To change the key display format, click the [Preferences] window > [View] tab >
[Key display format].
6.
The BPM of the track is displayed.
7.
The current play position is indicated with vertical lines and a horizontal bar.
(Playing address and full waveform)
8.
The phrase is displayed.
2 345
6
7
8
1
4
6
7108
5
91 2 3

EXPORT mode
53
9.
Turn on/off the Beat Sync function. ([2 PLAYER] mode)
10.
Set the track to the Master Player for the Beat Sync function to light up. ([2
PLAYER] mode)
|
Setting panel
1.
Display the [MY PAGE] window.
2.
Display the [Preferences] window.
3.
Adjust the volume level.
4.
Display the volume level.
5.
Audio skip occurs if the highlight reaches 100% of the bar. (Audio dropout meter)
6.
The current time of your computer is displayed.
1 432
6
5


EXPORT mode
55
[MEMORY] panel
Saved cue and loop points are displayed. To save a cue, see “To save a cue point”
(page 79). To save a loop point, see “To save a loop point” (page 81).
1.
Change the color of the cue marker shown on the upper side of the waveform
display.
Depending on the DJ player, the changed color can be displayed.
2.
Shows the time of a cue or loop point (minute/second/millisecond).
Click it to move the playback point to the cue or loop point.
3.
Enter a comment for a cue or loop point to display.
Depending on the DJ player, the edited comment can be displayed.
4.
Shows when a loop point is saved. Click it to set to an active loop. Its color then
changes to red.
5.
Delete a cue or loop point.

EXPORT mode
56
[HOT CUE] panel
Hot Cues are displayed. For information about Hot Cues, see “Using a Hot Cue”
(page 82).
1.
Hot Cues are saved. If its color is green, a Cue is saved. If its color is orange, a
loop is saved.
You can change the color of the Cue marker by right-clicking it.
2.
Shows time of a Hot Cue point (minute/second).
Click it to jump to the saved Hot Cue point.
If it is empty, click it to save the Hot Cue point.
3.
Enter a comment for a Hot Cue to display.
4.
Shows when a loop point is saved.
5.
Delete a Hot Cue.

EXPORT mode
57
[INFO] panel
Information of a track loaded to the player is displayed.
1.
Rating
2.
Color
3.
Comment
4.
File type
5.
File size
6.
Sample rate
7.
Bit rate

EXPORT mode
58
|
Enlarged waveform panel
[1 PLAYER] mode
[2 PLAYER] mode
1.
Change a zoom range of the enlarged waveform.
• : Hide the icons.
• [RST]: Reset the zoom range.
2.
Drag the waveform to the right or left to move the playback point forward or
backward. (page 72)
Beat positions detected by analyzing the track are displayed as vertical lines.
3.
The phrase is displayed.
4.
Set two tracks in Players A and B as a good match combination ([Matching]). ([2
PLAYER] mode)
21 3
2
3
41

EXPORT mode
59
|
Function panel ([1 PLAYER] mode)
Switch the display to [CUE/LOOP] or [GRID].
1.
[CUE/LOOP] (page 59)
2.
[GRID] (page 60)
[CUE/LOOP] panel
Set and save a Hot Cue, loop, and cue.
1.
Save Hot Cues. To delete a Hot Cue, point on it with the mouse cursor, and then
click [X]. (page 83)
2.
Save the cue and loop point which you set. (page 79) (page 81)
3.
Move to a cue or loop point.
: Move to the next cue or loop point.
: Move to the previous cue or loop point.
4.
Delete a cue or loop position.
5.
Click the lower bar to switch the buttons.
• : Specify a beat length from the current position, and start the loop
play. (Auto Beat Loop) (page 81)
• : Set real-time cues and loop in/out points, and cancel/resume a
loop playback. (Manual Loop) (page 78)
6.
Turn on/off the quantize. (page 76)
7.
Display a menu screen to set the color of the enlarged waveform, analyze the
currently playing track, export tracks, etc.

EXPORT mode
60
[GRID] panel
Adjust the beat grid and phrase. For more details on the beat grid, see “Adjust the
beat grid” (page 74).
1.
Shift the playback position (a red vertical line at the center of the waveform) to
the first beat of bar.
2.
Display the distance of beat grid at the playback position (a red vertical line at
the center of the waveform) as BPM. You can also enter BPM manually to
change the distance of beat grid.
3.
Change the beat grid according to BPM determined by the click interval of [TAP].
4.
Move the beat grid to the left by 1 msec.
5.
Move the beat grid to the right by 1 msec.
6.
Widen the beat grid distance by 1 msec when is turned on.
7.
Narrow the beat grid distance by 1 msec when is turned on.
8.
Double the BPM. The length of each beat grid distance is halved.
9.
Halve the BPM. The length of each beat grid distance is doubled.
10.
Select the whole track as an adjustment range of the beat grid.
When switching to the [GRID] panel, the whole track is already selected and this
button is not available. The adjustment range is changed to the whole track
when is turned on and the range is set to the current position or later.
11.
Re-set the beat grid from the current position (a red vertical line at the center of
the waveform) according to the BPM determined.
12.
Undo your last action in the [GRID] panel.
13.
Redo the action you undid in the [GRID] panel.
14.
Turn the metronome sound on/off.
Metronome sound starts with the playback track, synchronized with the beat
grid.
15.
Change the metronome volume to one of three levels.
91 2 3 4 5 6 7 8
10 11 12 13 14 15 16 17

EXPORT mode
61
16.
Enable/Disable Track Analysis, Key Analysis, and Beatgrid Adjustment.
(page 76)
If you set it to disable, is displayed on the track list.
17.
Edit each phrase which is displayed in the track information panel by loading the
track analyzed with [Phrase].
• After you click [CUT] to light up, click on the phrase to be divided.
• To change the phrase type, click .
• To delete all phrases, click [CLEAR].
• To adjust the position of the phrase, click the phrase and drag the divided
position (white line).
• To display the [PHRASE EDIT] panel, open the [Preferences] window > [View]
tab > [Layout], and select [Phrase (Full Waveform)] (page 187). For details
about [PHRASE EDIT] panel, refer to “PHRASE EDIT operation guide” on the
rekordbox website.
|
Function panel ([2 PLAYER] mode)
1.
Adjust the beat grid.
2.
Save the cue and loop point which you have set.
3.
Click the lower bar to switch the buttons.
• : Set the loop length by the specified number of beats. (Auto Beat
Loop) (page 81)
• : Set real-time cues and loop in/out points, and cancel/resume a
loop playback. (Manual Loop) (page 78)
4.
Turn MASTER TEMPO on/off.
5.
Reset the tempo to the original BPM. (TEMPO RESET)
6.
Adjust the track playing speed (tempo).
7.
Keep clicking it for pitch bend during the playback.
Hold to speed up and hold to slow down.
8.
Turn on/off the quantize. (page 76)

EXPORT mode
62
|
Recording panel
1.
Select a recording source.
2.
Adjust the recording level.
3.
The recording level is indicated.
4.
Start/Stop recording.
5.
The recording elapsed time and remaining time for continuous recording is
displayed.

EXPORT mode
63
For details about operations on the [Collection] screen, see “[Collection]” (page 7).
1.
Display the shortcut screen. Drag a folder or playlist on the tree view to create a
shortcut.
2.
Display tag lists or playlists.
3 of the 4 palettes on the right are playlist palettes. The left-most palette is used
as Tag List.
3.
Sort track information to search for a track. You can display/hide columns and
change their order.
4.
Display the playlist path, and select one to display the playlist.
5.
Highlight the keys of tracks that are compatible with the key of the track on the
selected deck when displaying the [Key] column. (Traffic Light)
6.
Change the display pattern for the artwork.
: Display the upper part of the artwork.
: Display the whole artwork.
7.
Search for a track, using a category filter.
8.
Search for a track by refining with [BPM], [KEY], [RATING], [COLOR], and [MY
TAG]. (Track filter)
Browser panel
11
4 7 8
10
65
9
12 3
12
15
13
14
16
1817
EXPORT mode
64
9.
Search for a track, using the search filter.
10.
Show/Hide playlist palettes.
11.
Display the My Tag settings screen. (My Tag)
12.
Display the RELATED TRACKS screen.
13.
Display the [SYNC MANAGER] window. Set tracks in rekordbox to be
synchronized with external libraries. (page 37)
14.
Display the [Mobile Library Sync] window. Set pairing with rekordbox (iOS).
(page 46)
15.
Select to display on the track list. (Tree View)
• [Collection]: Display all tracks in rekordbox.
• [Playlists]: You can organize the collection on rekordbox by creating a playlist
prior to your DJ performance.
• [Related Tracks]: Display RELATED TRACKS of the loaded track.
• [Hot Cue Bank Lists]: You can save 8 Hot Cue points with different tracks. Click
the [Preferences] window > [View] tab > [Layout] and set to display/hide.
(page 84)
• [Photo]: Display an image file list.
• [iTunes]: Refer to the iTunes library. Click the [Preferences] window > [View]
tab > [Layout] and set to display/hide.
• [Inflyte]: Refer to tracks on Inflyte. Click the [Preferences] window > [View] tab
> [Layout] and set to display/hide.
• [rekordbox xml]: Refer to xml with the rekordbox xml format. Click the
[Preferences] window > [View] tab > [Layout] and set to display/hide.
• [Explorer]: Display folder layers of your computer and external devices such
as a USB flash drive. Click the [Preferences] window > [View] tab > [Layout]
and set to display/hide.
• [Devices]: Display USB storage devices, SD cards, and mobile devices.
• [Histories]: Display playback histories on DJ equipment.
• [Recordings]: Display files recorded on rekordbox.
16.
Display tracks in a playlist selected from the tree view. (Track List)
17.
Display the sub-browser panel. (page 12)
18.
Display the track information screen.

EXPORT mode
65
The [LINK] button is displayed when rekordbox is connected to the DJ equipment
supporting PRO DJ LINK by a LAN cable or wireless LAN. Click the [LINK] button
to start communication with the DJ equipment. Information on the DJ equipment on
the same network is displayed in the Link status panel. For more details, see “Using
the LAN connection for DJ performance (LINK EXPORT)” (page 69) and “Using the
LAN connection” (page 93).
1.
Start/terminate communication with the DJ equipment connected by a LAN
cable or wireless LAN.
2.
Adjust the tempo (BPM) when rekordbox is set as the Sync Master. (Master
BPM)
3.
Synchronize using the master tempo (BPM) specified by rekordbox when using
the beat sync function on a DJ player. (Sync Master)
4.
Load the current master tempo (BPM).
5.
Display the status of each DJ equipment connected by a LAN cable or wireless
LAN. (Link Status)
Link status panel
2
1
34 5

EXPORT mode
66
Preparing for DJ performance
Use rekordbox to prepare for your DJ performance.
1 Add tracks to [Collection] of rekordbox and analyze them.
Analyze and measure the beat, tempo (BPM), and key of tracks.
“Adding a track” (page 13)
2 Prepare playlists, Hot Cue bank lists, etc. for your DJ performance.
“Using a Playlist” (page 34)
“Using a Hot Cue” (page 82)
3 Set point information (for cue, loop, Hot Cue).
“Using cue points” (page 78)
“Starting loop play” (page 80)
“Using a Hot Cue” (page 82)
4 Play the DJ equipment (PRO DJ LINK) (page 67)
Enjoy your DJ performance on Pioneer DJ equipment using point information
and playlists prepared on rekordbox with USB storage devices or LAN
connection.
Performance history on Pioneer DJ equipment, such as the number of times
played and cue/loop point information, is saved and can be copied to
rekordbox.

EXPORT mode
67
Using with DJ equipment (PRO DJ LINK)
Be sure to read “Safety Precautions” and “Connections” in the Instruction Manual
for the Pioneer DJ equipment listed below before connecting the equipment to your
computer.
For the compatibility of SD memory cards and USB storage devices (flash memory
or hard disk) with the Pioneer DJ equipment listed below, refer to the Instruction
Manual for the equipment.
• DJ PLAYER: CDJ-TOUR1, CDJ-2000NXS2, CDJ-2000NXS, CDJ-2000, CDJ-
900NXS, CDJ-900, CDJ-850, XDJ-1000MK2, XDJ-1000, XDJ-700, MEP-4000,
etc.
• DJ MIXER: DJM-V10, DJM-TOUR1, DJM-2000NXS, DJM-2000, DJM-900NXS2,
DJM-900NXS, etc.
• ALL-IN-ONE DJ SYSTEM: XDJ-RX2, XDJ-RX, XDJ-AERO, XDJ-R1, etc.
The latest information on Pioneer DJ equipment supporting rekordbox is available
on pioneerdj.com.
You can also read “Pro DJ LINK setup Guide” on the rekordbox website.
If the DJ equipment is not connected to a computer, you can use rekordbox tracks
on DJ equipment from USB storage devices (such as flash memory and hard disk).
Hint
• An SD memory card can also be used for some DJ players.
Using USB storage devices for DJ performance
(USB EXPORT)
Computer
DJ player
USB storage device

EXPORT mode
68
|
To use USB EXPORT with multiple DJ equipment
When connecting a DJ mixer and DJ players supported with PRO DJ LINK by LAN
cables, rekordbox tracks and data stored on USB storage devices can be used on
4 DJ players. (page 90)
Hint
• An SD memory card can also be used for some DJ players.
• Instead of a DJ mixer, a switching hub can be used.
• For connection instructions, refer to the Instruction Manual for the DJ equipment.
USB storage device
Computer
LAN cable LAN cable
DJ player DJ mixer DJ player

EXPORT mode
69
When connecting your computer to the DJ player by a LAN cable or wireless LAN,
you can use rekordbox tracks on the DJ player in real time. (page 93)
Hint
• For connection instructions, refer to the Instruction Manual of the DJ player and the operating
instructions of your computer.
Using the LAN connection for DJ performance
(LINK EXPORT)
Computer
LAN cable or wireless
DJ player

EXPORT mode
70
|
To use LINK EXPORT with multiple DJ equipment
When connecting a computer via PRO DJ LINK using a LAN cable, 4 DJ players can
be loaded with rekordbox tracks in a real time.
Also, when connecting a computer to a DJ mixer supported with PRO DJ LINK by a
LAN cable, rekordbox tracks can be monitored over headphones connected to the
DJ mixer.
Hint
• Instead of a DJ mixer, a switching hub can be used.
• 2 computers can be connected via PRO DJ LINK.
• For connection instructions, refer to the Instruction Manual for the DJ equipment.
Computer
LAN cable LAN cable
DJ player DJ mixer DJ player
Computer

EXPORT mode
71
Playing tracks
Use the player panel to play tracks.
1 Drag and drop a track to the player panel from the track list of the browser
panel.
2 Click in the operation panel.
Playback starts.
|
To move the playback position
Click on the enlarged waveform to move the playback position to where you click.
Hint
• In the [1 PLAYER] mode, you can also move the playback position by clicking [<]/[>] on the
operation panel. The position will be moved by the beat count displayed in the operation panel.
If clicking [<]/[>] during the loop play, not only the current playback position but also the LOOP
IN and LOOP OUT points are moved. For the loop play, see “Starting loop play” (page 80).
|
To listen to tracks easily using the browser panel
Click the waveform in the [Preview] column of the browser panel to start the preview
from the position you clicked. Click the stop button on the left side of the waveform
to stop the preview.
When the preview starts in the [Preview] column, any other track playing in the
player panel pauses.
Previewing a track from the beginning of the track
Click the artwork in the [Artwork] column of the browser panel.
Move the mouse cursor away from the artwork to stop the preview.

EXPORT mode
72
During the preview, click on the artwork to skip the preview position ahead by 30-
second increments.
When the preview starts in the [Artwork] column, any other track playing in the
player panel pauses.
Displaying Cue Marker in the preview waveform
Cues and Hot Cue Markers can be displayed on the preview waveform in the track
list. You can then check Cue status of the track in the track list without loading the
track to the player panel.
To display Cues and Hot Cue Markers on the preview waveform, open the
[Preferences] window > [View] tab > [Layout] and select [Display Cue Markers on
Preview].
Click around Cue Marker on the preview waveform, and then the preview play can
be started from the Cue point.
Hint
• For setting Cues, see “Using cue points” (page 78).
Triggering play, pause, and CUE in the enlarged waveform
Using the mouse on the enlarged waveform, triggers the same behavior as clicking
, and [CUE].
• Left-click: the same behavior as clicking and .
• Right-click: the same behavior as clicking [CUE].
To enable/disable this function, open the [Preferences] window > [View] tab > [Click
on the waveform for PLAY and CUE] and select [On] or [Off].
Hint
• For setting Cues, see “Using cue points” (page 78).

EXPORT mode
73
Changing the color of the waveform
Open the [Preferences] window > [View] tab > [Waveform] > [Color], and then select
[Blue], [RGB], or [3Band].
Note
• When you select [3Band], the waveform is displayed in blue for DJ equipment that does not
support [3 Band].
Changing the beat count display
You can change the beat count displayed in the center of the enlarged waveform.
Open the [Preferences] window > [View] tab > [Beat Count Display], and then select
how to display the beat count.
• [Current Position (Bars)]: Display the number of bars from the beginning to the
current playback position.
• [Count to the next MEMORY CUE (Bars)]: Display the number of bars from the
current playback position to the next Memory Cue. If there is no next Memory Cue,
no bars are displayed.
• [Count to the next MEMORY CUE (Beats)]: Display the number of beats from the
current playback position to the next Memory Cue. If there is no next Memory Cue,
no beats are displayed.

EXPORT mode
74
1 Drag and drop a track from the track list in the browser panel to a player panel.
2 Click in the operation panel.
Playback starts.
• The BPM display shows the tempo measured when the track is added.
• The enlarged waveform display shows the beat grid as a white line which is
generated when the track is added (beat grid).
• On the enlarged waveform display, the beats are indicated on the beat grid
every 4 beats from the start to the end of the track. The first beat of bar is
displayed as red marks (as a red vertical line on [GRID] panel) on both sides
of the beat grid.
Hint
• [?] may appear for tracks analyzed by older version of rekordbox. This means information of the
track is insufficient or old. Right-click the track, and then select [Add New Analysis Data] to
update the information. [?] then disappears.
Adjust the beat grid
The enlarged waveform displays the beat grid with white lines. The beat grid can be
adjusted by the following procedure.
1 Select [1 PLAYER] on the upper-left of the screen.
The player panel is changed to [1 PLAYER] mode.
2 Click in the operation panel during playback.
Playback pauses.
3 Click [GRID] in the function panel.
The beat grids changed are shown as blue lines instead of white, and can be
edited.
4 Adjust the beat position.
For icons to adjust the grid, see “[GRID] panel” (page 60).
Checking the beat (beat grid)

EXPORT mode
75
Note
• You cannot adjust the beat grid when your computer is connected to DJ equipment supported
with PRO DJ LINK.
Re-analyzing tracks to detect beat positions and BPM
1 Click to display the [Preferences] window.
2 Click the [Analysis] tab > [Track Analysis], and then set [Track Analysis Mode].
Select [Normal] or [Dynamic] for analyzing waveform information of tracks.
3 Click the [BPM / Grid] checkbox in [Track Analysis Setting].
4 Close the [Preferences] window.
5 Right-click the track to be analyzed, and then select [Analyze Track].
6 Click [OK].
The waveform information of the track is analyzed. The detected beat position
and the measured BPM are saved on the computer.
Hint
• When tracks are re-analyzed, the beat grid set at “Adjust the beat grid” (page 74) is overwritten
by the re-analyzed beat grid.

EXPORT mode
76
You can set a track to ignore re-analysis and editing of the beat grid. It prevents grid-
adjusted tracks from being mistakenly overwritten.
In the Analysis Lock mode, the following operations are not active.
• Track Analysis (BPM/Grid, key, and phrase)
• Grid editing operations in the [GRID] panel
When tracks (including tracks with the Analysis Lock mode) are selected to be
analyzed in a track list, analysis is skipped on tracks with the Analysis Lock mode.
1 Click in the [GRID] panel of the [1 PLAYER] mode.
is changed to and the Analysis Lock is turned on.
Hint
• You can also set [Analysis Lock] after right-clicking a track in a track list.
• Alternatively, set [Analysis Lock] from the [Track] menu on the upper screen.
• When setting the track with [Analysis Lock], is displayed in the status column.
|
To turn off Analysis Lock
Click to change to . The Analysis Lock is turned off.
When setting cues and loops in the player panel, the cue and loop points can easily
be set on beat.
1 Click [Q] in the function panel.
[Q] lights up in red.
2 Set the cue or loop points.
For instructions on setting, see “Using cue points” (page 78) and “Starting loop
play” (page 80).
Setting the Analysis Lock
Using beat grids (quantize)

EXPORT mode
77
|
To play on a DJ player or DJ mixer using the quantize function
You can use track beat grids detected and adjusted on rekordbox, and enjoy the
quantize function for your DJ performance using cues and loops on particular DJ
equipment.
If a DJ player is connected by LAN cables, you can use beat grids with the quantize
function for special effects.
Hint
• For instructions on using the quantize function on DJ equipment, refer to the Instruction Manual
for the DJ equipment.
1 Select a track to be analyzed from a track list.
2 Select [Analyze Track] from the [Track] menu on the upper screen.
Hint
• You can select information to be analyzed on the [Preferences] window > [Analysis] tab > [Track
Analysis] > [Track Analysis Setting].
• You can also analyze a track by right-clicking on a track to be analyzed in the track list and
selecting [Analyze Track].
Note
• When a track has on the track list, you cannot select [Analyze Track] (page 76).
Selecting a track for analyzing

EXPORT mode
78
Set a cue point.
1 During playback, click in the operation panel.
Playback pauses.
2 Click [CUE] in the operation panel.
The paused point is set as the cue point, and a cue marker is displayed on the
lower side of the waveform.
3 Click to start playback from the cue point.
Hint
• When a new cue point is set, any previous cue point is deleted.
• When a different track is loaded, the previous cue point is canceled.
• You can save cue points as memory cues or Hot Cues.
|
To return to the cue point (Back Cue)
During playback, click [CUE] to return the playback point to the cue point
immediately. Playback pauses.
To resume playback from the cue point, click .
|
To check a cue point (Cue Point Sampler)
After returning to the cue point, click and hold [CUE] to start playback from the cue
point.
Playback continues while holding [CUE]. When released, playback returns to the
cue point, and pauses.
|
To set a cue point during playback (Real-Time Cue)
During playback, click [IN] in the function panel at the point to be set as a cue point.
Hint
• When the quantize is turned on, the cue point is automatically set to the nearest beat grid by
clicking [IN].
• For the function panel, see “Function panel ([1 PLAYER] mode)” (page 59) or “Function panel
([2 PLAYER] mode)” (page 61).
Using cue points

EXPORT mode
79
|
To save a cue point
After setting a cue point, click [MEMORY] in the function panel to save the cue point.
The time (minute/second/millisecond) of the saved cue point is shown in the
[MEMORY] panel of the playback track sub-information panel. A cue point marker
is displayed on the upper side of the waveform. Up to 10 cue points can be saved
for 1 track.
Hint
• You can use the saved cue points for your DJ performance on the DJ player.
• For the [MEMORY] panel, see “[MEMORY] panel” (page 55).
• For the function panel, see “Function panel ([1 PLAYER] mode)” (page 59) and “Function panel
([2 PLAYER] mode)” (page 61).
Calling and playing saved cue points
1 Load the track with the saved cue point to the player panel.
The saved cue point time (minute/second/millisecond) is shown in the
[MEMORY] panel of the playback track sub-information panel. A cue point
marker is displayed on the upper side of the waveform.
2 Select a cue point to be used.
The playback point jumps to the cue point, and pauses.
3 Click .
Playback starts.
Hint
• You can select a cue point using the function panel. ([1 PLAYER] mode)
: Select a cue forward from the current playback position.
: Select a cue backward from the current playback position.

EXPORT mode
80
Set [IN] and [OUT] of the loop point.
1 Display with a scroll bar in the function panel.
2 During playback, click [IN] in the function panel at the point to start loop
playback. (Loop In Point)
If using a cue point as the Loop In Point, this operation is not necessary.
3 During playback, click [OUT] in the function panel at the point to end loop
playback. (Loop Out Point)
The loop playback starts from the Loop In Point.
Hint
• When a loop point is set, the previous loop point is deleted.
• When a different track is loaded, the previous loop point is canceled. You can save loop points.
• When the quantize is turned on. click [IN] and [OUT] to set a loop point to be matched close to
the beat grid on playback.
|
To cancel the loop play (Loop Exit)
During the loop play, click [EXIT] in the function panel to cancel the loop play. When
reaching the loop out point, playback continues without returning to the loop in point.
|
To resume the loop play (Reloop)
After cancelling a loop play, click [RELOOP] in the function panel during the
playback. Loop play restarts from the previous loop in point.
Starting loop play

EXPORT mode
81
|
To specify the loop length by the number of beats (Auto Beat
Loop)
You can play a loop with a loop length of between 1/64 and 512 beats, according to
the BPM of the track.
When you click the Auto Beat Loop button, the current playback position is changed
to the loop in point, and a loop is set for the selected number of beats.
Hint
• During a loop play, use a scroll bar to display , and click [<] or [>] to halve/double
the loop length from the loop in point.
• When the quantize is turned on, click [IN] to set a loop in point to be matched to the beat grid
position.
• To cancel a loop play, click the Auto Beat Loop button again.
|
To export loops and save them as WAV files
During a loop play, click in the player panel, and then select [Export Loop As
Wav].
• Exported loops are saved as WAV files (48 kHz sampling frequency, 16-bit
quantization), and added to [Collection]. Specify the file name when saving, which
will be shown as a title in [Collection].
• For instructions on using saved loops (WAV files), refer to the Instruction Manual
for the DJ equipment.
|
To save a loop point
During a loop play or shortly after canceling a loop play click [MEMORY] in the
function panel to save a loop point for later. The time (minute/second/millisecond) of
saved loop point is then shown in the [MEMORY] panel of the playback track sub-
information panel. Up to 10 loop points (including cue points) can be saved for one
track.
Hint
• You can use the saved loop points for your DJ performance on the DJ player.
• For the [MEMORY] panel, see “[MEMORY] panel” (page 55).

EXPORT mode
82
Using the saved loop points
1 Load the track with the saved loop point to the player panel.
The loop point time (minute/second/millisecond) is shown in the [MEMORY]
panel of the playback track sub-information panel. A loop point (from loop in to
out) is shown in yellow on the waveform.
2 Select a loop point to be called.
The playback point jumps to the loop point, and pauses.
3 Click .
The loop play starts.
Hint
• You can select a loop point using the function panel. ([1 PLAYER] mode)
: Select a loop point forward from the current playback position.
: Select a loop point backward from the current playback position.
Setting a saved loop as the active loop
When a loop point is saved, (in orange) is displayed on the loop point.
To set the loop as an active loop, click . The loop is set as an active loop, and
the icon is changed to (in red).
If your player supports the loop function, when you click in the player panel and
set [Active Loop Playback] to [On], the loop play automatically starts at the point of
the active loop during playback. You can check how active loop is performed on
CDJ/XDJ series, etc. on rekordbox.
Hint
• For instructions on active loops, refer to the Instruction Manual for the DJ equipment.
When cue and loop points are saved as Hot Cues, they can be played
instantaneously. You can choose up to 8 Hot Cues per track.
Hint
• Hot Cues can be called out and played on DJ equipment. The number of Hot Cues you can save
depends on the DJ equipment.
Using a Hot Cue

EXPORT mode
83
|
To save Hot Cues
During the play or pause mode, in the [HOT CUE] panel of the sub-information
panel, click the [A] - [H] (Hot Cue point) at the position you wish to save as a Hot
Cue. The playing (or paused) point when the button was clicked is saved as a Hot
Cue.
• When a Hot Cue point is clicked during a loop play, the currently playing loop is
stored as a Hot Cue in orange.
Hint
• When the quantize is turned on, set a Hot Cue. When you click the Hot Cue point, it is
automatically set to the nearest beat grid.
• You can save Hot Cues to click the [A] - [H] in the [CUE/LOOP] panel of the function panel. ([1
PLAYER] mode)
• For the [HOT CUE] panel, see “[HOT CUE] panel” (page 56).
Calling and playing saved hot cue points
1 Load the track with the saved hot cue point to the player panel.
The saved hot cue point time (minute/second) is shown in the [HOT CUE] panel
of the sub-information panel. A hot cue point marker is displayed on the upper
side of the waveform.
2 Select a hot cue point.
Playback starts from the selected hot cue point.
Hint
• You can select a hot cue point using [A] to [H] in the [CUE/LOOP] panel in the function panel.
([1 PLAYER] mode)
• If the [Preferences] window > [Advanced] tab > [Others] tab > [Hot Cue], and [During Pause,
GATE playback is applied.] is selected, switch to the [GATE] mode. In the [GATE] mode, the
playback continues only when you click and hold a hot cue button during pause. Also, when you
release the button, the playback pauses, and the playback point is returned to a hot cue point.

EXPORT mode
84
|
To organize Hot Cues by using Hot Cue Bank List
Using Hot Cue Bank Lists, you can call cue/loop points of different tracks on your
DJ performance.
The cue/loop point information for different tracks can be stored in Hot Cue Banks.
The combination of the 8 Hot Cue Banks is called Hot Cue Bank List.
If loading multiple Hot Cue Bank Lists onto a DJ player, you can make a variety of
DJ performances using Hot Cue combinations.
To display [Hot Cue Bank List] in the tree view, open the [Preferences] window >
[View] tab > [Layout], and click [Hot Cue Bank List] checkbox.
Note
• The number of Hot Cue Banks depends on the DJ equipment.
• Hot Cue Bank Lists cannot be loaded onto some DJ equipment.
• If the player panel is in the [2 PLAYER] mode, Hot Cue Bank and [X] are not displayed.
Create a new Hot Cue Bank List
1 Click [+] on the right side of the [Hot Cue Bank Lists] in the tree view of the
browser panel.
[Untitled Hot Cue Bank List] is added under the [Hot Cue Bank Lists] folder.
2 Type the list name using your computer, and then press the [Enter] key.
Hint
• To delete a Hot Cue Bank List, right-click on the Hot Cue Bank List, and then select [Delete Hot
Cue Bank List]. You can also click on the Hot Cue Bank List, and then press the [Delete] key on
your computer keyboard.
EXPORT mode
85
Save cue and loop points as Hot Cue Banks
During the play or pause mode, click the [A] - [H] in Hot Cue Bank List at the position
you wish to save. The cue point is stored in a Hot Cue Bank. The saved point is
displayed in green.
Hint
• When a Hot Cue Bank is clicked during a loop play, the currently playing loop point is stored and
displayed in orange in a Hot Cue Bank.
Check saved Hot Cue Banks
In the Hot Cue Bank List, click a Hot Cue Bank of a saved cue/loop point to start its
playback.
Hint
• To delete a cue/loop point saved in the Hot Cue Bank List, click its [X] on the right side of the
Hot Cue Bank.
Call a saved Hot Cue and save it in Hot Cue Bank
1 Open the [Preferences] window > [Advanced] tab > [Others] tab > [Hot Cue],
and click the [During Pause, GATE playback is applied.] checkbox.
2 Load a track containing Hot Cue points onto the player panel.
The cue or loop points saved in the track are displayed in the [HOT CUE] panel.
3 In the [HOT CUE] panel, click a point you wish to save in Hot Cue Bank.
The playback position is moved to the selected point, and the play pauses.
4 Click the appropriate [A] - [H] in the Hot Cue Bank List.
The saved point is displayed in the Hot Cue Bank.

EXPORT mode
86
Organize Hot Cue Bank Lists by using folders
1 Right-click the [Hot Cue Bank Lists] folder, and then select [Create New Folder].
[Untitled Folder] is created under the [Hot Cue Bank Lists] folder.
2 Type the folder name using your computer keyboard, and then press the [Enter]
key.
3 Drag Hot Cue Bank Lists to the created folder.
Hot Cue Bank Lists are moved under the created folder.
Hint
• To delete a folder, right-click on the folder, and then select [Delete Folder]. You can also press
the [Delete] key on your computer keyboard. All Hot Cue Bank lists and folders contained in the
folder are deleted.
Add an artwork image to a Hot Cue Bank List
Valid artwork image file formats are JPEG (.jpg or .jpeg) and PNG (.png).
1 Right-click a Hot Cue Bank List, and then select [Add Artwork].
2 Select an image file, and then click [Open].
The artwork image is added to a Hot Cue Bank List.
Hint
• To display the added artwork image, right-click the Hot Cue Bank List.
Use [Histories] to check played tracks and track orders.
1 Double-click [Histories] in the tree view.
Play histories are displayed in the year and month folders.
2 Select a play history.
Checking the play histories

EXPORT mode
87
You can load tracks and playlists from [Collection] to USB storage devices (flash
memory or hard disk). Connect the USB storage device to a DJ player for your DJ
performance.
Hint
• For music files (file formats) that can be loaded and played on Pioneer DJ player, refer to the
Instruction Manual for each DJ player.
• An SD memory card can be used for some DJ players.
• To import music files, connect a USB storage device which stores a playlist exported from
another computer. Right-click a playlist or folder in [Devices], and then select [Import Playlist] or
[Import Folder].
• When using MEP-4000 or XDJ-R1, open the [Preferences] window > [DJ System] tab > [Device]
tab > [Library], and select each device. When the USB storage device is removed after selecting
DJ player, the necessary data for your DJ performance is loaded to the USB storage device.
Using USB storage devices

EXPORT mode
88
Connect the USB storage device to your computer
Insert the USB storage device into your computer, and then click . USB storage
device settings are displayed in [Devices].
You can make settings for USB storage devices to use on a DJ player. Refer also to
the Instruction Manual for the DJ player.
Hint
• You can change the setting of [My Settings] on the [Preferences] window > [DJ System] tab >
[My Settings] tab. When [Apply settings on devices automatically] is set, the changed settings
are applied to USB storage devices.
Note
• File systems such as NTFS and exFAT are not supported by DJ equipment, thus they are not
displayed on the screen. Use FAT32 for Windows and a FAT32 or HFS+ formatted device for
Mac.
• If you set [Color] to [3Band], the waveform is displayed in blue for DJ equipment that does not
support [3 Band].
[General]
[Device Name] Set the name to display.
[Background Color] Set the background color to display.
[Waveform Color] Set the waveform color to display.
[Type of the
Overview
Waveform]
Select the display type of the waveform to display.
[Category] Specify a category and the order to display.
[Sort] Specify a sort order to display.
[Column] Specify a user setting category to display on the right side of the title,
when browsing music files on the display window of DJ equipment.
[Color] Enter or edit a comment on one of the eight colors used for classifying the
music files categories.
[My
Settings]
Set to whether all settings of all items are applied automatically.

EXPORT mode
89
Remove the USB storage device from your computer
Click on the right side of to remove before disconnecting the USB storage
device from your computer.
Note
• The USB storage device must not be disconnected while the data is transferring. If you want to
disconnect the device while data is being transferred, click [X] on the right of the progress bar
to cancel the data transfer.
• When the [Preferences] window > [DJ System] tab > [Device] tab > [Library] > [Create library
exclusively for] , [XDJ-R1] or [MEP-4000] is selected, is displayed on the right side of .
When you click , the creation of a library exclusively for the XDJ-R1 or MEP-4000 starts.
Wait until it finishes, and then disconnect the USB storage device from the computer.
|
To transfer tracks to a USB storage device
Drag tracks from [Collection] to in [Devices]. The transfer progress bar is
displayed at the bottom of the screen, and both tracks and track information are
transferred to the USB storage device.
Hint
• Tracks can also be transferred by dragging them from [iTunes] or [Explorer] to in [Devices].
• To delete a track from the USB storage device, select the track in [Devices], and then click the
[Delete] key on the computer keyboard. (Tracks in the process of being transferred cannot be
deleted.)
• Tracks can be transferred to 2 devices at the same time.
• For some DJ equipment, when tracks are transferred to the USB storage device, an exclusive
library ([Collection] or [Playlist]) is created on the USB storage device when it is removed.
|
To transfer playlists to a USB storage device
1 Click on the left of to transfer the playlist.
2 Click on the left of the [Playlists] folder.
3 Drag a playlist to [Devices].
The playlist and the tracks contained in it are transferred to the USB storage
device.
Hint
• A playlist can be transferred by dragging it from [iTunes] to [Devices].
• To delete the playlist from the USB storage device, select the playlist in [Devices], and then click
the [Delete] key on the computer keyboard.

EXPORT mode
90
• Depending on the DJ equipment, there may be restrictions on the names of playlists and the
folder structure on the USB storage device. For details, refer to the Instruction Manual of the DJ
equipment.
|
To transfer Hot Cue Bank Lists to USB storage devices
You can use combinations of Hot Cues of different tracks on DJ equipment by using
a Hot Cue Bank List created prior to your DJ performance.
The available number of Hot Cue Banks depends on the DJ equipment.
1 Click on the left of to transfer the Hot Cue Bank List.
2 Click on the left of the [Hot Cue Bank Lists] folder.
3 Drag the Hot Cue Bank List to [Devices].
The Hot Cue Bank List and the tracks contained in it are transferred to the USB
storage device.
Hint
• To delete the Hot Cue Bank List from the USB storage device, select the Hot Cue Bank List in
[Devices], and then click the [Delete] key on the computer keyboard.
|
To use USB storage devices connected to a DJ player for DJ
performance (USB EXPORT)
You can use USB storage devices (flash memory or hard disk) for your DJ
performance. Without using a computer, you can transfer tracks, playlists, and track
information (such as cue points) to the DJ player. See also “Using USB storage
devices for DJ performance (USB EXPORT)” (page 67).
• An SD memory card can also be used for some DJ equipment.
• Hot Cue Bank Lists cannot be loaded onto some DJ equipment.
• For MEP-4000 and XDJ-R1, the number of tracks displayed in the folders and
playlists on the USB storage device is limited. In addition, certain kinds of audio
format, including AIFF, are not supported by MEP-4000.
• For instructions on connecting USB storage devices to DJ equipment and using
the USB storage devices for your DJ performance, refer to the Instruction Manual
for the DJ player.
EXPORT mode
91
DJ performance using the quantize function on a DJ player or DJ mixer
The beat grid of tracks detected and adjusted beat grids using rekordbox can be
used through the quantize function of cueing and looping on the DJ player. When
the DJ player and DJ mixer are connected by a LAN cable, you can use detected
and adjusted beat grids through the quantize function for special effects.
• For instructions on using the quantize function on the DJ player or DJ mixer, refer
to the Instruction Manual for the DJ equipment.
Using the beat sync function between DJ players for DJ performance
If you detected and adjusted beat grids of tracks using rekordbox, you can
synchronize tempos (BPM) and beats of DJ players connected via PRO DJ LINK
(page 67). You can also synchronize them of the left and right decks of an all-in-one
DJ system.
• For instructions on using the beat sync function on the DJ player, refer to the
Instruction Manual of the DJ player.
Using Hot Cues on a DJ player
Hot Cue ([A] - [H]) information of tracks can be called and used on a DJ player.
• For instructions on using the Hot Cue information on a DJ player, refer to the
Instruction Manual of the DJ player.
• If [Auto Load Hot Cue] is set on tracks, load these tracks onto the DJ player. Hot
Cues saved in tracks are then automatically loaded onto Hot Cues on the DJ
player.
• The number of Hot Cues depends on the DJ player.
Save play histories on rekordbox from DJ equipment
Connect the USB storage device used for your DJ performance to the computer. A
play history of tracks in the device is automatically saved on rekordbox. The history
is displayed in the [Histories] folder with its saved date.
• The history is deleted from the USB storage device.
Note
• When the [Preferences] window > [DJ System] tab > [Device] tab > [History] > [Import the play
history automatically] is not set, play histories are not imported automatically.
• When importing manually, open the [Histories] folder in the USB storage device. Right-click the
play history to be saved, and then select [Import History].
• Tracks in the play histories can only be exported from [Collection] of your rekordbox. Tracks
exported from another rekordbox or tracks deleted from your rekordbox cannot be saved in the
play histories. Such tracks are excluded.

EXPORT mode
92
Load track information updated on a DJ player
The following information is updated.
• Cue Points and Loop Points
• Hot Cues
• Beat Grids
• Other information (colors, ratings, and comments)
1 Connect the USB storage device used for your DJ performance to the
computer.
2 Right-click of the USB storage device you wish to load track information, and
then select [Update Collection].
The [Update Collection with USB Device] window is opened when the track
information starts updating.
Hint
• If you click [Cancel] while updating, the [Update Collection with USB Device] window is closed.
• Depending on the DJ player, updated information may differ.

EXPORT mode
93
Using the LAN connection
If you connect a computer to a DJ player by a LAN cable or wireless LAN, you can
directly load rekordbox tracks and data, and use them on the DJ player. (page 95)
• For transferring tracks to DJ equipment, it is not necessary to export them to USB
storage devices.
• You can use various rekordbox track-selecting features (e.g. track browsing)
during your DJ performance.
• On rekordbox, you can check the play histories of DJ players (page 86). A play
history by PRO DJ LINK is created in the year’s folder as [LINK HISTORY yyyy-
mm-dd].
When your computer is connected to a PRO DJ LINK-compatible DJ mixer by a LAN
cable, you can monitor tracks in rekordbox through headphones connected to the
DJ mixer. (page 94))
Depending on your computer’s security software and operating system settings, it
may not be possible to establish links with DJ equipment. In this case, it is necessary
to clear settings for any programs and communications ports that are blocked.
• For the link status display, see “Link status panel” (page 65).
1 Connect the computer and DJ equipment to the network.
When detecting DJ equipment connected to the network, is displayed at
the bottom left of the browser panel.
2 Click .
Communication with DJ equipment connected by a LAN cable or wireless LAN
is enabled.
The link status panel (icons of connected DJ equipment) is displayed at the
bottom of the browser panel, and is displayed.
Hint
• For connection instructions, and the unit number of DJ players that can be connected, refer to
the Instruction Manual for the DJ equipment.
Establishing the link

EXPORT mode
94
• When connected using a switching hub or a PRO DJ LINK-compatible DJ mixer, rekordbox
music files and data can be shared with 4 DJ players.
• It may take time for the network address to be acquired automatically, depending on the
communications environment.
• When is displayed on the left side of the link status panel, there are two computers
connected, one of which has rekordbox installed.
• When is displayed on the left side of the link status panel, the computer is connected to the
network by a wireless LAN.
• When [MIDI/HID] is displayed on the right side of the DJ equipment icon, DJ equipment is
communicating with another computer by USB control (MIDI or HID).
|
To change the displaying order of the DJ equipment icons in the
link status panel
The order in which DJ equipment icons display in the link status panel can be
changed by dragging them left and right.
|
To exit the link
Click to cancel the communication with DJ equipment connected by a LAN cable
or wireless LAN.
To monitor rekordbox tracks through headphones connected to the DJ mixer, open
the [Preferences] window > [Audio] tab > [LINK MONITOR], select [Use “LINK
MONITOR” of Pioneer DJ Mixers], and then start playback.
• For instructions on the DJ mixer, refer to the Instruction Manual for the DJ mixer.
Hint
• The click sound of the waveform on the [Preview] column or [Artwork] column is also monitored
with headphones from the DJ mixer.
Monitoring tracks through headphones
connected to the DJ mixer

EXPORT mode
95
Drag a track from a track list in the browser panel to in the link status panel. The
track is loaded onto the DJ player, and playback starts.
Note
• When the [EJECT/LOAD LOCK] function of a DJ player is active, tracks cannot be loaded until
playback on the DJ equipment pauses.
• Tracks in [Devices] cannot be loaded onto a DJ player.
|
To use the quantize function on a DJ player or DJ mixer
If you have detected and adjusted beat grids of tracks using rekordbox, you can use
them with the quantize function on performing cue operations and playing loops at
the DJ player. Furthermore, if a DJ player and a DJ mixer are connected by a LAN
cable, you can use the quantize function for special effects (FX).
• For instructions on using the quantize function on a DJ player or DJ mixer, refer to
the Instruction Manual for DJ equipment.
|
To use the beat sync function between DJ players or all-in-one DJ
system for DJ performance
If you have detected and adjusted beat grids of tracks using rekordbox, you can
synchronize tempos (BPM) and beats of DJ players connected via PRO DJ LINK.
You can also synchronize them of the left and right controller decks.
• For instructions on using the beat sync function on a DJ player, refer to the
Instruction Manual of the DJ player.
Hint
• You can synchronize tempos (BPM) and beats of multiple DJ equipment by specifying tempos
(BPM) on rekordbox.
Using a DJ player
EXPORT mode
96
|
To use Hot Cues on DJ equipment
The Hot Cue ([A] - [H]) information of music files can be called and used on DJ
equipment.
• For instructions on using Hot Cues on DJ equipment, refer to the Instruction
Manual of DJ equipment.
Hint
• When [Auto Load Hot Cue] is enabled and such tracks are loaded onto a DJ player, Hot Cues
saved in tracks are automatically loaded.
• The number of Hot Cues depends on the DJ player.
|
To load the Hot Cue Bank Lists onto a DJ player
Drag the required Hot Cue Bank List from the [Hot Cue Bank Lists] to in the link
status panel. The Hot Cue Banks stored in the Hot Cue Bank Lists are loaded into
the Hot Cues of the DJ player.
Hint
• The number of available Hot Cues depends on the DJ player.
|
To share tracks by using Tag List
Tag List is a list allowing you to perform real-time browsing from each DJ player
displayed in the link status panel.
When tracks are added from rekordbox to Tag List, the tracks on Tag List can be
loaded onto the DJ player and played by operating the DJ player.
1 Open the [Preferences] window > [View] tab > [Layout], and select [Playlist
Palette].
2 Click in the browser panel to display the playlist palette.
3 Click [TAG] above the tree view, and then click on the right side of [TAG].
4 Drag a track from [Collection] in the browser panel to [Tag List].
The tracks are added to [Tag List].
Hint
• Tracks can also be added by right-clicking a track and selecting [Add to Tag List].
• Tracks and playlists can also be added by dragging them from [Playlists] or [iTunes].
• Up to 100 files can be added.
EXPORT mode
97
Change the order of tracks on Tag List
1 Click the heading of the column displaying the track order.
Each time you click, the arrangement switches between ascending and
descending order.
2 Drag a track to change its position in the list.
Note
• If tracks are sorted by any column header other than track order, you cannot change the track
order by dragging a track.
Play tracks on a DJ player by using Tag List
By operating the DJ player, tracks on Tag List can be loaded and played on each DJ
player, and tag lists actually used during performances can be saved as rekordbox
playlists. For instructions on accessing tag lists from the DJ player, refer to the
Instruction Manual of the DJ player.

EXPORT mode
98
Mixing ([2 PLAYER] mode)
Mix tracks to find a good match combination or adjust beat grids.
A good match combination of tracks can be saved in the library and can be called
as RELATED TRACKS when selecting the next track to play.
|
To mix two tracks in Players A and B
1 Select [2 PLAYER] on the upper-left of the screen.
The player panel is switched to [2 PLAYER] mode.
2 Drag a track from the track list, etc. to Player A.
3 Drag a track from the track list, etc. to Player B.
4 Click in the operation panels of Player A and Player B.
The tracks in Player A and Player B start playback.
Preparing for mixing

EXPORT mode
99
5 Adjust the mixing audio volume of Player A and Player B.
You can try mixing with a crossfader in the operation panel.
Move the crossfader to A to increase the volume of Player A and to decrease
the volume of Player B. Move the crossfader to B to increase the volume of
Player B and to decrease the volume of Player A.
|
To adjust the track playback speed (Tempo Control)
Click the tempo adjustment button to match the playback speed of 2 tracks.
[+]: The playback speed becomes faster.
[-]: The playback speed becomes slower.
[RST]: The playback speed is reset to the original speed.
BPM value: You can enter the BPM by double clicking the number.
|
To adjust the playback speed without changing the pitch (Master
Tempo)
1 Click [MT] in the function panel.
The [MT] lights up in red and the master tempo is turned on.
2 Click [+]/[-] to adjust the tempo (BPM).
The pitch of the track does not change even when you change the playback
speed.
Note
• The sound quality may change because the sound is digitally reprocessed.
|
To adjust the beat positions of two tracks manually using Pitch
Bend
Click to slow down the playback or to speed up the playback in the function
panel during playback.

EXPORT mode
100
|
To synchronize the beat positions and tempo of two tracks using
BEAT SYNC
1 Play a track on Player A.
The Player which starts the playback first becomes the Sync Master.
2 Play a track on Player B.
3 Click [BEAT SYNC] in the function panel on Player B.
The Tempo (BPM) and beat positions of the track on Player B is synchronized
with those on Player A.
To turn the SYNC function off, click [BEAT SYNC] again.
To get back to the original BPM on each player after turning the SYNC function
off, click [RST].
|
To set 2 tracks as a good match combination ([Matching])
If the 2 tracks are a good match to mix in terms of harmony, etc., click to store
such information in the library. The stored information can be shown as a good
match combination.
• If the 2 tracks are a good match when loading these tracks onto the Player A and
Player B, lights up in blue automatically.
• To display tracks with good match combinations for a particular track, see “Using
RELATED TRACKS” (page 31).

EXPORT mode
101
Recording
You can record sound input through hardware connected via USB. For example,
when connected to a turntable via USB, you can record source music from an
analog record. Also, you can record your DJ performance by connecting your
computer to an audio interface, such as a DJ mixer.
A recording is created as a WAV file.
In the EXPORT mode, only audio input from external equipment can be recorded.
To record from Master Out of rekordbox, use the recording function in the
PERFORMANCE mode. (page 155)
1 Click on the top of the screen.
The recording panel is displayed.
2 Select a recording source.
The recording source shown in the menu depends on the connected hardware.
• When PLX-500 is connected, select [USB REC].
• When DJM-900NXS2 is connected, select [Master Out], [Channel 1],
[Channel 2], [Channel 3], or [Channel 4].
• When DJM-900NXS is connected, select [Channel 1], [Channel 2], [Channel
3], or [Channel 4].
• Depending on the recording sources and the connected hardware, settings of
the connected hardware may be necessary. For details, refer to the operating
instructions of the connected hardware.
3 Turn the recording level knob to adjust the recording level.
Start playback of some tracks on the connected hardware, check the recording
level indicator, and adjust the recording level accordingly.
If the level is too low, recorded files will contain noise and the volume will be
low. If the level is too high, clipping will occur and the sound will be distorted.
The best recording quality can be obtained by increasing the maximum
recording level to the point where not all the indicators hit the red zone.
4 Click .
flashes and rekordbox is in the recording standby mode.
5 Play a track to be recorded on the connected hardware.
Recording starts when audio input is received. The changes to , and the
elapsed time and remaining time for recording are shown.

EXPORT mode
102
6 Click .
Recording stops.
When no sound continues more than 20 seconds, recording stops
automatically.
7 Enter information about the recorded file.
8 Click [OK].
The recorded file is saved on [Recordings] in the tree view of the browser panel.
Hint
• To avoid automatic start/stop recording, open the [Preferences] window > [Advanced] tab >
[Recordings] tab, and set [Recording starts when:]/[Recording ends when:] to [Pressing the REC
button].
|
To separate the recorded file automatically
rekordbox has a feature to automatically create another file when it detects a certain
length of silence. If you enable this function, you can create audio files per track
when recording an analog record (if it has multiple tracks and breaks between
them).
The length of the silence can be set from 1 to 10 seconds.
Open the [Preferences] window > [Advanced] tab > [Recordings] tab, and adjust the
settings of automatic separation as follows.
• If the file does not separate;
[Silence Level Threshold]: Move the slider to right to increase the threshold.
[When silence continues for]: Decrease the length of silence.
• If the file separates unnecessarily;
[Silence Level Threshold]: Move the slider to left to decrease the threshold.
[When silence continues for]: Increase the length of silence.
See “Other settings for recordings” (page 103) in “EXPORT mode”.
Hint
• When the automatic separation feature is enabled, a screen with [Will you save the separate
recording files?] is displayed after recording. If you click [No], the recording is saved as one file
(not separated).

EXPORT mode
103
Note
• This feature separates a file by detecting silence. Therefore, if there is no silence between
tracks, the recorded file is not separated. Conversely, if a track has a silent or a low volume-level
part, the file may be separated there. If this feature does not work correctly even after these
setting values are adjusted, open the [Preferences] window > [Advanced] tab > [Recordings]
tab, and do not select the [Automatically separate files when silence continues].
|
To display recorded files
1 Click on the left of [Recordings] in the tree view of the browser panel.
Folders containing recorded files are shown in the tree view.
2 Select a file in the track list, and then drag and drop it to the player.
To start playback, click in the operation panel.
Hint
• If you have input tag information, the file is shown in [Album] in [Artist] under [Recordings]. If you
have not input tag information, click [Recordings] to display the recorded files in the track list.
• To delete unwanted recorded files, right-click the file and select [Remove Recorded File].
Note
• Folders in [Recordings] cannot be edited in the tree view. To edit the name of a folder, etc., use
the rename facility in Finder or Windows Explorer.
|
Other settings for recordings
See “[Recordings] (EXPORT mode)” (page 200).

104
PERFORMANCE mode
Depending on your subscription plan, some functions may not be available. For
details on subscription plan, refer to the rekordbox website.
rekordbox.com/en/
: Invalid function on your subscription plan
About the PERFORMANCE mode screen
1.
Player panel (page 105)
2.
Browser panel (page 125)
1
2
PERFORMANCE mode
105
1.
Track information panel (page 107)
2.
Effect panel (page 119)
3.
Global section (page 106)
4.
Enlarged waveform panel (page 125)
5.
Performance pads (page 110)
6.
Microphone panel (page 151)
7.
JOG panel (page 108)
8.
Sampler deck (page 121)
9.
Mixer panel (page 123)
10.
Headphone panel (page 123)
11.
Recording panel (page 124)
Player panel
1
5791087 56
2
14
11
3

PERFORMANCE mode
106
|
Global section
1.
Switch between the PERFORMANCE mode and EXPORT mode (page 48).
2.
Change the layout of the deck and waveform (2 deck/4 deck, horizontal/vertical
or browse screen) (page 154).
3.
Display the effect panel (page 119), sampler deck (page 121), mixer
panel (page 123), recording panel (page 124), video panel *, lyric
panel *, and LIGHTING panel *.
* Click each tab on the [Preferences] window, and click the [Enable XXX
Function] checkbox in the uppler-left of the screen.
4.
Turn on to enable Ableton Link. (page 130)
5.
Open the PAD EDITOR window.
Connect to DJ equipment supporting Pad Editor.
For details on operating Pad Editor, refer to “PAD EDITOR Operation Guide” on
the rekordbox website.
6.
Open the setting window to use MIDI Learn.
Connect to equipment which has the MIDI control function.
For details on operating MIDI Learn, refer to “MIDI LEARN Operation Guide” on
the rekordbox website.
7.
Display the [MY PAGE] window.
8.
Display the [Preferences] window.
9.
Adjust the volume level from MASTER OUT.
When connecting to DJ equipment compatible with this feature, is shown
for setting PC MASTER OUT on or off.
• [ON]: MASTER OUT sound outputs from both the connected DJ equipment
and computer’s internal speaker.
• [OFF]: MASTER OUT sound outputs from the connected DJ equipment only.
For compatible DJ equipment, refer to FAQ on the rekordbox website.
10.
The volume level from MASTER OUT is indicated.
11.
The audio dropout meter (audio dropouts that have reached 100%) is displayed.
1
11 12 13
8 10765432 9

PERFORMANCE mode
107
12.
When the computer is unplugged from the mains power supply, the remaining
battery life of the computer is displayed.
13.
The current time is displayed.
|
Track information panel
1.
The track’s artwork image is displayed.
Point on the artwork image with the mouse cursor to display , and then click
to unload the track.
2.
The track name, artist name, original BPM and key are displayed.
3.
Remaining time ( [-] ) and elapsed time are displayed.
4.
Turn down the key by a semitone. (Semitone Down)
5.
Turn on/off the Key Sync function.
6.
Turn up the key by a semitone. (Semitone Up)
7.
Turn on/off the Beat Sync function (page 144).
8.
Display the current cue position.
9.
The full waveform, cue point, memory cue point, hot cue point, phrase, and
Lighting scenes are displayed.
Click to shift the playback position to the position you clicked.
The waveform color can be changed on the [Preferences] window. (page 73)
10.
The key sync function or the current key of the track is displayed.
Double-click to reset the key if you have changed it using semitone up/down
function.
To change the key display format, click the [Preferences] window > [View] tab >
[Key display format].
11.
The difference from the original key is displayed.
10
4
6
7
9
5
8
12 3
11
12

PERFORMANCE mode
108
12.
Set the deck as a Master Player for the Beat Sync function.
|
JOG panel
Click to display the performance pad and the JOG panel if the [GRID EDIT] panel
is displayed.
1.
Click the lower bar to switch the buttons.
: Set the loop length by the specified number of beats. (Auto Beat Loop)
: Set real-time cues and loop in/out points, and cancel/resume a loop playback.
(Manual Loop) (page 139)
2.
When playback is paused, a cue point is set to the current position. Click and
hold to continue playback. (page 137)
3.
Select the DVS mode.
21 43 6 75
96
10
12 1311
8
PERFORMANCE mode
109
4.
You can set information associated with the platter on the [Preferences] window
> [View] tab > [Switch JOG Display].
• [Current CUE / SLIP]: A red marker indicates the position of the Cue point.
When [SLIP] is on, the inner ring turns red, and a yellow marker indicates the
position of the Cue point.
• [HOT CUE COUNTDOWN]: The distance to Hot Cue within 5 laps is indicated.
It changes the platter displaying according to the distance to the Hot Cue.
5.
Display the current BPM.
6.
Adjust the playback speed. The playback speed can be changed by clicking
[+]/[-]. (page 132)
7.
Perform without breaking the rhythm of the track. (slip mode) (page 143)
8.
Set a loop in point, loop out point, Hot Cue, and Cue automatically according to
the beat position. (quantize function) (page 136)
9.
Start or pause playback. (page 132)
10.
Display the playback speed changed rate (%).
11.
Keep clicking it for pitch bend during the playback.
12.
The adjustable range for playing speed is displayed. (TEMPO RANGE)
13.
Adjust the playback speed without changing the pitch. (Master Tempo)
(page 132)
When you shift the key on a track information panel, the display here is changed
to [KEY RESET]. Click to reset the key.

PERFORMANCE mode
110
|
Performance pads
If the [GRID EDIT] panel is displayed, click to switch to the performance pad.
By switching the pad, you can use various functions.
In the PAD mode, click the function name displayed in the lower side of the pad. This
allows you to select various functions to be assigned to the performance pad.
[HOT CUE] (page 110) / [PAD FX] (page 111) / [SLICER] (page 112) / [BEAT JUMP]
(page 113) / [BEAT LOOP] (page 113) / [KEYBOARD] (page 114) / [KEY SHIFT]
(page 114) / [SEQ. CALL] (page 115) / [ACT. CENSR] (page 116) / [MEMORY CUE]
(page 117)
[HOT CUE] mode
After saving Hot Cues, you can call the specific playback position quickly and mark
on the full waveform or enlarged waveform.
For details on how to operate, see “Using a Hot Cue” (page 141).
1.
Hot Cues are displayed.
If you click an empty pad, the current playback position is saved as a Hot Cue.
If you click a pad with a Hot Cue, the playback position jumps to the Hot Cue
position.
Right-click the Hot Cue pad to enter comments and change the color.
2.
Shows when a loop point is saved. (HOT CUE LOOP)
Click it to set to an active loop. Its color then changes to red.
3.
Scroll the display.
4.
Point at the pad with the mouse cursor, and then click [X] to delete the Hot Cue
from the pad.

PERFORMANCE mode
111
[PAD FX] mode
For details on how to operate, see “Using PAD FX” (page 165).
1.
While holding the click, the effect is applied.
For the RELEASE FX, turn on or off by clicking.
2.
Change the FXs and FX parameters assigned to each performance pad.
• There are 4 parameters; [BEAT FX], [SOUND COLOR FX], [SCENE FX], and
[RELEASE FX].
In a parameter [BEAT FX], you can change the beat of the FX.
• In the RELEASE FX pad, set [HOLD ON/OFF] to [ON] to turn on by holding,
or set [HOLD ON/OFF] to [OFF] to turn on/off by clicking.
3.
Scroll the display.
4.
Switch the bank.
You can save effect settings on two banks.
PERFORMANCE mode
112
[SLICER] mode
For details on how to operate, see “Using a slicer” (page 177).
1.
While clicking, roll playback of a sliced and assigned section occurs. (Playback
of the section is repeated only while clicking the pad.)
2.
The same sliced section is played.
3.
The range of the slicer is shifted and moved.
4.
Change the length of the slice.
5.
Change the length of the roll.

PERFORMANCE mode
113
[BEAT JUMP] mode
For details on how to operate, see “Using the beat jump function” (page 145).
1.
The playback position jumps to the displayed length (beat or bar) and direction.
During the loop play, the loop position moves.
2.
Scroll the display.
[BEAT LOOP] mode
1.
Specify a beat length for a loop play from the current playback position.
Click again to cancel the specifying.
2.
Scroll the display.

PERFORMANCE mode
114
[KEYBOARD] mode
For details on how to operate, see “To use [KEYBOARD]” (page 147).
1.
Shift the key by a semitone when using a HOT CUE.
2.
Scroll the display.
3.
Switch to the HOT CUE screen to select a HOT CUE.
4.
Select a HOT CUE.
[KEY SHIFT] mode
For details on how to operate, see “To use [KEY SHIFT]” (page 146).
1.
Shift the key by a semitone.
2.
Scroll the display.


PERFORMANCE mode
116
[ACT. CENSR] (ACTIVE CENSOR) mode
You can apply an effect to specified sections of a track. When the playback position
reaches a specified section, the effect is automatically applied.
• You can specify multiple sections of a track.
• During reverse playback, the effect is not applied.
For details on how to operate, see “Using ACTIVE CENSOR” (page 183).
1.
Select an effect.
2.
Set the beginning point for the effect to be applied. is shown on the enlarged
waveform.
When the playback position is in the specified range, [IN ADJ] is displayed and
you can change the beginning point.
3.
Set the ending point at which the effect will no longer be applied.
When the playback position is in the specified range, [OUT ADJ] is displayed
and you can change the ending point.
4.
Clear the specified section. You can click when the playback position reaches to
the specified section.
5.
Jump to the beginning of the specified section (IN point).
6.
When selecting [TRANS] or [V.BRAKE], change the beat parameter.
7.
Turn on/off the active censor mode.

PERFORMANCE mode
117
[MEMORY CUE] mode
For details on how to operate, see “To save a cue point” (page 138) or “To save the
loop” (page 140).
1.
Change the color of the Cue marker.
2.
Display the saved cue or loop.
Left-click the time to jump to the point. Playback pauses.
Right-click the time to enter a comment.
3.
Shows when a loop point is saved. (MEMORY LOOP)
Click it to set to an active loop. Its color then changes to red.
4.
Save a cue or loop.
5.
Point at the pad with the mouse cursor, and then click [X] to delete the saved
Cue or loop.

PERFORMANCE mode
118
|
[GRID/PHRASE EDIT] panel
Click to switch to the [GRID/PHRASE EDIT] panel if the performance pad is
displayed.
1.
Set the nearest grid position to [1.1Bars].
2.
Shift the playback position (a red vertical line at the center of the waveform) to
the first beat of bar. (page 136)
3.
Move the beat grid to the left by 1 msec / 3 msec.
4.
Move the beat grid to the right by 1 msec / 3 msec.
5.
Undo your last action in the [GRID EDIT] panel.
6.
Redo the action which you undid in the [GRID EDIT] panel.
7.
Display and change the Auto Gain value detected by track analysis. (Auto Gain)
When the [Preferences] window > [Controller] tab > [Mixer] tab > [Auto Gain] is
set to [Enable], this value is displayed.
8.
Start or pause playback.
9.
Display the distance of beat grid at the playback position (a red vertical line at
the center of the waveform) as BPM. You can also enter BPM manually to
change the distance of beat grid.
10.
Change the beat grid according to BPM determined by the click interval of [TAP].
11.
Narrow the beat grid distance by 1 msec / 3 msec when is turned on.
12.
Double/halve the BPM. The length of each beat grid distance is halved/doubled.

PERFORMANCE mode
119
13.
Select the whole track as an adjustment range of the beat grid.
When switching to the [GRID EDIT] panel, the whole track is already selected
and this button is not available. The adjustment range is changed to the whole
track when is turned on and the range is set to the current position or later.
14.
Re-set the beat grid from the current position (a red vertical line at the center of
the waveform) according to the BPM determined.
15.
Widen the beat grid distance by 1 msec / 3 msec when is turned on.
16.
Turn the metronome sound on/off and change its volume to one of three levels.
Metronome sound starts with the playback track, synchronized with the beat
grid.
17.
Enable/Disable Track Analysis, Key Analysis, and Beatgrid Adjustment.
(page 135)
If you set it to disable, is displayed on the track list.
18.
Edit each phrase which is displayed in the track information panel by loading the
track analyzed with [Phrase].
• After you click [CUT] to light up, click on the phrase to be divided.
• To change the phrase type, click .
• To delete all phrases, click [CLEAR].
• To adjust the position of the phrase, click the phrase and drag the divided
position (white line).
• To display the [PHRASE EDIT] panel, open the [Preferences] window > [View]
tab > [Layout], and select [Phrase (Full Waveform)] (page 187). For details
about [PHRASE EDIT] panel, refer to “PHRASE EDIT operation guide” on the
rekordbox website.
|
Effect panel
Click in the global section (page 106). The following screens are about [BEAT
FX]. For details on how to operate, see “Using effect features” (page 159).
• Single mode: Apply one effect.
8
10
9
11
12
1 23 5467
12
11
13

PERFORMANCE mode
120
• Multiple mode: Apply multiple effects at the same time.
1.
Select a deck to be applied with an effect.
• [1] through [4]: Apply the effect to decks 1 through 4.
• [S]: Apply the effect to the sampler.
• [M]: Apply the effect to MASTER OUT.
2.
Switch between the single mode and multiple mode.
3.
Turn on/off the effect.
4.
Select an effect.
5.
Save multiple parameter settings that are adjusted in the single mode.
You can call the saved parameter settings when you select the effect.
The position of FX LEVEL/DEPTH is not saved.
6.
Turn on/off the RELEASE FX.
7.
Select a RELEASE FX.
8.
Set BPM.
9.
Adjust the volume balance between the original sound and the sound with
effects. (FX LEVEL/DEPTH)
10.
Change the number of beats of the effect.
11.
Adjust the parameter for each effect.
12.
Change the effect level.
13.
Change the number of beats of the RELEASE FX.
1 2 3 4 4 43 3 67 8
9 9
10
9
13
10 10

PERFORMANCE mode
121
|
Sampler deck
Click in the global section (page 106).
For details on operation, see “Using the sampler deck” (page 168).
1.
Play the sampler.
To stop playback, click this with pressing the [Shift] key on the computer
keyboard.
2.
Output the sampler deck to your headphones.
3.
Adjust the volume of the whole sampler deck.
4.
Adjust the output level of the whole sampler deck.
5.
Sets of samplers are saved in four banks. (Sampler bank)
6.
Select an output channel for the sampler deck during the external mixer mode.
7.
Set the quantize to on / off. (Sampler quantize)
8.
Set SYNC to the sampler deck.
9.
Set the sampler deck as the master in the sync mode.
10.
Switch between the sampler and OSC sampler.
11.
Adjust BPM for playback of the sampler.
Click [-]/[+] to change the BPM.

PERFORMANCE mode
122
Sequencer panel
When displaying the sampler deck, the sequencer panel is also displayed.
For details on operation, see “Using a sequencer” (page 173).
1.
Record the sampler sequence.
2.
Play the sampler sequence.
3.
Save the recorded sampler sequence.
4.
Indicate how the sequence is saved. (Sequence slot)
A sequence name in white indicates that the sequence is saved. A grayed out
sequence name indicates that the sequence is not saved. A grayed out
sequence name with a red circle indicates that the sequence is temporarily
recorded.
Up to eight sequences can be saved.
5.
Change the sequence length.
6.
Indicates sequence length and beats. (Beat Counter)
During recording or playback of a sequence, a marker moves to indicate the
playback position.
7.
Mute the sampler sequence per sampler slot. ([Sequence MUTE mode])
8.
Delete the sampler sequence per sampler slot. ([Sequence ERASE mode])
9.
Turn the metronome sound on/off.
Metronome sound starts with the playback track, synchronized with the beat
grid.
10.
Change the metronome volume to one of three levels.

PERFORMANCE mode
123
|
Mixer panel
Click in the global section (page 106).
For details on operation, see “Using the mixer function” (page 149).
1.
The sound of the respective channels before passing through the channel
faders is indicated. (Channel level indicator)
2.
Adjust the audio input level for each channel.
Click to change the controller.
3.
Adjust the volume of each frequency band.
Click to change the value to [0].
4.
Monitor the clicked channel through your headphones.
5.
Adjusts the audio level for each channel. (Channel fader)
The audio is output according to the characteristics of the curve selected on the
[Preferences] window > [Controller] tab > [Mixer] tab > [CROSSFADER Curve].
6.
Adjust the monitor volume of the channel for which the [CUE] button is clicked,
and the sound of the [MASTER] channel.
7.
Adjust the volume level of the headphones.
8.
Assign the channel output to either the left or right of the crossfader. (Crossfader
assign)
9.
Audio is output from the crossfader according to the characteristics of the curve
selected on the [Preferences] window > [Controller] tab > [Mixer] tab > [Cross
Fader Curve]. (Crossfader)
6 987 8

PERFORMANCE mode
124
|
Recording panel
Click in the global section (page 106).
Depending on your subscription plan and DJ equipment connected to your
computer, this function may not be available.
For details on operation, see “Recording” (page 155).
1.
Select a recording source.
2.
Adjust the recording level.
3.
The recording level is indicated.
4.
Start/Stop recording.
5.
The [KUVO Live Playlist] window is displayed. (page 156)
6.
The recording elapsed time and remaining time for continuous recording are
displayed.

PERFORMANCE mode
125
|
Enlarged waveform panel
When selecting [2Deck Horizontal] in the global section.
1.
Change a zoom range of the enlarged waveform.
• : Hide the icons.
• [RST]: Reset the zoom range.
2.
When a memory cue or Hot Cue is set, a marker at each point is displayed.
3.
The current playback position and beats to the memory cue are displayed. (Beat
count)
Open the [Preferences] window > [View] tab > [Beat Count Display], and select
[Current Position (Bars)], [Count to the next MEMORY CUE (Bars)], or [Count to
the next MEMORY CUE (Beats)].
4.
Set two tracks in Players 1 and 2 as a good match combination.
5.
Extract a section of a track. (CAPTURE) (page 180)
See “Browser panel” (page 63)of “EXPORT mode”.
Split screen
Click at the bottom right of the screen. Another browser panel is displayed.
More tracks can be displayed in the list, which helps with your DJ performance.
• Click at the bottom right of the screen to switch the active window.
• Select a track in the split screen, and click a deck at the top of the screen. The
track then is loaded to the deck.
Browser panel

PERFORMANCE mode
126
Preparing for DJ performance
Use rekordbox to prepare for your DJ performance.
1 Add tracks to [Collection] of rekordbox and analyze them.
Analyze and measure the beat, tempo (BPM), and phrase of tracks.
• “Adding a track” (page 13)
2 Prepare a track list (playlists) for your DJ performance.
• “Using a Playlist” (page 34)
3 Set point information (for cue, loop, Hot Cue).
• “Using cue points” (page 137)
• “Starting loop play” (page 139)
• “Using a Hot Cue” (page 141)
4 Play the DJ equipment.
Enjoy your DJ performance on Pioneer DJ equipment using point information
and playlists prepared on rekordbox.
Performance history on Pioneer DJ equipment, such as the number of times
played and cue/loop point information, is saved and can be copied to
rekordbox.
• “Using with DJ equipment” (page 127)
5 Play with an Automix playlist.
Enjoy an Automix playlist with selecting a playlist.

PERFORMANCE mode
127
Using with DJ equipment
Connect the computer to the DJ equipment (DJ controller or DJ player) with a USB
cable to control rekordbox on the DJ equipment. Refer to the Instruction Manual of
connecting DJ equipment.
Be sure to read “Safety Precautions” and “Connections” in the Instruction Manual
for the Pioneer DJ equipment before connecting the equipment to your computer.
The latest information on Pioneer DJ equipment supporting rekordbox is available
on the rekordbox website and pioneerdj.com.
Note
• When a DJ player is connected via LAN with PRO DJ LINK, use EXPORT mode. For more
details, see “Using the LAN connection” (page 93).
• You may be unable to properly operate the device depending on the USB connection status.
This could be due to the bandwidth of the USB port and the USB hub on your computer.
Changing the USB hub or port may solve the problem.
• For details, refer to the Instruction Manual for the DJ equipment.
pioneerdj.com/en/support/documents/

PERFORMANCE mode
128
Standard connection with a DJ controller
Controlling four decks by adding DJ players
Using rekordbox with a DJ controller

PERFORMANCE mode
129
For information on the connection for each piece of DJ equipment, refer to
“Connection Guide for PERFORMANCE mode (CDJ/XDJ/DJM)” on the rekordbox
website.
Operating rekordbox with DJ players
Note
• A DJ mixer must be connected to the DJ players via audio cables.
Using rekordbox with DJ players

PERFORMANCE mode
130
Standard connection of a computer, 4 DJ players, and a DJ mixer
Note
• You do not have to connect the DJ players to a DJ mixer via audio cables.
Even when there is no direct connection between DJ equipment via cables, BPM
can be synchronized with the supported equipment and applications on the same
local network. This allows you to make compositions and music sessions easily. You
can also use the MIDI LEARN function. For details on the MIDI LEARN function, see
the “MIDI LEARN Operating Guide” on the rekordbox website.
Click [LINK] in the global section to enable Ableton Link.
To sync the BPM of Ableton link to the track loaded on the deck, turn on [LINK] in
the track information panel.
Click [Preferences] > [Controller] tab > [Deck] tab > [Ableton Link], and then click the
[Show Ableton Link screen when synchronization starts.] checkbox. The following
display will be shown when [LINK] in the global section is on. You can also display
the following screen by right-clicking on [LINK] in the global section and selecting
[Show Ableton Link window].
Using Ableton Link

PERFORMANCE mode
131
1.
The number of connected equipment and computers installed with applications
2.
Current BPM
To change the beat, drag up and down, or double-click the number.
3.
Beat position
4.
Change BPM.
Hint
• To disable Ableton link, click [LINK] in the global section again.
• While using Ableton Link, [BEAT SYNC] in the track information panel and [MASTER] on the
sampler deck will be changed to [LINK].
• Click [Preferences] > [Controller] tab > [Deck] tab > [Ableton Link], and click the [Enable start/
stop synchronization] chekbox to start/stop connected equipment at the same time.
Note
• Ableton Link cannot be enabled during Automix.
• For decks set to [RELATIVE] or [ABSOLUTE] for the DVS mode, Ableton Link cannot be
enabled.
2
4
1
3

PERFORMANCE mode
132
Playing tracks
Use the player panel to play tracks.
Hint
• For the JOG panel, see “JOG panel” (page 108).
• For the browser panel, see “Browser panel” (page 125).
1 Drag and drop a track to a deck of the player panel from the track list of the
browser panel.
2 Click in the JOG panel of the deck.
Playback starts.
|
To adjust the playback speed (tempo control)
The tempo increases when you click [+] and decreases when you click [-] on the
platter during playback.
Hint
• The changed rate (%) is indicated on the platter.
• Double-click the rate (%) to reset the tempo. (tempo reset)
Note
• When [-100%] is set, playback stops.
|
To change the range of the playback speed
Click [Tempo Range] in the platter to change the playback speed by 0.02% at
[±6] / 0.04% at [±10] and [±16] / 0.5% at [WIDE].
|
To adjust playback speed without changing the pitch (Master
Tempo)
Click [MT] on the platter which is being played. The [MT] lights up in red. The pitch
of the track does not change even when you change the playback speed with [+]/
[-] on the platter.
Note
• The sound quality may change because the sound is digitally reprocessed.

PERFORMANCE mode
133
|
To listen to tracks easily using the browser panel
See “To listen to tracks easily using the browser panel” (page 71) in “EXPORT
mode”.
1 Drag and drop a track from the track list of the browser panel to the player
panel.
2 Click in the JOG panel.
Playback starts.
• The BPM display shows the tempo measured when the track is added.
• The enlarged waveform display shows the beat grid as a white line which is
generated when the track is added (beat grid).
• On the enlarged waveform display, the beats are indicated on the beat grid
as a red line every four beats, from the start to the end of the track.
Hint
• [?] may appear for tracks analyzed by older versions of rekordbox. This means information of
the track is insufficient or old. Right-click the track, and then select [Add New Analysis Data] to
update the information. [?] then disappears.
Checking the beat (beat grid)

PERFORMANCE mode
134
|
To adjust the beat grid
The enlarged waveform displays the beat grid with white lines. The beat grid can be
adjusted by the following procedure.
1 Click in the JOG panel during playback.
Playback pauses.
2 Drag the enlarged waveform display to the left or right.
Adjust the beat to match the vertical white line at the center of the enlarged
waveform display.
3 Click to display the [GRID EDIT] panel.
The beat grids changed are shown as blue lines instead of white, and can be
edited.
4 Click .
The entire beat grid is slid based on the white vertical line which is placed on
the center of the enlarged waveform. The center beat is changed to the
beginning of a bar, and is displayed as a red line.
To slide the beat grid beyond a specific point, click . Beat grid points, passing
through the white center vertical line, are locked, and only beat grid points,
coming to the white center vertical line, are slid.
Hint
• For icons displayed in the [GRID EDIT] panel, see “[GRID/PHRASE EDIT] panel” (page 118).
Re-analyzing tracks to detect beat positions and BPM
See “Re-analyzing tracks to detect beat positions and BPM” (page 75) of “EXPORT
mode”.

PERFORMANCE mode
135
You can set a track to ignore re-analysis and editing of the beat grid. It prevents grid-
adjusted tracks from being mistakenly overwritten.
In the Analysis Lock mode, the following operations are not active.
• Track Analysis (BPM/Grid, key, and phrase)
• Grid editing operations in the [GRID EDIT] panel
When tracks (including tracks with the Analysis Lock mode) are selected to be
analyzed in a track list, analysis is skipped on tracks with the Analysis Lock mode.
1 Click to display the [GRID EDIT] panel (page 118) if the performance pad is
displayed on the deck where the track to be analysis locked is loaded.
2 Click .
is changed to and the Analysis Lock is turned on.
Hint
• Right-click the track in the track list, and then set [Analysis lock] to [On]. When [Analysis lock] is
set, is shown on the status column.
• You can also set [Analysis Lock] from the [Track] menu on the upper screen.
|
To turn off Analysis Lock
Click to change to . The Analysis Lock is turned off.
Setting the Analysis Lock

PERFORMANCE mode
136
When setting cues and loops in the player panel, the cue and loop points can easily
be set on beat. The quantize can be set independently on decks.
1 Click [Q] in the JOG panel for each deck.
[Q] lights up in red.
2 Set the cue or loop points.
For instructions on setting, see “Using cue points” (page 137) and “Starting loop
play” (page 139).
Hint
• When the beat setting of the quantize is set to a fraction (1/16, 1/8, 1/4, 1/2), [BEAT SYNC] of
tracks is disabled.
• When the fraction loop (1/32 to 1/2) is set, [BEAT SYNC] of tracks is disabled.
• To set the quantize for the sampler deck, click [Q] on the sampler deck. [Q] lights up in red.
• When turning on [BEAT SYNC] (page 144) and the quantize, you can keep the rhythm with the
beat position synchronized even when you play Hot Cues and loop.
• When turning on the quantize, you can set the quantize on all decks to be turned on
automatically. Open the [Preferences] window > [Controller] tab > [Others] tab > [Setting], and
select [All Decks].
See “Selecting a track for analyzing” (page 77) of “EXPORT mode”.
Using beat grids (quantize)
Selecting a track for analyzing

PERFORMANCE mode
137
A cue point can be set for each player deck.
1 During playback, click in the JOG panel.
Playback pauses.
2 Click [CUE] in the JOG panel.
The paused position is set as the cue point, and the cue mark (in orange) is
shown on the enlarged waveform display.
3 Click .
Playback starts from the cue point.
Hint
• When a new cue point is set, any previous cue point is deleted.
• When a different track is loaded, the previous cue point is canceled.
• You can save cue points as memory cues or Hot Cues.
Note
• When the quantize is turned on, the cue point may be set at a slightly different position from the
point you manually set. For details, see “Using beat grids (quantize)” (page 136).
• The headphones cue is a different function from cue point function. For details, see “Using the
microphone feature” (page 151).
|
To return to the cue point (Back Cue)
During playback, click [CUE] to return the playback position to the cue point
immediately. Playback pauses.
To resume playback from the cue point, click .
|
To check a cue point (Cue Point Sampler)
After returning to the cue point, click and hold (holding the left click button of the
mouse) [CUE] to start playback from the cue point.
Playback continues while holding [CUE]. When released, playback returns to the
cue point, and pauses.
Using cue points

PERFORMANCE mode
138
|
To set a cue point during playback (Real-Time Cue)
During playback, click [IN] in the JOG panel at the point to be set as a cue point.
Hint
• When the quantize is turned on, click [IN] to set the cue point to the nearest beat grid. (page 136)
• For the JOG panel, see “JOG panel” (page 108).
|
To save a cue point
After setting a cue point, select [MEMORY CUE] on the performance pad, and click
[MEMORY] in the [MEMORY CUE] panel to save the cue point. 10 cue points can
be saved for a track.
Hint
• You can use the saved cue points for your DJ performance on the DJ player.
• For the [MEMORY CUE] panel, see “[MEMORY CUE] mode” (page 117).
Using saved cue points
1 Load the track with the saved cue point to the player panel.
2 Select [MEMORY CUE] on the performance pad.
The cue point time (minute/second/millisecond) is shown in the [MEMORY
CUE] panel.
3 Select a cue point to be used.
The playback position jumps to the cue point, and pauses.
4 Click .
Playback starts.

PERFORMANCE mode
139
You can start a loop in two ways. For the manual loop, set its start position and end
position. For the auto beat loop, set its start position and the length of the loop in
number of beats.
Note
• When a supported DJ controller is connected, you cannot operate the loop play on rekordbox.
In this case, operate the loop play on the DJ controller.
|
To set the auto beat loop
1 Use the scroll bar in the JOG panel to display as following.
2 Click [<]/[>] to select the length of loop (beat).
3 During playback, click the auto beat loop (beat count) in the JOG panel at the
point to start the auto loop. [AUTO LOOP] lights up.
The loop play starts.
4 To cancel the loop play, click the auto beat loop (beat count) again.
Starting loop play

PERFORMANCE mode
140
|
To set the manual loop
1 Use the scroll bar in the JOG panel to display as following.
2 During playback, click [IN] at the point to start loop playback (Loop In Point).
The cue point is also set.
3 During playback, click [OUT] at the point to end loop playback (Loop Out Point).
[IN] and [OUT] light up, and the loop playback starts from the Loop In Point.
[RELOOP] changes to [EXIT].
4 To cancel the loop play, click [EXIT].
During playback, click [RELOOP] to call the last setting loop to start the loop
play.
Hint
• When a loop point is set, the previous loop point is deleted.
• When a different track is loaded, the previous loop point is canceled. You can save loop points.
• When the quantize is turned on, set a loop point to be matched close to the beat grid on
playback.
|
To save the loop
During the loop play, select [MEMORY CUE] on the performance pad, and click
[MEMORY] in the [MEMORY CUE] panel to save the loop point. 10 loop points can
be saved for a track.
Hint
• You can use the saved loop points for your DJ performance on the DJ player.
• For the [MEMORY CUE] panel, see “[MEMORY CUE] mode” (page 117).

PERFORMANCE mode
141
Using saved loop points
1 Load the track with the saved loop point to the player panel.
2 Select [MEMORY CUE] on the performance pad.
The cue point time (minute/second/millisecond) is shown in the [MEMORY
CUE] panel.
3 Select a loop point to be used.
The playback position jumps to the loop point, and pauses.
4 Click .
Playback starts.
Setting a saved loop as the active loop
When a loop point is saved, (in orange) is displayed on the right side of loop
point of [MEMORY CUE] panel.
To set the loop as an active loop, click . The loop is set as an active loop, and
the icon is changed to (in red).
Hint
• For instructions on active loops, refer to the Instruction Manual for the DJ equipment.
When using a Hot Cue, you can start playback from the cue and loop points quickly.
You can choose up to 16 Hot Cues per track.
Hint
• For the JOG panel, see “JOG panel” (page 108).
• For the [HOT CUE] panel, see “[HOT CUE] mode” (page 110).
Using a Hot Cue

PERFORMANCE mode
142
|
To save a Hot Cue
1 Select [HOT CUE] on the performance pad.
The [HOT CUE] panel is displayed.
2 During playback, click [A] - [P] performance pads at the point to be set as a Hot
Cue.
The point is saved as a Hot Cue.
Hint
• When a Hot Cue point is clicked during a loop play, the currently playing loop point is stored as
a Hot Cue. (HOT CUE LOOP)
• When the quantize is turned on, set a Hot Cue. When you click the Hot Cue point, it is set to the
nearest beat grid. (page 136)
Note
• You cannot save a Hot Cue at a performance pad which has already had one saved.
|
To play a Hot Cue
1 Select [HOT CUE] on the performance pad.
The [HOT CUE] panel is displayed.
2 Click the performance pad with a saved Hot Cue.
Hint
• During the Hot Cue playback, you can cancel the loop play and adjust the length of the loop.
|
To delete a Hot Cue
1 Select [HOT CUE] on the performance pad.
The [HOT CUE] panel is displayed.
2 Click [X] on the performance pad with the saved Hot Cue to be deleted.
See “Checking the play histories” (page 86) in “EXPORT mode”.
Checking the play histories

PERFORMANCE mode
143
Even when you change the playback position, such as by scratching, playback
continues in the background.
When you finish your performance in the slip mode, the track resumes to play in the
foreground. You can perform without losing track rhythm and breaking the flow of
tracks.
• The slip mode can be set for each deck.
• While playback continues in the background, the red ring of the platter rotates.
The playback position of the background playback is displayed on the waveform
as a line.
The slip mode is corresponded with following features.
• Hot Cue: By holding a pad or holding a performance pad on the DJ controller,
playback starts from the registered Hot Cue position. (slip Hot Cue)
• Scratch (only if the JOG operation is available on the connected DJ equipment):
While you touch the top of the JOG on the DJ controller. (slip scratch)
• Pause: When you click after starting playback.
• Auto loop / manual loop: During a loop play. (slip auto loop / slip manual loop)
• Reverse playback: After turning on REVERSE on the DJ controller, playback is in
the opposite direction for 8 beats and the background playback continues. (slip
reverse)
1 Click [SLIP] in the JOG panel.
[SLIP] lights in red, and the slip mode is turned on.
2 Operate a feature.
When operating a feature, playback continues in the background.
3 Cancel operation of the feature.
Playback continues from the point which is being played in the background.
4 Click [SLIP] again, and then the slip mode is turned off.
Using the slip mode

PERFORMANCE mode
144
The BPM and beat positions of the track playing can automatically be in sync with
a track playing on the sync master deck.
Before using the beat sync function, you need to analyze music files to obtain beat
grid information. (page 133)
1 Click [MASTER] in the track information panel of the deck which you wish to
use as sync master.
2 Start playback of a track on the deck to be synchronized.
3 Click [BEAT SYNC] in the track information panel of the deck to be
synchronized.
The BPM and beat positions of the track playing is in sync with a track playing
on the sync master.
4 To cancel the beat sync function, click [BEAT SYNC] again.
Hint
• For the track information panel, see “Track information panel” (page 107).
• If you click [MASTER] on the other deck, the sync master is switched to the deck.
• To sync with sample audio source on the sampler deck, see “Using the sampler deck”
(page 168) and “SYNC sampler deck with other decks ” (page 172).
• When changing or unloading a track on the deck of the sync master the sync master is switched
to the other deck.
When you call up the instant double function on a DJ controller, a track on a deck is
loaded to another deck on which the LOAD button is pressed. At this time, the
playback status (the playback position, loop play, etc.) and the deck setting (pads,
slip mode, etc.) are copied, and playback starts.
How to call up the instant double function depends on the DJ controller (such as
pressing the LOAD button twice). Refer to the Instruction Manual of each DJ
controller.
Hint
• You can also load a track by dragging and dropping a title part of a track loaded on a deck to
another deck.
Using the beat sync function
Using the instant double function

PERFORMANCE mode
145
You can instantly jump backward or forward from the current playback position by a
predetermined number of beats.
Hint
• For the screen, see “[BEAT JUMP] mode” (page 113).
1 Select [BEAT JUMP] on the performance pad.
The [BEAT JUMP] panel is displayed.
2 Switch the display with a scroll bar.
3 Click a performance pad.
The playback position jumps in the direction designated by the selected
number of beats.
Select from [FINE] (= 5 ms), [1/8] beat, [1/4] beat, [1/2] beat, [1] beat, [2] beats,
[4] beats, [8] beats, [16] beats, [32] beats, [64] beats, and [128] beats.
rekordbox has a key shift function; key sync to automatically sync the key among
tracks on other decks, and semitone up/down to manually shift the key of a track.
Also, you can use two pad modes with the key shift function; [KEY SHIFT] mode and
[KEYBOARD] mode.
The key sync function enables you to shift the key of a track, and sync the key
among tracks loaded to a deck. This allows you to mix tracks with different keys
without any discordance.
The [KEYBOARD] mode on the pad mode enables you to shift the key of a track,
and start a playback from the selected Hot Cue point. This allows you to improvise
with any sound from tracks, like using a musical instrument keyboard. In the [KEY
SHIFT] mode you can specify a value for the key change.
Using the beat jump function
Using the key shift function

PERFORMANCE mode
146
|
To use [KEY SYNC]
You can shift the key of a track, and sync the key among tracks loaded to decks.
This allows you to mix tracks with different keys without any discordance.
Hint
• Before using [KEY SYNC], it needs to have already been analyzed. (page 14).
1 Click [KEY SYNC] in the track information panel of the deck of which the key is
used for synchronizing.
The key is automatically shifted to sync tracks on other decks.
2 Click [KEY SYNC] again to cancel the key sync.
After cancelling the key sync, the synced key remains.
To reset the key, click [KEY RESET].
|
To use [KEY SHIFT]
Using the [KEY SHIFT] mode on the pad mode, you can specify a value for the key
change. In addition, you can operate the key sync, semitone up/down, and key
reset.
1 Select [KEY SHIFT] on the performance pad.
Values for the key change ([-12] to [+12]), [KEY SYNC], [SEMITONE UP]/
[SEMITONE DOWN], and [KEY RESET] are displayed in the list or on the pad.
2 Click the pad.
The key on a deck you selected is shifted.

PERFORMANCE mode
147
|
To use [KEYBOARD]
Using the [KEYBOARD] mode on the pad mode, you can shift the key of a track, and
start a playback from the selected Hot Cue point. This allows you to improvise with
any sound from tracks, like using a musical instrument keyboard.
1 Select [KEYBOARD] on the performance pad.
2 Click on the performance pad.
The setting status of Hot Cues is displayed in the list or on the pad.
3 Select the Hot Cue of which you want to shift the key.
If no Hot Cue is set, click the pad or list to set it.
4 Click [-12] to [+12] on the pad.
The Hot Cue with the key shifted by the selected value starts playing back.
5 Click [KEY RESET] to reset the key.
Hint
• If you click , Hot Cues are displayed in the list, and you can select a Hot Cue of which you
want to shift the key.
PERFORMANCE mode
148
Select a playlist to be used as an Automix playlist.
1 Click .
The [Automix] window is displayed.
2 Drag & drop a playlist from the tree view into the [Automix] window.
Tracks in the playlist are added into the [Automix] window.
1.
Clear the display of tracks on the current Automix playlist from the [Automix]
window. You can also storage as a new playlist.
2.
Storage the Automix playlist displayed on the [Automix] window as a new
playlist.
3.
Set [Repeat playback], [Random playback], or the method to load to a deck
([Automix settings]).
3 Click .
The track of the Automix playlist is loaded onto the deck 1 or deck 2
automatically, and Automix starts.
4 To finish Automix, click again.
Automix stops, and the current playing track continues until the end of the track.
When unloading the loaded track, Automix also stops.
Using Automix playlists

PERFORMANCE mode
149
Click in the global section to display the mixer panel.
Hint
• For the mixer panel, see “Mixer panel” (page 123).
• When you connect your computer to a DJ controller, the mixer panel is automatically hidden.
|
To adjust the audio tone level
Turn the [HIGH], [MID], or [LOW] control in the mixer panel during playback.
|
To switch the function of [EQ/ISO (HI, MID, LOW)] controls
Open the [Preferences] window > [Controller] tab > [Mixer] tab > [EQ], and set [EQ/
ISOLATOR].
• [EQ]: Use as the equalizer mode.
• [ISOLATOR]: Use as the isolator mode.
When [EQ] is selected, set [EQ Type].
• [DJM-900NXS]: Set to the same EQ characteristics of DJM-900NXS.
• [DJM-900NXS2]: Set to the same EQ characteristics of DJM-900NXS2.
Hint
• When you click words of [HIGH]/[MID]/[LOW] to light up, the band is turned off. While they light
up, each controller is not activated.
Using the mixer function

PERFORMANCE mode
150
Use headphones to monitor audio.
Hint
• For the mixer panel and headphones panel, see “Mixer panel” (page 123).
1 Click in the global section.
2 Turn [MIX] in the headphones panel to the middle position.
The audio volume balance of [MASTER] (master volume) and [CUE]
(headphones volume) are the same on playback.
3 Turn [LEVEL] in the headphones panel all the way to the left.
The audio is not output.
4 Click [CUE] in the mixer panel which corresponds with the deck for monitoring.
[CUE] lights up and monitoring is available.
5 Adjust the volume with [LEVEL] in the headphones panel.
Monitoring audio

PERFORMANCE mode
151
When compatible DJ equipment is connected, open the microphone panel to use
the microphone feature.
For compatible DJ equipment, refer to FAQ on the rekordbox website
(rekordbox.com).
|
Microphone panel
Click in the global section to display the microphone panel. Depending on the
DJ equipment connected, the display may differ.
1.
Turn on/off the microphone.
2.
Display the microphone volume level.
3.
Turn on/off the microphone effect.
4.
Select a microphone effect.
5.
Adjust the microphone effect level.
6.
Turn on/off TALKOVER. (page 152)
7.
Turn on/off FEEDBACK REDUCER. (page 153)
8.
Select the FEEDBACK REDUCER type. (page 153)
Using the microphone feature

PERFORMANCE mode
152
|
To turn on MIC TALKOVER
When you change the microphone sound volume above the set value, the sound
from other channels attenuates automatically.
1 Open the [Preferences] window > [Controller] tab > [Mixer] tab > [Microphone
Input], and set [Talkover Mode] to [Advanced] or [Normal].
• [Advanced]: Only the mid-range sound of channels, other than the MIC
channel, is attenuated according to the set value of the talkover level.
• [Normal]: The sound of channels, other than the MIC channel, is attenuated
according to the set value of the talkover level.
2 Click [TALK OVER] in the microphone panel.
[TALK OVER] lights up and MIC TALKOVER is turned on.
Volume
Frequency
Volume
Frequency

PERFORMANCE mode
153
|
To reduce microphone Feedback (FEEDBACK REDUCER)
When microphone feedback occurs, the frequency is detected, and a filter is
inserted to cut only the detected frequency band. This reduces the howling sound
of the feedback with minimum effect on sound quality.
1 Click FEEDBACK REDUCER to turn it on.
When FEEDBACK REDUCER is turned on, it lights up.
2 Click to select a type.
• [LIGHT -FEEDBACK REDUCER]:
The cutting frequency band is narrow. Select this type when you want to
prioritize sound quality, such as for singing or rap performances.
• [HEAVY -FEEDBACK REDUCER]:
The cutting frequency band is wide. Select this type when you want to
prioritize feedback reduction, such as for speeches or MCing.

PERFORMANCE mode
154
At the global section or from [View] menu on the upper screen, you can customize
the screen according to your DJ performance style.
• You can change the number of decks, the horizontal / vertical display of enlarged
waveform, and size of browser.
• You can display the effect, sampler deck, mixer, recording, video, lyric, or
LIGHTING panel.
Using 2 decks on DJ performance
• Global section: Select [2Deck Horizontal] or [2Deck Vertical].
• [View] menu: Select [2Deck Horizontal] or [2Deck Vertical].
Using 4 decks on DJ performance
• Global section: Select [4Deck Horizontal] or [4Deck Vertical].
• [View] menu: Select [4Deck Horizontal] or [4Deck Vertical].
Hint
• When selecting [2Deck Horizontal] or [4Deck Horizontal], the enlarged waveform is displayed in
the full width of the layout screen. This makes it easy for mixing.
• When selecting [2Deck Vertical] or [4Deck Vertical], the enlarged waveform is displayed in the
full height of the layout screen. This makes it easy for scratching.
• Select [Browse] to enlarge the browser panel to make the selection easier.
• For the global section, see “Global section” (page 106).
Changing the screen layout

PERFORMANCE mode
155
Recording
You can record analog sound of your DJ performance or input through connected
hardware.
Recordings are created as WAV files.
Hint
• For the screen, see “Recording panel” (page 124).
Note
• Depending on your subscription plan or the DJ equipment connected to your computer, you may
not be able to record. For details on subscription plan, refer to the rekordbox website.
|
To start recording
1 Click in the global section.
The recording panel is displayed.
2 Select a recording source.
To record with the internal mixer mode, select [Master Out].
Depending on the recording sources and the connected hardware, settings of
the connected hardware may be necessary. For details, refer to the operating
instructions of the connected hardware.
3 Turn the recording level knob to adjust the recording level.
Start playback of some tracks on the connected hardware, check the recording
level indicator, and adjust the recording level accordingly.
• If the level is too low, recorded files will contain noise and the volume will be
low.
• If the level is too high, clipping will occur and the sound will be distorted.
The best recording quality can be obtained by increasing the maximum
recording level to the point where not all the indicators hit the red zone.
4 Click .
flashes and rekordbox is in the recording standby mode.
5 Play a track to be recorded on the connected hardware.
Recording starts when audio input is received. changes to , and the
elapsed time and remaining time for recording are shown.

PERFORMANCE mode
156
6 Click .
Recording stops.
When no sound continues more than 20 seconds, recording stops
automatically.
7 Enter information about the recorded file.
8 Click [OK].
The recorded file is saved on [Recordings] in the tree view of the browser panel.
Hint
• To avoid automatic start/stop recording, open the [Preferences] window > [Controller] tab >
[Recordings] tab > [Recording starts when:] and [Recording ends when:], and set to [Pressing
the REC button.]. Recording starts when you click , and recording stops when you click .
|
To record while publishing a playlist on KUVO
You can record while using the “Live Playlist” function which can publish the playing
playlist on KUVO at the same time.
Click [KUVO] in the recording panel, and then select [Start/Stop recording linked
with Live Playlist.]. When publishing starts by clicking [START], recording also
starts. When publishing stops by clicking [STOP], recording also stops.
For more information about KUVO, refer to the guide on the KUVO website.
https://kuvo.com
|
To upload the recoding file to social media
For Mixcloud and YouTube, you can upload recorded music files. For KUVO, you
can post the link of music files uploaded to Mixcloud and YouTube.
Before operating, check that your computer is connected to the internet.

PERFORMANCE mode
157
1 Display the recorded file, and select it.
2 Click .
The [Share Mix] window is displayed.
3 Click the checkbox of uploading application.
If not logged in, the login window is displayed.
• When Mixcloud or YouTube is selected, you can select KUVO.
4 Click [Replace image] to change the image.
5 Click [Share].
Uploading starts.
When uploading is completed, the uploaded URL and the editing window of
each social media are displayed.
• When selecting KUVO, Mixcloud, and YouTube, the link of music files
uploaded to Mixcloud is posted to KUVO.
6 Click [Close].
Uploaded recording file is displayed with the social media icon on the [Share]
column of the track list.
: Mixcloud
: YouTube
: KUVO

PERFORMANCE mode
158
Changing to another social media account
After step 3, change the account as follows.
• Mixcloud: Click > [Change your account] > [Go to mixcloud.com] to display the
Mixcloud website. Log out of the account, and then log in with another account as
described in step 3.
• YouTube: Click > [Change your account], and then log in another account.
Hint
• You can also display the [Share Mix] window as follows.
– Select a recorded file, right-click it, and then select [Share Mix].
– Select a recorded file, and then select [Share Mix] from the [File] menu on the upper screen.
• The recorded file is uploaded by converting the file format as follows.
– Bit depth: 16 bit
– Sampling frequency: 44.1 kHz
– Bit rate: 192 kbps
– File extension: .M4A (Mixcloud), .MP4 (YouTube)
Note
• For terms of use or operation methods on the website, refer to the website.
|
To operate for other recordings
See the following pages of “EXPORT mode”.
• “To separate the recorded file automatically” (page 102)
• “To display recorded files” (page 103)
• “Other settings for recordings” (page 103)

PERFORMANCE mode
159
Using effect features
There are three effect modes in rekordbox; BEAT FX, SOUND COLOR FX, and
RELEASE FX. The PAD FX feature enables you to operate these effects with the
pads.
Popular effects in our DJ mixer (DJM series, etc.) and remix station (RMX series,
etc.) are pre-installed in rekordbox, opening the door to a wide variety of DJ
performances.
For controlling effects using a DJ controller, refer to the Instruction Manual of each
DJ controller.
Hint
For the screen, see “Effect panel” (page 119).
Note
• Depending on your subscription plan and DJ equipment connected to your computer, this
function may not be available. For details on subscription plan, refer to the rekordbox website.
Click in the global section to display or hide the effect panel.
To switch an effect panel, open the [Preferences] window > [View] tab > [Layout],
and set [Effect Panel] in advance.
When using BEAT FX and RELEASE FX, select decks on which to apply effects in
the effect panel.
• Decks 1 to 4: Click [1] to [4].
• Sampler deck: Click [S].
• Master out: Click [M]. When the master out is selected for effects, you cannot
assign effects to any other deck or the sampler deck. If you assign effects to the
master out when any of decks 1 to 4 or sampler deck have effects already
assigned, those assignments are disabled.
Displaying the effect panel
Selecting decks for the effects

PERFORMANCE mode
160
Hint
• For the sampler deck, see “Sampler deck” (page 121).
You can use various effects to match the tempo (BPM) of a track loaded to the deck.
Furthermore, you can control two effect units, [FX1] and [FX2], allowing you to
assign a deck for each unit.
BEAT FX has two effect modes.
• “To use Beat FX multi-mode” (page 160)
• “To use Beat FX single-mode” (page 161)
|
To use Beat FX multi-mode
You can use up to three effects at the same time for each effect unit. Before using
this mode, select the deck on which to apply the effects.
1.
Switch to Beat FX multi-mode.
2.
Turn on effects.
3.
Select an effect.
4.
Adjust the balance of the original sound and effect sound. (FX LEVEL/DEPTH)
For example, when you select [ECHO], you can use the knob to coordinate how
much echo is mixed on the original track.
The original sound is output when the knob is turned fully counterclockwise.
The sound with the effect is output when the knob is turned fully clockwise.
5.
Select the number of beats to apply to effects in sync with the BPM.
Hint
• For some effects, including [REVERB], a parameter value is set instead of beats.
• If you select a beat-based effect and a parameter-based effect, and turn them on at the same
time, both the beat and parameter values are displayed.
Using BEAT FX
PERFORMANCE mode
161
|
To use Beat FX single-mode
You can select one effect per effect unit. Before using this mode, select a deck on
which to apply the effect.
1.
Switch to Beat FX single-mode.
2.
Turn on the effect.
3.
Select an effect.
4.
Save multiple parameter settings that are adjusted in the single-mode.
(SNAPSHOT)
You can call the saved parameter settings when you select the effect.
The position of FX LEVEL/DEPTH is not saved.
5.
Adjust the balance of the original sound and effect sound. (FX LEVEL/DEPTH)
For example, when you select [ECHO], you can use the knob to coordinate how
much echo is mixed on the original track.
The original sound is output when the knob is turned fully counterclockwise.
The sound with the effect is output when the knob is turned fully clockwise.
6.
Select the number of beats to apply effects in sync with the BPM.
For some effects, a parameter value is set instead of beats, or these buttons are
not enabled.
7.
Adjust the effect level.
The parameter differs for each effect.
8.
Click to light up in blue, and you can change the effect level.
The parameter differs for each effect.
23 4
6 87
5 87
1

PERFORMANCE mode
162
|
To set the BPM of effects
There are two modes for setting BPM; [AUTO] and [TAP]. Click [TAP] or [AUTO] to
select the mode. The [AUTO] mode is set by default.
• [AUTO] mode: The BPM of a track loaded to a deck is the benchmark BPM for the
effect. You can apply the effect in sync with the BPM of the track for each deck.
• [TAP] mode: Click [TAP] several times in rhythm to set the BPM as the base value
for the effect.
RELEASE FX is a function to apply effects, to cancel BEAT FX, and to enable
smooth transition of the currently playing track and the effect sound.
You can also set to turn off SOUND COLOR FX.
1 Click in RELEASE FX in the effect panel to select an effect.
2 Click / to select a beat.
Set the length of the RELEASE FX.
3 Click and hold the effect to be applied.
The effect name lights in blue while the effect is applied.
4 Release holding to turn off the effect.
The effect name is displayed in white at the same time.
Using RELEASE FX

PERFORMANCE mode
163
SOUND COLOR FX enables you to change the intensity of various effects
according to the position of its [COLOR] knob. You can easily arrange tracks by
selecting an effect and turning the knobs.
SOUND COLOR FX has two effect modes.
• “To use SOUND COLOR FX single-mode” (page 163)
• “To use SOUND COLOR FX multi-mode” (page 164)
Hint
• The number of knobs displayed on the screen depends on the connected DJ products.
• If no DJ product is connected, [COLOR] knobs and parameter knobs for [CH 1] to [CH 4] are
displayed.
|
To use SOUND COLOR FX single-mode
[DEFAULT] mode
SOUND COLOR FX on the connected DJ controller is displayed.
When connecting the DDJ-RZX, the screen displays as follows.
1.
Switch to the single-mode.
2.
Switch to the [DEFAULT] mode.
3.
Turn on an effect.
• Effects on the connected DJ controller are displayed.
• [FILTER] is displayed when a DJ controller is not connected.
4.
Adjust the effect level.
5.
The effect is applied to the channel of which you turned the knob.
If the knob is in the center position, the effect is not applied.
The effect level differs according to the clockwise or counterclockwise turn of the
knob.
Using SOUND COLOR FX

PERFORMANCE mode
164
[USER] mode
You can select favorite effects from 9 types of effect and save them.
1.
Switch to the single-mode.
2.
Switch to the [USER] mode.
3.
Turn on/off the effect.
The same effect is applied to [CH1] to [CH4].
4.
Select an effect.
5.
Adjust the effect level.
6.
The effect is applied to the channel of which you turned the knob.
If the knob is in the center position, the effect is not applied.
The effect level differs according to the clockwise or counterclockwise turn of the
knob.
|
To use SOUND COLOR FX multi-mode
You can apply a different effect to each channel. For example, you can apply [DUB
ECHO] to a rhythm track and mix it with a cappella [FILTER]. You can apply [NOISE]
to a specific channel.
1.
Switch to the multi-mode.
2.
Adjust the effect level.
3.
Turn on/off the effect.
4.
Select an effect.
5.
The effect is applied to the channel of which you turned the knob.
If the knob is in the center position, the effect is not applied.
The effect level differs according to the clockwise or counterclockwise turn of the
knob.
1 2 3 3 34 5 4 4 435 5 5

PERFORMANCE mode
165
|
To turn off both RELEASE FX and SOUND COLOR FX
Open the [Preferences] window > [Controller] tab > [Effect] tab > [RELEASE FX],
and select [Apply RELEASE FX on CFX]. You can then turn off RELEASE FX and
SOUND COLOR FX at the same time.
PAD FX enables a wide range of performance effects just by clicking and releasing
a performance pad.
For the screen, see “[PAD FX] mode” (page 111).
1 Select [PAD FX] on the performance pad.
Preset effects for each pad are displayed.
2 Select a bank on the bank button [1] and [2].
PAD FX has 2 banks, and 16 preset effects can be set to each bank.
Hint
• Preset effects can be replaced with other effects.
|
To use PAD FX (operation with a mouse)
1 Click and hold the pad to light it up.
The effect is applied while lit.
2 Release the click to turn the light off.
Note
• When using a mouse, you can control only some of the operations.
Using PAD FX

PERFORMANCE mode
166
|
To use PAD FX (operation with a DJ controller)
1 Press and hold a performance pad of the DJ controller to light it up.
The effect is applied while lit.
2 Release pressing the performance pad to turn the light off.
Hint
• When you press more than one performance pad (different effects), all the effects are turned on
at the same time.
• If an effect has different beats, only the last performance pad you pressed turns on.
To use Release FX in PAD FX
1 Press and hold a performance pad of a DJ controller of which Release FX is
not set, to light it up.
The effect is applied while lit.
2 Press the performance pad which is set with Release FX.
Other effects in PAD FX are turned off.
3 Release pressing the performance pad to turn the light off.
The sound returns to the original sound.
To change beats temporarily by PAD FX
You can temporarily change the beats while pressing a performance pad.
1 Press and hold the performance pad which is set with the required effect, to
light it up.
2 Press [<]/[>] while pressing the performance pad.
The beats of PAD FX changes according to the button.

PERFORMANCE mode
167
|
To use the edit mode of PAD FX
You can customize the type of effect, beats, and parameter for each bank.
1 Click on the performance pad to switch to the edit mode.
lights up in blue.
2 Click the effect to be selected.
3 Click to select the beats and parameter values.
You can input parameter values with the computer keyboard.
For RELEASE FX, you can set [HOLD ON/OFF].
• [ON]: Click the performance pad to turn on/off the effect.
• [OFF]: Click and hold the performance pad to turn on, and release the click to
turn off.
4 Click to exit the edit mode.
lights off.

PERFORMANCE mode
168
Using the sampler deck
rekordbox has a sampler deck which can play 16 (20 including OSC samplers)
audio tracks at the same time. In this manual, each player is called “sampler slot”
(or “slot”).
You can use the sample audio in various ways, from the basic Oneshot mode to the
SYNC mode, with a track on the deck.
Hint
• For the screen, see “Sampler deck” (page 121).
• You can extract a section of a track on the deck and load it to a sampler slot with the CAPTURE
function. For the operation of CAPTURE, see “Extracting a section from a track (CAPTURE)”
(page 180).
• You can also use sampler audio files. For details on downloading, see “Download and install
sample pack” of “rekordbox Introduction” on the rekordbox website.
|
To load sample audio to a sampler slot
1 Click in the global section.
A sampler deck is displayed.
2 Click [BANK] to switch a bank.
The sampler deck has four banks, each of which has 16 slots.
3 Drag and drop a track from a track list to a sampler slot.
The play mode is set to [Oneshot].
The track is stored after quitting/exiting rekordbox.
Deleting a track from a sampler slot (Unload)
Position the mouse cursor to the track’s title and click . The track loaded to the
sampler slot is deleted.
|
To play a sampler slot
Click ([Play mode (Oneshot)] or ([Play mode (Loop)]) to light it up and start
playing.
• While holding the [Shift] key on the computer keyboard, click or to stop
playing.
• If you position the mouse cursor to the track’s title and click , the audio is
muted.

PERFORMANCE mode
169
|
To play a sampler slot while switching banks
If you click [BANK] to switch banks while playing a sampler slot, the playback does
not stop. However, when you play a sampler slot in the same slot position of the
previous bank, that sampler slot stops and the sampler slot in the currently
displayed bank starts.
The following displays an example of this:
1 Click or .
Playback of a sampler slot starts.
2 Click [BANK] to switch banks.
When a sampler slot is played in another bank, the level meter (gray) is running.
It displays the status of a sampler slot playing in the background.
3 Click or .
When playing the sampler slot in the current bank, the playback of the sampler
slot of the previous bank is stopped.
|
To use Quantize
Click [Q] (Quantize) on the sampler deck to light it up and turn on Quantize.
For setting the Quantize beat, open the [Preferences] window > [Controller] tab >
[Others] tab > [Type] > [QUANTIZE], set [LOOP SAMPLER(LOOP)] to [Enable], and
then select the value.
Note
• The Quantize function is only enabled in sampler slots which are set to [Play mode (Loop)].

PERFORMANCE mode
170
|
To adjust the volume of the sampler deck
1 Turn [GAIN] in the sampler deck.
Adjust the volume of the entire sampler deck.
When mixing, the volume level can be adjusted if the volumes of the sampler
deck and other decks differ.
2 Click in the global section.
The mixer panel is displayed.
When both the sampler deck and mixer panel are already displayed, the
sampler volume slider and sampler monitor [CUE] are displayed.
3 Move the sampler volume slider.
Adjust the volume of the entire sampler deck.
Hint
• Before outputting to MASTER OUT, set the sampler volume slider to the minimum, click the
sample monitor [CUE] to turn on, and then check the volume level with headphones.
|
To customize the color setting of sampler slots
You can customize colors of playback buttons for tracks loaded to each sampler
slot.
1 Open the [Preferences] window > [View] tab > [Color] > [SAMPLER], and set
[Sync with Frequency].
The color of playback buttons changes in sync with the frequency color of a
track.
Hint
• You can select the color by right-clicking or .

PERFORMANCE mode
171
For each sampler slot, you can switch the play mode, adjust volume, etc.
Each setting is saved.
Position the mouse cursor to the track's title in the sampler slot and click the [EDIT]
button. The button will light up and enable edit mode.
1.
Switch the play mode.
• [Play mode (Oneshot)]: Play the audio file till the end, and then stop it.
During playback, you can click to restart playback from the beginning of the
audio file.
• [Play mode (Loop)]: Start the loop play. During playback, you can click to
start the loop playback from the beginning.
The play mode can be switched by right-clicking the track in the track list and
selecting [Track Type].
2.
The playback continues only when you click and hold or . When
released, the playback pauses. ([Gate mode])
3.
The loop play starts without the altering pitch even when the track is played in a
tempo different from the original tempo (BPM). (Master Tempo)
4.
The loop play starts in sync with the BPM of the sampler deck. (Slot SYNC)
5.
If the volume varies widely from the sampler slot, you can adjust it to level the
volume. (Slot Gain)
6.
Fine-tune playback position. ([Play mode (Oneshot)] only)
7.
Halve/double the BPM.
8.
Display the BPM value.
Editing the sampler slot (Edit mode)

PERFORMANCE mode
172
You can playback a sampler slot set in the [Play mode (Loop)] in sync with other
decks. To use the SYNC play with a sampler deck, you need to set a player deck as
the SYNC MASTER in advance. (page 144)
The following displays an example of this:
1 Position the mouse cursor to the track’s title in the sampler slot which you want
to sync, and click the [EDIT] button to enable edit mode.
2 Click and [SYNC] on the edit screen to light up.
3 Click [BPM SYNC] on the sampler deck to light up.
4 Click on the left of the title of the sampler slot.
Playback starts with the BPM of the track on the master deck.
The BPM value of MASTER for SYNC is displayed on the BPM of the sampler
deck.
Hint
• To adjust the BPM of the sampler deck, use [+]/[-] in the sampler deck to change the value. Click
the BPM display and enter the value to change the BPM. When you click [MASTER] on a
sampler deck, the deck is set as the sync master.
SYNC sampler deck with other decks

PERFORMANCE mode
173
Using a sequencer
rekordbox has a sequencer function which allows you to record, play, and store the
sequences you play at the sampler deck. Enjoy various DJ performances with this
sequencer. You can create original rhythm loops or vocal loops in advance to
overlap the playback track, use the overdubbing function to add samplers such as
improvised finger drums, or use the mute function to remove particular sounds.
Hint
• For the screen, see “Sequencer panel” (page 122).
|
To record the sequence (Overdub recording)
Note
• Depending on your subscription plan and DJ equipment connected to your computer, this
function may not be available. For details on subscription plan, refer to the rekordbox website.
1 Click in the global section.
The sampler deck is displayed.
2 Click the BPM display in the sampler deck and enter the BPM value.
3 Select [BANK] on the sampler slot you wish to play.
4 Click [1Bar] in the sequencer panel to select the length of sequence recording.
5 Click (Sequence Rec).
The button starts blinking and sequence recording turns to the standby mode.
6 Click in the sampler deck.
Overdub recording of the sequence starts.
7 Click (Sequence Rec) to stop recording.
8 Click [SAVE].
The sequence is saved.

PERFORMANCE mode
174
Hint
• During overdub recording, the sequence of the playback is recorded temporarily.
• The temporarily recorded sequence is displayed with a red circle in the sequence slot.
• Recording a sequence is only possible for sampler slots in [Play mode (Oneshot)].
• Once [Q] (Quantize) in the sampler deck is turned on, quantized sequencer panel is recorded
and played back. (page 169)
• You can also record the sequence by clicking the of the sequence in the standby mode.
• If you have not saved the temporarily recorded sequence, it is deleted when you restart
recording or when you quit/exit rekordbox.
• The name of the saved sequence is highlighted in the sequence slot.
• Up to 8 sequences can be saved.
|
To call a saved sequence for playback (Sequence playback)
1 Click [<]/[>] of the sequence slot in the sequencer panel to select the sequence.
2 Click
The sequence is played.
Hint
• The bank automatically switches to the bank of the sampler deck of the saved sequence.
• Click again to stop the sequence.
• Click (Sequence Rec) during the playback of the sequence to enable overdubbing.
• Sampler slots which play before being called are stopped.
|
To delete a saved sequence
Point the mouse cursor to the sequence slot, and then click [X] to delete the
sequence.

PERFORMANCE mode
175
|
To use [Sequence Mute mode]
[Sequence MUTE mode] enables/disables mute for each sampler slot during
playback of a sequence or overdub recording.
You can arrange the rhythm loop you made with the sequence recording by cutting/
adding a particular sound for each sound source, such as kick and snare.
1 Play a sequence.
2 Click [MUTE] in the sequencer panel to light it up.
3 Click of the sampler slot you wish to set to [Sequence Mute mode].
or in the sampler slot lights up in white.
4 Click [MUTE] again to cancel [Sequence Mute mode].
|
To use [Sequence Erase mode]
You can erase a sequence for a sampler slot during playback of a sequence or
overdub recording.
1 Play a sequence.
2 Click [ERASE] in the sequencer panel to light it up.
3 Click [X] of the sampler slot from which you wish to erase the sequence.
The sequence is erased.
4 Click [ERASE] again to cancel [Sequence Erase mode].
|
To use Metronome
1 Click to light it up in the sequencer panel.
The metronome sound starts.
2 Click to adjust the metronome volume.
The metronome volume can be adjusted to one of 3 levels.

PERFORMANCE mode
176
Drag and drop the display of a sequencer panel to a player panel deck. The
sequence is loaded to the deck with a track name of “PATTERN *(*)”.
Hint
• To start loop playback of the whole sequence after loading, open the [Preferences] window >
[Controller] tab > [Sampler] tab > [SEQUENCER] > [Sequence Load], and select [Load the
sequence and automatically play].
• The sequence track is created when the marker on the sequence beat counter reaches the right
edge. If the recorded sequence is not correctly loaded, play the sequence until the marker
reaches the right edge, and then drag and drop again.
You can call and play up to 8 sequences directly with pads.
1 Select [SEQ. CALL] on the performance pad.
The [SEQ. CALL] panel is displayed.
2 Click the pad.
The sequence is played.
Hint
• For the screen, see “[SEQ. CALL] (SEQUENCE CALL) mode” (page 115).
• Click the same pad again to start playback of the sequence from the beginning.
• When the pad is clicked while pressing a SHIFT key, the sequence playback pauses.
Loading a sequence to a deck (SEQUENCE
LOAD)
Calling a sequence with pads (SEQUENCE
CALL)

PERFORMANCE mode
177
Using a slicer
The specified range is divided into 8 sections, which are assigned to the respective
performance pads. If you click and hold a performance pad, the sound divided for
the section and assigned to that pad plays as a loop.
During the loop play of the pad, the normal playback with the original rhythm
continues in the background. When the pad is released and loop playback ends,
playback resumes from the position reached at that point.
Hint
• For the screen, see “[SLICER] mode” (page 112).
• The slicer function can be used with tracks for which beat grid is set. For setting beat grids, see
“Checking the beat (beat grid)” (page 133).
1 Load a track to a deck.
2 Shift the playback position to a point where you wish to set a slicer, and pause.
3 Select [SLICER] on the performance pad.
Click to switch to the slicer loop mode.
Use / to shift the start position.

PERFORMANCE mode
178
4 Click or to select the slicer range.
The range selected is divided equally into 8 sliced sections, which are assigned
to each pad as displayed below.
5 Click to in the JOG panel.
6 Click and hold the pad.
While the pad is held, the assigned section plays in a loop.
The length of the loop play differs according to the setting at the loop playback
length (ROLL).
The loop playback length (ROLL) can be set in the range from 1/64 to 1/8 of the
value of slicer range (LENGTH).
7 Release the click.
The track returns to the position that has been playing in the background.
8 Click / .
The range of the slicer is moved.
The change depends on the value of slicer range (LENGTH).
9 Select any function other than [SLICER] on the performance pad to cancel
slicer mode and slicer loop mode.
SLICER LENGTH
Sliced sections 1 through 8
Section 1 Section 2 Section 3 Section 4
Section 5 Section 6 Section 7 Section 8

PERFORMANCE mode
179
Slicer mode and slicer loop mode
• Slicer mode:
When the playback position reaches the end of a slicing range that has been
divided into 8 sections, the range displayed on the screen changes to the next
slicing range that is to be divided in 8 sections. These sliced sections are assigned
to the respective pads, replacing the previously assigned sections.
• Slicer loop mode:
When the playback position reaches the end of a slicing range, the playback
position returns to the beginning of the same range.

PERFORMANCE mode
180
Extracting a section from a track
(CAPTURE)
You can extract a section from the loop play and slicer, and use it as a sampler.
For the sampler, see “Using the sampler deck” (page 168).
|
To extract a section from loop playback (LOOP CAPTURE)
For the loop play, see “Starting loop play” (page 139).
1 Start the loop play from which you wish to extract a section.
2 Click [<] on the right side of the enlarged waveform, and then click .
The color of the loop range changes.
3 Drag and drop the loop range to the slot of the sampler deck.
The range is ready to be used as a sampler.
The sampler is stored at [Capture] in [Sampler] of [Collection].
Note
• When the [Preferences] window > [Controller] tab > [Sampler] tab > [SLOT] > [Do not overwrite
the loaded Slot] is selected, you cannot drag and drop to a slot already loaded.

PERFORMANCE mode
181
|
To extract a section from slicer (SLICER CAPTURE)
You can extract the whole range of the slicer or one of the 8 sections.
For the slicer, see “Using a slicer” (page 177).
Extracting the whole slicing range
1 Select [SLICER] on the performance pad.
2 Click [<] on the right side of the enlarged waveform, and then click .
The color of the slicer changes.
3 Drag and drop the waveform part of the slicing range to the 8 slots in either the
right or left section of the sampler.
The audio divided into 8 is loaded to eight sampler slots respectively, and ready
to be used as a sampler.
The sampler is stored at [Capture] of [Sampler] in [Collection].
Note
• When the [Preferences] window > [Controller] tab > [Sampler] tab > [SLOT] > [Do not overwrite
the loaded Slot] is selected, you cannot drag and drop to a slot already loaded.

PERFORMANCE mode
182
Extracting one of the 8 divided slicer sections
1 Select [SLICER] on the performance pad.
2 Click [<] on the right side of the enlarged waveform, and then click .
The color of the slicer changes.
3 Drag and drop the number part of the slicer section below the waveform to the
slot of the sampler.
Ready to be used as a sampler.
The sampler is stored at [Capture] of [Sampler] in [Collection].
Note
• When the [Preferences] window > [Controller] tab > [Sampler] tab > [SLOT] > [Do not overwrite
the loaded Slot] is selected, you cannot drag and drop to a slot already loaded.

PERFORMANCE mode
183
Using ACTIVE CENSOR
You can apply effects automatically to specified sections of a track in advance.
For example, you can specify an expletive that should not be output. Turn on the ACTIVE
CENSOR and play a track, replacing the expletive with an effect. Turn off the ACTIVE CENSOR
for the track to be output as original.
Hint
• For the screen, see “[ACT. CENSR] (ACTIVE CENSOR) mode” (page 116).
1 Select [ACT. CENSR] on the performance pad.
2 Click [IN] at the position of the IN point (beginning) of the section you wish to
specify.
3 Click [OUT] at the position of the OUT point (ending) of the section you wish to
specify.
[OUT] switches to [OUT ADJ]. [IN] switches to [IN ADJ].
Hint
• You can specify multiple sections in one track.
• appears on the track list in the browser panel.

PERFORMANCE mode
184
|
To turn on the ACTIVE CENSOR to apply an effect
1 Click [ON/OFF].
The enlarged waveform marker and the specified section are displayed in
yellow.
2 Select an effect from [REV ROLL], [TRANS 1/8] (or [TRANS 1/4]), [ECHO], and
[V.BRAKE 1/16 - 32].
3 Play the track.
The effect is applied when playback position reaches the IN point marker.
The effect is turned off when the playback position reaches the OUT point
marker.
Hint
• in the track list of the browser panel turns yellow.
• When [TRANS] or [V.BRAKE] is selected, you can change the beat parameter by clicking [<]/[>].
• You can set a different beat parameter for each specified section.

PERFORMANCE mode
185
|
To fine-tune an ACTIVE CENSOR section
When the playback position is within the specified section, the [IN] and [OUT] points
are displayed as [IN ADJ] and [OUT ADJ] respectively. You can then adjust the IN
point and OUT point.
Change the IN point
1 Click [IN ADJ].
The playback position moves to the IN point.
2 Move the IN point, and then click [IN ADJ].
The IN point changes.
Change the OUT point
1 Click [OUT ADJ].
The playback position moves to the OUT point.
2 Move the OUT point and click [OUT ADJ].
The OUT point changes.

186
Others
[MY PAGE] window
Click [MY PAGE] in the upper-right corner of the screen or select [MY PAGE] from
the [File] menu on the upper screen to display the [MY PAGE] window. The user
account name will be displayed in the upper-right corner of the screen. You can
change the account.
For details, refer to “rekordbox Introduction” on the rekordbox website.
|
[INFORMATION]
Display information from the rekordbox website.
|
[PLAN]
Activate your computer with your contracted subscription plan.
|
[LIBRARY SYNC]
Set the Cloud Library Sync function. For details, refer to “Cloud Library Sync
Operation Guide” on the rekordbox website.
|
[KUVO]
Set KUVO.
Hint
• Click [CLOSE] to close the [MY PAGE] window.

Others
187
[Preferences] window
To change the settings, click on the upper-right of the screen, or select
[Preferences] from the [File] menu on the upper screen to display the [Preferences]
window.
Depending on your rekordbox version and subscription plan, some items may not
be displayed.
|
[View]
[Language] Select a language.
[Browse] [FontSize] Set the character size and
the character style to
normal/bold.
[Line Space] Set the line spacing for
track lists.
[Show the selected track to
the center]
When scrolling, the cursor
selecting a track remains at
the center of the track list.
[Coloring of played tracks] After playing the track, the
color of the track
information in the track list
is changed. You can set to
reset the color when
quitting/exiting rekordbox.
To reset the color
immediately, click [RESET],
and then click [OK].

Others
188
[Layout] [Tree View] Display [Related Tracks],
[Hot Cue Bank List]
(EXPORT mode), [iTunes],
[Inflyte], [SoundCloud]
(PERFORMANCE mode),
[Beatport]
(PERFORMANCE mode),
[rekordbox xml], and
[Explorer] in the tree view.
[Playlist Palette] Display the playlist palette.
[Display Cue Markers on
Preview]
Display memory and Hot
Cues in the waveform in the
preview column.
[OSC Sampler]
(PERFORMANCE mode)
Display the OSC sampler
toggle button in the sampler
deck.
[Phrase (Enlarged
Waveform)]
[Phrase (Full Waveform)]
Display phrase data on the
enlarged waveform and full
waveform. When select
[Phrase (Full Waveform)],
the [PHRASE EDIT] panel
can be available to use.
[Effect Panel]
(PERFORMANCE mode)
Switch the display of the
effect panel.
[Enlarged Waveform]
(PERFORMANCE mode)
Set the order of the
waveforms for the 4 decks
mode.
[PAD Mode]
(PERFORMANCE mode)
Set how to display the pad.
[Auto]: Switch to the PAD
Display automatically when
connecting to a DJ
controller.
[Tooltips] Display tooltips.

Others
189
[Waveform] [Waveform Drawing Rate] Set the drawing rate of the
waveform. A higher speed
makes a better quality
waveform. However, CPU
load increases.
[Color] Set the color of the
enlarged/full waveform as
[Blue], [RGB], or [3Band].
[Full/Preview Waveform] Select full or half display of
the waveform overview and
preview.
[Beat Count Display] Set the count display to the current position or to the next
memory cue.
[Click on the waveform for
PLAY and CUE]
(EXPORT mode)
Set play/pause, current cue by clicking the enlarged
waveform.
Left-click: play/pause
Right-click: current cue settings, starting playback from
the cue point
[Switch JOG Display]
(PERFORMANCE mode)
Switch information on the platter.
[CURRENT CUE / SLIP]: The cue point and SLIP status
when SLIP is turned on are displayed.
[HOT CUE COUNTDOWN]: The distance to Hot Cue
within 5 laps is displayed.
[Key display format] Select a key display format from [Classic] (key name) or
[Alphanumeric] (such as 1A and 2A).
When selecting [Display key information on the database],
key is displayed as recorded on the track.

Others
190
[Color] [Skin] Set the base color of the
display.
[Dark]: The conventional
black tone design.
[Light]: White tone design
for outdoor use.
[HOT CUE] Set the color of HOT CUE.
[CDJ]: Display Hot Cues in
green and Hot Loop in
amber.
[COLD1]: Display in blue
and green.
[COLD2]: Display in blue
gradation.
[COLORFUL]: Display in
multicolor.
[PAD FX]
(PERFORMANCE mode)
Set the color of PAD FX.
[SAMPLER]
(PERFORMANCE mode)
Select the sampler color to
correspond with that of the
frequency of the sampler
sound, or a fixed color
(purple). Note that the color
set manually for samplers is
shown regardless of the
color selected here.
Others
191
|
[Audio]
[LINK MONITOR]
(EXPORT mode)
Set to monitor rekordbox music files over the headphones
of the DJ mixer connected by PRO DJ LINK.
[Metronome] Set the tone of the metronome while you are monitoring
beat grids of music files.
[Audio] Set the audio device to output sound.
[Sample Rate] Set the sampling frequency of audio data sent to an audio
device.
A higher sampling rate brings the playback quality closer
to the original sound. However, as the amount of audio
data increases, the loading on the computer or audio
device also increases, and audio skipping may occur.
[Buffer size] Set the number of samples each time to be sent to an
audio device.
A larger buffer size reduces audio skipping. However, the
transmission delay (latency) increases, and the scratching
is delayed.
[Mixer Mode]
(PERFORMANCE mode)
[Internal]: Use the mixer function on rekordbox.
[External]: Use an external DJ mixer/DJ controller. This
gives a six-way output: track decks 1 through 4, sampler
deck, and preview.
[Input channels] Set the audio input channel. The input audio you set is the
source for the recording.
Click [Setting Utility] to start the utility settings for the audio
device. You can make the input settings on the computer.
[Output channels] EXPORT mode: Set the audio output channel when there
are multiple outputs from the audio device.
PERFORMANCE mode: Set the audio output channel.
• When [Mixer Mode] is set to [Internal], set the output
channels of [Master Output], [Headphones Output], and
[Booth Output].
• When [Mixer Mode] is set to [External], set to 6 output
channels: such as track decks 1 through 4, sampler
deck, and preview.
[Preview]
(PERFORMANCE mode)
Set the preview audio volume level.

Others
192
|
[Analysis]
[Control Device
Information]
(PERFORMANCE mode)
Display information about the connected HID/MIDI
controller.
[Track Analysis] [Track Analysis Mode] Set the mode for analyzing
the track’s waveform
information.
[Normal]: Suitable for
analyzing tracks which
have a relatively consistent
tempo.
[Dynamic]: Suitable for
analyzing tracks which
contain significant tempo
changes.
[BPM Range]: Set BPM
range obtained by normal
analysis.
[Track Analysis Setting] Set items to be analyzed
when analyzing tracks.
[Auto Analysis] Set to enable/disable the
auto analysis of imported
tracks.
[Set Memory Cue at the first
beat of track when
analyzing]
The first beat of the track is
automatically set to the
memory cue when
analyzing the track.
[Key Analysis] [Write the value to the ID3
tag]
Store the detected key in
the ID3 tag.
[Analysis Process] Set concurrent process mode.
If [Performance] is selected, analysis progresses at high
speed. However, CPU load increases.

Others
193
|
[DJ System] (EXPORT mode)
For details on settings and using on a DJ player, refer to the Instruction Manual of
the DJ player.
[General]
Select the color and display style of waveform on the DJ player.
[Category]*
Set the category items to be used with the DJ player and the order of items to be
displayed.
[Sort]
*
Set the sorting items to be used with the DJ player and the order of items to be
displayed.
[Column]
*
Select a category to be displayed on the right of titles when browsing music files on
the DJ player’s display.
[My Settings]
Select the settings to be used on the DJ player. These settings can be made for the
DJ player using USB storage devices, mobile device, or PRO DJ LINK. When you
change the settings on the DJ player, the changed settings are updated to
rekordbox.
[HOT CUE]
When adding a music file to [Collection], the [Allow to auto load HotCue on CDJ]
checkbox on the [Info] screen has a check mark automatically. When music files
with this setting are loaded into the DJ player, the Hot Cue points saved on the DJ
player are replaced with points saved in the loaded music files.

Others
194
[Device]
* These settings are commonly applied with more than one DJ player which is displayed in the link
status panel. Also, they are applied with the default settings for [Device]. The settings can be
changed for each USB storage device.
[Library] Create a library (such as [Collection], [Playlists], etc.) for
only MEP-4000 or XDJ-R1. When the USB storage device
is disconnected from the computer, the library is created
on the device.
When the [Create 320×320 pixels size image] checkbox
has a check mark, 320 x 320 pixel artwork can be created
on the exporting device (only for XDJ-R1).
[Delete Tracks] When a playlist is deleted from the USB storage device or
SD card, tracks in the playlist are deleted.
Tracks can be deleted only if they are not contained on
another playlist.
[History] When the device is connected to a DJ player, the history
of tracks played on the DJ player is added to [Histories].

Others
195
|
[Controller] (PERFORMANCE mode)
[Deck]
[Eject/Load Lock] Select [Lock] to prevent music files from being loaded to
the deck while a track is playing.
[Needle Lock] Select [Lock] to disable needle search while a track is
playing.
[Memory Cue Call Look] Select [Lock] to prevent Memory Cue from being used
while a track is playing.
[Load] [Load Setting]: Playback starts at Memory/Hot Cue
nearest to the beginning to the track.
[Load Method]: Press the [LOAD] button or push [Rotary
Selector] on the DJ controller to load music files (only
when DDJ-RZ is connected).
[Auto Cue] When all decks are set to [Enable], a cue point is set at the
beginning of the track (the position of the first audio input)
according to the selected [Auto Cue Level]. The [Auto Cue
Level] setting is common to all decks.
When [Load Setting] is set, a cue point is set to a memory
cue or hot cue nearest to the beginning of a track
preferentially.
[Vinyl Speed Adjust] [Touch/Brake]: Adjust the speed of the pause when
operating the top of Jog Dial or pressing the button.
[Release/Start]: Adjust the speed of starting playback
when releasing fingers from the top of Jog Dial or pushing
button.
[JOG] [JOG Rotation Speed]: Select the rotation speed of
playback on the platter.
[After turning on the cue button and spinning the jog, the
track returns to the cue point and pause.]
[Continuous Playing] [Automatically load tracks in a list and have them play
continuously one after another.]

Others
196
[Mixer]
[BEAT/BPM SYNC] [Sync Type]: Select [BEAT SYNC] or [BPM SYNC].
[Allow BEAT/BPM SYNC with double/half BPM.]: When
the gap of BPM between the master deck and other decks
is doubled/halved, the synced BPM is half/double of the
original track. In this case, turn on this setting to sync in
the BPM which is close to the original track.
[HOT CUE] [During Pause, GATE playback is applied.]: Playback
starts from the Hot Cue position while pressing and
holding Hot Cue on the DJ controller. When Hot Cue is
released, the playback position returns to the Hot Cue
position, and then playback pauses.
However, playback cannot start when CUE is turned on
and [AUTO BEAT LOOP] is set.
[AUTO BEAT LOOP] Set Loop length when Auto Beat Loop button or controller
is pressed on the connected DJ equipment (DDJ/XDJ
series, etc.).
[Ableton Link] Set Sync function to enable/disable, or switch between
showing/hiding the display of [Ableton Link], when SYNC
function starts.
[Auto Gain] Select [Enable] to automatically adjust the audio volume
of the track loaded to a deck. You can also adjust it
manually using the [Auto Gain] knob on the [GRID EDIT].
[EQ] Select [EQ] or [ISOLATOR].
When [EQ] is selected, you can set [EQ Type].
[Channel Fader Curve] Set the Channel fader curve.
[CROSSFADER Curve] Set the crossfader curve.
[Output Level] Adjust the output level of decks.
Select from the following values (for all decks).
When [Audio] tab > [Mixer Mode] is set to [Internal]:
-21 dB/-18 dB/-15 dB/-12 dB/-9 dB/-6 dB/-3 dB/NONE
When [Audio] tab > [Mixer Mode] is set to [External]:
-12 dB/-9 dB/-6 dB/-3 dB/NONE/+3 dB/+6 dB/+9 dB
If the level is too high, clipping is likely to occur when
applying FX or mixing.
Clipping will enable the limiter to prevent distortion, but at
the same time it will spoil the attack of a sound.

Others
197
[Effect]
[Sampler]
[Recordings]
[RELEASE FX] Set the number of units for RELEASE FX.
When [Audio] tab > [Mixer Mode] is set to [Internal],
RELEASE FX is applied to the Master output if [Unit
Number] is set to [1].
To set this to turn off [SOUND COLOR FX] at the same
time when turning on RELEASE FX, select [Apply
RELEASE FX on CFX].
[CFX] This setting is available only when DDJ-RZ is connected.
Apply CFX to the sampler sound by turning the CFX knob
for the microphone.
[SLOT] Select the number of samplers. Also, you can set not to be
overwritten.
[Capture] [Location of Files]: Set the location to store the captured
audio.
[Location of a Bank for Slicer Capture]: Select the number
of the bank to store the slicer captured audio.
[Auto Panel Mode] Display the sampler deck when pressing the [SAMPLER]
button on a DJ controller compatible with rekordbox.
[Sequence Load] After loading, the full length of the track is set as a loop,
and then automatically starts in loop playback.
[Location of Files] Set the location for saving recorded files.
[Silence Level Threshold] Set the level of sound to be considered
silent.
[Recording starts when:] Set to [Pressing the REC button.] or
[Detecting audio input.].
[Recording ends when:] Set to [Pressing the REC button.] or
[Detecting 20 sec. of silence.].
[Automatically separate files when silence
continues.]
Set to automatically split recorded files
when silence continues.
[Automatically optimize audio level of a
recorded file.]
Set to automatically adjust the volume of
recorded files.

Others
198
[Others]
Make settings for the quantize.
|
[Keyboard]
Assign keyboard shortcuts to each button. Refer to “Default keyboard shortcut
references” on the rekordbox website.
[Automatically import a recorded file.] Set to automatically import recorded files.
[Automatically display tag information
window of a recorded file.]
Set to automatically display the tag
information window after recording.
[Mode] If [Type] > [QUANTIZE] > [HOT CUE] and [LOOP
SAMPLE(LOOP)] are set to [Enable], you can set how to
adjust the beat when calling Hot Cue, Loop, or Sampler
Loop during playback.
When this is checked, these functions are called
immediately. (The playback position after being called is
adjusted so that the beat is not shifted.)
When this is unchecked, these functions are called after
playing to the next beat.
* This function is enabled only when [Q] on the deck is turned
on.
Type [SNAP] Adjust the position where Hot Cue is set or Auto Beat
Loop is started, to the beat which is close to the current
position.
* This function is enabled only when [Q] on the deck is turned
on.
[QUANTIZE] [HOT CUE], [LOOP/SAMPLER(LOOP)], [REVERSE]:
Adjust the beat not to be shifted even when using these
functions during playback.
Select how to adjust [HOT CUE] and [LOOP/
SAMPLER(LOOP)] on [Mode].
[SEQUENCER]:
Adjust the timing to operate for recording the sequence.
* This function is enabled only when [Q] on the deck is turned
on.
[Setting] Select whether to turn on/off all decks at once or not, when
clicking [Q] on each deck to turn on/off the quantize.

Others
199
|
[Advanced]
[Database]
[Browse]
[iTunes] [iTunes Library File] Specify the xml file of the iTunes
library to browse in [iTunes].
[Convert iTunes “Grouping”
to rekordbox “Label”]
When importing music file information
from the iTunes library to [Collection],
iTunes group information will be
saved as rekordbox label information.
[rekordbox xml] [Imported Library] Specify the playlist library (the
location of the xml file) to browse on
[rekordbox xml].
[Auto Relocate
Search Folders]
Automatically find files of tracks or videos in [Collection] which
cannot be played because they have been deleted, moved, etc., and
relocate them.
[Auto Export]
(EXPORT mode)
Music files imported from an external device are automatically
exported.
[Database
management]
Select the master database for use. The master database can be
transferred to an external device. When the master database is
transferred, analyzed files are also transferred. By transferring a
master database to an external drive storing music files, you can
manage them on different computers.
[My Tag] When adding My Tag information to the track, it is also
added to the comment column in the track list.
[Color]* You can edit comments when you classify music files with
eight color codes on the DJ player. For more instruction on
using the library browse function of a DJ player, refer to
the Instruction Manual of the DJ player.
[KUVO] When importing music files, they are set as public on
KUVO.
[Display speed] The speed to display the iTunes library will be improved if
you select a track list in the tree view.
Do not check the mark if your computer memory is
insufficient.

Others
200
* These settings are commonly applied with more than one DJ player which is displayed in the link
status panel. Also, they are applied with the default settings for [Device]. The settings can be
changed for each device.
[Recordings] (EXPORT mode)
[Library Sync]
To use the Cloud Library Sync function, you can display the [MY PAGE] window, set
the operation setting to upload music files, and set the location of downloaded music
files.
For details, refer to “Cloud Library Sync Operation Guide” on the rekordbox website.
[Drop-down menu] A drop-down menu is displayed when clicking and holding
the track for one second.
[Tag List] Delete the track from the tag list when loading it to a deck
from the tag list. Also, you can delete all tracks from the
tag list when quitting/exiting rekordbox.
[Library Protection] Avoid accidentally editing or deleting the track information
and the list displayed in the track list or tree view.
[Location of Files] Specify the location for the recorded files.
[Silence Level Threshold] Set the level for silence of sound to be
considered silent.
[Recording starts when:] Set to [Pressing the REC button.] or
[Detecting audio input.].
[Recording ends when:] Set to [Pressing the REC button.] or
[Detecting 20 sec. of silence.].
[Automatically separate files when silence
continues.]
Set to automatically split recorded files
when silence continues.
[Automatically optimize audio level of a
recorded file.]
Set for adjusting the audio level of a
recorded file automatically.
[Automatically import a recorded file.] Set for importing a recorded file
automatically.
[Automatically display tag information
window of a recorded file.]
Display the tag information window after
recording.

Others
201
[Others] (EXPORT mode)
[Others] (PERFORMANCE mode)
|
[DVS] (PERFORMANCE mode)
Click the [Enable DVS Function] checkbox to enable the DVS function.
Please refer to “rekordbox dvs setup guide” on the rekordbox website.
|
[Video] (PERFORMANCE mode)
Click the [Enable Video Function] checkbox to enable the video function.
Please refer to “rekordbox video operating guide” on the rekordbox website.
|
[Lyric] (PERFORMANCE mode)
Click the [Enable Lyric Function] checkbox to enable the lyric function.
Please refer to “rekordbox lyric operating guide” on the rekordbox website.
[Computer Name] Set the name of the computer to be displayed on the DJ
player.
[Quantize Beat Value] Set the value for the quantize on the player.
[BEAT/BPM SYNC] [Sync Type]: Select [BEAT SYNC] or [BPM SYNC].
[Allow Beat/BPM Sync with double/half BPM.]: When the
gap of BPM between the master deck and other deck is
doubled/halved, the synced BPM is half/double of the
original track. In this case, turn on this setting to sync in
the BPM which is close to the original track.
[HOT CUE] [During Pause, GATE playback is applied.]: Playback
starts from the Hot Cue position while clicking and holding
Hot Cue. When Hot Cue is released, the playback position
returns to the Hot Cue position, and then playback
pauses. However, playback cannot start when CUE is
turned on and [Auto Beat Loop] is set.
[Export Loop As Wav] Select the sampling frequency when exporting a loop.
[Inflyte] Select the location where files downloaded from Inflyte will
be saved.
[KUVO] Enable the Live Playlist function.
[Inflyte] Select the location where files downloaded from Inflyte will
be saved.

Others
202
|
[Lighting] (PERFORMANCE mode)
Click the [Enable Lighting Function] checkbox to enable the Lighting function.
Please refer to “LIGHTING mode operating guide” on the rekordbox website.

Others
203
Menu list
Depending on your rekordbox version and subscription plan, some items may not
be displayed.
|
[rekordbox] menu (for Mac)
|
[File] menu
[Import]
[Sample Pack] (PERFORMANCE mode)
[Display All Missing Files]
The [Missing File Manager] window will be displayed. It displays a list of tracks and
videos in [Collection] that cannot be played because their files have been deleted,
moved, etc., and can be used to rearrange their file locations. (page 23)
[About rekordbox] Display your installed version of rekodbox.
[Preferences] Display the [Preferences] window.
[Services] Select [Services Preferences...] to display [Services
Preferences]. (in Mac OS Standard)
[Hide rekordbox] Hide the rekordbox. (in Mac OS Standard)
[Hide Others] Hide all windows except for rekordbox. (in Mac OS
Standard)
[Show All] Display all windows. (in Mac OS Standard)
[Quit rekordbox] Quit rekordbox.
[Import Track] Add music files to [Collection].
[Import Folder] Select a folder to add its music files to [Collection].
[Import Playlist] Add playlist files (M3U, M3U8, and PLS).
[Import Sample Pack] Import the downloaded Sample Pack to rekordbox.
[Download Sample Pack] Download the Sample Pack, which is an audio source file
to be used as a sampler.

Others
204
[Library]
[Preferences] (for Windows)
Change various settings in rekordbox. (page 187)
[Exit] (for Windows)
Exit rekordbox.
|
[View] menu
[Backup Library] Save the rekordbox library (databases such as
[Collection], [Playlists], etc.), analysis information, and
music files as a backup.
The backup data file name, appended with the current
date, will be displayed.
[Restore Library] Restore rekordbox library (database such as [Collection],
[Playlists], etc.), analysis information, and music files.
You can restore the backup library to another computer.
[Import your library from
ver. 5 (or earlier)]
Convert the library of an earlier rekordbox version than
ver. 6.0 and import it for use.
[Full screen] Display the rekordbox as full screen.
[Skin] Set the basic color of the display.
[1 Player] (EXPORT mode) Display a single player in the player panel.
[2 Players] (EXPORT mode) Display two players in the player panel.
[Simple Player] (EXPORT mode) Display a simplified version of the player
panel.
Only playback, pause, and the volume
adjustment can be operated.
[2 Deck Horizontal] (PERFORMANCE
mode)
Display 2 decks with horizontal enlarged
waveforms.
[2 Deck Vertical] (PERFORMANCE mode) Display 2 decks with vertical enlarged
waveforms.
[4 Deck Horizontal] (PERFORMANCE
mode)
Display 4 decks with horizontal enlarged
waveforms.
[4 Deck Vertical] (PERFORMANCE mode) Display 4 decks with vertical enlarged
waveforms.
[Full Browser] (EXPORT mode) Turn the display of the player panel off.

Others
205
|
[Track] menu
[Browse] (PERFORMANCE mode) Display the minimized deck and enlarged
browser window.
[Show / Hide Pad and Platter]
(PERFORMANCE mode)
Show or hide pads and platters for each
deck. (horizontal waveform only)
[Show Split Screen] (PERFORMANCE
mode)
Display also the other window of the
browser.
[My Tag Configuration Window] Display the My Tag configuration window
at the right side of the track list.
“Related Tracks” on Subpanel Display a window of RELATED TRACKS at
the right side of the track list.
[Information Window] At the right side of the track list, display
information of the track selected in the
track list.
[Sub Browser Window] At the right side of the track list, display
another window with the tree view and
track list.
[Automix] (PERFORMANCE mode) Show or hide the [Automix] window.
[Import To Collection] Add the selected track to [Collection].
[Analyze Track] Analyze the selected track to show the full waveform,
enlarged waveform, BPM, beat positions, and bar
positions.
[Analysis Lock] Set to disable re-analysis and grid edit.
[Add To Playlist] Add the selected track to [Playlists].
[Reload Tag] Read the ID3 tag information from the selected track
again, and then reload it to the track information of the
rekordbox library (databases such as [Collection],
[Playlists], etc.).
[Cloud Library Sync] Operate the Cloud Library Sync function.
[Export Track] Export the selected track to the device.
[Remove from Collection] Remove the selected track from the [Collection].
The music file in your computer is not deleted.
[Show information]/[Hide
information]
Display/hide the [Information] window.
Others
206
|
[Playlist] menu
|
[Help] menu
[Show in Finder]/[Show in
Explorer]
Display the folder, in which the selected track is stored, in
the Finder or Explorer.
[Auto Relocate] Automatically find files of tracks or videos in [Collection]
which cannot be played because they have been deleted,
moved, etc., and relocate them.
[Relocate] Relocate the music file to a different file path.
[Cloud Library Sync] Operate the Cloud Library Sync function.
[Export Playlist] Export the selected playlist to the device.
[Import Playlist] Import the selected playlist in [iTunes], [rekordbox xml], or
[Devices].
[Create New Playlist] Add a new playlist under the selected playlist or folder.
[Create New Intelligent
Playlist]
Add a new intelligent playlist under the selected playlist or
folder.
[Create New Folder] Add a new folder under the selected playlist or folder.
[Delete Playlist] Delete a selected playlist, intelligent playlist.
[Sort Items] Sort playlists in the selected folder in ascending order.
[Playlist], [H. Cue Bank], and [Playlist]/[H. Cue Bank]/[Hot
Cue Bank List] in [Devices] can be sorted.
[Renumber Track Order] Renumber tracks as sorted in the playlist.
[Export a playlist to a file] Save information of the selected playlist in text or M3U8
format.
[User’s Manual] Display the webpage for downloading this manual.
[Online support] Connect to the online support site.
[rekordbox Update
Manager]
Connect to the update site.
[About rekordbox] (for
Windows)
Display your installed version of rekordbox.

Others
207
System requirements
Before installing rekordbox, make sure to read “Software end user license
agreement” (page 216).
|
Supported OS
rekordbox is supported by the following OS:
• Mac: macOS Catalina 10.15 (latest update), macOS Mojave 10.14 (latest
version), macOS High Sierra 10.13 (latest version), macOS Sierra 10.12 (latest
version)
• Windows: Windows® 10, 8.1
The latest information (supported OS, required operating environment, etc.) is
available on the rekordbox website (rekordbox.com).
|
Required system (minimum required operating environment)
Make sure that your computer meets the following system requirements before
installing rekordbox. For details on the latest information, refer to the rekordbox
website.
• CPU: 2.5 GHz dual-core Intel® processor Core
TM
i5
• Memory: 8 GB (or more) RAM
• Hard disk/SSD: 2 GB (or more) free space (excluding space necessary for storing
music files)
• Display resolution: 1 280 × 768 (or larger)
• Sound: Audio output to speakers, headphones, etc. (built-in or external audio
device)
• Internet connection: For the account registration or inquires, use a web browser
supporting 128-bit SSL (e.g. Safari 10 or later, Internet Explorer® 11 or later).
• USB port: A USB port is required to transfer music files to a USB storage device
(flash memory, hard disk, etc.) or to connect to a DJ controller.
• LAN port: An Ethernet LAN adapter (RJ45 port) is required for communication with
DJ equipment to transfer music files to a PRO DJ LINK compatible CDJ/XDJ
series, etc. For details, refer to the Instruction Manual of the Pioneer DJ product.
Note
• Full functionality is not guaranteed with all computers even when the above operating
environment conditions are fulfilled.
Others
208
• Even with the required memory capacity indicated for the operating environment above,
rekordbox may not provide full functionality and performance due to lack of memory in the cases
described below. Take the necessary measures to ensure sufficient free memory. Adding extra
memory, in order to achieve stable performance, is recommended.
– When there are many tracks being managed in the rekordbox library.
– When resident programs and services are running.
• Depending on your computer’s power saving settings, it may not be possible for your computer
to achieve its optimum CPU and/or hard-disk processing capacity. Especially with a laptop
computer, use an external AC power source to ensure best performance when using rekordbox.
• rekordbox may not operate properly if combined with other programs installed on your computer.

Others
209
Communications environment on the
computer
Depending on your computer’s security software and operating system settings,
communications with DJ equipment or mobile devices may be interrupted. If this
occurs, check your settings for the following 7 programs to ensure that they are not
blocked. The program extension depends on the OS of the computer; e.g. the
extension “.app” is for Mac and “.exe” for Windows:
rekordbox
PSvNFSd
PSvLinkSysMgr
edb_streamd
ls-unity-rekordbox-win
rbhttpserver
rbcloudagent.exe
When sharing of the computer’s internet connection is enabled, problems may arise
in communications with other computers or DJ units connected on the LAN. Disable
sharing before connecting the computer to the LAN.
• Mac: Open [System Preferences], and uncheck [Internet Sharing] under
[Sharing].
• Windows: Open [Local Area Connection Properties], and then at [Sharing],
uncheck [Allow other network users to connect through this computer’s Internet
connection] under [Internet Connection Sharing].
Communications with DJ equipment or mobile devices may also be interrupted if the
network (IP address, port number, etc.) is restricted by a router or another
communications device.
For details on the communications devices, security software, and the settings of
the operating system, contact the respective manufacturer or your sales agent.

Others
210
File formats that can be loaded and
played
Files that can be loaded and played on rekordbox are listed below.
• It may not be possible to read or play copyright-protected music files.
• For music files (file formats) that can be loaded and played on DJ equipment
produced by Pioneer DJ, refer to the Instruction Manual of the DJ equipment.
|
Music files
Music
file
Compatible
formats
Encoding
method
Bit
depth
Bit rate Sampling
frequency
File
extension
MP3 MPEG-1
AUDIO
LAYER-3
CBR
VBR
16 bit 32 kbps to
320 kbps
32 kHz
44.1 kHz
48 kHz
.mp3
MPEG-2
AUDIO
LAYER-3
CBR
VBR
16 bit 16 kbps to
160 kbps
16 kHz
22.05 kHz
24 kHz
.mp3
AAC MPEG-4
AAC LC
CBR
VBR
16 bit 8 kbps to
320 kbps
16 kHz
22.05 kHz
24 kHz
32 kHz
44.1 kHz
48 kHz
.m4a
.mp4
WAVE Uncompressed
PCM
16 bit
24 bit
— 44.1 kHz
48 kHz
88.2 kHz
96 kHz
192 kHz
.wav
AIFF Uncompressed
PCM
16 bit
24 bit
— 44.1 kHz
48 kHz
88.2 kHz
96 kHz
192 kHz
.aif
.aiff

Others
211
|
Video Files
• File extension: mpg, mp4, m4v, avi (Windows), qtz (Mac)
• Video format
– Codec: h.264, mpeg-4, mpeg-2
– Display resolution: up to 1 920 × 1 080
• Audio format: LPCM (aiff), aac, mp3
|
Image files
• File extension: jpeg, png, gif (animated gif files are not supported)
* Depending on the OS or the operating environment of your computer, some files may not be
imported or played.
Apple Lossless Compressed
PCM
16 bit
24 bit
— 44.1 kHz
48 kHz
88.2 kHz
96 kHz
192 kHz
.m4a
FLAC Compressed
PCM
16 bit
24 bit
— 44.1 kHz
48 kHz
88.2 kHz
96 kHz
192 kHz
.flac
.fla
Music
file
Compatible
formats
Encoding
method
Bit
depth
Bit rate Sampling
frequency
File
extension

Others
212
Supported media (file system)
Note that rekordbox can only write to SD memory cards and USB storage devices
(flash memories or hard disks) which use a file system listed in the table below.
• To check the compatibility of SD memory cards and USB storage devices (flash
memories or hard disks) with your DJ equipment produced by Pioneer DJ, refer to
the Instruction Manual of the DJ equipment.
• HFS+ is available for Mac.
Recording
media
FAT16 FAT32 NTFS HFS HFS+
SD memory
cards
N/A N/A N/A
USB storage
devices
N/A N/A

Others
213
Online support site
Before making inquiries on rekordbox operating procedures or technical issues,
read this manual and check the FAQ provided on the rekordbox website
(rekordbox.com).
• AlphaTheta Corporation collects your personal information for the following
purposes:
1. To provide customer support for your purchased product
2. To inform you of product or event information via e-mail
3. To obtain feedback collected by survey for product planning purposes
– Your personal information is kept confidential corresponding to the privacy policy
set forth by our company.
– AlphaTheta Corporation’s privacy policy can be viewed on the rekordbox online
support site.
• When making inquiries regarding rekordbox, please be sure to let us know your
computer type and specifications (CPU, installed memory and other connected
peripherals, etc.), the operating system and version used, as well as concrete
information regarding the issue at hand.
– To inquire about configuration of your computer with non-AlphaTheta
Corporation peripheral devices
and to obtain the corresponding technical support, contact the manufacturer or
retailer.
• Further version updates are anticipated for improved functionality and
performance of rekordbox. Update programs will be available for download on the
rekordbox online support site. We strongly recommend you check for the updates
to always use the latest version of rekordbox.

Others
214
Disclaimer
Please note that AlphaTheta Corporation cannot accept responsibility for the
legality, morality or reliability of operation with regard to the use of rekordbox by
customers. Problems in operation of rekordbox may arise due to the operating
environment of the customer’s computer and of rekordbox, or conflict with other
software.
Please note that AlphaTheta Corporation cannot accept responsibility for loss of
your registered information. Please make a separate note of information you have
registered and store it in a safe place.

Others
215
Copyright warning
The use of rekordbox is restricted with regard to the playing and copying of copy-
protected music.
• The program may not operate properly if copy-protect encryption data is
embedded in recorded media.
• Playback, analysis, and other operations may stop if copy-protect encryption data
is detected as embedded in recorded media.
The material you record is for your own listening enjoyment, and cannot be used for
other purposes without permission from the copyright owner.
• Music recorded from CDs and other media may be protected by the copyright laws
of individual countries as well as by international convention. You are solely
responsible for the lawful use of the recordings you make.
• When handling music that has been downloaded over the internet, the person who
has downloaded the music is fully responsible for using the music in compliance
with his/her contract with the website from which the music was downloaded.

Others
216
Software end user license agreement
This Software End User License Agreement (“Agreement”) is between you (both the
individual installing the Program and any single legal entity for which the individual
is acting) (“You” or “Your”) and AlphaTheta Corporation (“AlphaTheta”).
TAKING ANY STEP TO SET UP OR INSTALL THE PROGRAM MEANS THAT YOU
ACCEPT ALL OF THE TERMS OF THIS LICENSE AGREEMENT. PERMISSION
TO DOWNLOAD AND/OR USE THE PROGRAM IS EXPRESSLY CONDITIONED
ON YOUR FOLLOWING THESE TERMS. WRITTEN OR ELECTRONIC
APPROVAL IS NOT REQUIRED TO MAKE THIS AGREEMENT VALID AND
ENFORCEABLE. IF YOU DO NOT AGREE TO ALL OF THE TERMS OF THIS
AGREEMENT, YOU ARE NOT AUTHORIZED TO USE THE PROGRAM AND
MUST STOP INSTALLING IT OR UNINSTALL IT, AS APPLICABLE.
1. DEFINITIONS
1.1 “Documentation” means written documentation, specifications and help content
made generally available by AlphaTheta to aid in installing and using the Program.
1.2 “Program” means all or any part of AlphaTheta’s software licensed to You by
AlphaTheta under this Agreement.
2. PROGRAM LICENSE
2.1 Limited License. Subject to this Agreement’s restrictions, AlphaTheta grants to
You a limited, non-exclusive, non-transferable, license (without the right to
sublicense):
(a) To install a single copy of the Program in Your computer or mobile device, to
use the Program only for Your personal purpose complying with this Agreement
and the Documentation (“Authorized Use”);
(b) To use the Documentation in support of Your Authorized Use; and
(c) To make one copy of the Program solely for backup purposes, provided that all
titles and trademark, copyright and restricted rights notices are reproduced on the
copy.
2.2 Restrictions. You will not copy or use the Program or Documentation except as
expressly permitted by this Agreement. You may transfer the Program (when the
Program is transferred related license is also transferred without any procedure),
but will not sublicense, rent, lease or lend the Program, or use it for third-party
training, commercial time-sharing or service bureau use. You will not Yourself or
through any third party modify, reverse engineer, disassemble or decompile the
Program, except to the extent expressly permitted by applicable law, and then only
after You have notified AlphaTheta in writing of Your intended activities.
Others
217
2.3 Usage of Lyrics. Usage of Lyrics is limited to your personal, noncommercial use
in accordance with the terms of this Agreement. You may not reproduce (other than
as authorized for your own personal usage), publish, transmit, distribute, publicly
display, rent or lend, modify, create derivative works from, sell or participate in the
sale of or exploit in any way, in whole or in part, directly or indirectly, any of the Lyrics
so provided. You agree that you are not granted any so-called “karaoke” or “sing-
along” rights to Lyrics and you shall not seek to or remove any vocal track from a
sound recording that shall be associated with a Lyric provided to you. You agree not
to assign, transfer or transmit any Lyrics to any third party. You agree that you shall
not seek to or do anything that will defeat, evade or circumvent any efforts that may
be made to protect the Lyrics from any unauthorized usage. Licensee also agrees
that except as specifically authorized herein, the foregoing restrictions apply to their
use of Lyrics.
2.4 Ownership. AlphaTheta or its licensor retains all right, title and interest in and to
all patent, copyright, trademark, trade secret and other intellectual property rights in
the Program and Documentation, and any derivative works thereof. You do not
acquire any other rights, express or implied, beyond the limited license set forth in
this Agreement.
2.5 No Support. AlphaTheta has no obligation to provide support, maintenance,
upgrades, modifications or new releases for the Program or Documentation under
this Agreement.
3. WARRANTY DISCLAIMER
THE PROGRAM AND DOCUMENTATION ARE PROVIDED “AS IS” WITHOUT
ANY REPRESENTATIONS OR WARRANTIES, AND YOU AGREE TO USE THEM
AT YOUR SOLE RISK. TO THE FULLEST EXTENT PERMISSIBLE BY LAW,
ALPHATHETA EXPRESSLY DISCLAIMS ALL WARRANTIES OF ANY KIND WITH
RESPECT TO THE PROGRAM AND DOCUMENTATION, WHETHER EXPRESS,
IMPLIED, STATUTORY, OR ARISING OUT OF COURSE OF PERFORMANCE,
COURSE OF DEALING OR USAGE OF TRADE, INCLUDING ANY WARRANTIES
OF MERCHANTABILITY, FITNESS FOR A PARTICULAR PURPOSE,
SATISFACTORY QUALITY, ACCURACY, TITLE OR NON-INFRINGEMENT.
4. EXPORT CONTROL AND COMPLIANCE WITH LAWS AND REGULATIONS
You may not use or otherwise export or re-export the Program except as authorized
by United States law and the laws of the jurisdiction in which the Program was
obtained. In particular, but without limitation, the Program may not be exported or
re-exported (a) into any U.S.-embargoed countries or (b) to anyone on the U.S.
Treasury Department’s Specially Designated Nationals List or the U.S. Department
of Commerce Denied Persons List or Entity List. By using the Program, you
Others
218
represent and warrant that you are not located in any such country or on any such
list. You also agree that you will not use the Program for any purposes prohibited by
United States law, including, without limitation, the development, design,
manufacture, or production of nuclear, missile, or chemical or biological weapons.
5. U.S. GOVERNMENT RESTRICTED RIGHTS
The Program and Documentations are “commercial computer software” and
“commercial computer software documentation” as those terms are defined in 48
C.F.R. §252.227-7014 (a) (1) (2007) and 252.227-7014 (a) (5) (2007). The U.S.
Government's rights with respect to the Program and Documentations are limited by
this license pursuant to 48 C.F.R. § 12.212 (Computer software) (1995) and 48
C.F.R. §12.211 (Technical data) (1995) and/or 48 C.F.R. §227.7202-3, as
applicable. As such, the Program and Documentations are being licensed to the
U.S. Government end users: (a) only as “commercial items” as that term is defined
in 48 C.F.R. §2.101 generally and as incorporated in DFAR 212.102; and (b) with
only those limited rights as are granted to the public pursuant to this license. Under
no circumstance will the U.S. Government or its end users be granted any greater
rights than we grant to other users, as provided for in this license. Manufacturer is
AlphaTheta Corporation, Yokohama i-Mark Place 6F, 4-4-5 Minatomirai, Nishi-ku,
Yokohama-city, Kanagawa prefecture, Japan, ZIP: 220-0012
6. DAMAGES AND REMEDIES FOR BREACH
You agree that any breach of this Agreement’s restrictions would cause AlphaTheta
irreparable harm for which money damages alone would be inadequate. In addition
to damages and any other remedies to which AlphaTheta may be entitled, You
agree that AlphaTheta may seek injunctive relief to prevent the actual, threatened
or continued breach of this Agreement.
7. TERMINATION
AlphaTheta may terminate this Agreement at any time upon Your breach of any
provision. If this Agreement is terminated, You will stop using the Program,
permanently delete it from your computer or mobile device where it resides, and
destroy all copies of the Program and Documentation in Your possession,
confirming to AlphaTheta in writing that You have done so. Sections 2.2, 2.3, 2.4, 3,
4, 5, 6, 7, 8 and 9 will continue in effect after this Agreement's termination.
8. GENERAL TERMS
8.1 Limitation of Liability. In no event will AlphaTheta or its subsidiaries be liable in
connection with this Agreement or its subject matter, under any theory of liability, for
any indirect, incidental, special, consequential or punitive damages, or damages for
Others
219
lost profits, revenue, business, savings, data, use, or cost of substitute procurement,
even if advised of the possibility of such damages or if such damages are
foreseeable. In no event will AlphaTheta’s liability for all damages exceed the
amounts actually paid by You to AlphaTheta or its subsidiaries for the Program. The
parties acknowledge that the liability limits and risk allocation in this Agreement are
reflected in the Program price and are essential elements of the bargain between
the parties, without which AlphaTheta would not have provided the Program or
entered into this Agreement.
8.2 The limitations or exclusions of warranties and liability contained in this
Agreement do not affect or prejudice Your statutory rights as consumer and shall
apply to You only to the extent such limitations or exclusions are permitted under the
laws of the jurisdiction where You are located.
8.3 Severability and Waiver. If any provision of this Agreement is held to be illegal,
invalid or otherwise unenforceable, that provision will be enforced to the extent
possible or, if incapable of enforcement, deemed to be severed and deleted from
this Agreement, and the remainder will continue in full force and effect. The waiver
by either party of any default or breach of this Agreement will not waive any other or
subsequent default or breach.
8.4 No Assignment. You may not assign, sell, transfer, delegate or otherwise
dispose of this Agreement or any rights or obligations under it, whether voluntarily
or involuntarily, by operation of law or otherwise, without AlphaTheta’s prior written
consent. Any purported assignment, transfer or delegation by You will be null and
void. Subject to the foregoing, this Agreement will be binding upon and will inure to
the benefit of the parties and their respective successors and assigns.
8.5 Entire Agreement. This Agreement constitutes the entire agreement between
the parties and supersedes all prior or contemporaneous agreements or
representations, whether written or oral, concerning its subject matter. This
Agreement may not be modified or amended without AlphaTheta’s prior and
express written consent, and no other act, document, usage or custom will be
deemed to amend or modify this Agreement.
8.6 You agree that this Agreement shall be governed and construed by and under
the laws of Japan.
9. RESTRICTIONS TO INFRINGEMENTS OF COPYRIGHT PROTECTED DATA
OWNED BY THIRD PARTY
When using the program, You must agree on the following:
(a) To follow copyright protection laws, rules and regulations designated in every
country and international treaties;
(b) To legally obtain music data used in the Program;
Others
220
(c) Not to bypass or decode Digital Rights Management technology implemented
to the data.
In addition, you may not copy music data beyond the extent of private use. You may
not give or transfer music data to third party. You may not share or intend to share
the media or storage used to save music data with others. You may not save music
data to media or storage which allows access to third party. You may not provide live
distribution of such music data to third party.

Others
221
Trademarks and licenses
• rekordbox™ is a registered trademark of AlphaTheta Corporation.
• PRO DJ LINK™ is a trademark of AlphaTheta Corporation.
• Windows® is a registered trademark of Microsoft Corporation in the U.S. and
other countries.
• iPhone, Apple Music, iTunes, Mac, and macOS are trademarks of Apple Inc.,
registered in the U.S. and other countries.
• iOS is a trademark containing Cisco trademark signs in the U.S. and other
countries.
• App Store is a service mark of Apple Inc.
• Android, Google Play, YouTube, and YouTube logo are registered trademarks or
trademarks of Google LLC.
• Mixcloud and Mixcloud logo are trademarks or registered trademarks of Mixcloud
Limited.
• Intel® processor Core™ is a trademark of Intel Corporation in the United States of
America and other countries.
• Wi-Fi is a registered mark of the Wi-Fi Alliance.
• ASIO is a trademark and software of Steinberg Media Technologies GmbH.
• Ableton is a trademark of Ableton AG.
• Dropbox is a registered trademark of Dropbox, Inc.
• Inflyte is a trade name or registered trademark of Inflyte Ltd.
• The names of companies and products mentioned herein are the trademarks of
their respective owners.
©2020 AlphaTheta Corporation. All rights reserved.
