
SecureW2 Third-Party CA SCEP
Integration with Microsoft Intune
Chapter 1: Introduction 4
Prerequisites 4
Device Profiles in Microsoft Intune 5
Chapter 2: Configure Azure 6
Creating a New Application 8
Creating a Client Secret 7
Adding API Permissions 8
Chapter 3: Configure SecureW2 10
Getting Started 11
Creating an Intermediate CA for Intune SCEP Gateway Integration 12
Creating an Intune Certificate Template 13
Creating an Intune CA IdP 13
Configuring Polic y Management 14
Configuring a Roles Policy 14
Configuring an Enrollment Policy 15
Configuring a Network Policy 15
Chapter 4: Trusted Certificate Profiles 1 7
Trusted Certificate Profile for SecureW2 Root CA 18
Exporting the SecureW2 Root CA 18
Creating a Trusted Certificate Profile - SecureW2 Root CA 19
Trusted Certificate Profile for SecureW2 Intermediate CA 2 0
Exporting the SecureW2 Intermediate CA 2 0
Creating a Trusted Certificate Profile - SecureW2 Intermediate CA 2 3
Trusted Certificate Profile for the RADIUS Server Root CA Certificate 23
Exporting the Trusted RADIUS Server Root CA Certificate 24
Creating a Trusted Certificate Profile - RADIUS Server Root CA Certificate 24
Chapter 5: SCEP Certificate Profile for SecureW2 Certificate Requests 28
Creating a SCEP Certificate Profile 28
Chapter 6: Wi-Fi Profile for Secure SSID Configuration 35
Creating a Wi-Fi Profile 35
Assigning a Device Profile 35
Adding Wi-Fi Settings for Devices Running Android 36


Chapter 1: Introduction
This guide describes the steps to integrate a SecureW2 third-party CA with Microsoft Intune to
create and auto-enroll certificates for Microsoft Intune Managed Devices using the Simple
Certificate Enrollment Protocol (SCEP).
Admins can then view and manage the end-entity certificates on the JoinNow Management
Portal.
Note : When a device, which has been enrolled through the Intune third-party CA integration, is
removed from Intune, the corresponding certificates are automatically revoked in the JoinNow
Management Portal.
Prerequisites
To set up Microsoft Intune to allow devices to enroll for digital certificates using the SCEP, you
need:
● A Microsoft Online Services account with a Microsoft Intune (Microsoft Endpoint
Manager) subscription.
● Permissions to register an application in Azure Active Directory (AD).
● An account in the JoinNow Management Portal set up for TLS-based authentication.
● Getting Started Wizard to generate Certificate Authorities (CAs) and the RADIUS Server.
Device Profiles in Microsoft Intune
Device profiles allow you to add and configure settings, and then push those settings to devices in
your organization.The following profiles are created for end-user devices to connect to the
secured network using user certificates:
● Trusted Certificate Profile for the SecureW2 RADIUS Server Root CA.
● Trusted Certificate Profile for the SecureW2 Root CA.
● Trusted Certificate Profile for the SecureW2 Issuing CA.
● SCEP Profile for the SecureW2 SCEP certificate requests.
● Wi-Fi profile for secure SSID configuration.
Note : You must create a separate profile for each platform.

Chapter 2: Configure Azure
This section describes the steps to configure Azure and Intune to work with the SecureW2 PKI.
Creating a New Application
To create an app in Azure to communicate with the Intune CA IdP, follow the given steps.
1. Log in to the Azure portal.
2. Go to App registrations .
3. Click New registration .
4. On the displayed screen, configure the following settings.

5. Click Register . The following screen is displayed.
6. Copy the Application (client) ID , Object ID , and Directory (tenant) ID values to your
console. These values are required to create an Intune IdP in the JoinNow Portal. (See the
Creating an Intune CA IdP section.)
Creating a Client Secret
1. On the left pane, go to Manage and click Certificates & secrets .

2. Click New client secret .
3. In the Description field, enter a description for the client secret.
4. From the Expires drop-down list, select an expiration date.
5. Click Add .
6. The client secret is displayed under the Value column.
Note : Ensure that you save the client secret on your console properly, as this secret is
non-recoverable.
Adding API Permissions
To provide the API permission for SecureW2 to access the Azure directory, follow the given steps.
1. On the left pane, go to Manage and click API Permissions .
2. On the displayed screen, click Add a permission .

3. Select Microsoft Graph .
3. Select Application permissions .
4. From the Application drop-down menu, select Application.Read.All .
5. Click Add permissions .
6. Select Intune .
7. Select Application permissions .
8. From the Permissions drop-down menu, select scep_challenge_provider .
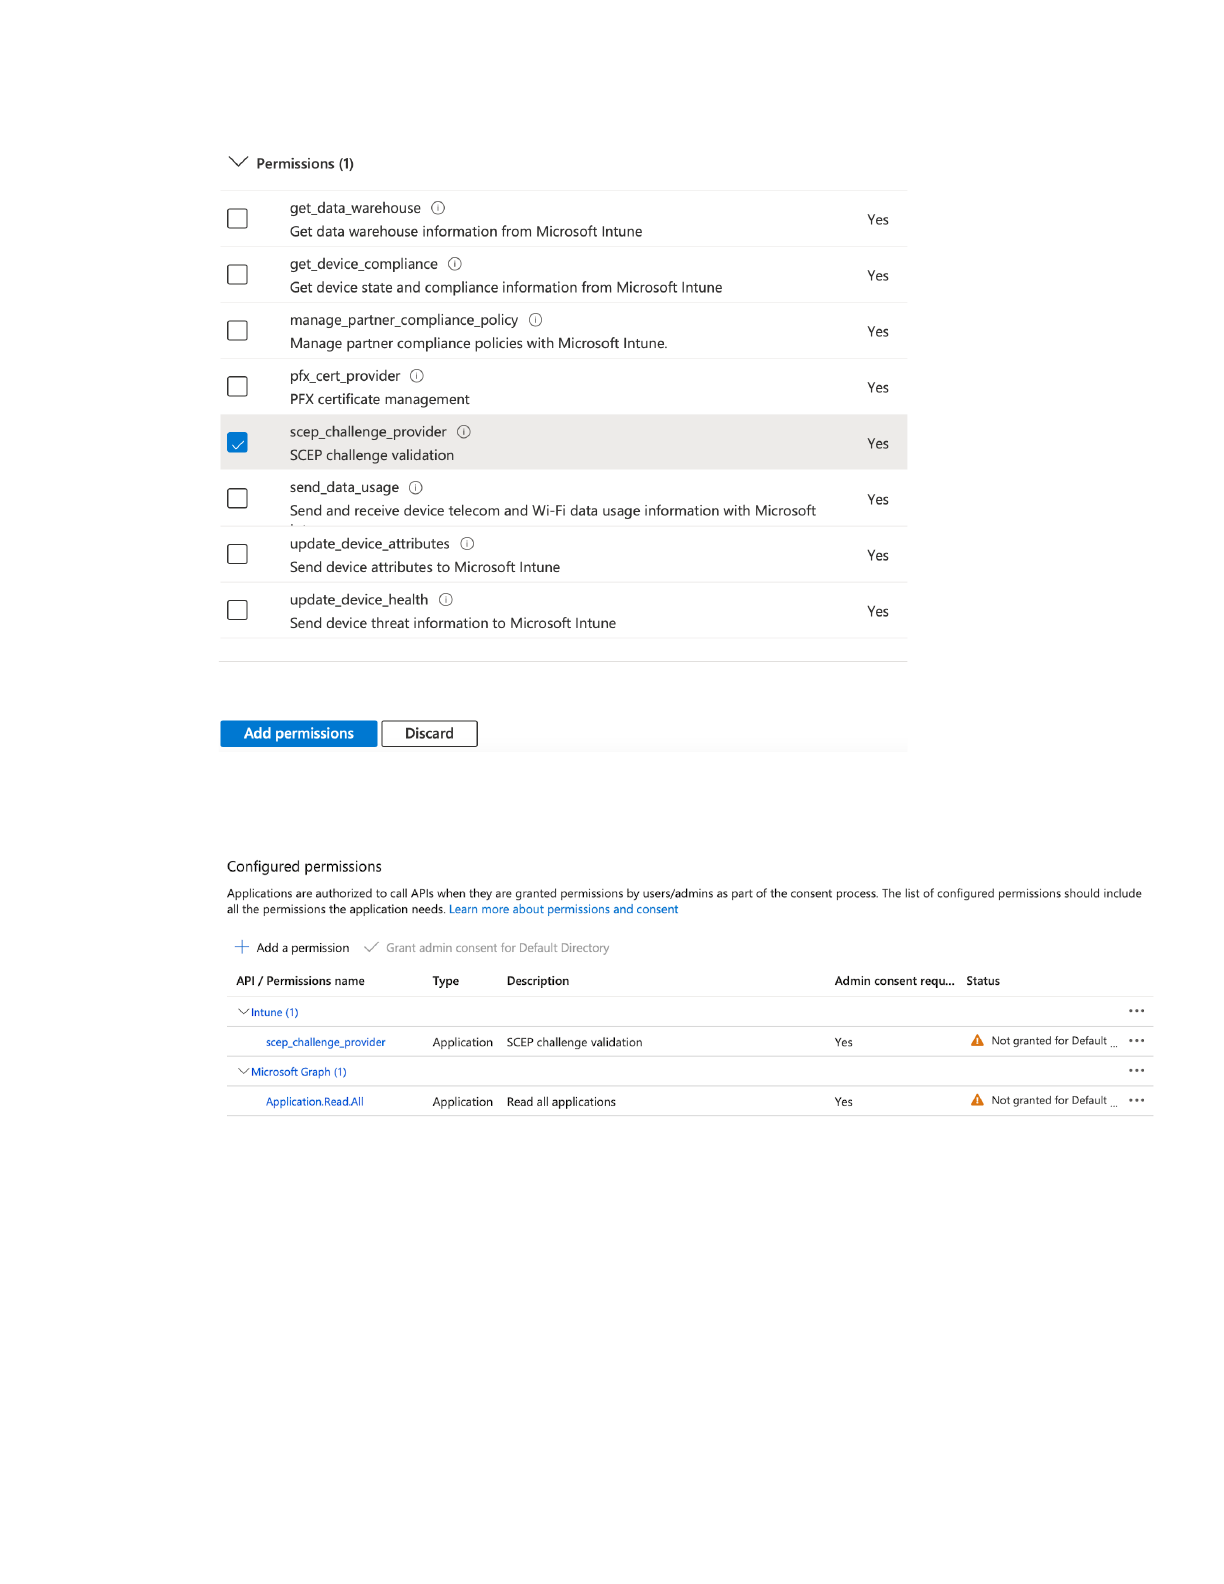
8. After adding the permissions, click Add permissions .
9. The Configured permissions screen is displayed.
Chapter 3: Configure SecureW2
This section describes the following procedures carried out in the JoinNow Management Portal:
● Generating the required network profiles
● Creating a SecureW2 Intermediate CA
● Creating a certificate template
● Creating an Identity Provider (IdP) for Intune CA,
● Creating the Role and Enrollment policies

Getting Started
The Getting Started Wizard creates everything you need for 802.1x. It will generate a RADIUS
server, CAs, profiles, a Landing page to onboard BYOD devices if desired, and all the default
network settings you need for 802.1x.
Note : This is not mandatory if you already tested SecureW2 PKI flow.
1. Log in to the JoinNow Management Portal.
2. Go to Device Onboarding > Getting Started .
3. On the following screen, retain the default settings as shown.
4. For the SSID field, enter the name of the SSID with which you want to authenticate users.
5. For the Wireless Vendor field, from the drop-down list, select a wireless infrastructure
vendor.
6. For the Radius Vendor field, from the drop-down list, select SecureW2 .
7. Click Create .
The Getting Started wizard typically takes 60-90 seconds to create the profile.

Creating an Intermediate CA for Intune SCEP Gateway Integration
As a best practice, SecureW2 recommends using a dedicated intermediate CA for Intune
enrollments. The CA that issues certificates to BYOD devices should be separate from the CA that
issues certificates to managed devices, because managed devices do not require email
notifications. You can disable email notifications for a dedicated CA that issues certificates to
Intune managed devices.
To create a new intermediate CA:
1. Go to PKI Management > Certificate Authority and click Add Certificate Authority .
2. In the Basic section, from the Type drop-down list, select Intermediate CA .
3. From the Certificate Authority drop-down list, select the default Root CA that comes with
your organization.
4. In the Common Name field, type a name. SecureW2 recommends a name that includes
”SCEP”.
5. Click Save . The new intermediate CA is generated.

Creating an Intune Certificate Template
To create an Intune certificate template:
1. Go to PKI Management > Certificate Authorities . In the Certificate Templates section,
click Add Certificate Template .
2. In the Name field, enter Intune Certificate Template as the name of the template.
3. In the Subject field, enter CN=${/device/identity:/device/clientId} as the common name.
4. In the Validity Period field, enter the validity period of the certificate (based on
requirement).
5. In the SAN section, for the:
● DNS field, enter: ${/device/clientId:/device/identity}
● RFC822 field, enter: ${/device/clientId}
● Other Name field, enter: ${/device/clientId}
6. In the Extended Key Usage section, from the Use Certificate For list, select Client
Authentication .
7. Click Update .
Creating an Intune CA IdP
In the JoinNow Management Portal, create an IdP for the Intune CA to accept requests from the
Intune portal. The IdP provides the Endpoint URI for the SCEP profiles in Intune.
1. Go to Identity Management > Identity Providers .
2. Click Add Identity Provider .
3. Enter a suitable name and description for the IdP, in the respective fields.
4. In the Type field, from the drop-down list, select INTUNE CA PARTNER .
5. Click Save . The following screen is displayed.
6. Click the Configuration tab.

7. Enter the Client ID , Client Secret , and Tenant ID which you obtained after creating a new
app in the Azure portal. (See the Creating a New Application and Creating a Client Secret
sections.)
8. From the Certificate Authority drop-down list, select the Intermediate CA you
created.(See the Creating an Intermediate CA for Intune SCEP Gateway Integration
section.)
9. Copy the Endpoint URI to your console.
10. Click Update .
Configuring Policy Management
Setting up Microsoft Intune requires two separate policies in the JoinNow Management Portal:
● A Roles policy and
● An Enrollment policy.
Note : Microsoft Intune does not need a dedicated Device Role policy. You can use the Default
Device Role policy in the configuration.
Configuring a Roles Policy
To configure a Roles policy:
1. Go to Policy Management > Roles .
2. Click Add Role .

3. Type a name and display description, in the respective fields, and click Save .
4. The page refreshes and the Conditions tab is displayed. Click the Conditions tab.
5. In the Conditions section, from the Identity Provider drop-down list, select the Intune CA
IdP you created. (See the Creating an Intune CA IdP section.)
6. In the Attributes/Groups section, for the Attribute field, retain ANY .
7. Click Update .
Configuring an Enrollment Policy
To configure an enrollment policy:
1. Go to Policy Managemen t > Enrollment and click Add Enrollment Policy .
2. Type a name and display description, in the respective fields, and click Save .
3. The page refreshes and the Conditions and Settings tabs are displayed.
4. Click the Conditions tab.
5. In the Conditions section, from the User Role list, select the user role policy you created
earlier.
6. From the Device Role list, select DEFAULT DEVICE ROLE POLICY .

Note : You must select a User Role and Device Role for enrollment. You can use a Fallback
Device policy to allow enrollment based on the Role policy.
6. Click the Settings tab.
7. In the Settings section, from the Use Certificate Authority drop-down list, select the
Intermediate CA you created earlier. (See the Creating an Intermediate CA for Intune SCEP
Gateway Integration section.)
8. From the Use Certificate Template drop-down list, select the template you created earlier
(see the Creating an Intune Certificate Template section).
9. For the other settings, retain the default values.
10. Click Update .
Configuring a Network Policy
To set up a network policy:

1. Go to Policy Management > Network .
2. Click Add Network Policy .
3. Add a Name and optional Description to the Basic tab
4. Click Save . The Conditions and Settings tabs appear.
Network Policy Conditions
The Conditions tab under Network policy is where you map Roles policies and other user
attributes. You can configure the Roles policy you just created.
We’ve configured the conditions for the Azure tenant network policy, which is the Roles policy
created earlier, the email attribute from the lookup policy, and the issuing CA. The ‘Match All’
option is selected, meaning that if every rule is checked, the RADIUS will respond to the user
with an ‘Access_Accept’ and the RADIUS attributes that we’ll configure under Settings.
Network Policy Settings
Our policy sends a RADIUS_ACCEPT if users are verified as active. You can take it a step
further by segmenting the users into separate VLANs. So, we need to configure a RADIUS
attribute to send them to a VLAN.
1. Choose the Settings tab.
2. Click Add Attribute .
a. From the Dictionary drop-down list, select Radius:IETF .
b. From the Attribute drop-down list, select Filter-Id .
c. In the Value text box, enter a value for the VLAN.
d. Click Save .


Chapter 4: Trusted Certificate Profiles
Trusted Certificate Profile for the RADIUS Server Root CA
Certificate
You should configure the Trusted Certificate Profile with the certificate of your RADIUS server
certificate's issuing authority. This is to make the devices trust your RADIUS server by validating
the RADIUS server certificate. We achieve this server validation in the profile configuration by
adding the Root and/or Intermediate Certificate Authority (CA) certificates that issued the RADIUS
server certificate. When you assign this profile, the Microsoft Intune managed devices receive the
trusted certificates.
Note : For other RADIUS vendors, other than SecureW2 RADIUS server, ensure that you have the
Root or Intermediate CA that issues the RADIUS server certificates.
Note : You must create a separate profile for each OS platform. The steps to create trusted
certificates are similar for each device platform.
Trusted Certificate Profile for SecureW2 Root CA
This trusted certificate profile is required for the certificate chain of trust.
Note : You must create a separate profile for each OS platform. The steps to create trusted
certificates are similar for each device platform.

Exporting the SecureW2 Root CA
To export the SecureW2 Root CA from the JoinNow Management Portal, follow the given steps.
1. Log in to the JoinNow Management Portal.
2. Go to PKI Management > Certificate Authorities .
3. In the Certificate Authorities section, click the Download link for the Root CA issued to
your organization.
This certificate is imported when you set up the trusted certificate profile described in the
following section.
Creating a Trusted Certificate Profile - SecureW2 Root CA
1. Sign in to the Microsoft Endpoint Manager portal.
2. Select Devices > Configuration profiles > Create profile .
3. From the Platform drop-down list, select the device platform for this trusted certificate.
The options are:
● Android
● iOS
● macOS
● Windows 10 and later

4. From the Profile type drop-down list, select Templates , and then select Trusted
certificate . Click Create .
Note : You must create a separate profile for each OS platform. The steps to create trusted
certificates are similar for each device platform.
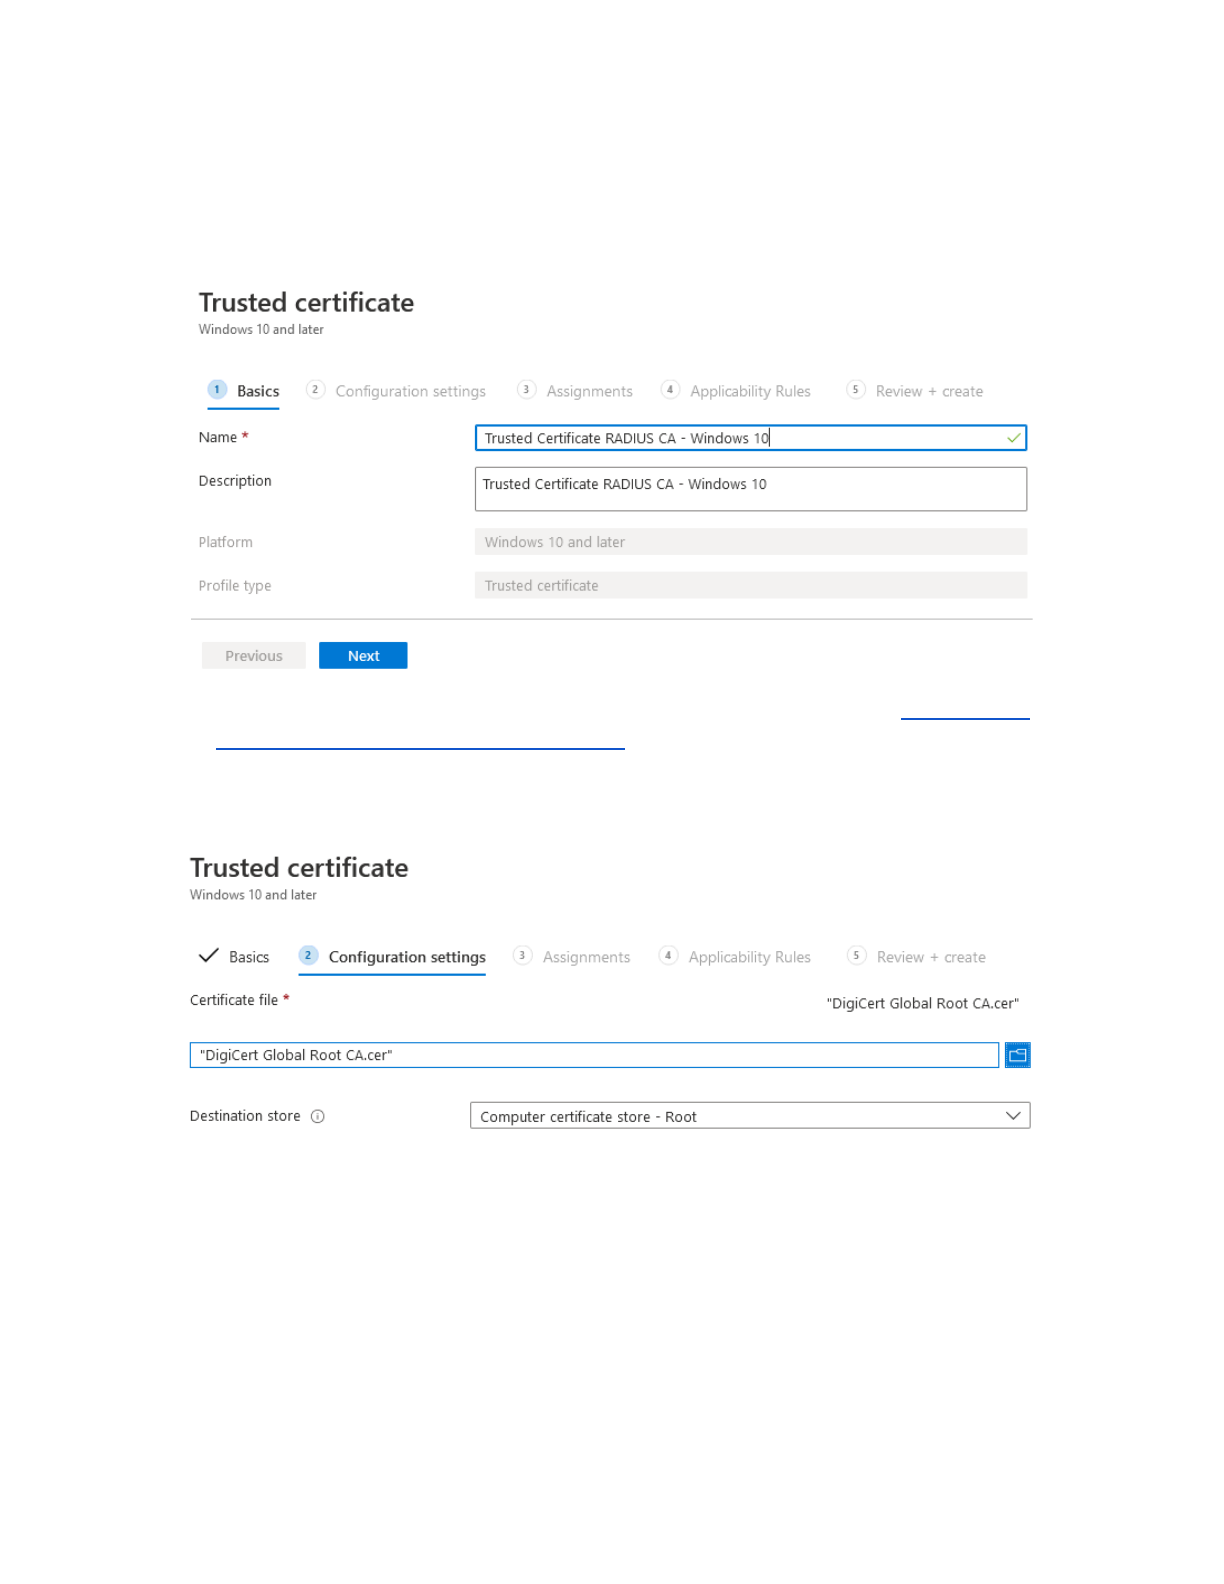
5. On the Trusted certificate page, type a name and description for the trusted certificate
profile and then click Next .
6. Add the Root certificate you saved earlier by clicking the Browse button (see the Exporting
the SecureW2 Root CA section).
7. Click Next .
Note : For Windows 8.1 and later devices only, configure the Destination Store field as Computer
certificate store - Intermediate as shown in the following screen.
Trusted Certificate Profile for SecureW2 Intermediate CA
This Trusted Certificate Profile is required to map the SecureW2 Intermediate CA certificate to the
SCEP certificate profile. This CA certificate must be the certificate that issues the end-user
certificates.

Note : You must create a separate profile for each OS platform. The steps to create trusted
certificates are similar for each device platform.
Exporting the SecureW2 Intermediate CA
To export the SecureW2 Intermediate CA from the JoinNow Management Portal, follow the given
steps.
1. Log in to the JoinNow Management Portal.
2. Go to PKI Management > Certificate Authorities .
3. In the Certificate Authorities section, click the Download link for the Intermediate CA
created earlier. (See the Create an Intermediate CA for Intune SCEP Gateway Integration
section.)
This certificate is imported when you set up the trusted certificate profile described in the
following section.
Creating a Trusted Certificate Profile - SecureW2 Intermediate CA
1. Sign in to the Intune (Microsoft Endpoint Manager) portal.
2. Select Devices > Configuration profiles > Create profile .
3. From the Platform drop-down list, select the device platform for this trusted certificate.
The options are:

● Android
● iOS
● macOS
● Windows 10 and later
4. From the Profile type drop-down list, select Templates , and then select Trusted
certificate . Click Create .
Note : You must create a separate profile for each OS platform. The steps to create trusted
certificates are similar for each device platform.
5. On the Trusted certificate page, type a name and description for the trusted certificate
profile and then click Next .

6. Add the certificate you saved earlier by clicking the Browse button (see the Exporting the
SecureW2 Intermediate CA section).
8. Click Next .
Note : For Windows 8.1 and later devices only, configure the Destination Store field as Computer
certificate store - Intermediate as shown in the following screen.
8. Assign the profile to appropriate Groups and Rules , review it, and click Create .

Exporting the Trusted RADIUS Server Root CA Certificate
This section lists the steps to export the RADIUS Server Root CA Certificate from the JoinNow
Management Portal.

1. Click Network Profiles .
2. Click the Edit link of the network profile you configured earlier.
3. In the Certificates section, click Add/Remove Certificate .
4. Check the checkbox next to DigiCert Global Root CA (Mon Nov 10 00:00:00 UTC 2031)
as shown in the following screen.
5. Click Update .
6. The CA appears in the Certificates section.
7. Click Download .
Creating a Trusted Certificate Profile - RADIUS Server Root CA
Certificate
After downloading the RADIUS Server certificate, create a Trusted Certificate Profile in Intune to
push this certificate to the organization’s devices. The process is as follows:
1. Sign in to the Microsoft Endpoint Manager portal.
2. Select Devices > Configuration profiles > Create profile .

3. From the Platform drop-down list, select the device platform for this trusted certificate.
● Android
● iOS
● macOS
● Windows 10 and later
4. From the Profile type drop-down list, select Templates , and then select Trusted
certificate and click Create .
Note : You must create a separate profile for each OS platform. The steps to create trusted
certificates are similar for each device platform.
5. Enter a name and description for the trusted certificate profile, in the respective fields.
6. Click Next .
7. Click the Browse button to add the certificate you saved earlier (see the Exporting the
Trusted RADIUS Server Root CA Certificate section) and then click Next .
Note : For Windows 8.1 and later devices only, from the Destination Store drop-down list,
select Computer certificate store - Root .
8. Assign the profile to appropriate Groups and Rules , review it and click Create .

Chapter 5: SCEP Profile for SecureW2 Certificate
Requests
The SCEP Profile is required for end-user devices to communicate with the SecureW2 Issuing CA
certificate for the enrollment of end-user certificates. Once the end-user certificate is enrolled
successfully, the certificate is used to connect to the Wi-Fi network.

Note : You must create a separate profile for each OS platform. The steps to create trusted
certificates are similar for each device platform.
Creating a SCEP Certificate Profile
1. Sign in to the Microsoft Endpoint Manager portal.
2. Select Devices > Configuration profiles > Create profile .
3. From the Platform drop-down list, select the device platform for this SCEP certificate. You
can select one of the following platforms for device restriction settings:
● Android
● iOS
● macOS
● Windows 10 and later
4. From the Profile type drop-down list, select Templates and then select SCEP certificate .
Click Create .

Note : You must create a separate profile for each OS platform. The steps to create trusted
certificates are similar for each device platform.
5. On the SCEP certificate page, type a name and description for the SCEP Certificate profile
and click Next .

6. For Certificate Type - User , use the following settings:
a. Certificate type : Select User for user certificates.
b. Subject name format : Choose how Microsoft Intune creates the subject name in
the certificate request. Select one of the following options:
■ CN={{UserName}}
■ CN={{EmailAddress}}
■ CN={{UserPrincipalName}}
c. Subject alternative name : Choose how Microsoft Intune creates the subject
alternative name (SAN) in the certificate request. We advice customers to use one
of the following attributes in the given format:
■ Email address : {{User Name}}
■ Email address : {{UserPrincipalName}}
■ Email address : {{AAD_Device_ID}}
Note : To test if attributes are configured correctly, check the General Events
section in the SecureW2 Management Portal for any event messages, such as
Device Creation Failed , which indicates that the attributes are not correctly
mapped.
d. Key storage provider (KSP) (Windows Phone 8.1, Windows 8.1, and later): Select
where the certificate’s key is to be stored. Choose the following value:
■ Enroll to Trusted Platform Module (TPM) KSP if present, otherwise
Software KSP
e. Key usage : Enter the key usage options for the certificate. Select both options:
■ Key encipherment : Allow key exchange only when the key is encrypted.
■ Digital signature : Allow key exchange only when a digital signature helps
protect
the key.

f. Key size (bits) : Select the number of bits contained in the key. Select the largest
bit size.
g. Hash algorithm (Android, Windows Phone 8.1, Windows 8.1 and later): Select
SHA-2 , the strongest level of security that the connecting devices support.
Note : Certificate type is not a setting on Android SCEP Profiles.
7. Root Certificate : Click the + sign and choose the profile created earlier (Trusted Certificate
Profile for SecureW2 Issuing CA).
8. Extended key usage : Add values for the certificate's intended purpose. In most cases, the
certificate requires Client Authentication so that the user or device can authenticate to a
server. From the Predefined values drop-down list, select Client Authentication .
9. Enrollment Settings
● Renewal threshold (%) : Enter the percentage of the certificate lifetime that
remains
before the device requests renewal of the certificate. The default value is 20%.
● SCEP Server URLs : Enter the Endpoint URI available in the Intune CA IdP. (See the
Creating an Intune CA IdP section.)
10. Select Next and assign the profile to appropriate Groups and Rules , review it, and click
Create .

11. For Certificate Type - Device , use the following settings:
a. Certificate type : Select Device certificate for scenarios such as user-less devices,
example kiosks, or for Windows devices, placing the certificate in the Local
Computer certificate store.
b. Subject name format : Choose how Microsoft Intune creates the subject name in
the certificate request. Select one of the following options:
● CN={{DeviceName}}
● CN={{AAD_Device_ID}}
c. Subject alternative name : Choose how Microsoft Intune creates the subject
alternative name (SAN) in the certificate request. We advice customers to use one
of the following attributes in the given format:
● Email address: {{DeviceName}}
● Email address: {{AAD_Device_ID}}
Note : To test if the attributes are configured correctly, check the General Events section in the
JoinNow Management Portal for any event messages, such as Device Creation Failed , which
indicates that the attributes are not correctly mapped.
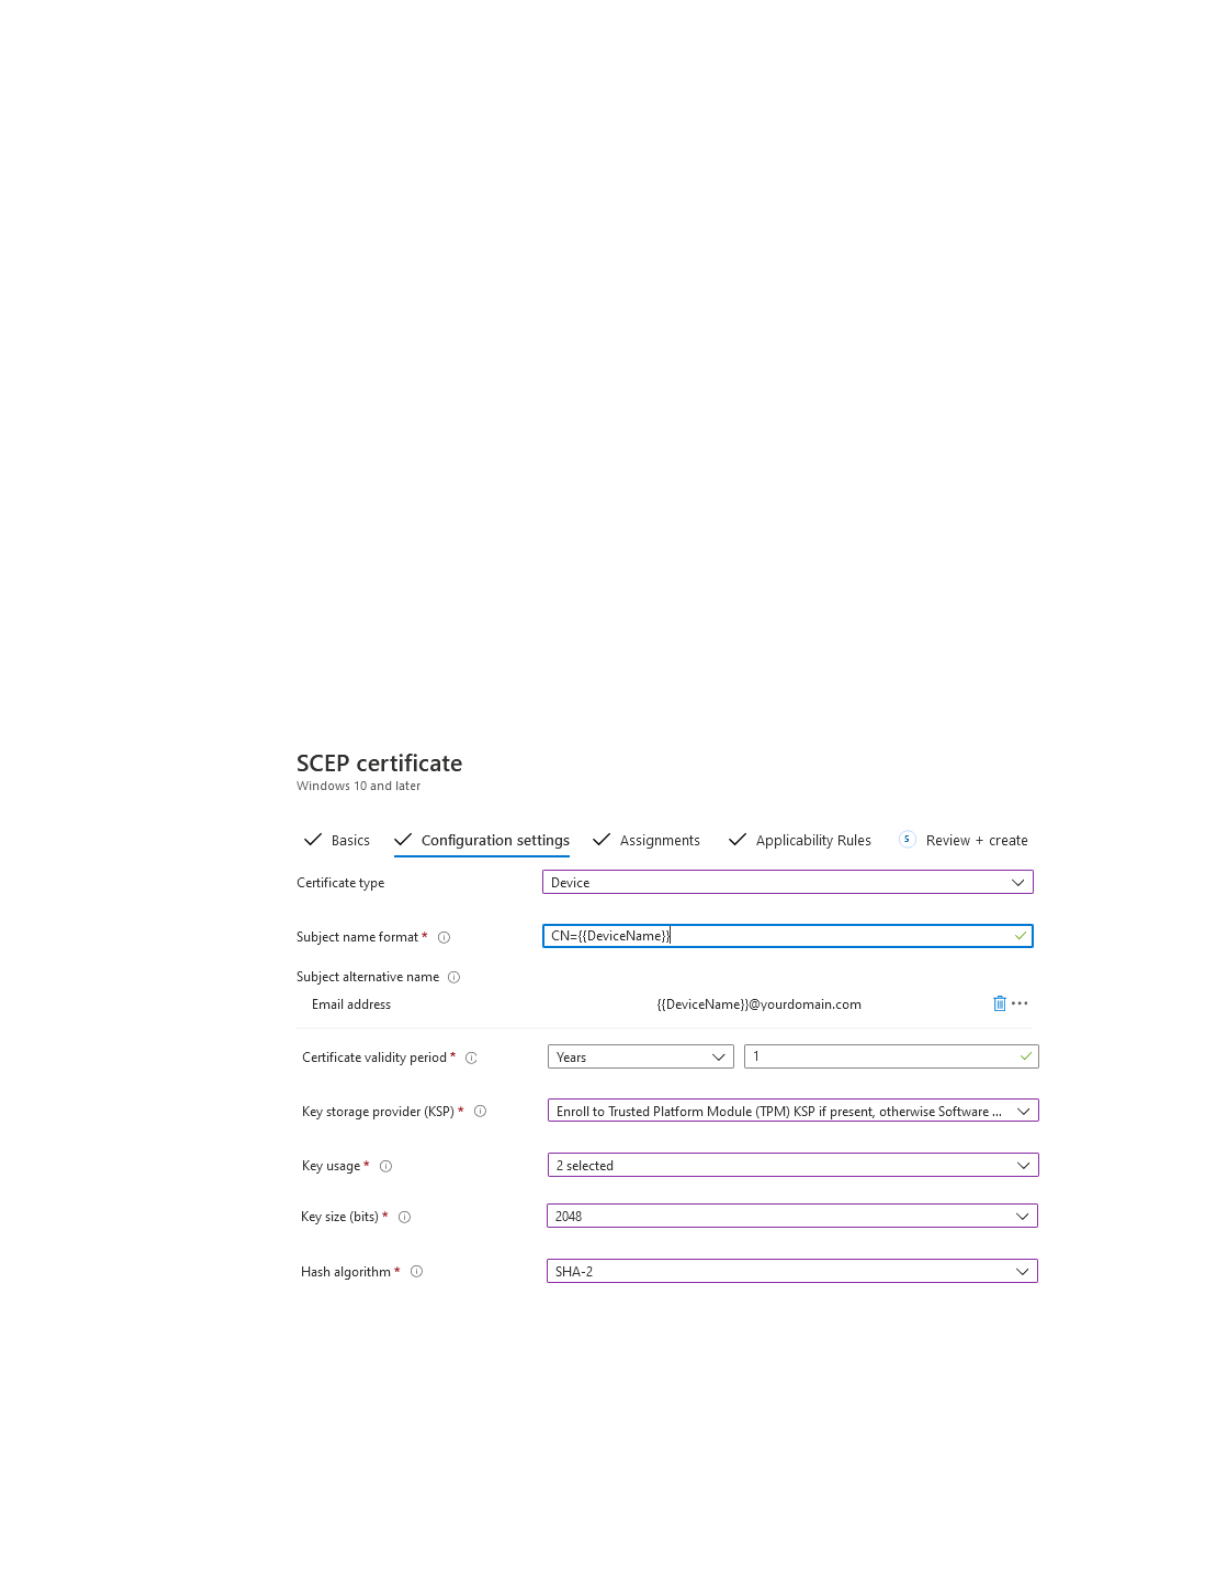
d. Key storage provider (KSP) (Windows Phone 8.1, Windows 8.1 and later): Select
where the key to the certificate is stored. Choose the following value:
● Enroll to Trusted Platform Module (TPM) KSP if present, otherwise
Software KSP
e. Key usage : Select the key usage options for the certificate. Select both the options:
● Key encipherment: Allows key exchange only when the key is encrypted.
● Digital signature: Allows key exchange only when a digital signature helps
protect
the key.
f. Key size (bits) : Select the number of bits contained in the key. Select the largest bit
size.
g. Hash algorithm (Android, Windows Phone 8.1, Windows 8.1, and later): Select
SHA-2 , the strongest level of security that the connecting devices support.
h. Root Certificate : Click the + sign and choose the profile created earlier. (See the
Trusted Certificate Profile for SecureW2 Intermediate CA section.)
i. Extended key usage : Add values for the certificate's intended purpose. In most
cases, the certificate requires Client Authentication so the user can authenticate
to a server. From the Predefined values drop-down list, select Client
Authentication .
j. Enrollment Settings
● Renewal threshold (%) : Enter the percentage of the certificate lifetime that
remains before the device requests renewal of the certificate.

● SCEP Server URLs : Enter the Endpoint URI available in the Intune CA IdP.
12. Select Next and assign the profile to appropriate Groups and Rules , review it, and click
Create .

Chapter 6: Wi-Fi Profile for Secure SSID
Configuration
Microsoft Intune includes built-in Wi-Fi settings that you can deploy to users and devices in your
organization. This group of settings is called a profile, which can be assigned to different users
and groups. Once you assign users a profile, they can obtain access to the network without
configuring it themselves.
Creating a Wi-Fi Profile
1. In the Microsoft Endpoint Manager portal, select Device configuration > Profiles > Create
profile .
2. Enter a name and description for the Wi-Fi profile.
3. From the Platform drop-down list, select one of the OS devices to apply the Wi-Fi settings:
○ Android
○ iOS
○ macOS
○ Windows 10 and later
Note : You must create a separate profile for each OS platform. The steps to create trusted
certificates are similar for each device platform.
4. In the Profile Type drop-down list, select Templates and then scroll down and select
Wi-Fi .
5. After adding your Wi-Fi settings, select Create to add the configuration profile. The profile
is created and is displayed in the profiles list ( Devices > Configuration profiles ).
Assigning a Device Profile
After creating a profile, you must specify the devices to which the profiles are to be pushed. You
can accomplish this by assigning them.
1. In the Microsoft Endpoint Manager portal, select Devices > Configuration profiles . All the
profiles are listed.
2. Select the profile you want to assign > Assignments .
3. Select to Include groups or Exclude groups, and then select your groups. When you select
your groups, you are choosing an Azure AD group. To select multiple groups, hold down
the Ctrl key, and select your groups.

4. Click Save ..
Adding Wi-Fi Settings for Devices Running Android
You can create a profile with specific Wi-Fi settings, then deploy this profile to your Android
devices.
Table 1: Configuration steps for devices running Android
Setting Name
Configuration Step
Wi-Fi type
Select Enterprise .
Network name
Enter a name for your reference.
SSID
Enter the name of the wireless network that devices connect to.
EAP type
Select the Extensible Authentication Protocol (EAP) type used to
authenticate secured wireless connections. Select EAP-TLS .
○ Server Trust - Root certificate for server validation : Select
an existing trusted Root certificate profile, created in Creating
a Trusted Certificate Profile - RADIUS Server Root CA . This
certificate is presented to the server when the client
connects to the network, and is used to authenticate the
connection. Select OK to save your changes.
○ Client Authentication - Client certificate for client
authentication (Identity certificate) : Select the SCEP profile
created previously in Creating a SCEP Certificate Profile . This
certificate is the identity presented by the device to the server
to authenticate the connection. Select OK to save your
changes.
Note : Retain the default values for the Connect automatically and Hidden network attributes.
After you have configured the Wi-Fi settings, select OK and then click Create . The profile is
created and displayed in the profiles list.
Adding Wi-Fi Settings for iOS Devices
You can create a profile with specific Wi-Fi settings, then deploy this profile to your iOS devices.

Table 2: Configuration steps for iOS devices
Setting Name
Configuration Step
Wi-Fi type
Select Enterprise .
Network name
Enter a name for the Wi-Fi connection.
SSID
Enter the name of the wireless network that devices connect to.
EAP type
Select the Extensible Authentication Protocol (EAP) type used to
authenticate secured wireless connections. Select EAP-TLS .
○ Server Trust - Certificate server names : Add one or more
common names used on your RADIUS server certificates
issued by your trusted CA. For the SecureW2 RADIUS, it is:
radius01.securew2.com
○ Root certificate for server validation : Select an existing
trusted Root certificate profile, created in Creating a Trusted
Certificate Profile - RADIUS Server Root CA . This certificate is
presented to the server when the client connects to the
network, and is used to authenticate the connection.
Select OK to save your changes.
○ Client Authentication - Client certificate for client
authentication (Identity certificate) : Select the SCEP profile
created previously in Creating a SCEP Certificate Profile . This
certificate is the identity presented by the device to the server
to authenticate the connection. Select OK to save your
changes.
Note : Retain the default values for the Connect automatically , Hidden network , and Proxy
settings attributes.
After you have configured the Wi-Fi settings, select OK and then click Create . The profile is
created and displayed in the profiles list.
Adding Wi-Fi Settings for macOS Devices
You can create a profile with specific Wi-Fi settings, then deploy this profile to your macOS
devices.
Table 3: Configuration steps for macOS devices
Setting Name
Configuration Step

Wi-Fi type
Select Enterprise .
Network name
Enter a name for the Wi-Fi connection.
SSID
Enter the name of the wireless network that devices connect to.
EAP type
Select the Extensible Authentication Protocol (EAP) type used to
authenticate secured wireless connections. Select EAP-TLS .
○ Server Trust - Certificate server names : Add one or more
common names used on your RADIUS server certificates
issued by your trusted CA. For the SecureW2 RADIUS, it is:
radius01.securew2.com
○ Root certificate for server validation : Select an existing
trusted Root certificate profile, created in Creating a Trusted
Certificate Profile - RADIUS Server Root CA . This certificate is
presented to the server when the client connects to the
network, and is used to authenticate the connection.
Select OK to save your changes.
○ Client Authentication - Client certificate for client
authentication (Identity certificate) : Select the SCEP profile
created previously in Creating a SCEP Certificate Profile . This
certificate is the identity presented by the device to the server
to authenticate the connection. Select OK to save your
changes.
Note : Retain the default values for the Connect automatically , Hidden network , and Proxy
settings attributes.
After you have configured the Wi-Fi settings, select OK and then click Create . The profile is
created and displayed in the profiles list.
Adding Wi-Fi Settings for Windows 10 and Later Devices
You can create a profile with specific Wi-Fi settings, then deploy this profile to your Windows 10
and later devices.
Table 4: Configuration steps for Windows 10 and later devices
Setting Name
Configuration Step
Wi-Fi type
Select Enterprise .

Wi-Fi name (SSID)
Enter the name of the wireless network that devices connect to.
Connection name
Enter a name name for the Wi-Fi connection.
EAP type
Select the Extensible Authentication Protocol (EAP) type used to
authenticate secured wireless connections. Select EAP-TLS .
○ Server Trust - Certificate server names : Add one or more
common names used on your RADIUS server certificates
issued by your trusted CA. For the SecureW2 RADIUS it is:
radius01.securew2.com
○ Root certificate for server validation : Select an existing
trusted Root certificate profile, created in Creating a Trusted
Certificate Profile - RADIUS Server Root CA . This certificate is
presented to the server when the client connects to the
network, and is used to authenticate the connection.
Select OK to save your changes.
○ Client Authentication - Client certificate for client
authentication (Identity certificate) : Select the SCEP profile
created previously in Creating a SCEP Certificate Profile . This
certificate is the identity presented by the device to the server
to authenticate the connection. Select OK to save your
changes.
Note : Retain the default values for the Connect automatically when in range , Metered
Connection Limit , Single sign-on (SSO) , Enable Pairwise Master Key (PMK) caching , Enable
pre-authentication , and Company Proxy settings attributes.
After you have configured the Wi-Fi settings, select OK and then click Create . The profile is
created and displayed in the profiles list.

Chapter 6: Troubleshooting
This section lists the common issues and the steps to resolve them.
Common issues that you may encounter after the configuration is done:
● Certificate fails to enroll.
● Connection to the secure SSID fails.
● Error messages are displayed:
○ Device Creation Failed in the SecureW2 Management Portal > Device Onboarding
> Events or
○ SCEP enrollment failed in the Intune portal.
To resolve them:
● Check if the attributes have values and are mapped correctly. For more information, see:
Creating an Intermediate CA for Intune SCEP Gateway Integratio n .
● Make sure that the SCEP profile (in the Intune Portal) is configured to send values in the
SAN attribute using Email address (RFC822) . The common attributes configured are
DeviceName and AAD_Device_ID. For more information, see: Creating an Intermediate CA
for Intune SCEP Gateway Integratio n .
● Confirm if the User Role Policy is mapped to the Intune API Token as identity Provider and
similarly ensure that Enrollment Policy is mapped to the Role and default Device Role. For
more information, see: Configuring a Role Policy .
● Ensure that the SCEP profile is configured accurately.For more information, see: Creating
an Intermediate CA for Intune SCEP Gateway Integratio n .
● Check if the Trusted Root CA of the RADIUS server certificate is mapped in the Wi-Fi
profile. For more information, see: Creating a Wi-Fi Profile .
● Remove the SCEP profile and push any other profile, like the Trusted Root CA profile, to
confirm if the user is successful with the configuration. For more information, see:
Exporting Trusted RADIUS Server Root CA Certificate .
Possible issues in Microsoft Intune:
● SCEP enrollment failed. For more information, see:
https://docs.microsoft.com/en-gb/troubleshoot/mem/intune/troubleshoot-device-enrollm
ent-in-intune
● Users not assigned to the application in Azure. For more information, see:
https://docs.microsoft.com/en-us/mem/intune/fundamentals/users-add
