
Shared: QuickBooks
Connector
Setup Guide for Concur Standard Edition
Last Revised: August 19, 2023
Applies to these SAP Concur solutions:
Expense
Professional/Premium edition
Standard edition
Travel
Professional/Premium edition
Standard edition
Invoice
Professional/Premium edition
Standard edition
Request
Professional/Premium edition
Standard edition

ii Shared: QuickBooks Connector Setup Guide for Concur Standard Edition
Last Revised: August 19, 2023
© 2004 - 2024 SAP Concur All rights reserved.
Table of Contents
Section 1: Overview .................................................................................................... 1
Important Timing Considerations ............................................................................... 1
Sending Expense/Invoice Data to QuickBooks ....................................................... 1
Changing Accounting Information in QuickBooks ................................................... 1
Supported Editions of QuickBooks .............................................................................. 2
QuickBooks Online Prerequisites ................................................................................ 2
QuickBooks Desktop Prerequisites ............................................................................. 3
Supported QuickBooks Account Types ........................................................................ 3
Section 2: Configure the Intuit QuickBooks Connector in SAP Concur ......................... 4
Step 1: Accounting .................................................................................................. 4
Connecting QuickBooks Desktop with Concur ........................................................ 5
Connecting QuickBooks Online With SAP Concur .................................................. 11
ERP Liability Account Code (Invoice Only) ........................................................... 13
Step 2: Custom Fields ............................................................................................ 14
Custom Fields - QuickBooks Desktop ................................................................. 14
Custom Fields - QuickBooks Online .................................................................... 15
View List Items ............................................................................................... 15
Step 3: Expense Types ........................................................................................... 16
Expense Account Codes .................................................................................... 16
Invoice Account Codes ..................................................................................... 17
Mapping Expense Types to List Items/Products & Services .................................... 18
Step 4: Employee Reimbursements (Expense Only) ................................................... 21
Entering Account Codes for Reimbursement Methods ........................................... 21
Step 5: Payment Types (Expense Only) .................................................................... 22
Consolidated Vendor Handling ........................................................................... 24
Step 6: File Export Configuration (QuickBooks Desktop Invoice Only) ........................... 25
Step 7: Users ........................................................................................................ 26
Step 8: Synchronize Vendors from QuickBooks (Invoice Only) ..................................... 27
Section 3: Sending Expense or Invoice Data to QuickBooks ...................................... 28
Expense Data ........................................................................................................ 28
Invoice Data ......................................................................................................... 30
Section 4: Managing the Integration ......................................................................... 32
Updating the Synchronized Data in SAP Concur ......................................................... 32
QuickBooks Online ........................................................................................... 32
QuickBooks Desktop ........................................................................................ 32
Viewing Integration Issues with Expense .................................................................. 33
QuickBooks Online ........................................................................................... 33

Shared: QuickBooks Connector Setup Guide for Concur Standard Edition iii
Last Revised: August 19, 2023
© 2004 - 2024 SAP Concur All rights reserved.
QuickBooks Desktop ........................................................................................ 33
Viewing Integration Issues with Invoice .................................................................... 34
Refreshing the Integration ...................................................................................... 34
Disconnecting the Integration .................................................................................. 35

iv Shared: QuickBooks Connector Setup Guide for Concur Standard Edition
Last Revised: August 19, 2023
© 2004 - 2024 SAP Concur All rights reserved.
Revision History
Date Notes/Comments/Changes
August 19, 2023
Added an ERP Liability Account Code section and updated the File Export
Configuration (QuickBooks Desktop Invoice Only) section in the Step: 1
Accounting section. Minor edits throughout.
June 27, 2023
Updated screenshots throughout. Added notes about web connector best
practices. Added note about running web connector in multiuser mode and
on a schedule.
April 22, 2023
Removed QuickBooks Desktop from the Invoice Account Codes > Sync
Account section. The Sync Account Codes button was removed from the
QuickBooks UI for feature parity with Concur Expense.
January 21, 2022 Updated the copyright year; no other changes; cover date not updated
October 22, 2021 Updated the ADP Payroll reimbursement method note
April 15, 2021 Updated the copyright year; no other changes; cover date not updated
March 22, 2021
Replaced "Company Card" with "Payment Types" to reflect the new module
name.
February 20, 2021 The “Other Current Liabilities” QuickBooks account type is now supported.
November 14, 2020
Updated the images on page 5 and 10 to reflect the new “Connect to
QuickBooks” button design.
September 23, 2020 Updated the Sync Account Codes section.
September 10, 2020 Updated the information about setting default account codes for Invoice.
July 27, 2020
Updated the screenshot in step 2 of the second procedure (Step 7) on page
23; cover date note updated.
July 7, 2020
Updated pages 4, 12, and 13 to reflect changes to the Custom Fields page.
April 27, 2020
Renamed the Authorization Request check box to Request on the guide’s
title page; cover date not updated
January 15, 2020 Updated the copyright; no other changes; cover date not updated
August 17, 2019
Updated to reflect changes to the UI on the File Export > Select Format
page.
June 8, 2019
Updated text and images throughout to reflect UI name change from "Cost
Tracking" to "Custom Fields".

Shared: QuickBooks Connector Setup Guide for Concur Standard Edition v
Last Revised: August 19, 2023
© 2004 - 2024 SAP Concur All rights reserved.
Date Notes/Comments/Changes
May 17, 2019 Updated these sections:
• Supported Editions of QuickBooks
• QuickBooks Online Prerequisites
• QuickBooks Desktop Prerequisites
• Step 1: Accounting > Connecting QuickBooks Desktop with SAP
Concur
• Step 1: Accounting > Connecting QuickBooks Online with SAP
Concur
• Step 3: Expense Types > Mapping Expense Types to List
Items/Products & Services
• Step 4: Employee Reimbursements (Expense Only) > Entering
Account Codes for Reimbursement Methods
• Step 5: Company Card (Expense Only)
• Disconnecting the Integration
February 26, 2019
Updated the Step 2: Cost Tracking section with changes to list
management.
November 28, 2018
Updated the supported version number for the Intuit QuickBooks Connector
to 2.3.0.20.
September 4, 2018 Updated these sections:
• Supported QuickBooks Account Types
• Step 4: Employee Reimbursements (Expense Only) > Entering Account
Codes for Reimbursement Methods
July 27, 2018
Updated the Configure the Intuit QuickBooks Connector in Concur > Step 2:
Cost Tracking > Data Entry Details section with new list functionality.
May 12, 2018
Added the Supported QuickBooks Account Types section and updated the
Step 2: Cost Tracking > Data Entry Details section.
April 25, 2018
Added version information for QuickBooks Desktop to Supported Editions of
QuickBooks section.
April 16, 2018
Changed the check boxes on the front cover; no other changes; cover date
not updated
April 14, 2018 Added the Step 8: Synchronize Vendors from QuickBooks (Invoice) section.
February 10, 2018
Updated guide to include step by step instructions for configuration, added
several sections, including:
• Important Timing Considerations
• QuickBooks Online Prerequisites
• QuickBooks Desktop Prerequisites
• Consolidated Vendor Handling
• Managing the Integration
November 4, 2017
Updated guide to include new Product Settings page, which replaces the
Setup Wizard.
October 4, 2017 Minor edit; no change to Last Revised date on cover or footers.

vi Shared: QuickBooks Connector Setup Guide for Concur Standard Edition
Last Revised: August 19, 2023
© 2004 - 2024 SAP Concur All rights reserved.
Date Notes/Comments/Changes
December 15, 2016 Changed copyright and cover; no other content changes.
June 17, 2016
Added Invoice specific information, so this guide is now a shared guide
between Invoice and Expense.
March 18, 2016 Removed references to Sync Manager and Concur QuickBooks Connector
Added information about Intuit QuickBooks Web Connector
November 20, 2015
Updated references to the Introduction step of setup because it has been
renamed to Accounting.
March 13, 2015 Clarified how clicking Connect to QuickBooks impacts the Setup Wizard
Removed information about two user interfaces
October 17, 2014 Updated GL Account Code information.
September 16, 2014 Added information about two user interfaces; no other content changes
May 16, 2014
New document. (This content originated from the Expense Setup Guide for
Concur Standard.)
NOTE: Multiple SAP Concur product versions and UI themes are available, so this
content might contain images or procedures that do not precisely match your
implementation. For example, when SAP Fiori UI themes are implemented, home
page navigation is consolidated under the SAP Concur Home menu.

Section 1: Overview
Shared: QuickBooks Connector Setup Guide for Concur Standard Edition 1
Last Revised: August 19, 2023
© 2004 - 2024 SAP Concur All rights reserved.
Intuit QuickBooks Connector
Section 1: Overview
SAP Concur and Intuit have partnered to make accounting for expenses in
QuickBooks easier. The Standard Edition of Concur lets you import QuickBooks
accounting data into your Concur configuration. This data allows you to utilize your
unique accounting data when entering expenses and/or invoices. When you choose
to send the data to QuickBooks, Concur sends the expense data as a bill, or credit
card charge, or the invoice data.
NOTE: If you would like to enable QuickBooks Connector for your company, contact
SAP Concur client services for more information.
Important Timing Considerations
Sending Expense/Invoice Data to QuickBooks
The QuickBooks Connector sends the approved reports/invoices to QuickBooks when
the administrator clicks send data (Expense) or Send to QuickBooks (Invoice) in
Payment Manager. Once the data has been sent to QuickBooks, the reports/invoices
cannot be modified in Concur.
Changing Accounting Information in QuickBooks
The QuickBooks Connector synchronizes accounting data from QuickBooks to Concur
at multiple times.
QuickBooks Online:
• Whenever the administrator views the Product Settings pages.
• Whenever the administrator clicks My ERP Data > Refresh from the
Accounting page of Product Settings.
QuickBooks Desktop:
• Whenever the Intuit administrator runs the QuickBooks Web Connector.
For more information, refer to the Updating the Synchronized Data in Concur
section of this guide.
In Concur, the QuickBooks related data for expenses and invoices is stored in the
report or invoice when it is submitted for approval. Any changes to the QuickBooks
related data that happen in Concur after the report or invoice is submitted are not
reflected in the submitted reports or invoices. This preserves the record of the data
as it was at the time of submission.

Section 1: Overview
2 Shared: QuickBooks Connector Setup Guide for Concur Standard Edition
Last Revised: August 19, 2023
© 2004 - 2024 SAP Concur All rights reserved.
Because of this, you should manage the timing of changes in QuickBooks carefully.
When making changes to any data in QuickBooks that would impact Concur, you
should verify that there are no submitted and unpaid reports or invoices. If the
report/invoice is sent to QuickBooks while it contains data that is no longer valid, it
will cause an error and fail to post. To correct this error, the processor must send the
report or invoice back to the employee, who can re-submit it with the latest
QuickBooks information.
The following changes in QuickBooks should be managed carefully:
• Removing a list item from a customer or class list
• Removing or renaming a cost object
• Removing or modifying account codes
Prior to making these changes, the administrator should notify users to stop
submitting expense reports and invoices and wait for all submitted reports to finish
the approval/sync process. Then the administrator can make the change in
QuickBooks and update the synchronized data in Concur.
The administrator can review which reports are submitted and not yet sent to
QuickBooks using the Expense Processor, Invoice Processor, and Payment Manager
tools.
For more information, refer to the Managing the Integration section of this
guide.
Supported Editions of QuickBooks
• Plus (online): Full transaction and list (class, client, and location) integration
(Expense only)
• Essentials (online): Transaction integration only (Expense only)
• Desktop (2020 or later Full transaction and list (class and client)
integration. Concur mirrors Intuit’s policy for supporting only the most recent
3 years of products. Meaning, Intuit discontinues support for QBD versions
older than 3 years. As of May 31,
2023, Intuit will discontinue support for
QBD 2020.
QuickBooks Online Prerequisites
• QuickBooks credentials—Providing an administrative-level Intuit User ID
and Password easily enables your Concur system to access your QuickBooks
data from the Intuit cloud.
• Employees set up as vendors—By design, QuickBooks sends employee
specific expense information to Concur using vendor settings. Employees
must be set up as vendors in QuickBooks with a first name, last name, and
email – all three of these fields are required by Concur.
• Company file—This single QuickBooks company file connects to your Concur
system.

Section 1: Overview
Shared: QuickBooks Connector Setup Guide for Concur Standard Edition 3
Last Revised: August 19, 2023
© 2004 - 2024 SAP Concur All rights reserved.
NOTE: The QuickBooks Online Connector only supports US, UK, and AUZ versions of
QuickBooks. The connector does not support multicurrency transactions. All
transactions from Concur will post to QuickBooks in the home currency.
NOTE: I
f your QuickBooks company is managed by an accountant or a QuickBooks
Pro Advisor, please seek advice from your accountant or advisor.
QuickBooks Desktop Prerequisites
The Intuit QuickBooks Web Connector is compatible with SAP Concur and can be
used with the following U.S. editions of QuickBooks Financial Software products:
• QuickBooks Enterprise Solutions
• QuickBooks Premier (2020 or later)
• QuickBooks Pro (2020 or later)
• QuickBooks Simple Start (2020 or later)
NOTE: The QuickBooks Desktop Connector only supports the US version of
QuickBooks. The connector does not support multicurrency transactions. All
transactions from Concur will post to QuickBooks in USD (United States
Dollar).
NOTE: SAP Concur certifies versions of the QuickBooks desktop web connector
(QBWC) that come with the supported version of QuickBooks desktop. Intuit
might release newer versions of the QBWC throughout the year. These
versions work with the Concur integration; however, not every version of
QBWC is certified.
NOTE: If your QuickBooks company is managed by an accountant or a QuickBooks
Pro Advisor, please seek advice from your accountant or Advisor.
Supported QuickBooks Account Types
The Concur QuickBooks Connector supports the following account types in
QuickBooks:
• Expense
• Fixed Assets
• Cost of Goods Sold
• Other Current Assets
• Credit Card
• Accounts Payable
• Current Assets
• Other Current Liabilities

Section 2: Configure the Intuit QuickBooks Connector in SAP Concur
4 Shared: QuickBooks Connector Setup Guide for Concur Standard Edition
Last Revised: August 19, 2023
© 2004 - 2024 SAP Concur All rights reserved.
The connector does not support integrating the following account types with the Is
Billable Cost field on the Custom Fields page:
• Fixed Assets
• Accounts Payable
• Credit Card
For more information, refer to the Step 2: Custom Fields section of this guide.
Section 2: Configure the Intuit QuickBooks Connector in SAP
Concur
SAP Concur brings select QuickBooks configuration data into your Concur company.
As a QuickBooks user, Concur will prompt you for QuickBooks-specific configuration
information on these pages of Product Settings:
1. Accounting
2. Custom Fields
3. Expense Types
4. Employee Reimbursements (Expense only)
5. Payment Types (Expense only)
6. File Export Configuration (Invoice only)
7. Users
8. Vendor Manager (Invoice only)
NOTE: Once you have finished configuring QuickBooks using Product Settings and
begin using Concur Expense and/or Concur Invoice, you will find that
QuickBooks-specific information is also found in the Concur Expense:
Payment Manager User Guide for Concur Standard Edition and its
corresponding QuickBooks-specific extract document, Concur Expense:
Payment Manager QuickBooks IIF Extract User Guide for Concur Standard
Edition.
Step 1: Accounting
On the Accounting page of Product Settings, you will click Connect to QuickBooks
and link your QuickBooks account to your Concur company. The process to connect
varies depending on whether you use QuickBooks Desktop or QuickBooks Online.
When connecting Concur to a QuickBooks company, the process of entering your
accounting data is automated. This ensures that your users are accounting for their

Section 2: Configure the Intuit QuickBooks Connector in SAP Concur
Shared: QuickBooks Connector Setup Guide for Concur Standard Edition 5
Last Revised: August 19, 2023
© 2004 - 2024 SAP Concur All rights reserved.
expenses correctly. This eliminates data entry and ensures the data is correct
because we use what you have in QuickBooks.
Connecting QuickBooks Desktop with Concur
In Administration > Expense Settings or Expense & Invoice Settings or
Invoice Settings > Accounting, clicking the Connect to QuickBooks button
displays your access token and a link to download your SAP Concur Web Connector
file.

Section 2: Configure the Intuit QuickBooks Connector in SAP Concur
6 Shared: QuickBooks Connector Setup Guide for Concur Standard Edition
Last Revised: August 19, 2023
© 2004 - 2024 SAP Concur All rights reserved.
To download the Intuit QuickBooks Web Connector and your Concur Web
Connector file:
1. Log in as the admin in single user mode. Make sure that the QuickBooks
company file that you want to connect to Concur is open.
NOTE: You must be in the correct QuickBooks file that you want to connect to
Concur and you must be logged in as an admin in single user mode.
2. Copy the access token id shown in the window; you will paste this into the
password area of your Intuit QuickBooks Web Connector. You will only need
to do this one time.
3. Click Download your Concur Web Connector file.
4. On the Authorize New Web Service window, click OK to grant Concur
access to your QuickBooks company.
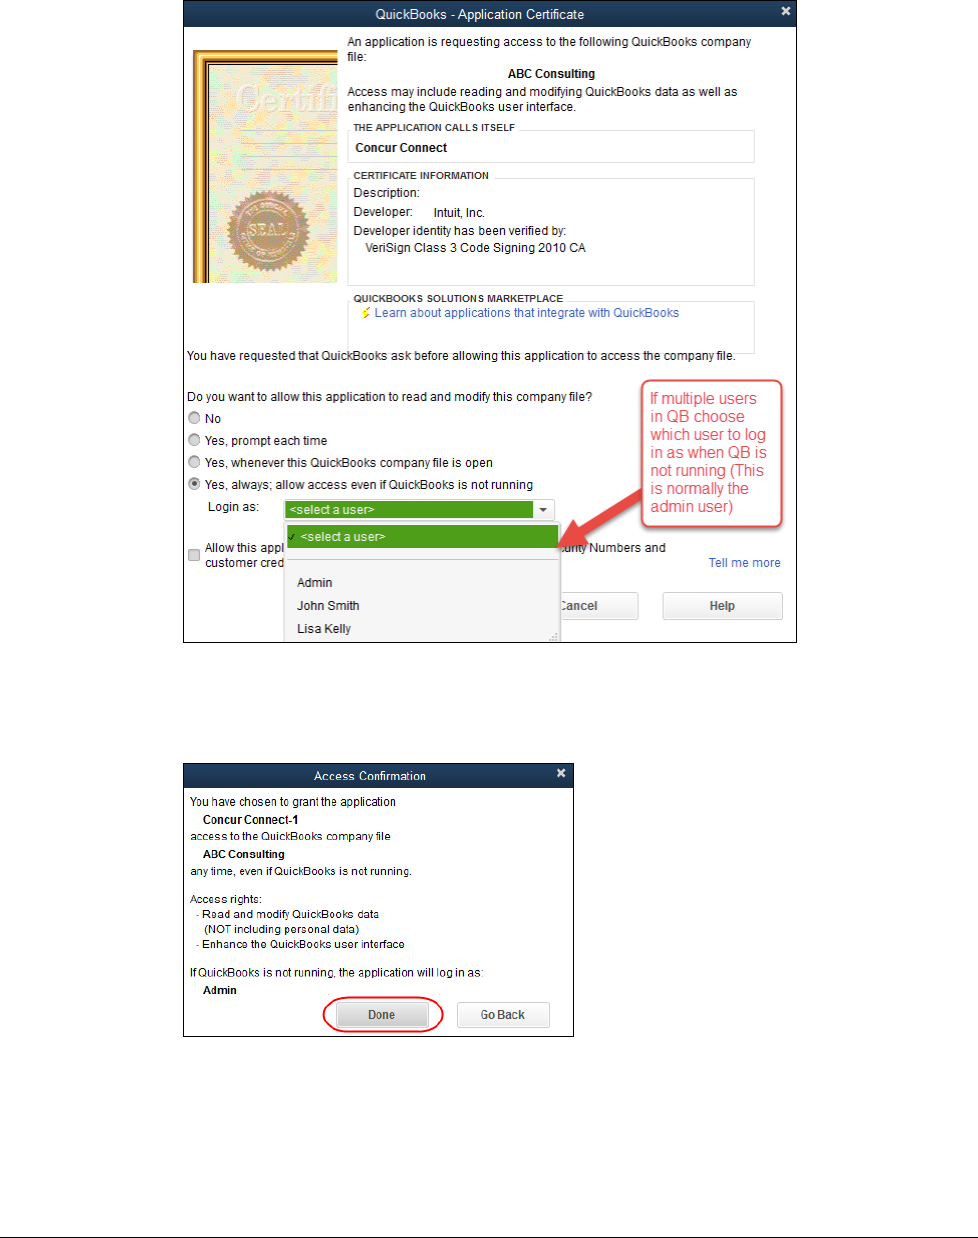
5. On the QuickBooks – Application Certificate window, select Yes, always
allow access even if QuickBooks is not running.
Section 2: Configure the Intuit QuickBooks Connector in SAP Concur
Shared: QuickBooks Connector Setup Guide for Concur Standard Edition 7
Last Revised: August 19, 2023
© 2004 - 2024 SAP Concur All rights reserved.
6. From the Login as dropdown, select Admin.
7. Click OK.
8. On the Access Confirmation window, click Done.

Section 2: Configure the Intuit QuickBooks Connector in SAP Concur
8 Shared: QuickBooks Connector Setup Guide for Concur Standard Edition
Last Revised: August 19, 2023
© 2004 - 2024 SAP Concur All rights reserved.
To connect your Concur company to your QuickBooks company:
1. Paste your access token from SAP Concur into the password field in your
Intuit QuickBooks Web Connector.
2. Click Update Selected.
3. Click Yes.
4. Select the row and click Hide to minimize the Connector, instead of exiting
the Connector.

Section 2: Configure the Intuit QuickBooks Connector in SAP Concur
Shared: QuickBooks Connector Setup Guide for Concur Standard Edition 9
Last Revised: August 19, 2023
© 2004 - 2024 SAP Concur All rights reserved.
5. In Concur refresh your browser and click Sign Out.
Once the web connector is successfully installed and updated, Concur will
show a status that you are connected to your QB file via QuickBooks Web
Connector.
You have successfully installed your new QB integration for QuickBooks
desktop. Your Token ID/Password for QB Web Connector is displayed on
the Accounting page.
NOTE: Once the Concur file is added to the Intuit web connector, you can run
the web connector on a schedule. You can also be logged in as the
admin user or in multiuser mode. The QuickBooks file must be open
for the web connector to run even if it is running on a schedule.
(QUICKBOOKS DESKTOP ONLY) DEFINE QUICKBOOKS ITEMS SETTINGS
In QuickBooks, items are used for tracking anything that a company buys, sells, or
resells (billable and non-billable items) and these items are tied to an expense
account and/or an income account.
In Concur Expense and Concur Invoice, if your company uses QuickBooks Desktop
with the QuickBooks Connector, you can map expense types to QuickBooks accounts
or QuickBooks items.
The Does your company use items list in ERP? list on the Accounting page
determines whether expense types can be mapped to QuickBooks items.
The Does your company use items list in ERP? list is only available on the
Accounting page if the company is connected to a QuickBooks company using the
QuickBooks Connector, and Intuit QuickBooks Desktop: Pro, Premier and Enterprise
is selected from the Select your accounting software list on the Accounting
page.

Section 2: Configure the Intuit QuickBooks Connector in SAP Concur
10 Shared: QuickBooks Connector Setup Guide for Concur Standard Edition
Last Revised: August 19, 2023
© 2004 - 2024 SAP Concur All rights reserved.
To define your QuickBooks item settings:
1. Click Administration > Expense Settings or Expense & Invoice Settings
> Accounting.
2. On the Accounting page, select whether you want to map QuickBooks items
to expense types.
3. Choose from the following options:
♦ Yes, we use items: This option enables the QuickBooks Item Name
column on the Expense – Account Codes and Invoice – Account
Codes pages so that you can map Concur expense types to QuickBooks
items.
♦ No, we do not use items: The system will not display the QuickBooks
Item Name column on the Expense – Account Codes or Invoice –
Account Codes page.
4. Click Save.

Section 2: Configure the Intuit QuickBooks Connector in SAP Concur
Shared: QuickBooks Connector Setup Guide for Concur Standard Edition 11
Last Revised: August 19, 2023
© 2004 - 2024 SAP Concur All rights reserved.
If you choose Yes, we use items, expense types can be mapped to QuickBooks
accounts or QuickBooks items on the Expense - Account Codes and Invoice –
Account Codes pages.
Connecting QuickBooks Online With SAP Concur
To connect SAP Concur to your QuickBooks:
1. Click Administration > Expense Settings or Expense & Invoice Settings
> Accounting.
2. Click Connect to QuickBooks. This button only appears if Intuit Integration
is enabled for your company. The process of connecting the Concur account
to your QuickBooks application starts.
3. Enter your Intuit credentials when prompted to confirm your permissions and
enable the QuickBooks data transfer.
4. Select the relevant QuickBooks company file. If you administer more than one
company in QuickBooks, select the company you want to connect to Concur.
5. Authorize SAP Concur to give Concur permission to use select QuickBooks
data. Once you are connected to QuickBooks, you can start to take advantage
of easier transaction data transfer between Concur and QuickBooks.
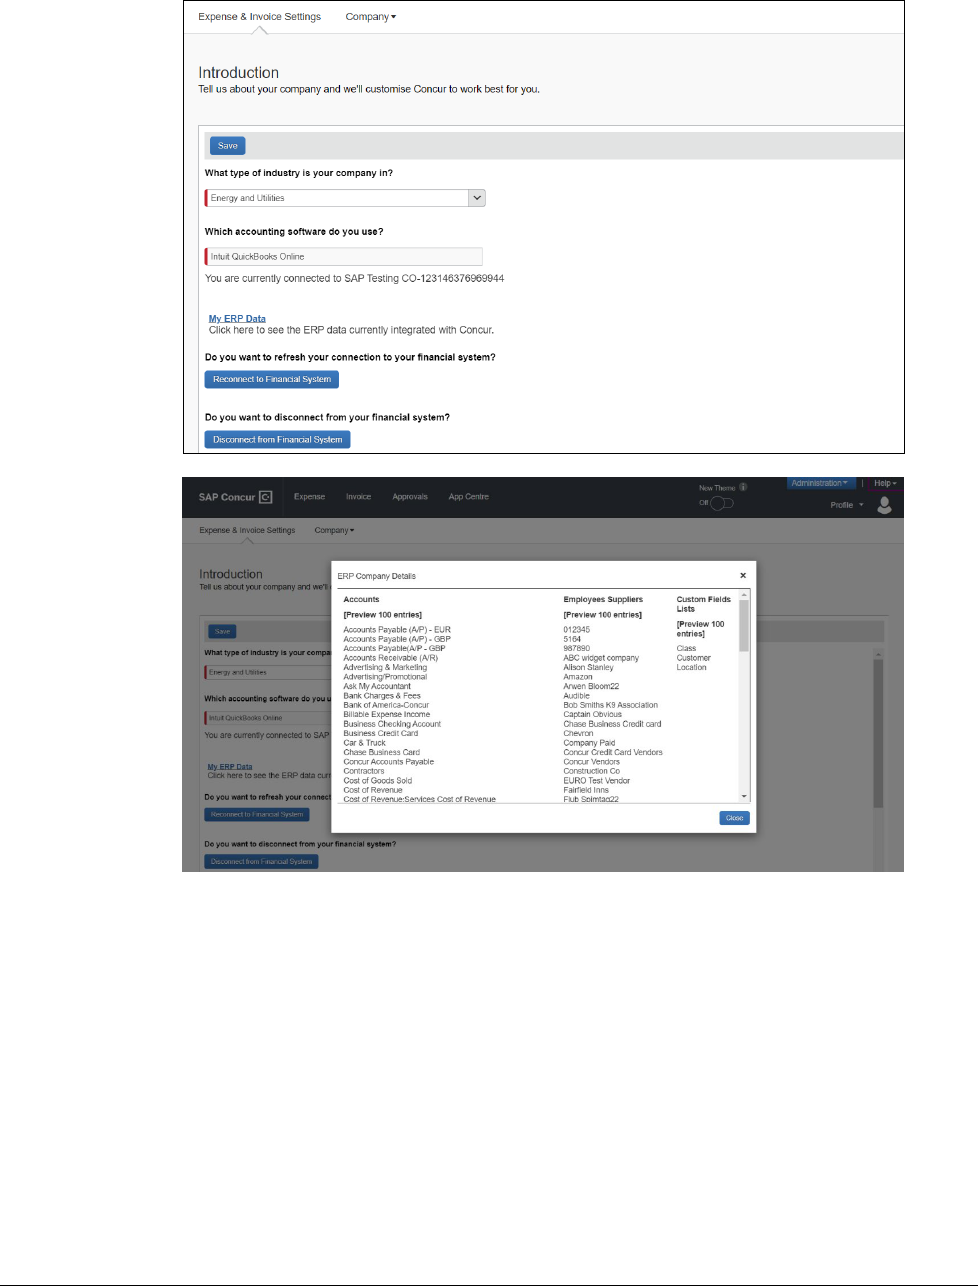
6. Once you are connected, the screen displays the My ERP Data link, which
provides a summary view (up to 100) of the QuickBooks data that is now
integrated with Concur, including GL Expense accounts, employee and vendor
records, and customer and class list names.
Section 2: Configure the Intuit QuickBooks Connector in SAP Concur
12 Shared: QuickBooks Connector Setup Guide for Concur Standard Edition
Last Revised: August 19, 2023
© 2004 - 2024 SAP Concur All rights reserved.

Section 2: Configure the Intuit QuickBooks Connector in SAP Concur
Shared: QuickBooks Connector Setup Guide for Concur Standard Edition 13
Last Revised: August 19, 2023
© 2004 - 2024 SAP Concur All rights reserved.
ERP Liability Account Code (Invoice Only)
For Concur Invoice clients, use the Invoice ERP Liability Account Code list on the
Accounting page to map your company’s ERP liability account code to ensure
invoices post directly to it. This required field ensures that the systems are mapped
to avoid failures in invoice postings.
To enter your liability account code:
1. On the Accounting page, in the ERP Liability Account Code list, enter your
company’s ERP account code.
2. Click Save.
Section 2: Configure the Intuit QuickBooks Connector in SAP Concur
14 Shared: QuickBooks Connector Setup Guide for Concur Standard Edition
Last Revised: August 19, 2023
© 2004 - 2024 SAP Concur All rights reserved.
Step 2: Custom Fields
On the Custom Fields page in Product Settings, clients with QuickBooks Desktop
can add custom fields to integrate with QuickBooks. Concur automatically adds the
integrated fields for QuickBooks Online clients.
Custom Fields - QuickBooks Desktop
On the Custom Fields page, you can create custom fields to integrate with
QuickBooks Desktop. After you create a list field, you will be prompted to enter list
items. Instead, click Custom Fields to return to the field list.
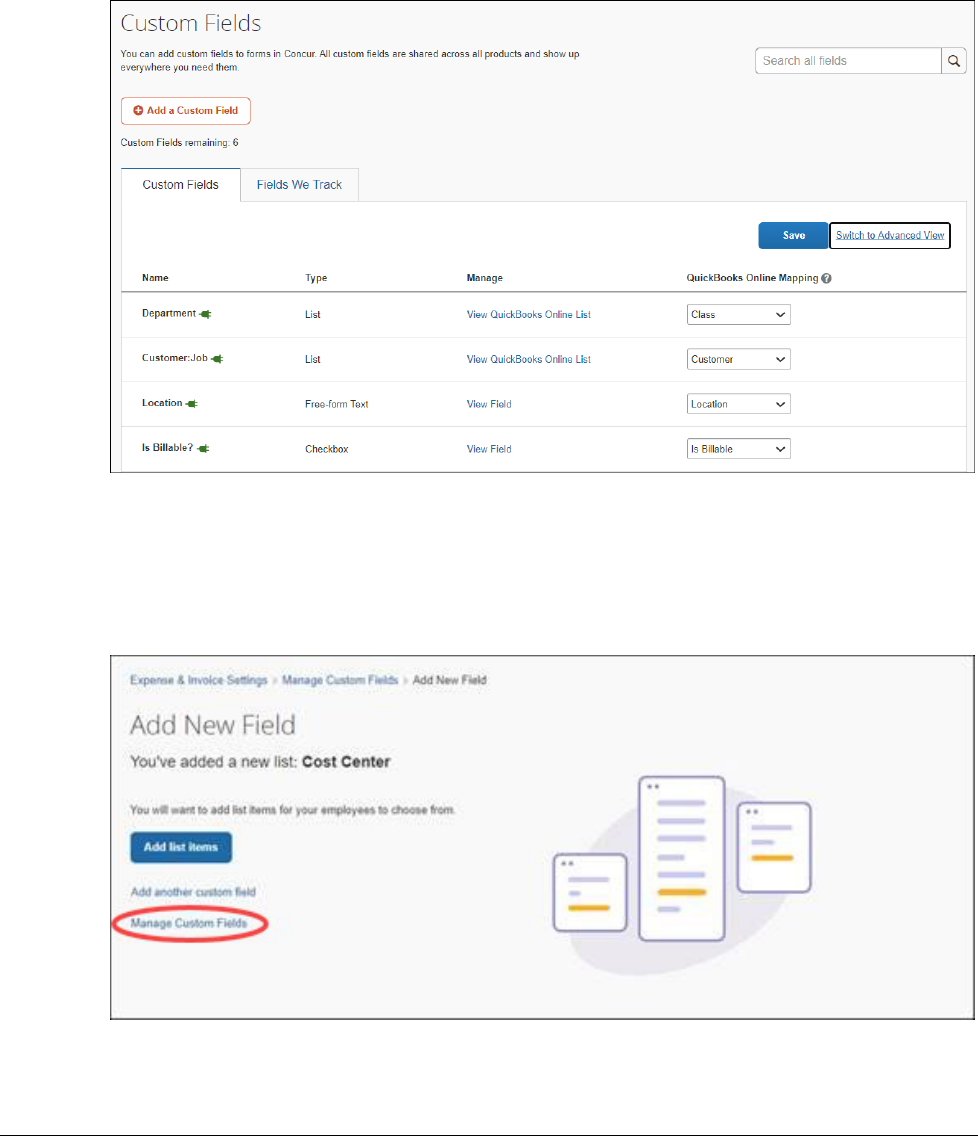
After you have added a list field, you can configure it to be integrated with
QuickBooks by selecting either Class or Custom from the list in the QuickBooks

Section 2: Configure the Intuit QuickBooks Connector in SAP Concur
Shared: QuickBooks Connector Setup Guide for Concur Standard Edition 15
Last Revised: August 19, 2023
© 2004 - 2024 SAP Concur All rights reserved.
Desktop Mapping column. The list items for the field will be imported from
QuickBooks when you click the View List link.
If you use QuickBooks Connector with QuickBooks Desktop, the following applies:
• You can select whether the list field should be part of the accounting
synchronization, by selecting Class or Custom from the list in the
QuickBooks Desktop Mapping column.
• The Is Billable field is intended to work with a customer mapping. Ensure
that if the Is Billable field is configured to integrate with QuickBooks, that a
customer field is also configured to integrate with QuickBooks. The connector
does not support integrating the following QuickBooks account types with the
Is Billable field: Fixed Assets, Bank, Account Receivable, Accounts Payable,
Credit Card, Other Current Liability, Long Term Liability, Equity, and Income.
• The import of the list values for the fields is automated, you do not need to
enter them manually after creating the list field.
• You cannot use the fields integrated with QuickBooks as the account code
driver field.
Custom Fields - QuickBooks Online
If you use QuickBooks Connector with QuickBooks Online, the following applies:
• The connector creates the cost object fields when you connect your Concur
company with QuickBooks. The default mapping it creates is:
♦ The Department cost object, mapped to the QuickBooks Class field.
♦ The Customer:Job cost object, mapped to the QuickBooks Customer
field.
♦ The Location cost object, mapped to the QuickBooks Location field.
• The import of the list values for the fields is automated.
• You cannot use the fields integrated with QuickBooks as the account code
driver field.
• If you use the Is Billable field, you must also configure a field to map to the
Customer list in QuickBooks. The customer selected on a billable expense on
the expense report will be correctly billed in QuickBooks.
View List Items
The admin can click the View List link on the Custom Fields page to view the list
item details for a field. The list items for fields that are mapped to the QuickBooks
Class, Customer, and Location (QuickBooks Online Only) fields will be read-only and
display on the View List page.
• Moving from Custom Fields to View List will automatically populate the list
values for the QuickBooks Customer, QuickBooks Class, and QuickBooks
Location (QuickBooks Online Only) fields.
• The Import List, Add, Edit, and Delete options are not visible.

Section 2: Configure the Intuit QuickBooks Connector in SAP Concur
16 Shared: QuickBooks Connector Setup Guide for Concur Standard Edition
Last Revised: August 19, 2023
© 2004 - 2024 SAP Concur All rights reserved.
• Multi-level lists are not compatible with QuickBooks Connector. Multi-level
lists cannot be used with fields that are configured to integrate with
QuickBooks by being set to Class, Customer, or Location on the Custom
Fields page.
For more information, refer to the Shared: Custom Fields Setup Guide for
Concur Standard Edition.
Step 3: Expense Types
Your users select expense types when they create expenses or invoices in SAP
Concur products. Users can only choose from the configured list. When the approved
expense or invoice data is sent to QuickBooks, Concur automatically knows where to
post those transactions. You can configure your GL account codes on the Account
Codes tab of the Expense Types page in Product Settings.
Expense Account Codes
On the Account Codes page, you can map your expense types to your QuickBooks
chart of account names or numbers. If you are using QuickBooks Desktop with the
QuickBooks Web Connector, you can map expense types to QuickBooks items. If you
are using alternate account codes, you can also map them on the Account Codes
page. The following account types are included:
• Expense
• Fixed Assets
• Cost of Goods Sold
• Other Current Assets
• Credit Card
• Accounts Payable
• Other Current Liabilities

Section 2: Configure the Intuit QuickBooks Connector in SAP Concur
Shared: QuickBooks Connector Setup Guide for Concur Standard Edition 17
Last Revised: August 19, 2023
© 2004 - 2024 SAP Concur All rights reserved.
To enter your default account codes:
1. Click Administration > Expense Settings or Expense & Invoice
Settings. Choose Expense from the Product menu and then click Expense
Types for Expenses.
2. On the Account Codes tab, select the desired account code in the ERP
Account Name or Number field.
3. Repeat for each expense type.
4. Click Save.
For information about entering alternate account codes, refer to the Concur
Expense: Expense Types Setup Guide for Concur Standard Edition.
Invoice Account Codes
On the Account Codes page, you can map your expense types to your QuickBooks
chart of account names or numbers. If you are using alternate account codes, you
can also map them on the Account Codes page.
To enter your default account codes:
1. Click Administration > Invoice Settings or Expense & Invoice Settings.
Choose Invoice from the Product menu and then click Expense Types for
Invoices.

Section 2: Configure the Intuit QuickBooks Connector in SAP Concur
18 Shared: QuickBooks Connector Setup Guide for Concur Standard Edition
Last Revised: August 19, 2023
© 2004 - 2024 SAP Concur All rights reserved.
2. On the Account Codes tab, select the desired account code in the ERP
Account Name or Number field.
3. Repeat for each expense type.
4. Click Save.
For information about entering alternate account codes, refer to the Concur
Invoice: Expense Types Setup Guide for Concur Standard Edition.
Mapping Expense Types to List Items/Products & Services
If you are using QuickBooks Desktop with the QuickBooks Connector, and selected
Yes, we use items from the Does your company use items list in your ERP? list
on the Accounting page, the ERP Item Name column is displayed next to the ERP
Account Name or Number column.
This step allows you to select a QuickBooks account or QuickBooks item to associate
with each expense type in Concur. The accounting and items information is used
when Concur sends the expense data to QuickBooks.
NOTE: An expense type can only be associated with either a QuickBooks account or a
QuickBooks item, not both.
NOTE: Qu
ickBooks items can be mapped to expense types for alternate groups and
alternate account codes.
If you have created policy groups, you may configure different expense type to
QuickBooks item mappings for the individual policy groups.
To map your expense types to items:
1. For Concur Expense, click Administration > Expense Settings or Expense
& Invoice Settings > Expense Types for Expenses > Account Codes.
For Concur Invoice, click Administration > Invoice Settings or Expense &
Invoice Settings > Expense Types for Invoices > Account Codes.

Section 2: Configure the Intuit QuickBooks Connector in SAP Concur
Shared: QuickBooks Connector Setup Guide for Concur Standard Edition 19
Last Revised: August 19, 2023
© 2004 - 2024 SAP Concur All rights reserved.
2. In the ERP Item Name field, enter the QuickBooks item name.
3. Click Save.
When the user creates an expense entry in Expense, expense types for the entry will
automatically be associated with the QuickBooks account or QuickBooks item.
When the user creates an invoice entry in Invoice, expense types for the entry will
automatically be associated with the QuickBooks account or QuickBooks item.
NOTE: An expense type can only be associated with either a QuickBooks account or a
QuickBooks item, not both.
QuickBooks items can be mapped to expense types for alternate groups and
alternate account codes.
To enter alternate account codes:
1. Select the list item from your account code driver list.

Section 2: Configure the Intuit QuickBooks Connector in SAP Concur
20 Shared: QuickBooks Connector Setup Guide for Concur Standard Edition
Last Revised: August 19, 2023
© 2004 - 2024 SAP Concur All rights reserved.
If you are using a check box as your alternate account code driver, the
<fieldname>:Y and <fieldname>:N options appear:
2. Click in the QuickBooks Account Name or Number field.
3. Enter your account code for the expense type. The default codes appear in
the Default Code column. If you leave the ERP Account Name or Number
column empty for a list item, Concur will use the default code when the user
selects that list item/expense type combo.
4. Repeat for each expense type.
5. Click Save.
For more information about mapping expense types for Concur Expense, refer
to the Concur Expense: Expense Types Setup Guide for Concur Standard
Edition.
For more information about mapping expense types for Concur Invoice, refer
to the Concur Invoice: Expense Types Setup Guide for Concur Standard
Edition.

Section 2: Configure the Intuit QuickBooks Connector in SAP Concur
Shared: QuickBooks Connector Setup Guide for Concur Standard Edition 21
Last Revised: August 19, 2023
© 2004 - 2024 SAP Concur All rights reserved.
Step 4: Employee Reimbursements (Expense Only)
On the Employee Reimbursements page of Product Settings, you will configure
the ERP Liability Account Code. You configure it on the Accounting tab from a
read-only list and populate it with the relevant liability accounts from your General
Ledger.
NOTE: If you use the ADP Payroll reimbursement method, a .CSV file is not
generated because the transaction information is sent directly to QuickBooks.
If ADP file with Financial Integration is enabled, payment batches
generate an ADP EPIP file. ADP file with Financial Integration is enabled
by SAP Concur internal staff. If you require an EPIP file, contact SAP Concur
support for assistance.
Entering Account Codes for Reimbursement Methods
Once you have saved the employee reimbursement method, the Accounting tab
appears.
To enter your account codes:
1. Click Administration > Expense Settings or Expense & Invoice Settings
> Employee Reimbursements.
2. Create or modify the desired employee reimbursement method.
3. On the Accounting tab, enter the codes in the fields:
Field Description
How do you want
your transactions to
appear in your ERP?
This field defaults to Bill.
ERP Liability Account
Code
This is the accounting code that appears in the accounting file
"Payment Demand Company Liability Account Code" field for
payments made with this reimbursement method. The
Liability Account field may be used to record when expenses
are incurred. Clients may use this field to capture a code that
represents an offset account in the GL extract. This account
code commonly represents the credit in the expense
accounting entry.
NOTE: The ERP Liability Account Code defaults to
Accounts Payable, select a different Accounts Payable account
if applicable.

Section 2: Configure the Intuit QuickBooks Connector in SAP Concur
22 Shared: QuickBooks Connector Setup Guide for Concur Standard Edition
Last Revised: August 19, 2023
© 2004 - 2024 SAP Concur All rights reserved.
Field Description
Cash Account Code
NOTE: This field is
only used for ADP
and Expense Pay
reimbursement
methods.
This is the accounting code that appears in the accounting file
Payment Demand Company Cash Account Code field for
payments made with this reimbursement method. The Cash
Account Code field may be used to record when expenses
settle. Clients may use this field to capture offsets against
transactions that directly impact the bank accounts. This
account code commonly represents the credit in the payment
accounting entry.
4. Click Save.
For more information, refer to the Concur Expense: Employee Reimbursement
Setup Guide for Concur Standard Edition.
Step 5: Payment Types (Expense Only)
The Concur administrator configures the company card programs on the Payment
Types page of Product Settings. For each card program, the Accounting tab allows
you to configure your accounting code and transaction settings for each card
program.
To enter your program settings:
1. Click Administration > Expense Settings or Expense & Invoice Settings
> Credit Cards.
2. On the Payment Types page, create or edit the desired card program.
3. On the Accounting tab, fill in the fields:
Field Description
How do you want your
transactions to appear
in your ERP?
Select the desired setting. If you select Credit Card, the
ERP Credit Card Account field will auto-populate with a
list of your card accounts in QuickBooks.
Do you want to use
consolidated vendor
handling?
Refer to the Consolidated Vendor Handling section below.
New credit card
merchants will be
consolidated in this
Vendor record in
QuickBooks
NOTE: This field defaults to yes and only appears if you
enable Consolidated Vendor Handling.
The default vendor record will be Concur Vendor. You can
change this to a different vendor name that you would like
to use in QuickBooks for the credit card transactions that
don’t exactly match an existing vendor.

Section 2: Configure the Intuit QuickBooks Connector in SAP Concur
Shared: QuickBooks Connector Setup Guide for Concur Standard Edition 23
Last Revised: August 19, 2023
© 2004 - 2024 SAP Concur All rights reserved.
Field Description
How do you want us to
handle charges that
have already been
entered in your ERP?
Select the desired option:
1. Match expense data to the existing credit card charge
in QuickBooks (Recommended Best Practice: If we
detect that the transaction already exists in
QuickBooks we will add the following information
provided by the end user on the expense report to the
existing entry in QuickBooks:
♦ Business Purpose
♦ Customer/Class value
♦ Billable/Non-Billable
♦ Concur Expense report ID
♦ Employee’s Last Name/First Name in the memo
field for alpha sorting on the QuickBooks Reconcile
Credit Card screen
2. Use the expense data to create a new credit card
charge in QuickBooks. Select this if you prefer that we
post a new credit card charge and during
reconciliation process you will determine which entry
to keep and which entry you need to delete.
3. Ignore the expense data if the transaction already
appears in QuickBooks. Select this if you have what
you need already and prefer that we do not create a
new entry in QuickBooks if we see that it already
exists in QuickBooks.
ERP Credit Card
Account
Select or enter the desired card account.
Clearing Account Code
Select the relevant clearing account codes. Concur imports
the clearing account codes (Other current asset accounts)
you use in QuickBooks to account for your card
transactions that are marked as a “personal expense”.
4. Click Save.
For more information, refer to the Concur Expense: Payment Types Setup
Guide for Concur Standard Edition.

Section 2: Configure the Intuit QuickBooks Connector in SAP Concur
24 Shared: QuickBooks Connector Setup Guide for Concur Standard Edition
Last Revised: August 19, 2023
© 2004 - 2024 SAP Concur All rights reserved.
Consolidated Vendor Handling
The Use consolidated vendor handling? setting allows you to configure how
Concur manages credit card transactions from vendors that don’t match existing
vendors. This setting defaults to yes. (You can change it to no.) The default record
used is “Concur Vendor” to use for credit card transactions when an exact match is
not found. This allows you to retain control over your vendor lists in QuickBooks and
provides you with the capability to reduce the number of infrequent and/or one-time
vendors that are added to your list during the posting process of the credit card
transactions. The vendor record name must be an exact match.
If you do not use Consolidated Vendor Handling, the transactions are posted to the
vendor value contained in the expense report.
QuickBooks Online and QuickBooks Desktop handle the vendors slightly differently.
Refer to the table below for the full details.
Using Consolidated Vendor Handling (default):
Vendor
information in
transaction
QuickBooks Online QuickBooks Desktop
No Vendor
Applies to the vendor defined in
the Consolidated Vendor Handling
setting.
Applies to the vendor defined in
the Consolidated Vendor Handling
setting.
Existing Vendor Applies to the existing vendor. Applies to the existing vendor.
New Vendor
Applies to the vendor defined in
the Consolidated Vendor Handling
setting.
Applies to the vendor defined in
the Consolidated Vendor Handling
setting.
Inactive Vendor
Applies to the vendor defined in
the Consolidated Vendor Handling
setting.
Applies to the inactive vendor.
Not Using Consolidated Vendor Handling:
Vendor
information in
transaction
QuickBooks Online QuickBooks Desktop
No Vendor Applies to "Unknown Vendor.” Applies to "Unknown Vendor.”
Existing Vendor Applies to the existing vendor. Applies to the existing vendor.
New Vendor
The vendor is created in
QuickBooks Online.
The vendor is created in
QuickBooks Desktop.
Inactive Vendor
Duplicate vendor is created in
QuickBooks Online.
Applies to the inactive vendor.
Section 2: Configure the Intuit QuickBooks Connector in SAP Concur
Shared: QuickBooks Connector Setup Guide for Concur Standard Edition 25
Last Revised: August 19, 2023
© 2004 - 2024 SAP Concur All rights reserved.
Step 6: File Export Configuration (QuickBooks Desktop Invoice Only)
The File Export Configuration page of Product Settings is reduced to options in
two tabs, the others preset to generate the .IIF file by your QuickBooks selection.
To configure your file export options:
1. Click Administration > Invoice Settings or Expense & Invoice Settings
> Invoice File Export.
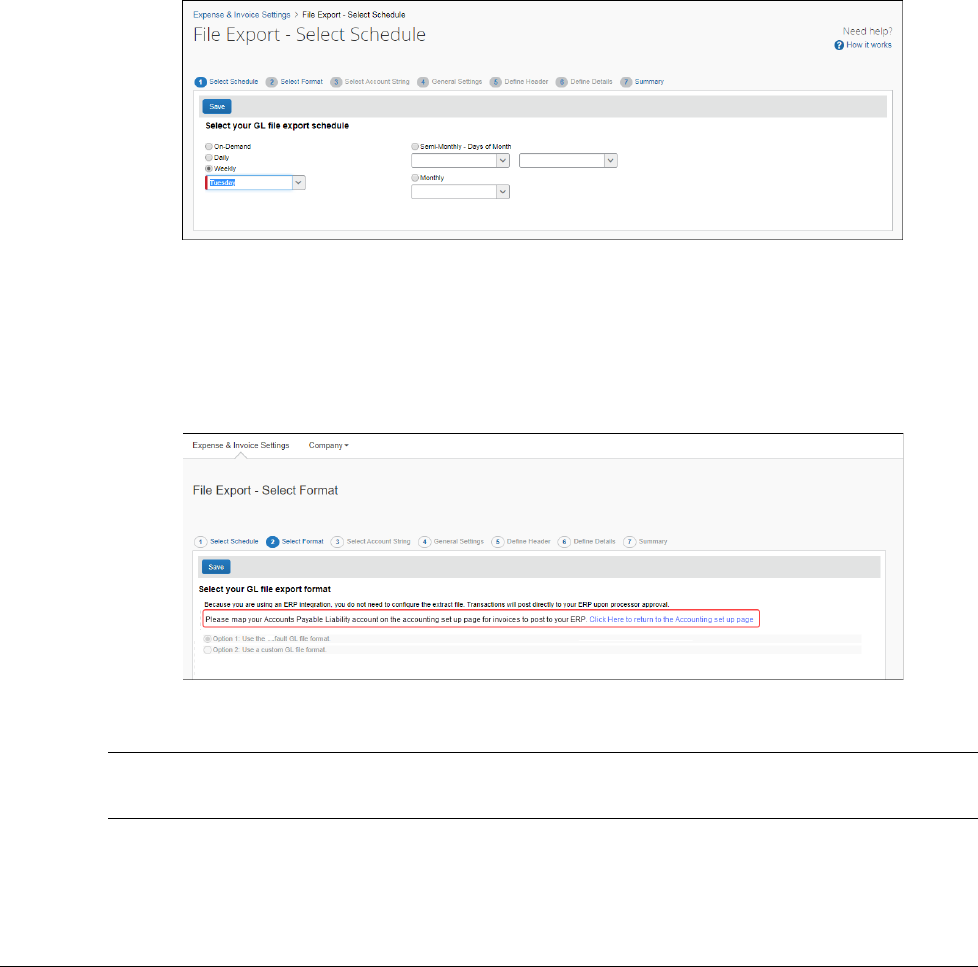
2. On the Select Schedule tab, select the schedule on which your extract will
be generated:
3. Click the Select Format tab.
You will see a message Please map your Accounts Payable Liability
account on the accounting set up page for invoices to post to your
ERP. Click the Click to return to the Account set up page link to return to
the Accounting page to map the ERP Liability Account Code.
4. Click Save.
NOTE: QuickBooks Online does not use a schedule and will post directly to QBO upon
processor approval. No extracts are created for QuickBooks Online.

Section 2: Configure the Intuit QuickBooks Connector in SAP Concur
26 Shared: QuickBooks Connector Setup Guide for Concur Standard Edition
Last Revised: August 19, 2023
© 2004 - 2024 SAP Concur All rights reserved.
Step 7: Users
On the Users page in Product Settings, Concur can import your employees from
QuickBooks. The users are granted access to Concur and associated with their
vendor record in QuickBooks. You should always add new employees in QuickBooks.
To import users from QuickBooks:
1. Click Administration > Expense Settings or Expense & Invoice Settings
or Invoice Settings > User Accounts.
2. To add users, click Add Users > From ERP.
3. The Add Users from ERP window appears. Select the check box next to the
user(s) you want to add and then click Add.
NOTE: E
ach employee is required to have an associated vendor record. QuickBooks
requires this if you create bills for the amounts due your employees. All
vendor records must have a first name, last name, and email to display on
the Add users from ERP page.

Section 2: Configure the Intuit QuickBooks Connector in SAP Concur
Shared: QuickBooks Connector Setup Guide for Concur Standard Edition 27
Last Revised: August 19, 2023
© 2004 - 2024 SAP Concur All rights reserved.
For more information, refer to the Shared: Users Setup Guide for Concur
Standard Edition.
Step 8: Synchronize Vendors from QuickBooks (Invoice Only)
QuickBooks Desktop and Online clients will be able to create vendors in QuickBooks
and then synchronize this data with Concur Invoice without having to use the vendor
import functionality.
To synchronize QuickBooks vendors with Invoice:
1. On the Vendor Manager page, select Open Vendor > Add Vendors from
ERP.
The Add Vendors from ERP window appears.
2. Select the vendors to add from QuickBooks.
3. Click Add.
NOTE: QuickBooks Desktop invoice vendors must have a Company Name to
add to Concur.

Section 3: Sending Expense or Invoice Data to QuickBooks
28 Shared: QuickBooks Connector Setup Guide for Concur Standard Edition
Last Revised: August 19, 2023
© 2004 - 2024 SAP Concur All rights reserved.
Section 3: Sending Expense or Invoice Data to QuickBooks
The Concur administrator uses Payment Manager to view and manage batches of:
• Expense reports that are ready for reimbursement
• Payment requests that are ready to be paid to vendors
You can click send data (in Concur Expense) or Send to QuickBooks (in Concur
Invoice) to prompt the Concur QuickBooks Connector to perform the data exchange
between your QuickBooks account and your Concur company.
NOTE: If you have connected your QuickBooks company to Concur, but do not see a
send data or Send to QuickBooks link, you are using the QuickBooks
Online Financial Integration instead of the QuickBooks Online Connector.
Refer to the Shared: QuickBooks Online Integration Using Concur Financial
Integration Service Setup Guide.
Expense Data
To send expense data to QuickBooks:
1. Click Administration > Company > Tools > Payment Manager.
2. For the desired batch, click close now.

Section 3: Sending Expense or Invoice Data to QuickBooks
Shared: QuickBooks Connector Setup Guide for Concur Standard Edition 29
Last Revised: August 19, 2023
© 2004 - 2024 SAP Concur All rights reserved.
3. Click send data.
For QuickBooks Online clients, once the send data button has been clicked there are
no more steps to synchronize approved report data to QuickBooks.
For QuickBooks Desktop clients, there are a few additional steps to perform.
(QuickBooks Desktop Only) To finish the data synchronization:
1. Click Run Web Connector.

Section 3: Sending Expense or Invoice Data to QuickBooks
30 Shared: QuickBooks Connector Setup Guide for Concur Standard Edition
Last Revised: August 19, 2023
© 2004 - 2024 SAP Concur All rights reserved.
2. In QuickBooks, click File > App Management.
3. Click Update Web Services.
4. Check the box next to the application file. Click Updated Selected.
Transactions will post into QuickBooks.
For more information about using the Payment Manager tool, refer to the
Concur Expense: Payment Manager User Guide for Concur Standard Edition.
For information about the relationship between the fields in the IIF extract file
and the fields in QuickBooks, refer to the Concur Expense: Payment Manager
QuickBooks IIF Extract User Guide for Concur Standard Edition.
Invoice Data
To send your invoice data to QuickBooks:
1. Click Invoice > Payments > Payment Manager.
2. Click Send to QuickBooks.

Section 3: Sending Expense or Invoice Data to QuickBooks
Shared: QuickBooks Connector Setup Guide for Concur Standard Edition 31
Last Revised: August 19, 2023
© 2004 - 2024 SAP Concur All rights reserved.
For QuickBooks Online clients, once the Send to QuickBooks button has been
clicked there are no more steps to synchronize approved invoice data to QuickBooks.
For QuickBooks Desktop clients, there are a few additional steps to perform.
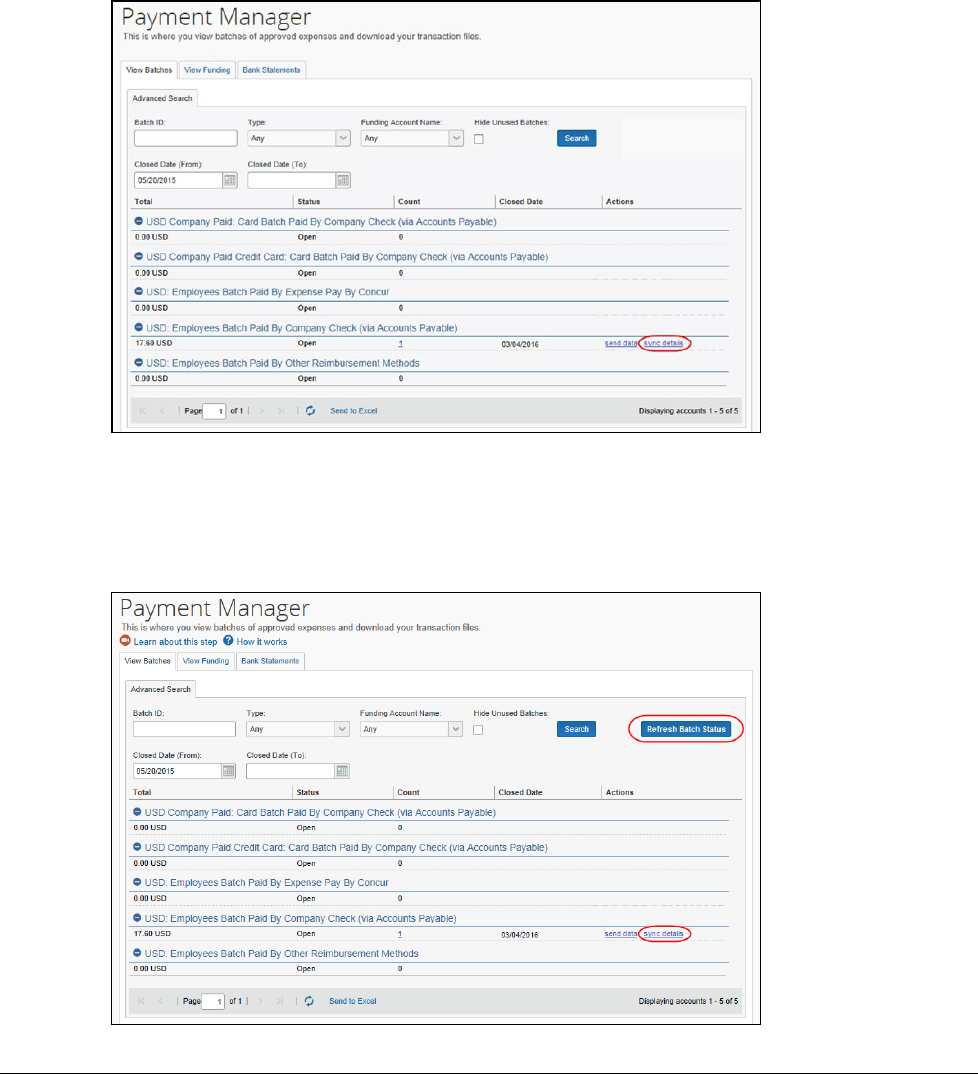
(QuickBooks Desktop Only) To finish the data synchronization:
1. In QuickBooks, click File > App Management > Update Web Services.
2. Click Update Selected.
Transactions will post into QuickBooks.
3. Once the Web Connector is run, in SAP Concur click Refresh Batch Status.
The sync details link displays.

Section 4: Managing the Integration
32 Shared: QuickBooks Connector Setup Guide for Concur Standard Edition
Last Revised: August 19, 2023
© 2004 - 2024 SAP Concur All rights reserved.
4. (Optional) Click sync details.
5. Log in to QuickBooks to see your posted transactions.
For more information about using the Payment Manager tool, refer to the
Concur Invoice: Administration User Guide for Concur Standard Edition.
For information about the relationship between the fields in the IIF extract file
and the fields in QuickBooks, refer to the Concur Invoice: Payment Manager
QuickBooks IIF Extract User Guide for Concur Standard Edition.
Section 4: Managing the Integration
Updating the Synchronized Data in SAP Concur
QuickBooks Online
Once your company is connected to QuickBooks, opening the Accounting page of
Product Settings will trigger the integration to synchronize the latest master data
from QuickBooks to Concur. The Concur administrator can also manually run the
integration synchronization by clicking Administration > Expense Settings or
Expense & Invoice Settings or Invoice Settings > Accounting > My ERP Data
> Refresh.
QuickBooks Desktop
The Intuit administrator runs the QuickBooks Web Connector, which causes the data
to synchronize between QuickBooks and Concur.
Section 4: Managing the Integration
Shared: QuickBooks Connector Setup Guide for Concur Standard Edition 33
Last Revised: August 19, 2023
© 2004 - 2024 SAP Concur All rights reserved.
Viewing Integration Issues with Expense
Administrators can review the sync details of each batch in Payment Manager.
QuickBooks Online
Click Sync Details for the desired batch.
QuickBooks Desktop
Once you have run the web connector, click Refresh Batch Status in Payment
Manager. Then click sync details for the desired batch.

Section 4: Managing the Integration
34 Shared: QuickBooks Connector Setup Guide for Concur Standard Edition
Last Revised: August 19, 2023
© 2004 - 2024 SAP Concur All rights reserved.
Viewing Integration Issues with Invoice
Payment managers can see previously run synchronization jobs (by selecting dates
and clicking Search), the date the synchronization took place, how many invoices
that were part of the invoice, the status of the synchronization, and synchronization
details, such as comments or errors that might have occurred during the
synchronization by clicking the sync details link in the Actions column.
In the example below, the Sync Details window shows an error.
The payment manager can resend the invoice by clicking the Resend link in the
Actions column.
Refreshing the Integration
Clients who want to refresh the QuickBooks Desktop or QuickBooks Online
integration with Concur can do so on the Accounting page in Product Settings.
To refresh your QuickBooks company to SAP Concur
1. Click Administration > Expense Settings or Expense & Invoice Settings
> Accounting.
2. Click Reconnect to Financial System.

Section 4: Managing the Integration
Shared: QuickBooks Connector Setup Guide for Concur Standard Edition 35
Last Revised: August 19, 2023
© 2004 - 2024 SAP Concur All rights reserved.
You will see a warning that you must reconnect to the same QuickBooks file.
3. Click Yes.
4. QuickBooks Online: Enter the admin credentials (user name and password)
to log into QuickBooks Online.
QuickBooks Desktop: Download a new file and password to enter into the
QuickBooks Web Connector.
Disconnecting the Integration
Clients who are ready to disconnect QuickBooks Desktop or QuickBooks Online from
Concur can do so on the Accounting page of Product Settings.
To disconnect your QuickBooks company from SAP Concur:
1. Click Administration > Expense Settings or Expense & Invoice Settings
> Accounting.
2. Click Disconnect from Financial System.
3. Click Save.
NOTE: Before disconnecting Concur from QuickBooks, you must process and
post all in flight reports.

Section 4: Managing the Integration
36 Shared: QuickBooks Connector Setup Guide for Concur Standard Edition
Last Revised: August 19, 2023
© 2004 - 2024 SAP Concur All rights reserved.
☼
