
1
The Center for Instruction and Technology
Last Updated: 6/7/2017
Getting Started with Google Forms
Learning Objectives
• Create form and add questions, image and video
• Structure your questions
• Share your form
• Examine data
• Email Notification
Create and Name Your Form
1. Login to myUSF, and choose Email.
2. Click Google Apps icon > choose Forms.
3. Under Start a new form, choose a template.
4. Replace Untitled form with a descriptive title.

2
The Center for Instruction and Technology
Last Updated: 6/7/2017
Pick a Theme
Click the Color Patlette icon to either upload your own image or pick a preset design, and
Preview.
Click open Settings icon and choose the appropriate Form Settings.
General
If you want to limit only one submission per user, you will enable the Limit to 1 response requires
sign in option. Respondents will be required to sign in to Google.
Choose Collect email address and response receipts if you would like to send a copy of the
submitted data to the respondents.
Respodents can also edit their responses after submit and see sunmary charts and all data if you
allow them.
More
Add-ons
Color Palette
Preview
Settings

3
The Center for Instruction and Technology
Last Updated: 6/7/2017
Presentation
You can change your confirmation message for respondents here. Also, choose Show Progress
bar, and Save.
Quizzes
Enable Make this a quiz if you want to have a quiz and score the questions. You have the option
to manually release the socre or have the score automatically displayed after submission.
Build Questions
1. When you first start creating a new form, simply start with changing the placeholder
Question Title
2. Then, choose a question type for your question.
4
The Center for Instruction and Technology
Last Updated: 6/7/2017
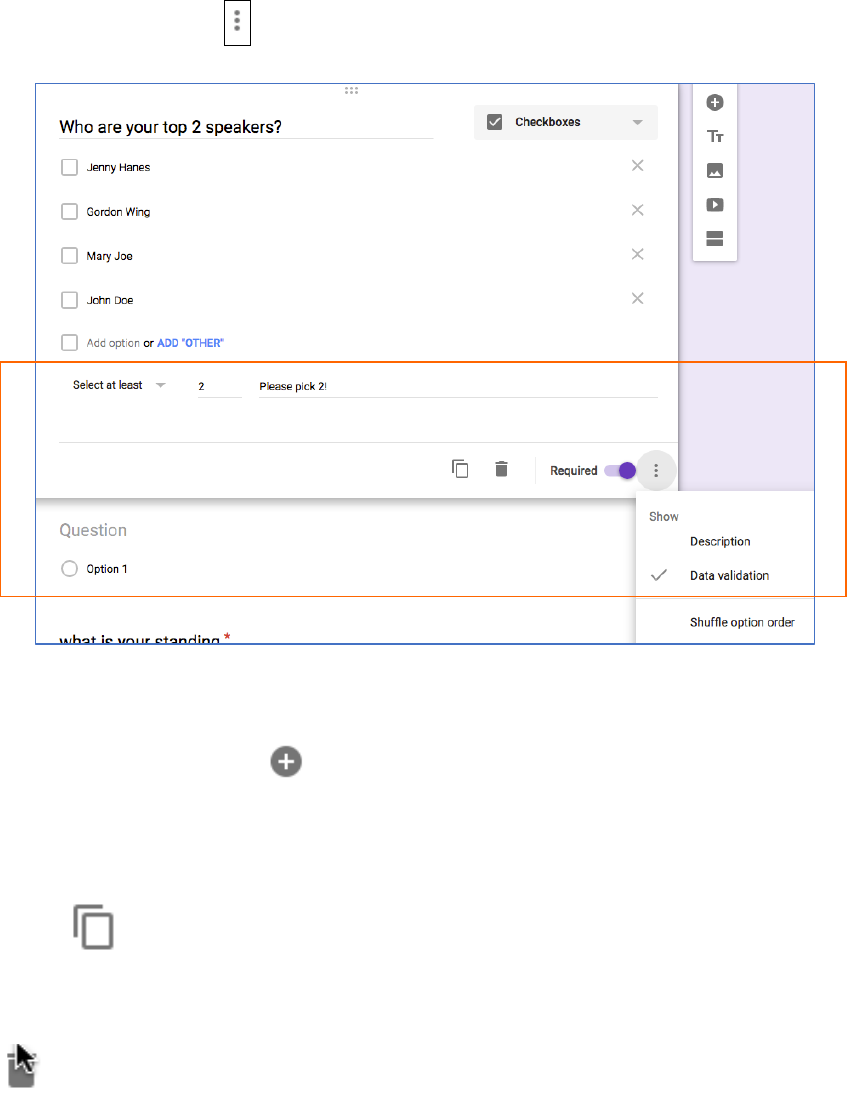
3. Enter Description as desired.
4. Turn on Required if your question is mandatory.
5. Some question types allow data validation option eg. Short answer, Checkboxes,
Paragraph.
6. Click the Show icon to choose Data Validation option.
Add New Question
1. Click the Add Question sign to create a new question. Choose the type of question
you would like to add.
2. Type question.
Duplicate Questions
Click on the icon to duplicate a question, then click and drag it to the proper location in the
form.
Delete Questions
Click to delete a question.

5
The Center for Instruction and Technology
Last Updated: 6/7/2017
Reorder Questions
Select the desired question, move your cursor up by the icon, drag and drop the question to
another location.
Short Answer
This allows you to type in a short answer such as name and address.
Paragraph (can be used for comments)
Paragraph allows you to enter a large text entry such as comments.
Checkboxes
Checkboxes allows you to choose more than one item from a list.
Multiple Choice
Users can only select one choice from the list. Go to section based on answer option available
for this question type.
Dropdown
This is a drop-list. Users can only select one choice from the list. Go to section based on
answer option available for this question type.
Multiple Choice Grid (Grid)
Users can only multiple rows and columns to rate multiple elements all in a grid format.
Click to deselect the Limit to one response per column.
Linear Scale
Linear Scale questions allows you rate something on a scale of whatever number you would like to
set e.g. on a scale of 1-5 with 5 being the highest.

6
The Center for Instruction and Technology
Last Updated: 6/7/2017
Go to Section Based on Answer (setup conditional questions in MC)
You can allow users to go directly to the appropriate section from a Multiple Choice or
Dropdown question type by selecting ‘Go to section based on answer’.
If you are directing users based on their answers, make sure you select the correct section.
If your form has multiple sections, make sure you choose Submit Form if you want to end the
survey.
Adding Image
Choose to add an image. Add Hover text if you like.

7
The Center for Instruction and Technology
Last Updated: 6/7/2017
Add Video
Choose to add an image. Add Hover text if you like.
Add Section
If you've created a long form, for example, and would like to make it easier for your respondents
to fill out, you can add page sections.

8
The Center for Instruction and Technology
Last Updated: 6/7/2017
• Choose to add a section. Once you have created your Section, you can start
adding questions under it.
Add File Upload
This file upload option is only available for G Suite customers with a Google Form shared within
their organization.

9
The Center for Instruction and Technology
Last Updated: 6/7/2017
Saving Form
Every time you make changes to your form, it is automatically saved in your Google Drive.
Create a Quiz
Now you can use Google Form to create a quiz and score the answers. First you need to turn on
the Make this a Quiz under Settings.
!
Create your questions, click on Answer Key.

10
The Center for Instruction and Technology
Last Updated: 6/7/2017
Assign points, and choose Add Answer Feedback if desired.
Send Quiz to Respondents
On the Send form pane, choose any of the optiosn to send your form. Fill out the necessary
information and click Send.

11
The Center for Instruction and Technology
Last Updated: 6/7/2017
See Quiz Scores
In settings under Quizzes, you can choose the Release Grade options to release scores
immediately after submission or later.
After you have completed your quiz, click on Responses to see quiz results. Click to store
data onto a Google Sheet.

12
The Center for Instruction and Technology
Last Updated: 6/7/2017
Respndents are able to see their scores immediately if you have allowed them to. See sample
below.
If you have chosen to release score at a later time, click the Release Scores link, and choose to
send scores to any or all students at once. See sample below.

13
The Center for Instruction and Technology
Last Updated: 6/7/2017
Add Collaborators
Click More on top right and choose Add Collaborators
to invite other editors to edit this form.
You can invite by typing in emails separated by commas for multiple editors, and grant
them different access rights.
You can also click the blue Change link to change your form from private to other access options.
More

14
The Center for Instruction and Technology
Last Updated: 6/7/2017
The staff you have invited receives an email like below.
Send Form to Respondents
1. Click the SEND button on top right to send your form via email, Google+, Facebook or
Twitter, or embed it in your website by using the Embed code.
2. For email, enter the recipient’s emails. Customize your message and subject line. Then click
Send.

15
The Center for Instruction and Technology
Last Updated: 6/7/2017
Accepting Responses
1. To review all responses, open up your form in Drive. Click RESPONSES to go to the
Responses screen.
2. Click the slider next to ‘Accepting responses’ to open/close your survey as desired.
Select Form Response Destination
After you’ve sent out your form, Google Forms will begin collecting the responses you receive. You
will decide how you’d like to store these responses. Click to create spreadsheet for
responses. Select response destination as a new spreadsheet or select existing spreadsheet. Then
click Create.

16
The Center for Instruction and Technology
Last Updated: 6/7/2017
View responses in Spreadsheet
• If you are on your form, you can click Responses > View responses in Sheets icon to
open up the spreadsheet to see your form data.
• If you are in My Drive, you will find a new spreadsheet file created automatically with
(Responses) next to your form title. Click open to view your data.
Keep responses only in Forms
If you did not choose to create a spreadsheet for your data, you
can then choose Responses > Download responses (.csv) instead.
Unlink Spreadsheet
You can choose to unlink your form from a spreadsheet at any given
time by selecting Responses > Unlink form. The spreadsheet will
no longer receive new responses, but responses will continue to be stored in Forms, available as a
real-time summary or as a CSV file. You can choose to re-link your form to a spreadsheet at
any time with no responses lost or deleted.
Enable Email Notifications
If you want to get an email notification, enable the option, click to
enable Get email notifications for new responses. (see above
diagram)
Go to Live Form in Spreadsheet
• Choose Form > Go to Live Form.

17
The Center for Instruction and Technology
Last Updated: 6/7/2017
Edit Form in Spreadsheet
• Choose Form > Edit Form.
See Revision History in Spreadsheet
If you have edited the form data in the spreadsheet view, and would like to review the revision
history, choose File > See revision history.
Duplicate Form in Spreadsheet
Sometimes, you might want to use an existing form as a base template, where you can modify it
slightly and save it for another purpose. In this case, you can duplicate the form.
1. In your form, choose File > Make a Copy to copy the existing form.
2. Then, Rename your form. Select ‘Share it with the same people’ if desired.
Spreadsheet Data
If you remove a question from the form, the previous data and the column will NOT be deleted
from the spreadsheet, but of course, the column will no longer be filled with any new data.
If you add a new question to your form, a new column with new form data will be added into the
spreadsheet automatically.
Monitor for Multiple Submissions
As you're reviewing the responses, keep in mind that you can't prevent users from submitting a form
more than once (unless you have required login for response), so the same person may have
submitted multiple responses. If you use Google Apps, however, you can choose to record the email
addresses of people who fill out your form, and then easily identify any duplicate responses.
Share Spreadsheet data
1. From your spreadsheet top menu, choose File > Share.
2. Add collaborators emails to allow them to View, Edit or Comment on your form data in
the Sharing Settings.

18
The Center for Instruction and Technology
Last Updated: 6/7/2017
3. Click Done when you are finished.
Add-Ons
Add-ons are scripts built by third-party developers to add more
functionality to your documents, spreadsheets, and forms. You can turn
them on and off at any time, and manage each one individually.
First, choose MORE and activate the Add-on you would like to use in your form.
1. From your form, click the Add-ons icon, and choose the Add-on (e.g. Form
notifications.)
2. Then, configure notifications as desired.
Resources
Choose where to save form responses:
https://support.google.com/docs/answer/2917686?p=forms_response&visit_id=1-
636228708350404413-1065084780&rd=1
Data Validation Examples:
Add-ons

19
The Center for Instruction and Technology
Last Updated: 6/7/2017
