
AT&T Office at Hand
®
User Guide

5
10
15
20
25
AT&T Office@Hand | User Guide | Table of Contents | 2
4 Part 1 - Getting Started
Introduction
6 Activate Your Account
6 Welcome Email
7 Create Password
8 Express Setup
9 User Info
9 Regional Settings
Emergency Calling
11 Call Handling: Call Forwarding
12 Call Handling Option
13 Voicemail
14 Finishing the Setup
Download Apps
16 How to Access Your Account
16 Email or Google as User ID
16 Single Sign-on
16 Account Validation
17 Use a Corporate Email Address to Log In
18 Use a Google Account to Log In
19 Overview
Messages
21 Call Log
22 Contacts
23 User Settings
24 Tools
Mobile App
*Available for Premium and Enterprise users only.
26 Office@Hand for Desktop
27 Office@Hand Meetings®
28 Archiver
28 Configure Archiver
29 Office@Hand for Salesforce™*
29 Office@Hand for Zendesk*
30 RingMe
31 Do Not Disturb
32 Audio Conference
33 Launch the Conferencing Application
34 Conference Commands
34 Preventing Music-On-Hold
35 RingOut
36 FaxOut
37 Placing Video Calls
38 Hot Desking
38 Log in to a common phone
38 Log out from a common phone
39 Part 2 - User Settings
40 User Settings
40 User Details
42 Schedule Meetings for Me
43 Use Text-to-Speech Name
44 Set a Custom Name Recording
45 Phones & Numbers
45 Phone Details
46 Set Your Presence
48 Intercom
49 Enable Intercom Calls

AT&T Office@Hand | User Guide | Table of Contents | 3
50 Screening, Greeting, & Hold Music
50 Set a User Greeting
51 Set up Call Screening
52 Connecting Message
53 Audio While Connecting
54 Set Hold Music
55 Blocked Calls
56 Call Handling & Forwarding
56 Call Forwarding
57 Incoming Call Handling
60 Call Flip
60 Manage Your Call Flip Numbers
60 To Use Call Flip
61 Messages & Notifications
61 Messages
61 Set a Voicemail Greeting
62 Notifications
63 Outbound Caller ID
64 Outbound Fax Settings
64 Changing Fax Cover Sheet
65 Adding Emails That Can Send Faxes
66 Faxing via Email

AT&T Office@Hand | User Guide | Part 1 - Getting Started
Part 1 - Getting Started
4

AT&T Office@Hand | User Guide | Part 1 - Getting Started
Introduction
AT&T Office@Hand is a business phone system that
connects employees with one solution. It offers enterprise-
grade features, including auto receptionist, multiple
extensions, and more.
This guide will help users set up and access the following
Office@Hand features:
• Messaging
• Call Log
• Contacts
• Integrations
• Office@Hand for Desktop
• Office@Hand Meetings
• Conferencing
• RingOut
• FaxOut
• Video Calling
• Presence
• Intercom
• User Greetings
• Audio and Hold Music
• Call Handling and Forwarding
• Call Flip
• Hot Desking
• Notifications
• Outbound Caller ID
• Corporate email as user ID
• Gmail (or G Suite) email as user ID
5
AT&T Office@Hand | User Guide | Part 1 - Getting Started
Activate Your Account
Welcome to the Office@Hand business phone system! If this
is your first time logging in, you'll need to activate your
Office@Hand account in order to start using it.
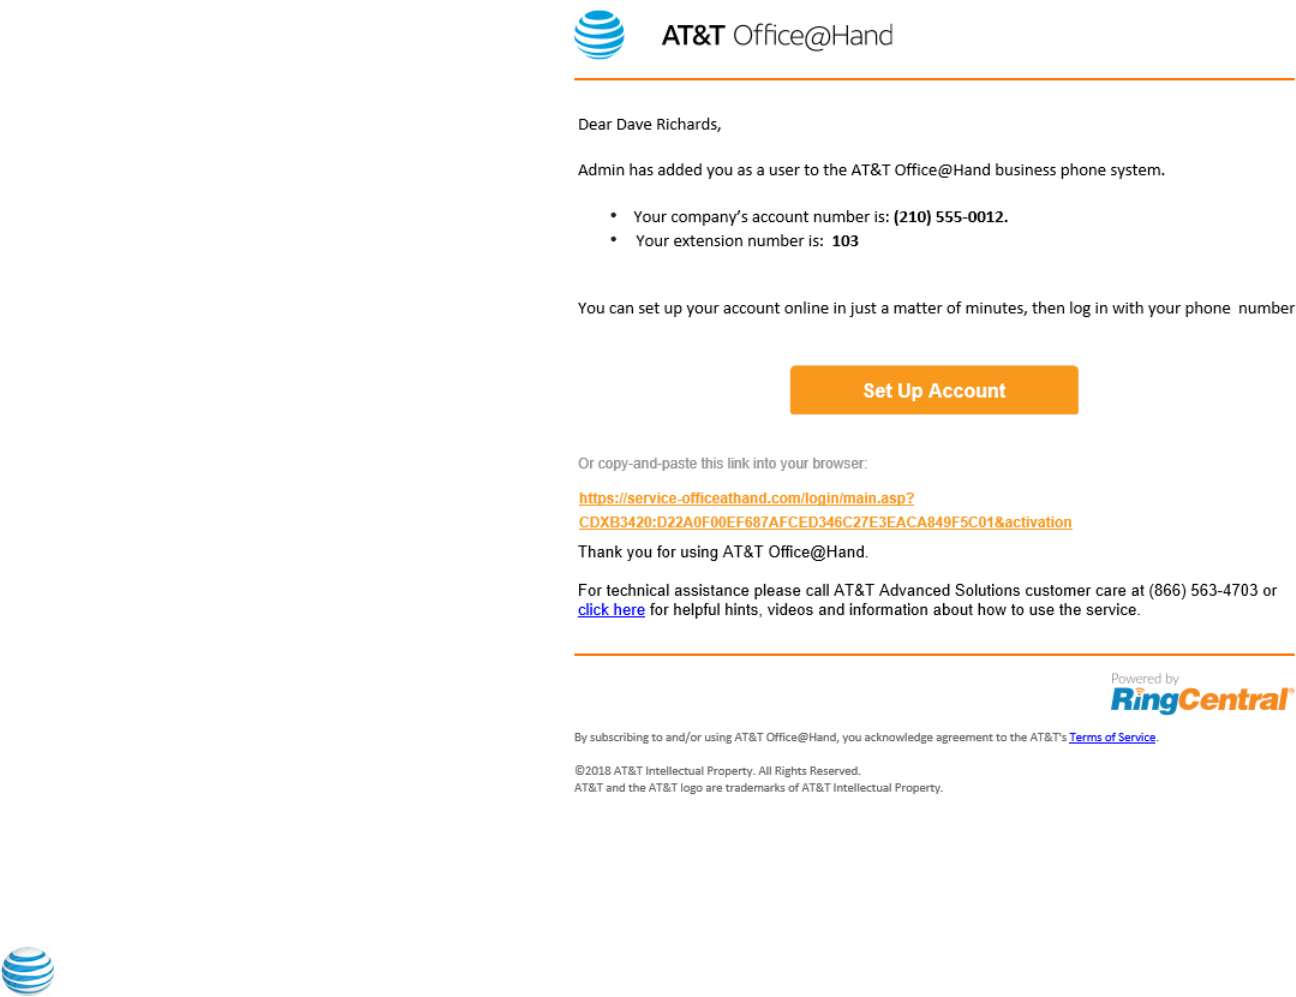
Welcome Email
After you have been added to the Office@Hand business
phone system, you will receive an email welcoming you to
your new account. In this email, you will receive your
company phone number and extension (if applicable). The
email will also indicate if your account is enabled for login
using Google login credentials. Please follow the
instructions in the email and click (or copy and paste) the
activation link.
6

AT&T Office@Hand | User Guide | Part 1 - Getting Started
Create Password
Next you'll need to create a password, PIN, and security
question and answer for your account. Follow the on-screen
prompts. After completing this step, you will be taken to the
Express Setup.
For Google-tagged accounts you may skip setting up a
Office@Hand password and login to your account using your
Google account.
7

AT&T Office@Hand | User Guide | Part 1 - Getting Started
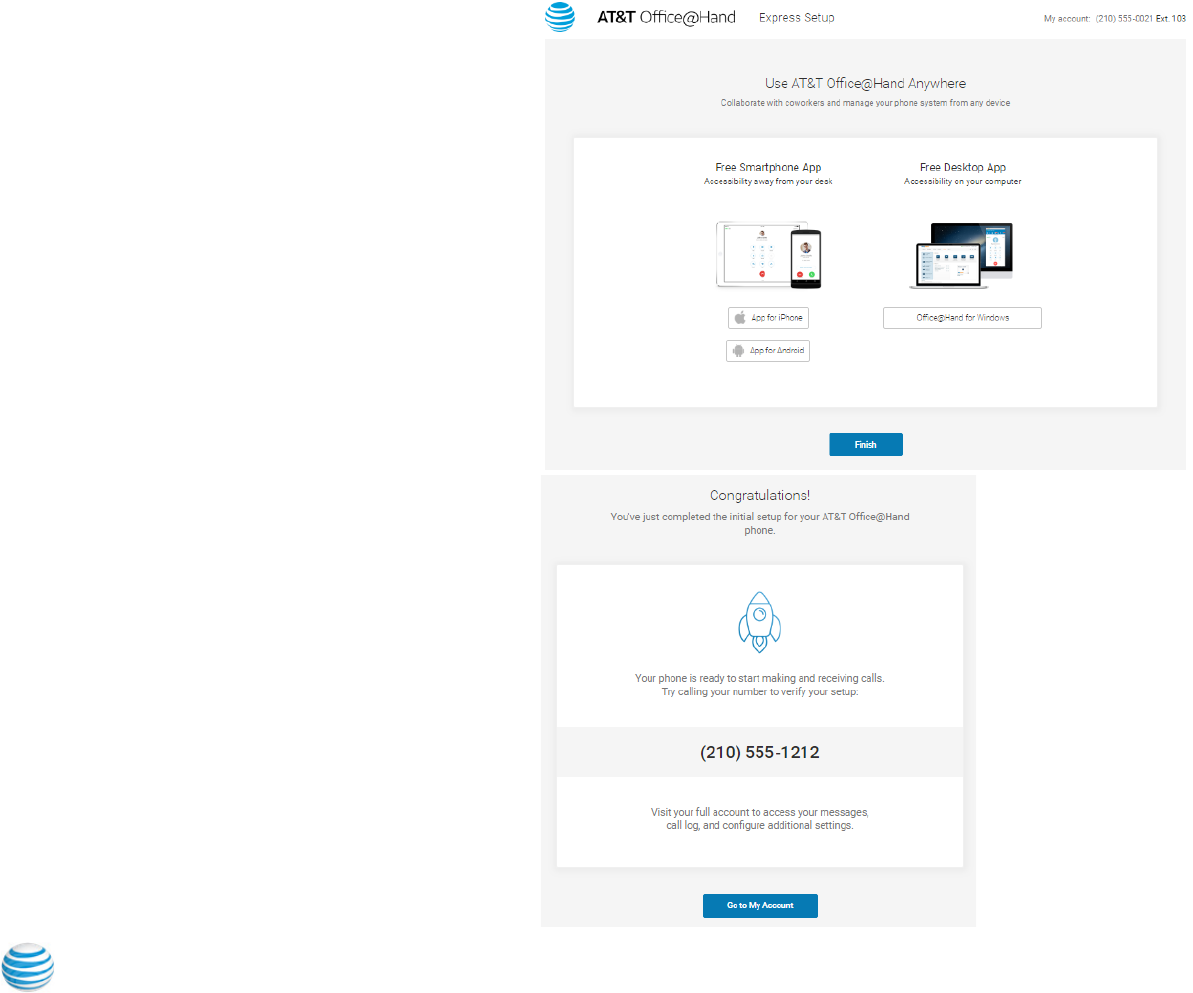
Express Setup
After you activate your account, Office@Hand starts
Express Setup, where you configure two easy steps to set up
your phone system.
8

AT&T Office@Hand | User Guide | Part 1 - Getting Started
User Info
First you'll need to confirm your basic info. Here you'll have
the opportunity to edit your first and last name, email
address, and regional settings.
Review the information in the User Info panel. Enter your
first name, last name, and email address, then click
Continue.
Regional Settings
Fill in the Regional Settings section by providing the
Country, Time Format, and Time Zone, and clicking
Continue.
9

AT&T Office@Hand | User Guide | Part 1 - Getting Started
Emergency Calling
Fill i
n the Emergency Calling panel. This address is very
important. If a 911 call is made, this is the address to which
Emergency Service dispatchers will send emergency first
responders.
1. Enter your name and address.
2. Read the Emergency Service details, including the
Emergency Service Terms and Conditions.
3. If you agree, click Agree and Continue.
10

AT&T Office@Hand | User Guide | Part 1 - Getting Started
Call Handling: Call Forwarding
In the Call Handling section, enter your other phones and
phone numbers. Click Add Devices to get started.
Select the additional devices you would like to ring when you
receive an incoming call to your business number.
Click Next when you are ready to move on.
11

AT&T Office@Hand | User Guide | Part 1 - Getting Started
Call Handling Option
Select your preferred Call Handling option: Simultaneously
or Sequentially. If you select Sequentially, you can arrange
the order of phone numbers by dragging up or down. Once
done, click Save.
12

AT&T Office@Hand | User Guide | Part 1 - Getting Started
Voicemail
In the Voicemail section, you can set up your voicemail
greeting. Select Keep Default to use the default greeting
displayed on the screen. Select Customize to record or
import your own voicemail greeting.
To record a custom greeting over the phone:
1. Click Call. Office@Hand will call you to record your
custom greeting over the phone.
2. Follow the prompts.
3. Once done recording, click Save.
To import an audio file:
1. Click Browse. Select your audio file.
2. Click Attach.
3. Once done, click Save.
13

AT&T Office@Hand | User Guide | Part 1 - Getting Started
Finishing the Setup
Once everything is set up, click Finish Setup.
14
AT&T Office@Hand | User Guide | Part 1 - Getting Started
Download Apps
Learn about the different apps for your mobile device or
desktop. You can download the Office@Hand Mobile app, or
Office@Hand for Desktop. Click Next.
Click Go to My Account to access your account.
15

AT&T Office@Hand | User Guide | Part 1 - Getting Started
How to Access Your Account
Log in to your online account at https://service-
OfficeAtHand.ATT.com using your main Office@Hand
phone number and password.
Email or Google as User ID
If configured by the admin for your account, users can log in
with a unique corporate email address or Google (Gmail or G
Suite) account. See Use a Corporate Email Address to Log In
and Use a Google Account to Log In.
Single Sign-on
If Single Sign-on is set up for your account, click Single Sign-
on at the bottom of the screen and enter your email address
on the following screen, then log in with your corporate
credentials.
Account Validation
Account Validation is a security feature that helps protect
against fraudulent activity on your account. You will be
asked for a security validation code when you log in from a
new or unrecognized computer for the first time. Depending
on your account settings, you will need to check your phone
or email for the security code and enter it in the box before
logging in..
16

AT&T Office@Hand | User Guide | Part 1 - Getting Started
Use a Corporate Email Address to Log In
The Email as User ID feature allows users to log in using a
unique email address. When users log in to an account, they
receive a notification about the feature, and can enable the
feature by specifying a unique email address.
This feature applies to accessing your Office@Hand online
account, Office@Hand from AT&T Meetings, endpoints such
as the Office@Hand Mobile App and Office@Hand for
Desktop, integration applications, and the Multiple Account
Access portal. This feature can also be configured during
Express Setup of your Office@Hand account.
For information on automatically provisioning users from
your corporate directory, see Directory Integration.
If not already configured, enable the feature:
1. Log into your account using Office@Hand credentials.
2. Enable the feature as follows:
a. In the email popup, select Enable now, and click OK.
b.Or, in User Settings, select Use email to log in.
3. Verify the uniqueness of the email address.
4. Edit any duplicate email addresses.
5. Click Save and log out.
To log in using email as user ID:
1. In the login screen, click Email.
2. Enter the unique Email address and Password that has
been associated with your Office@Hand account.
17

AT&T Office@Hand | User Guide | Part 1 - Getting Started
Use a Google Account to Log In
The Google login feature allows users native support for
logging in using a Google email address and password. This
feature requires a unique Google email address (Gmail or G
Suite email). The admin configures a Google email address
when assigning an extension, and verifies the uniqueness of
the email address. By default, users can log in with their
Google email address or Office@Hand credentials.
This feature applies to accessing your Office@Hand online
account, Office@Hand from AT&T Meetings, endpoints
such as the Office@Hand Mobile App and Office@Hand
for Desktop, integration applications, and the Multiple
Account Access portal. You can configure Google Email
addresses during the Express Setup of your Office@Hand
account.
If not already configured, set a Google email address.
1. Log in using your Office@Hand credentials.
2. Select Users.
3. Select a user. The user settings page is displayed.
4. In the Email field, specify a unique email address.
5. Click Verify email uniqueness; resolve duplicates.
6. Click Save and log out.
To Log In using Google:
1. In the login screen, click Google.
2. Enter your unique Gmail Email address and Password.
3. Edit any duplicate email addresses.
4. Click Allow to allow the application access.
18

AT&T Office@Hand | User Guide | Part 1 - Getting Started
Overview
The Overview page is your account home page. It shows
your recent voicemail and faxes, recent inbound and
outbound calls, Let's take a look at the navigation bar across
the top of this page and see how to use it.
Note: The administrator of the phone system will see the
tabs at the top for Admin Portal and My Extension. The
pages discussed in this section of the guide can be found
under My Extension. Users will only see this page and will
not have the option to switch to an Admin Portal.
19

AT&T Office@Hand | User Guide | Part 1 - Getting Started
Messages
Your voicemail and fax messages are stored in Messages.
Under Messages, you can:
• Review inbound and outbound callers
• Listen to voicemail messages
• View faxes
• Save voicemail and received faxes to your
computer
• Mark messages as read or unread
• Forward messages and faxes by email
• Click on a caller's number to call them back
• Delete and undelete items
• Block a caller
20

AT&T Office@Hand | User Guide | Part 1 - Getting Started
Call Log
The Call Log reports inbound and outbound calls and faxes
for the company number and specified extensions. The Call
Log is available as a Simple view which concisely summarizes
the calls, and as a Detailed view, which shows additional call
record details.
You can filter the call log records by number, time period,
call direction or type of call (inbound or outbound). Select
your filter criteria, and click Apply to refresh the log. In
Delivery Settings, you can set delivery of the call log to an
email address on a daily, weekly, or monthly basis, on a
specified day.
In the Type column you can see the type of calls:
Inbound Call
Outbound Call
Missed Call
If a call has been recorded, you can see an indication in the
Recording column. To listen to a call recording, select the
play icon in the Recording column for that call.
If your administrator has enabled it on your account, you will
have a Quality column in your Call Log. In the Quality
column you will see thumbs down icons for calls that were
connected. Click the white thumbs down if you were not
satisfied with the quality of a call.
Click to mark as a bad call
Marked as a bad call
21

AT&T Office@Hand | User Guide | Part 1 - Getting Started
Contacts
Contacts include Company contacts which are all the users
of your Office@Hand system. It also includes your Personal
contacts, which you can add manually, or import from a
comma-separated variable (CSV) text data file, or from
Microsoft Outlook.
22

AT&T Office@Hand | User Guide | Part 1 - Getting Started
User Settings
Click the Settings tab at the top of the homepage to access
your Settings page. On the Settings page you will see options
for your user extension, Phones & Numbers, Screening,
Greeting & Hold Music, Call Handling & Forwarding,
Messages & Notifications, Outbound Caller ID, and
Outbound Fax Settings.
23

AT&T Office | User Guide | Part 1 - Getting Started
Too l s
This section allows you to obtain the latest tools to enhance your productivity and
customize your service to suit the way you work.
Mobile Apps
Download the iPhone, Android, or iPad app to take your Office@Hand service on
the go.
Desktop Apps
Use the Office@Hand Desktop application to control your calls from your PC or
Mac. Send and receive text messages, faxes, and answer or screen incoming calls,
send to voicemail, transfer, disconnect, or monitor voice messages as they are being
left and pick up the ones you want to talk to.
Meetings
Office@Hand Meetings® is an online meeting solution. Share documents, websites,
and files from cloud storage; annotate, chat, and even record your meetings.
Collaborate with up to 50 people (including the host) to share and contribute-
anywhere, anytime, from any device. Integrate with Microsoft Outlook.
Archiver
Archiver lets you securely save your messages and recorded calls automatically and
easily search the stored data at any time from within your Dropbox or Google Drive
account to quickly retrieve the records.
App for Salesforce
Office@Hand for Salesforce enhances your Customer Relationship Management
(CRM) experience with integrated business communications. This app is available
only for Office@Hand Office Premium and Enterprise customers.
App for Zendesk
Office@Hand for Zendesk provides seamless integration of your
Zendesk application and your Office@Hand services to enabled improved
customer retention, greater agent productivity, and advance business
processes. This app is available only for Office@Hand Premium and
Enterprise customers.
RingMe
The RingMe button gives your customers the ability to call you by clicking on the
button on your web site or email signature.
24

AT&T Office@Hand | User Guide | Part 1 - Getting Started
Mobile App
With the Office@Hand mobile app, you have the
convenience and power of your entire business phone
solution in the palm of your hand. Easily navigate the
interface to take calls, check messages, send business texts,
adjust settings, and more - from virtually anywhere.
To download the Office@Hand Mobile app, visit the iTunes
App Store for iOS or the Google Play Store for Android.
25

AT&T Office@Hand | User Guide | Part 1 - Getting Started
Office@Hand for Desktop
Office@Hand for Desktop turns your PC or Mac computer
into an all-in one communication hub completely sync'd to
your office network so you can collaborate with your
colleagues and clients anywhere you have a broadband
connection and a headset. With Office@Hand for Desktop,
you're ready to communicate as soon as you log into your
computer, no matter where you are.
Office@Hand for Desktop combines the call handling power
you expect from your desk phone with the collaboration
tools you rely on most-like texting, conferencing, and faxing-
so you can stay productive with fewer devices to worry
about.
Office@Hand for Desktop is easy to install:
1. From the Tools tab, select Desktop Apps.
2. Click Download for Mac or Download for PC. The file
will download in your browser.
3. Follow the prompts in the Office@Hand Setup
Wizard.
26

AT&T Office@Hand | User Guide | Part 1 - Getting Started
Office@Hand Meetings®
Office@Hand Meetings is a downloadable app for video
conferencing and web sharing of the desktops and
application displays of conference participants. The app is
available in desktop and mobile versions. Office@Hand
Office Enterprise users can have up to 200 participants per
meeting, Premium users can have up to 100 participants per
meeting, and Standard and all other Office users can have up
to 4 participants per meeting. The number of participants
includes the host.
Participants are invited to join a meeting by email or SMS;
they don't have to be Office@Hand customers but can
download and run the Office@Hand Meetings app for free
and join your meetings without needing to create an account
or log in.
To download the Office@Hand Meetings app for your
desktop:
1. From the Tools tab, select Meetings.
2. Select the Meetings for Desktop tab.
3. Click Download for Mac or Download for PC. The file
will download in your browser.
4. Follow the prompts in the Office@Hand Meetings
Setup Wizard.
To download the Office@Hand Meetings mobile app:
1. From the Tools tab, select Meetings.
2. Select the Meetings Mobile App tab.
3. Click Download on the App Store or Get it on Google
Play.
4. Follow the instructions for installation through the
iTunes App Store for iOS or Google Play Store for
Android to download the Office@Hand Meetings app
for your mobile devices.
27

AT&T Office@Hand | User Guide | Part 1 - Getting Started
Archiver
Archiver makes archiving important communications data
simple and convenient through the seamless integration of
SFTP, Dropbox, or Google Drive cloud storage with your
Office@Hand service.
With Archiver, you can securely save your messages and
recorded calls automatically and easily search the stored
data at any time from within your account to quickly retrieve
the records you want.
Configure Archiver
1. From the Admin Portal, select the Tools tab.
2. Click Archiver and log in to the tool with your
Office@Hand credentials.
3. The Accounts tab displays the connection status of
your accounts. Click Connect and enter the
credentials to connect Office@Hand to your Dropbox,
Google Drive, or SFTP account.
4. Click Sync Options.
5. When connected to an account, you can enable or
disable data backup from Office@Hand to the account
by selecting Enable Backup.
Archiver will run the job on an hourly basis and
archive to Dropbox, Google Drive, or SFTP all of the
extensions’ call recordings generated within the hour
before last Archiver job run.
6. Select the types of Data to backup. By default, Call
Recordings are backed up for admins and users. Users
can select for their own extensions whether to backup
Call Recordings, Voice Mails, SMS and/or Fax.
28

AT&T Office@Hand | User Guide | Part 1 - Getting Started
Office@Hand for Salesforce™*
Office@Hand for Salesforce enhances your CRM experience
with integrated business communications. With
Office@Hand for Salesforce you can place calls from within
Salesforce by simply clicking on contact or account records.
Your incoming calls trigger a pop-up window with the
caller's account information. And you can attach call Notes
to specific contact records. Your Office@Hand
Administrator will need to configure this application for
your account.
Office@Hand for Zendesk*
Office@Hand for Zendesk seamlessly combines the features
of the Zendesk application and your Office@Hand services.
With the Office@Hand for Zendesk, you can enhance your
Zendesk experience with one-click dialing through your
Office@Hand phone system, screen-pop features, multiple
browser tabs for multiple interactions, and more. Your
Office@Hand Administrator will need to configure this
application for your account.
*Available with Office@Hand Premium and Enterprise Editions.
29

AT&T Office@Hand | User Guide | Part 1 - Getting Started
RingMe
RingMe is a click-to-call feature designed to help drive
traffic from your website or email to your telephone sales
team and thereby increase lead opportunities. Whether you
are using a local or a toll-free number, you can provide your
visitors a way to call you with a simple click of the mouse.
1. From the Tools tab, select RingMe.
2. Next to Callers will be routed to, select your
preference from the drop-down menu.
3. Under RingMe Style, select whether you'd like a
hyperlink or a button. If choosing a button, click >
Change Button Style to see other color options.
4. Under Security, check the boxes if you'd like to Use
SSL mode and Require callers to enter security image
confirmation code.
5. Under Generate Code, choose the type of code you'd
like from the drop-down menu.
6. Click Copy Code to copy your code to your
computer's clipboard. Then paste the code wherever
you'd like to add your RingMe button.
30

AT&T Office@Hand | User Guide | Part 1 - Getting Started
Do Not Disturb
In the upper right of every page of your online account is a
small colored icon next to your name. This icon displays your
Do Not Disturb status. Click the icon to toggle between
statuses:
• Take all calls - you are available to take all
incoming calls.
• Do not accept call queue calls - you do not accept
from a call queue; those calls are sent to your
voicemail.
• Do not accept any calls - you do not accept any
calls. All callers are sent to voicemail.
31

AT&T Office@Hand | User Guide | Part 1 - Getting Started
Audio Conference
Office@Hand customers can setup, host, and join
conference calls anytime, anywhere. Click the Conference
icon in the upper right corner of your online account to get
started.
Each conference call can include up to 1000 attendees,
enabling you to hold large meetings and broadcasts.
Each customer receives a unique conference bridge number,
and each user on the phone system gets his or her own host
and participant access code so that you and your team can
hold independent conferences whenever you want.
You also have the option to add the international dial-in
number in the invitation. Check the "I have international
participants" option and select the needed countries in the
list.
32

AT&T Office@Hand | User Guide | Part 1 - Getting Started
Launch the Conferencing Application
1. Click the Conference icon.
2. A pop-up will appear with conference numbers and
settings.
a. View Dial-in numbers.
b.View Host and Participant codes.
c. If you have international
participants, check the box
next to I have international participants. Select
international dial-in numbers at the bottom of the
pop-up.
d.Check the box next to Enable join before host to
allow participants to start a conference call without
a host.
e. Click Invite with Email to open an email with prep-
populated conference details - simply enter
participant emails and send.
f. Click Conference Commands to view Conference
Commands*.
3. Click Close.
*See Conference Commands on the next page.
33

AT&T Office@Hand | User Guide | Part 1 - Getting Started
Conference Commands
For the Conferencing feature, the host and participants have
the same conference bridge number to dial into, but their
call control depends on the access codes that they will use.
The Host has the full call control and can access the
conference commands in the table to the right.
Participants, on the other hand, have limited control of the
conference commands.
The commands are displayed with the conferencing dial-in
information.
Preventing Music-On-Hold
On an demand parameter can be configured to prevent
users from playing music-on-hold. When you request
support to enable this parameter for your account, and a
user with music on hold enabled joins a conference bridge,
the client is prevented from playing music-on-hold during an
explicit or implicit hold (such as answering an incoming call).
This feature allows other participants on the bridge to
continue without disruption.
34

AT&T Office@Hand | User Guide | Part 1 - Getting Started
RingOut
RingOut enables one-touch calling from any phone or
Internet-enabled computer, allowing you to make calls using
your business caller ID from any location, such as a hotel
room. The Office@Hand system will call your phone first,
then dial out to the number you’d like to call to get you
connected. The RingOut icon is located in the upper right of
every online account page.
1. Click the RingOut icon in the upper right corner.
2. A pop-up dialer will appear.
3. Dial a number or use your keyboard to type a number
into the text field. You can also choose from among
recent calls, or from your contact list.
4. Select the From number you’d like to show as your
caller ID. You also have the option to choose Custom
phone number from the drop-down menu and enter
the desired number in the text field below the drop-
down menu.
5. Once you have entered From and To numbers, the
Call button will turn green.
6. Check the box next to Prompt me to press 1 before
connecting the call if you’d like the system to confirm
that you would like to make the call before you are
connected. When the system calls you, you will hear
"Please press 1 to connect." This protects you in case
you mistyped your own number, or if your voicemail
picks up too quickly.
7. Click the Call icon. The system first calls you. When
you answer (and press 1 as instructed if you’ve
selected this option), it then calls the other number
and connects you.
35

AT&T Office@Hand | User Guide | Part 1 - Getting Started
FaxOut
From any page on your Office@Hand online account, click
the FaxOut icon located in the upper right corner. Fill in the
form with recipient's fax number and cover page
information, and attach or scan a document, which will
automatically be converted into a fax.
A wide variety of standard document types, including word
processing and spreadsheet and PDF documents, are
recognized by FaxOut. You can also send files from Dropbox,
Box or Google Drive with just a few clicks.
1. Click the FaxOut icon in the upper right corner.
2. Enter up to 50 recipients and add a cover page
message.
3. Attach files from Dropbox, Box, Google Drive or your
computer and authorize Office@Hand to access your
files (you have to do this only once).
4. Click Send Now.
36
AT&T Office@Hand | User Guide | Part 1 - Getting Started
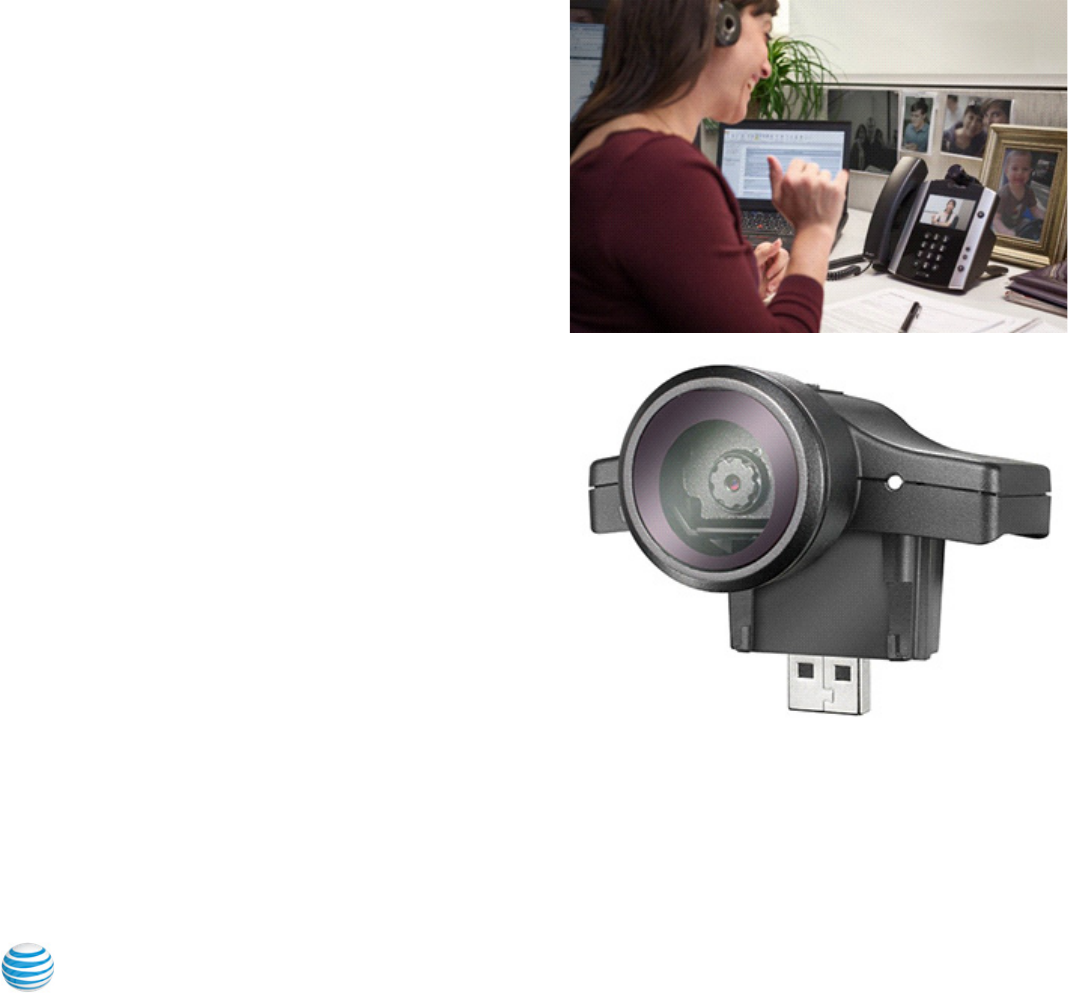
Placing Video Calls
Your admin can enable video on internal point-to-point calls
in your Office@Hand account. Supported devices include
the Polycom VVX 601/600 and 501/500. Some devices
support detachable cameras for video calling.
You can control video-enabled phones through a softkey.
The softkey displays “Audio Mode” in the idle state when the
video feature is enabled on your Office@Hand service. You
can use the softkey to toggle between ‘Audio Mode’ (to
make an audio-only call) and ‘Video Mode’.
37

AT&T Office@Hand | User Guide | Part 1 - Getting Started
Hot Desking
Hot desking enables you to log in to a shared phone that
adopts your phone settings. Hot desking allows employees
who travel from different offices to share the same common
phone and desk while keeping their own extension profiles
and voicemail access.
Hot desking is only available for extensions with digital lines.
Host phones will not support any inbound or outbound
calling without a guest user logged in (except emergency
calls).
Log in to a common phone
1. Press the Login soft key (or dial *90) on a common
phone.
2. At the prompt, enter the extension number and pin
(used at set up).
3. You are logged in to the common phone.
Log out from a common phone
1. Press the Logout soft key on the phone (or dial *90) to
log out.
2. You are logged out from the common phone.
38

AT&T Office@Hand | User Guide | Part 2 - User Settings
Part 2 - User Settings
39

AT&T Office@Hand | User Guide | Part 2 - User Settings
User Settings
As a User, you may be able to change your contact info,
voicemail greeting, call handling, user hours, password, and
more, but not the extension number that was assigned to
you by the system administrator.
Your administrator may use the Roles and Permissions
feature to control which settings users can access or edit. A
role is a set of permissions that is assigned to a user. If some
settings described here are not available to you, your
administrator may not have granted you a role with
permissions that can access or edit those settings.
User Details
1. From the Settings tab, select your name and extension
at the top of the list of settings on the left.
2. Under User Details, make changes on the General tab.
a. First Name
b.Last Name
c. Record User Name: click the play icon to hear the
current recording or click Edit. Select Record my
name and record the name by phone, computer, or
import. Or select AT&T Office@Hand text-to-
speech to create a phonetic spelling of your name or
extension so the system can pronounce it correctly.
d.De
partment: Add your department title.
e. Contact Phone
f. Mobile Phone
g. Email: address for Office@Hand communications.
h.Use email to log in: Enables your admin to enable
you to log into your Office@Hand account using
your corporate email address and password.
i. Password: Set and reset password, PIN, and
Security Question.
40

AT&T Office@Hand | User Guide | Part 2 - User Settings
3. Select and change the information you want to change
on the Settings & Permissions tab.
a.Regional Setting: Time zone, time format, country
code.
b.User Hours: Set your working hours.
c.Roles: Lists the role assigned to you by your admin
tha
t controls what you can do within the
system. A role is a collection of permissions that
could be based on a job function.
d.User Groups:
Specifies any user groups where you
are a member. The user group manager can
modify your settings and view your call log.
e.Temp
late: Click to Apply an existing template
(group configurations) for call handling.
f.Sche
dule Meetings for Me: Grant permission to
other users in Office@Hand Meetings to
schedule a meeting on your behalf.
41

AT&T Office@Hand | User Guide | Part 2 - User Settings
Schedule Meetings for Me
Schedule Meetings for Me simplifies the process
of
scheduling Office@Hand meetings without the need to log
into different accounts to host meetings for others. For
example, a manager can assign his/her executive assistant to
schedule meetings for them.
1. From the Settings tab, select your name and extension
at the top of the list of settings on the left.
2. Click Schedule Meetings for Me.
3. Select the boxes of the users you want to grant
permission to schedule meetings for you.
4.
Clic
k Save.
When scheduling a meetin
g in Office@Hand Meetings, the
host can select you
r name
from the Schedule for field in the
Schedule a Meeting window. See the Office@Hand Meetings
Guide for information on scheduling meetings.
42

AT&T Office@Hand | User Guide | Part 2 - User Settings
Use Text-to-Speech Name
1. From
the Settings tab, select your name and extension
at the top of the list of settings on the left.
2. Click the User Details section.
3. Click Edit under Record User Name.
4. A pop-up will appear with options for your recorded
name.
5. Select the button next to Office@Hand text-to-
speech name.
6. Enter your name in the text field.
7. Click Save.
43

AT&T Office@Hand | User Guide | Part 2 - User Settings
Set a Custom Name Recording
1. From t
he Settings tab, select your name and extension
at the top of the list of settings on the left.
2. Select User Details.
3. Click Edit under Record User Name. A pop-up will
appear with options for your recorded name.
4. Select Record my name from the menu.
5. Select how you'd like to set your custom recording:
a. Record Over the Phone
Next to Call me at, choose a phone number from the
drop-down menu if you have saved numbers or type a
phone number in the text field. Click the Call Now but-
ton, and Office@Hand will call you to record your
message.
b.Record Usin
g Computer Microphone
Clic
k Allow if Office@Hand asks to record through
your computer. The microphone test and record set-
tings will appear. When ready, click the red Record
button to record your company greeting through your
computer microphone. Stop the recording and listen
to the playback.
c. Import
Browse for a WAV or MP3 file you want to use. Click
Attach. Click the play button to listen to your greeting.
6. Click Save.
44

AT&T Office@Hand | User Guide | Part 2 - User Settings
Phones & Numbers
In the Phones & Numbers section, you can view your phones
and numbers, edit your presence and intercom settings as
well as view your conference numbers and invite people to a
conference call via email.
Phone Details
1. From the Settings tab, select Phones & Numbers.
2. Click the Phones tab.
3. Click Edit to see the phone details of a phone. You can
view your Device, Serial Number, Assignee Type, and
Status, edit your phone name, your Default area code,
your Bandwidth Settings and enable HD Voice*, and
edit your Emergency Address.
4. Click Save.
*Available for Premium and Enterprise users only.
45

AT&T Office@Hand | User Guide | Part 2 - User Settings
Set Your Presence
Presence-capable phones have status indicator lights that
let you see who is available, busy, or on hold. You can turn on
Presence and decide who gets monitored and how you want
to handle the calls.
1. From the Settings tab, select Phones & Numbers.
2. Click the Phones tab.
3. Click Presence. A pop-up will appear with a list of
users who are currently able to see your Presence.
4. On the Appearance tab, check the box next to Ring
my phone when any user I am monitoring rings if
you'd like to use this feature.
5. Check the box next to Enable me to pick up a
monitored line on hold if you'd like to use this feature.
6. Click Select a User.
7. Select a user to add from the list to your Presence-
capable phone.
8. Click Done.
9. Click Save.
Note: If you use Office@Hand for Desktop, the list of users
under Appearance will automatically sync with the HUD list
on your desktop. Any changes you make to the HUD list on
your desktop will also automatically sync with the
Appearance list in your online account.
46

AT&T Office | User Guide | Part 2 - User Settings
10. Click the Permissions tab.
11. Next to Allow other users to see my presence, select the button next to On
or Off.
12. Select the users who you'd like to allow to see your Presence.
13. Click Save.
47

AT&T Office@Hand | User Guide | Part 2 - User Settings
Intercom
Intercom allows hands-free peer-to-peer conversations
between users on desk phones and the Office@Hand for
Desktop application. With Intercom, you can call another
extension in your company and that phone will
automatically answer the call in speakerphone mode. This
feature is useful for announcing parked calls, notifying of
visitors, and engaging in hands-free communications with
colleagues.
Most Office@Hand desk phones have Intercom softkeys.
Just press the Intercom softkey and dial an extension. The
extension phone beeps to notify the user of an incoming
intercom call, and the user's speakerphone is automatically
activated.
Call routing and forwarding is supported, so if users are on
intercom calls on their desk phones, incoming regular phone
calls can forward automatically another device. Just set your
forwarding rules to send calls to your mobile phone or the
Office@Hand for Desktop application if your desk phone is
busy.
The Polycom 6000 conference phone does not have
softkeys; use the touch tone command *85 to initiate an
Intercom session. The Office@Hand for Desktop application
cannot make, but can receive, Intercom calls. The
Office@Hand Mobile Apps cannot make an Intercom call;
incoming Intercom calls convert into regular inbound calls.
48

AT&T Office@Hand | User Guide | Part 2 - User Settings
Enable Intercom Calls
To e
nable Intercom calls:
1. From the Settings tab, select Phones & Numbers.
2. Click the Phones tab.
3. Click Intercom.
4. On the Phones tab, enable intercom calling by
choosing a phone to accept intercom calls. Click
Disabled (if Intercom is currently disabled) or the
current Intercom-enabled phone to change the
settings.
5. Select the button next to the phone you'd like to
accept intercom calls.
6. Click Save.
7. On the Users tab, select users who you'd like to be
able to make intercom calls to you.
8. Click Save.
49

AT&T Office@Hand | User Guide | Part 2 - User Settings
Screening, Greeting, & Hold Music
In this section, you can set your preferences for your
different greetings, hold music, and blocked calls.
Set a User Greeting
Your Office@Hand system comes with a default personal
greeting such as "Thank you for calling (user name)." You can
easily change this greeting to your own custom greeting.
Follow the steps on this page to record a custom greeting
over the phone or import a prerecorded greeting from your
computer.
1. Under the Settings tab, select Screening, Greeting &
Hold Music.
2. Click Edit under User Greeting. A pop-up will appear
with the current greeting.
3. Choose your preferred type of greeting.
a. Default: Select Default from the menu
b.Cu
stom: Select Custom from the menu and select
how you’d like to set your custom recording:
•Record Over the Phone: next to Call me at,
choose a phone number from the drop-down
menu if you have saved numbers or type a phone
number in the text field. Click Call Now and
Office@Hand will call you to record your
message.
•Record Using Computer Microphone: click
Allow if prompted to record through your
computer. The Microphone Test and Record
settings will appear. When ready, click the red
Record button to record your company greeting
through your computer microphone. Stop the
recording and listen to the playback.
•Import Browse for a WAV or MP3 file you want
to use. Click Attach. Click the play button to
listen to your greeting.
4. Click Done.
5. Click Save.
50

AT&T Office@Hand | User Guide | Part 2 - User Settings
Set up Call Screening
Turn on this option when you want callers to announce their
name before continuing to connect the call. This option lets
you identify the caller so you can pick up the call
immediately.
1. Under the Settings tab, click Screening, Greeting &
Hold Music.
2. Under Call Screening, click Enable.
3. Click Edit to set call screening options. Under Ask
callers to say their names before connecting, select
the button next to your preferred condition.
4. Click Done.
5. Click Save.
51

AT&T Office@Hand | User Guide | Part 2 - User Settings
Connecting Message
Set the recorded message you want callers to hear to let
them know the call will now be transferred to your line.
1. From the Settings tab, select Screening, Greeting &
Hold Music.
2. Under Connecting Message, click Enable.
3. Click Edit. A pop-up appears with the current
connecting message.
Choose your preferred type of message.
a.Default: Select the button next to Default.
b.Custom: Select the button next to Custom and
select how you’d like to set your custom
recording:
•Record Over the Phone
Next to Call me at, choose a phone number from
the drop-down menu if you have saved numbers
or type a phone number in the text field. Click
the Call Now button, and Office@Hand will call
you to record your message.
•Record Using Computer Microphone
Click Allow if prompted to record through your
computer. The Microphone Test and Record
settings will appear. When ready, click the red
Record button to record your company greeting
through your computer microphone. Stop the
recording and listen to the playback.
•Import Browse for a WAV or MP3 file you want
to use. Click Attach. Click the play button to
listen to your greeting.
4. Click Done.
5. Click Save.
Note: Repeat this process, selecting the After Hours tab (if
displayed), to set up a Connecting Message for after
business hours.
52

AT&T Office@Hand | User Guide | Part 2 - User Settings
Audio While Connecting
Set the music you'd like callers to hear in the while waiting to
be connected. Please Note that the "Audio while
connecting" setting is applied on a rule basis, the "Hold
music" setting is applied for all calls.
1. Under the Settings tab, select Screening, Greeting &
Hold Music.
2. Under Audio While Connecting, click Enable.
3. Click Edit. A pop-up appears with the current audio.
4. Select the radio button next to your preferred choice
of audio:
a.Ring To
nes.
b.Mu
sic: Select audio from the drop-down menu.
c.Custom: Upload a WAV or MP3 file.
Pres
s the Play button to listen to your greeting, press
Record to re-record your custom greeting or select a
different type of audio.
5. Click Done.
6. Click Save.
53

AT&T Office@Hand | User Guide | Part 2 - User Settings
Set Hold Music
Set the music you'd like callers to hear while on hold. The
hold music will be applied to all calls.
1. Under the Set
tings tab, select Screening, Greeting &
Hold Music.
2. Under
Hold Music, click Enable.
3. Clic
k Edit. A pop-up appears with the current music.
4. S
elect the radio button next to your preferred choice
of music:
a.Ring Tones.
b.Mu
sic: Select your choice of music from the drop-
down menu.
You have standard music options
as well as options that are optimized for mobile
devices at the bottom of the list.
c.Custom: Upload a WAV or MP3 file.
Press the Pl
ay button to listen to your greeting, press
Record to re-record your custom greeting or select a
different type of audio.
5. Click Do
ne.
6. Clic
k Save.
54

AT&T Office@Hand | User Guide | Part 2 - User Settings
Blocked Calls
Choose specific phone numbers and fax numbers that you'd
like to block and prevent from calling or faxing your number.
You can also choose what message they will hear when they
attempt to call.
1. Under the Set
tings tab, select Screening, Greeting &
Hold Music.
2. Clic
k the Blocked Calls tab for call blocking options. If
you are the administrator, you will see a message
notifying you that calls blocked for this extension will
apply to any calls to the company as well as your own
extension.
3. Under Block Opt
ion select whether you'd like to block
specific calls and faxes or all calls.
4. On
ly Block these numbers or area codes:
a.Enter phone numbers
(and na mes) of specific
numbers you'
d like to block.
b.Click Block.
c.Click Callers will hear to set the message you'd
like them to hear.
5. Under Callers will hear you can click Edit to set the
message you'd like these callers to hear.
6. Block calls with no caller ID:
a.Select Faxes, Call and Faxes, or None.
b.Check the box next to Enable block calls from pay
phones if you'
d like this option.
7. Block calls from pay phon
es:
a.Select Faxes, Call a
nd Faxes, or None.
b.Edit Callers will hear to set the message you'd like
these callers to hear, then click Save.
8. Click Save.
55

AT&T Office@Hand | User Guide | Part 2 - User Settings
Call Handling & Forwarding
Call Forwarding
As a User, you can set up different call forwarding rules for
your extension(s). Add up to 10 forwarding numbers for
each extension assigned to you, and set calls to ring at these
numbers sequentially or simultaneously.
You can access the in-product help and tool tips to find more
information, including knowledgebase articles, on
configuring call handling and forwarding.
1. Fr
om the Settings tab, select Call Handling &
Forwarding.
2. Se
t Incoming calls forward in this order as follows:
a.Sequentially: Use the up and down arrows next to
each phone in the Move column to set the order
in which your phones will ring.
b.Simultaneously: All phones listed will ring at the
same time.
3. Create Ring Group: Us
e this feature to group
numbers and allow them to ring at the same time.
Check the box beside the numbers you want to select
and click Create Ring Group. Click Ungroup to
ungroup the numbers.
4. Add C
all Forwarding Phone: click this button to add
another phone number up to 10 forwarding numbers
for each phone extension.
5. Forward to
Other’s Phones: Click the kebab button
beside Add Call Forwarding Phone to open this
option and select from a list of other user's numbers.
6. Clic
k Save.
56

AT&T Office@Hand | User Guide | Part 2 - User Settings
Incoming Call Handling
You can choose settings in Incoming Call Information so that
when you receive a call, either at your office or forwarded to
another of your phones, you will hear a recorded prompt
that announces the name of the extension the caller dialed.
For example, it may say, "John, you have a call." Or "Sales,
you have a call."
This feature helps users who are members of more than one
department-or who use phones that are both business and
personal-answer the call appropriately.
1. From the Settings tab, click Call Handling &
Forwarding.
2. Click the Settings tab.
3. Click Edit under Incoming Call Information.
4. On Display Number, you can select Incoming Caller
ID or Called Number under Incoming Number
Displayed to Me. This setting is useful if you are using
a non-Office@Hand phone as a forwarding number, so
you would know how to identify an Office@Hand call.
a. Incoming Caller ID: displays the phone number of
the person calling.
b.Called Number: displays the phone number the
person dialed. If you use your business phone for
personal use as well, it allows you to identify
business calls and answer them appropriately.
57

AT&T Office@Hand | User Guide | Part 2 - User Settings
5. Click Play Announcement, to configure how you want
the announcement to play before connecting.
6. Direct Calls: this setting allows you to hear an
announcement when your extension or phone is
called directly. This is helpful for identifying how you
should answer the phone, especially if you use the
phone for both business and personal use. You can
select the following options under this setting:
a.For non-Office@Hand phones only: Plays
the
announcement when forwar
ding a call to your
home o
r mobile phone (to help you distinguish
between personal and business calls) but not
when forwarding to your Office@Hand phone.
b.Always: All calls will be announced before being
forwarded to any of your phones.
c. Never: All calls will be connected without an
announcement (unless they are from blocked
numbers)
7. Call Queue Calls: This setting applies if you are a
member of a call queue. This is helpful for identifying
how you should answer the phone, especially if you
are a member of multiple call queues.
a.
Fo
r non-Office@Hand phones only: Plays the
announcement when forwarding a call to your
home or mobile phone (to help you distinguish
between personal and business calls) but not
when forwarding to your Office@Hand phone.
You will still be prompted to press 1 to accept
department (Call Queue) calls on you non-
Office@Hand phones.
b.Always: All call
s will be announced before being
forwarded to any of your phones.
58

AT&T Office@Hand | User Guide | Part 2 - User Settings
8. Check Include mailbox name in announcement if
you’d like the mailbox name to be included in the
announcement. If this option is unchecked and you get
a department (Call Queue) call, the prompt will say
"Queue Call, to accept this call, press 1". If you are
supposed to accept calls from the Sales and Technical
Departments for example, checking this option will let
you know if the call you are getting is for Sales or
Technical Department.
9. Check Require my pin to answer: this option requires
the Office@HandPIN be entered before accepting a
call. This is a helpful security feature if you do not
want other people to accept your calls, such as when
you are at home or at another location.
10. Click Save.
59

AT&T Office@Hand | User Guide | Part 2 - User Settings
Call Flip
Office@Hand Call Flip lets you transfer conversations from
one device to another quickly and easily. Flip a call you are
on to your mobile phone on your way out of the office. Or flip
a mobile call to your home phone once you've finished your
commute.
Manage Your Call Flip Numbers
1. From the Settings tab, select the Call Handling &
Forwarding.
2. Click Call Flip.
3. A pop-up will appear with a list of numbers/ devices
assigned to that user with a Flip number beside each.
4. Click the arrows to move a device up or down to
change its assigned number. You may skip or leave any
number unassigned.
5. Click Save.
To Use Call Flip
When you are on a phone call, press the asterisk key (*) and a
number corresponding to the device to which it is assigned.
The call is transferred immediately to that device. For
example, if you have the number 2 assigned to your home
phone, clicking *2 while you are on a call will instantly
transfer the call to your home phone.
60

AT&T
Office@Hand | User Guide | Part 2 - User Settings
Messages & Notifications
Messages
In the messages section, deci de whether or not you'd like to take
messages , set your voicemai l greeting, and choose how you'd like to
be notified for different interactions.
Set a Voicemail Greeting
1. From the Settings tab, select Messages & Notifications.
2. Under Take Messages, click the button next to Yes.
3. Under Voicemail Greeting click Edit.
4. A pop-up will appear with the current Voicemail Greeting.
Choose your preferred type of greeting.
a. Default – Select the button next to Default.
b.Custom – Select the button next to Custom and select how
you’d like to set your custom recording:
• Record Over the Phone
Next to Call me at, choose a phone number from the
drop-down menu if you have saved numbers or type a
phone number in the text field. Click the Call Now button,
and Office@Hand will call you to record your message.
• Record Using Computer Microphone
Click Allow if Office@Hand asks to record through your
computer. The Microphone Test and Record settings will
appear. When ready, click the red Record button to
record your company greeting through your computer
microphone. Stop the recording and listen to the
playback.
• Import
Browse for a WAV or MP3 file you want to use. Click
Attach. Click the play button to listen to your greeting.
5.
Clic
k Save.
By default, you receive your own voicemail messages. To configure
another user/extension to receive your voicemail messages (for
example, when you are ou
t o
f the office), cl
ick Message Recip
ient
and select the user who should receive the voicemail messages.
61

AT&T Office@Hand | User Guide | Part 2 - User Settings
Notifications
Set your settings for email alerts or text messages when you
receive a voicemail message, fax, missed call or for the status
of their fax transmission results.
1. From the Settings tab, select Messages &
Notifications.
2. Click the Settings tab.
3. Click Edit under Notifications. A pop-up will appear
with options for email or text-message notifications to
a recipient of your choice when voicemail messages or
faxes are received, or calls missed.
4. Set your notification settings by checking the boxes
and filling in email and phone numbers.
a. Click Advanced Notification Options to see mor
e
detailed notification settings.
b.
Set your Advanc
ed Notification Options.
c. Click Back to Basic Notification Settings.
5. Click Save.
62

AT&T Office@Hand | User Guide | Part 2 - User Settings
O u t bo un d Ca l le r I D
This option allows a user to display or block the caller ID of
their phone numbers during outbound calls. As a default,
your outbound caller ID is not blocked. Follow the steps
below to change it.
1. From the Settings tab, select Outbound Calls/Faxes
at the top of the list of settings on the left.
2. Select the Caller ID tab.
3.
You have the option to choose different numbers to
display:
a.By Pho
ne: Choose a number to display for your
softphone, mobile phone, or desk phone.
b.By Feature: Choose a number to display for
RingOut from Web, RingMe, Call Flip, Fax
Number, and Additional Softphone.
4. Click Edit next to a phone number to select a phone
number you want to display as your called ID number
for that phone or feature type. Click Done.
5. Check the box next to Display my extension number
for internal calls if you want to display your extension
as your Caller ID when making internal calls. All
Office@Hand and IP phones will see the extension.
Calls forwarded to external phones, like a mobile
phone, will still show your complete direct phone
number.
6. Click Save.
63

AT&T Office@Hand | User Guide | Part 2 - User Settings
Outbound Fax Settings
Set your outbound fax settings using these instructions.
Changing Fax Cover Sheet
1. From the Settings tab, select Outbound Calls/Faxes
at the top of the list of settings on the left.
2. Select the Fax Settings tab.
3. Edit your Cover page info. Enter your Company
name, Address, City, State/Province, Zip/Postal
Code, and Country.
4. Under Cover Page click Select.
5. Select and preview the Default Cover Page. A default
cover sheet is attached to each fax you send through
Office@Hand. The variable information on the cover
page will be filled in during the fax-sending process.
6. Click Done.
7. Click Save.
64

AT&T Office@Hand | User Guide | Part 2 - User Settings
Adding Emails That Can Send Faxes
When a user sends a fax via Office@Hand, the system checks
the email address of the sender, and sends the fax if it is on
the approved list. Emails might include alternate company
accounts or personal accounts. You can have up to five
approved email addresses.
1. From the Settings tab, select Outbound Calls/Faxes
at the top of the list of settings on the left.
2. Select the Fax Settings tab.
3. Under Omit cover page when email subject line is
blank, select the button next to On or Off depending
on your preference. If this option is selected, when
you send a fax via email with a subject line, the cover
page will be used. If you send it without a subject line,
a cover page will not be used.
4. Enter the email address you wish to add.
5. Click Add (repeat for up to 25 additional addresses).
6. Click Save.
65

AT&T Office | User Guide | Part 2 - User Settings
Faxing via Email determine whether or not a cover page is sent with your fax. See
instructions for Adding Email
s that Can Send Faxes for more
information.
Send faxes by emailing them as attachments from any email address you
have added to the "Faxes Sent via Email" menu described previously.
1. Enter the recipient's 10-digit fax nu[email protected] in the To: field
.
For example, to send a document to the fax number 1-650-555-
6567, you would use this email address: 65[email protected]m.
3.
Attach the document you wish to fax.
4. Type your message in the body of the email.
5. Click Send.
2. Enter a subject in your email to use as your fax subject. Depending on
your settings for Faxes Sent via Email, adding a subject may
© 2018 AT&T Intellectual Property. All Rights Reserved. AT&T and the AT&T logo are trademarks of AT&T Intellectual Property. All other marks are the property of their
respective owners. KID-12536
66
