
501 AR323
Billing and Receivables
Instructor Led Training
Rev 11/23/2021

This training provides participants with the skills and information necessary to use Cardinal and is not intended to replace existing
Commonwealth and/or agency policies.
This course, and the supplemental resources listed below, are located on the Cardinal website (www.cardinalproject.virginia.gov)
under Learning.
Cardinal Reports Catalogs are located on the Cardinal website under Resources:
• Instructor led and web based training course materials
• Job aids on topics across all functional areas
• Variety of simulations
• Glossary of frequently used terms
The Cardinal screenshots included in this training course show system pages and processes that some users may not have
access to due to security roles and/or how specific responsibilities relate to the overall transaction or process being discussed.
For a list of available roles and descriptions, see the Statewide Cardinal Security Handbook on the Cardinal website in the
Security section under Resources.
1
Welcome to Cardinal Training

After completing this course, you will be able to:
2
Course Objectives
Enter a Standard Bill
Generate an Invoice
Adjust a Bill
Maintain and Update Receivables
Process Customer Statements


This lesson covers the following topics:
• Accounts Receivable Overview
• Key Concepts
• Billing Processes
4
Lesson 1: Introduction
1
Understanding Bills

The Accounts Receivable functional area of
Cardinal is composed of two modules:
Accounts Receivable
The Accounts Receivable module manages
the processing of payments that are due to
the agency.
Billing
The Billing module involves creating
invoices, reviewing and validating invoices,
and managing billing and distribution
cycles.
5
Accounts Receivable Overview

Some key concepts in creating and processing bills include:
• Billing is a separate module within Accounts Receivable.
• The user can receive various types of requests to enter a bill online. Examples include accident reports, payable
invoices, or inventory disbursement documents.
• Billing processing involves entering bill information, creating billing invoices, creating Accounts Receivable items, posting
Accounts Receivable items, and creating billing invoice adjustments.
• Different types of billing invoices can be created:
− Standard
− Recurring
− Installment
− Consolidated
• Cardinal allows the creation and review of pro forma invoices prior to generating final invoices.
6
Key Concepts

The process flows for creating and processing bills is highlighted below.
7
Billing Processes

In this lesson, you learned:
• Accounts Receivable Overview
• Key Concepts
• Billing Processes
8
Lesson 1: Summary
1
Understanding Bills

This lesson covers the following topics:
• Searching Invoiced Bills
• Entering a Standard Bill
• Entering a Recurring, Installment, and Consolidated Bill
• Reviewing Pro Forma Invoices
• Posting Receivables
• Budget Check Errors
• Viewing a Bill in Accounts Receivable
9
Lesson 2: Introduction
2
Entering a Bill Online

In Cardinal, there are four types of bills that can be entered:
• Standard - bills created manually for one time use
• Recurring - bills or portions of bills that can be reproduced
• Installment - bills that are used to invoice customers in segments
• Consolidated - bills that are grouped or consolidated into a single invoice
10
Bill Types

Before entering a bill, first determine if the bill already exists by searching for it.
Navigate to the Bills Invoiced page using the following path:
Main Menu > Billing > Locate Bills > Bills Invoiced
11
Searching Invoiced Bills
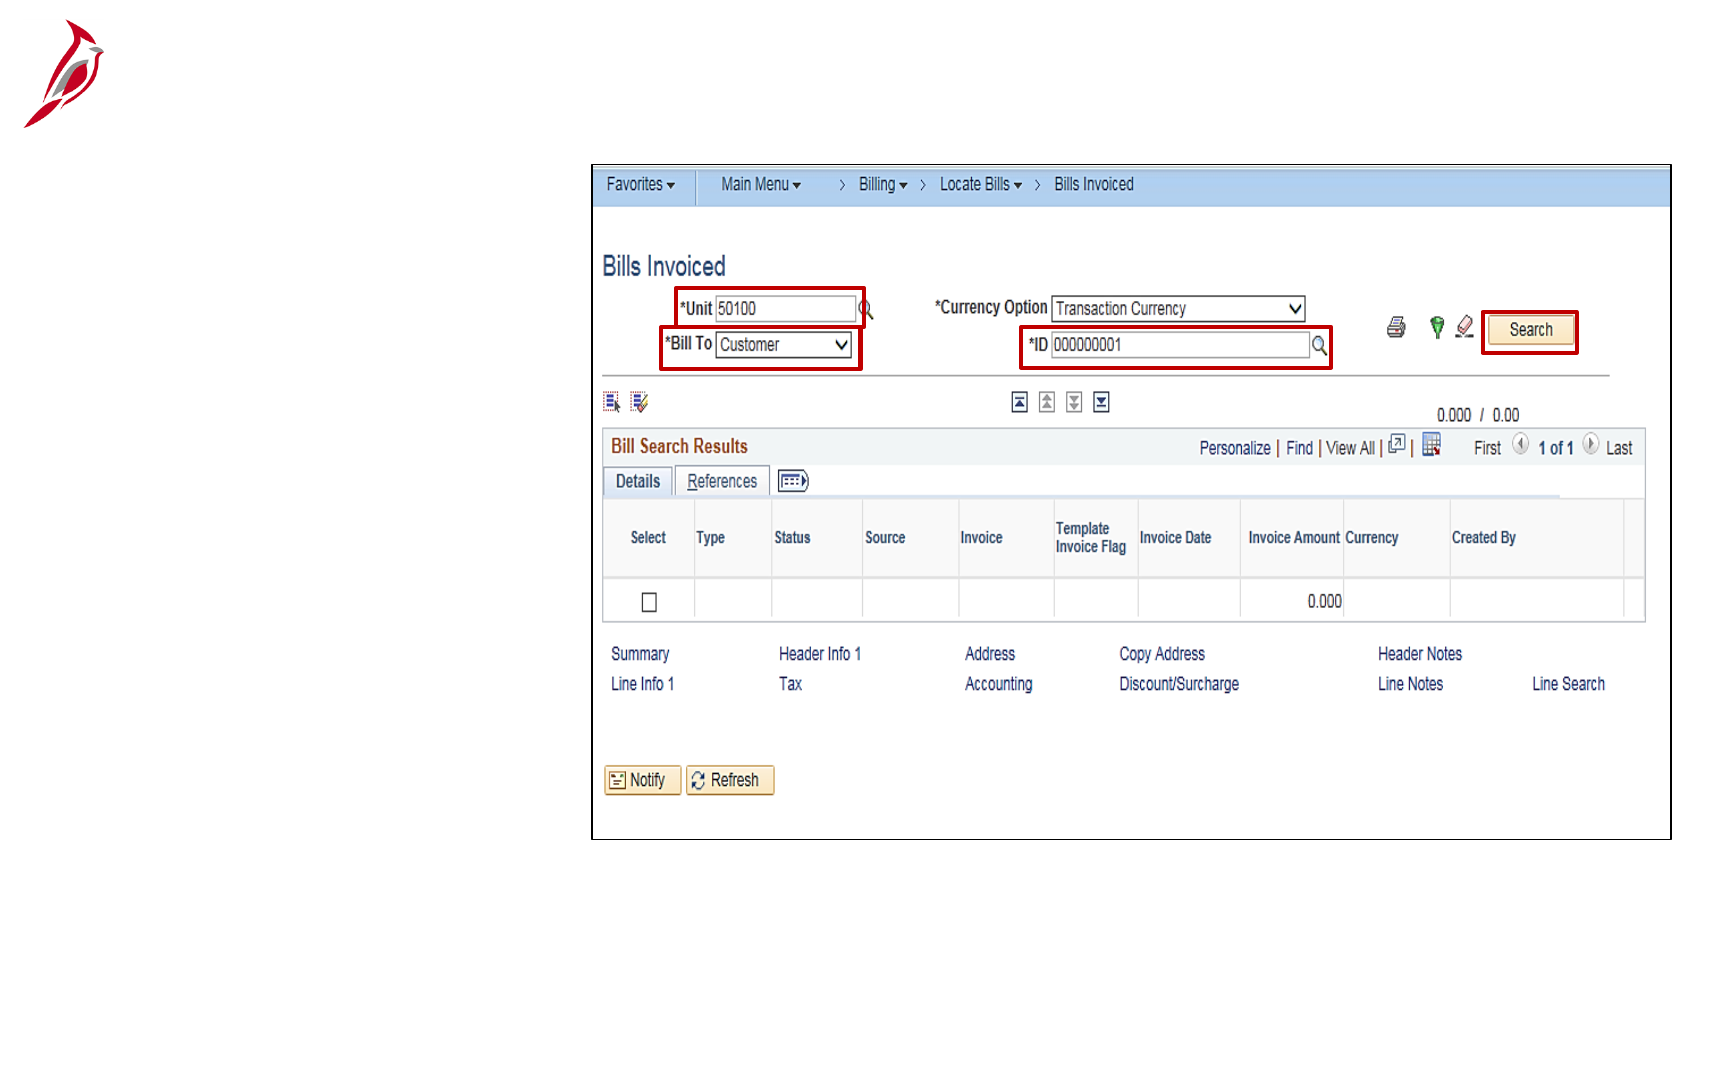
The Bills Invoiced page displays:
• The Unit defaults a business unit.
• The Bill To field has two options:
− Customer
− Contract
• This field defaults to Customer.
• The ID field is used to enter the
Customer ID. Enter the Customer
ID in the ID field or use the
lookup icon to find it.
• Click the Search button.
12
Searching Invoiced Bills (continued)

All bills that have been invoiced for this customer display. Check to see if the amount of the invoice to be paid is displayed in the
Invoice Amount field.
Review the Invoices to determine whether the bill has already been entered and invoiced.
• Click the Select box for any item that is a possible match.
• Click the Line Info 1 link.
13
Searching Invoiced Bills (continued)

Review the information on the Line –
Info 1 tab to determine whether it is
a duplicate of the bill.
14
Searching Invoiced Bills (continued)

Once it is determined that the bill has not been
invoiced, the user can enter the bill.
Navigate to the Bill Entry page using the following
path:
Main Menu > Billing > Maintain Bills > Standard
Billing
Select the Add a New Value tab.
15
Entering a Standard Bill

The Business Unit defaults to the agency’s business
unit.
The Invoice field defaults to NEXT. Do not change it.
Cardinal automatically assigns the number when the
invoice is saved.
The Bill Type Identifier describes the type of entity
being billed. There are four options:
• CCT – City County Towns
• FED – Federal Billing
• OTH – Other
• STA – State Agencies
16
Entering a Standard Bill (continued)

The Bill Source describes what is being billed.
Click the Look up icon to select the option for the bill being entered.
For this scenario, CALCU is selected.
17
Entering a Standard Bill (continued)

Enter the Customer number in the Customer
field. If the ID is not known, use the Look-up
icon to search for it.
If the customer does not exist in Cardinal, you will
need to create the customer. For more details
about creating and maintaining customers, see
the job aid entitled 501 AR323: Creating and
Maintaining Customers located on the Cardinal
website in Job Aids under Learning.
The Invoice Date and Accounting Date fields
default to the current date, when left blank.
Click the Add button.
18
Entering a Standard Bill (continued)

The Header – Info 1 tab displays. The Header information applies to the bill. The following fields default from the Add a New
Value page:
• Status
• Type
• Customer
• Source
The Cycle ID field identifies the billing cycle for the bill. Options include:
• Daily
• Monthly
• Federal
• Monthly Installment
• Monthly Recurring
• Quarterly
The Frequency field is used to determine the frequency of the billing cycle and defaults to Once. Other options include:
• Installment
• Recurring
Click the Header Info 2 link.
19
Entering a Standard Bill (continued)

20
Entering a Standard Bill (continued)

The Header – Info 2 tab displays.
Click the Entry Type lookup icon.
21
Entering a Standard Bill (continued)

The Look Up Entry Type page displays.
An Entry Type categorizes the pending items that create or
update posted items within the system. Examples of Entry
Types are Credit Memos (CR), Debit Memos (DR), Invoice
(IN), and Late Payment Penalty (OC).
Every receivable transaction that is entered or generated by
the system must have an entry type associated with it.
Select the Entry Type.
22
Entering a Standard Bill (continued)

The Entry Type displays.
Next, select the drop-down for the Entry Reason.
The Entry Reason categorizes different uses for a
single entry type. The reason that is associated
with an item defines which accounting entries
generate and can be used for reporting purposes.
Entry reasons are also used to define accounting
distributions of accounts (ChartField value) for each
entry type.
The Look Up Entry Reason page displays.
Select the Entry Reason.
23
Entering a Standard Bill (continued)

Click the Line – Info 1 tab.
24
Entering a Standard Bill (continued)

The Line – Info 1 tab is used to
record required charge
information.
The Table field determines the
type of options available in the
Identifier field.
Click the Table lookup icon and
select ID (PS/Billing Charge
ID).
The Discount Table and
Surcharge Table are not used
in Cardinal.
25
Entering a Standard Bill (continued)

The Identifier field is used to select
the item that is being billed and the
associated charge distribution. Click
the Identifier lookup icon to select the
appropriate option. For this example
we chose PROPDMGAR-RICHMOND.
Once the Identifier is selected the
Description, Unit of Measure, and
Unit Price fields populate. Do not
change them.
Enter the Quantity.
Click the Refresh button to see the bill
total.
Notice the new Net Plus Tax. This is
the amount that is shown on the bill.
When adding notes to the Line, click
the Notes link.
26
Entering a Standard Bill (continued)

The Line – Note tab displays.
Line note text can now be
added in the Note Text box.
Notes added here will appear
on the invoice under each line.
Click the Save button.
Notes can also be added to
the Header. To add notes to
the Header, click the Header 1
Info tab.
27
Entering a Standard Bill (continued)

Click the Notes link.
28
Entering a Standard Bill (continued)
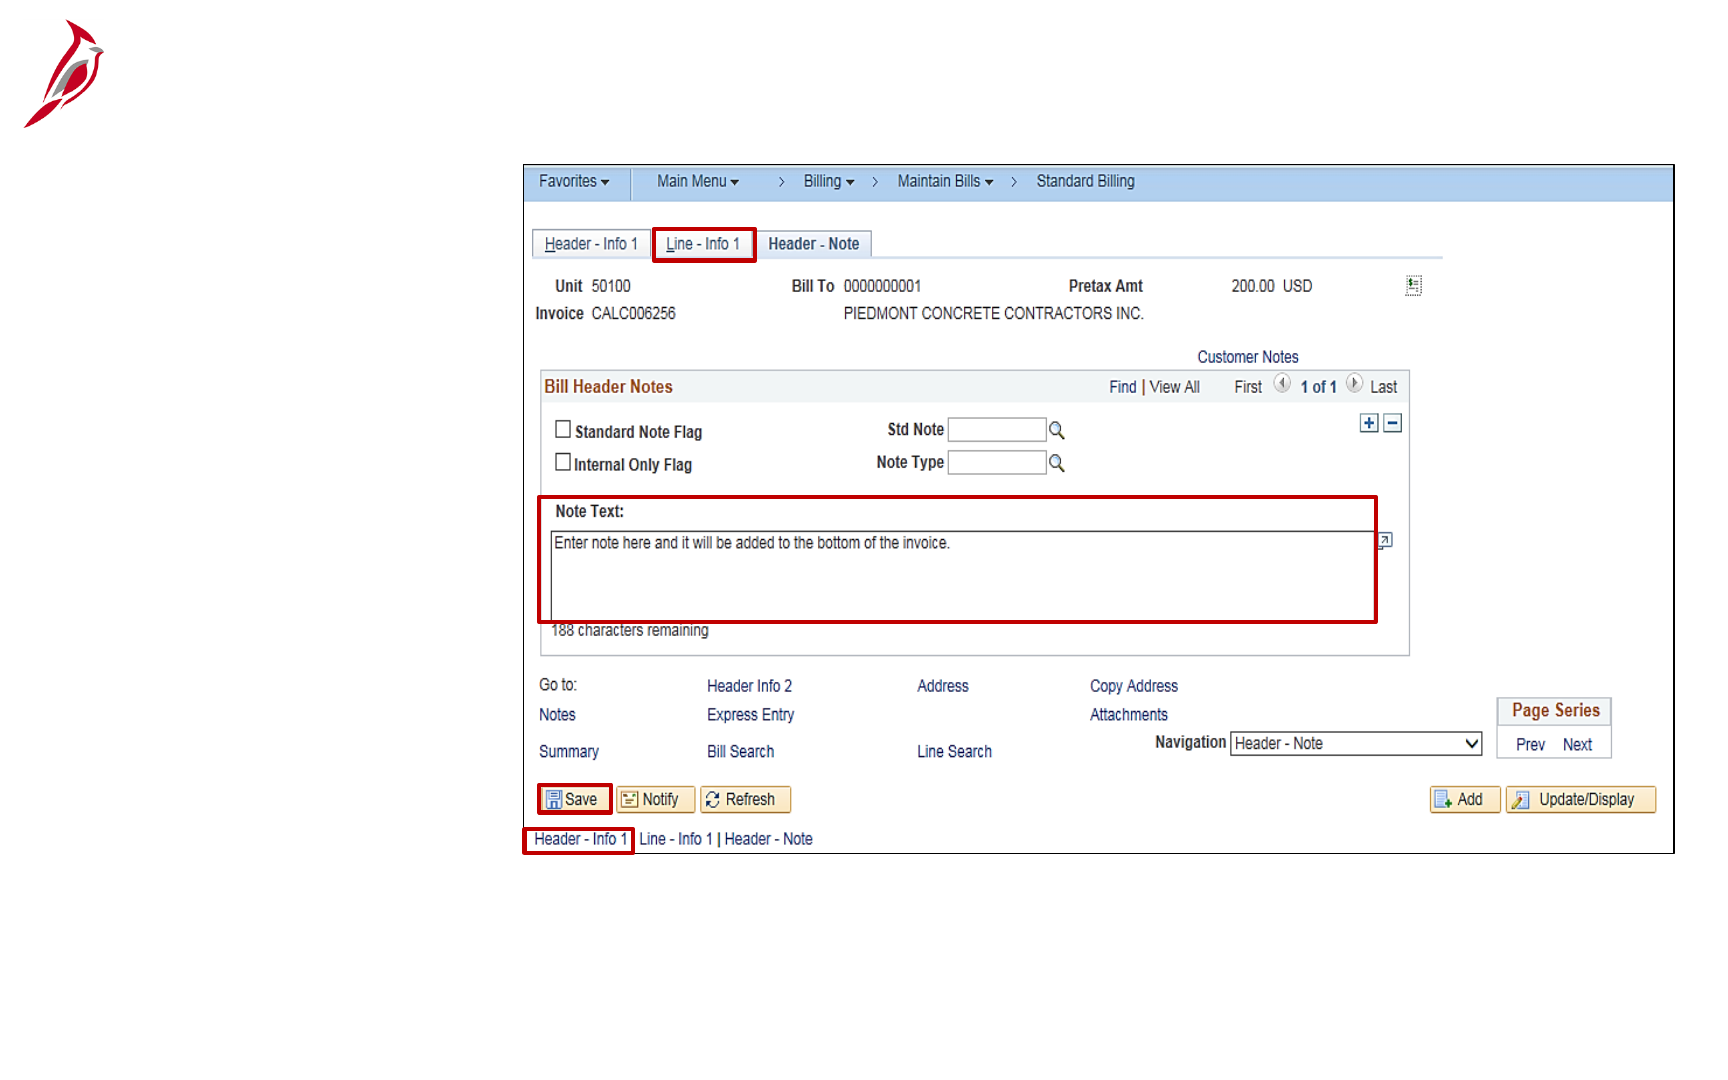
The Header – Note tab
displays.
Header note text can now be
added in the Note Text box.
Notes added here will appear at
the bottom of the invoice.
Click the Save button.
Click the Line – Info 1 tab.
29
Entering a Standard Bill (continued)

Click the Accounting link.
30
Entering a Standard Bill (continued)

The Revenue Distribution tab displays.
Review the accounting distribution showing in the Acctg Information tab and make changes if necessary. Use the scrollbar
under the distribution to view all values.
Click the Header – Info 1 tab.
31
Entering a Standard Bill (continued)

Click the Status look up icon
and select the RDY (Ready to
Invoice) option.
After the Status is entered,
click the Save button. The
Invoice number field populates.
Once the invoice has been
finalized and the bill status
changes from RDY to INV
(Invoiced), no further changes
can be made to the billing data.
Entering a Standard Bill (continued)
32

A recurring bill is one that occurs on a set schedule that allows for the reproduction of bills, or portions of bills, and the
generation of invoices by using templates.
Associating a recurring bill template with a predefined schedule (using the Recurring Schedule fields) allows the user control
over when and how often recurring bills are generated. A monthly fuel expense is an example of a potentially recurring bill.
Schedules automate and control the generation of recurring bills.
Recurring bills are generated monthly in Cardinal.
To create a recurring bill template, enter information on the original invoice (Standard Bill) template and set up recurring
parameters.
For more detailed information about entering a recurring bill, see the job aid entitled 501 AR323: Entering a Recurring
Bill located on the Cardinal website in Job Aids under Learning.
33
Entering a Recurring Bill

Installment billing is used to invoice customers in segments, with the total amount due divided equally, by percentage, or
according to the configured definition.
Although rare, installment billing may be used when the customer is unable to pay the total amount billed at once.
Each installment bill includes the installment number, the number of installments, the installment amount due, and the total
invoice amount.
Detailed installment billing information is entered manually.
For more detailed information about entering a recurring bill, see the job aid entitled 501 AR323: Entering an Installment
Bill located on the Cardinal website in Job Aids under Learning.
34
Entering an Installment Bill

Consolidated bills are bills that are grouped or
consolidated into a single invoice. In order to
consolidate bills, select individual bills for invoicing at
the same time as one group.
Navigate to the Header page using the following path:
Main Menu > Billing > Maintain Bills > Create
Consolidated Header
Create a consolidated bill header for the group of bills
selected and specify the customer for the bill in the
Customer field.
35
Entering a Consolidated Bill

To create a consolidated header, bills can be attached.
The bills the user has selected to attach to the consolidated header are invoiced at the same time as long as the bills are in
RDY (Ready) status.
Navigate to this page using the following path:
Main Menu > Billing > Maintain Bills > Attach and Detach Bills
36
Entering a Consolidated Bill (continued)

Search for an invoice to attach to a consolidated header by using the Search Parameters, such as Type, Status, and/or
Source. After clicking the Search button, all invoices matching the criteria will be returned.
From the Invoices to Attach or Detach section, select the appropriate invoices and click the Attach button. For a detailed
listing of the file extensions that are allowed as attachments in Cardinal, see the appendix section of this course.
The invoice is now attached to the consolidated header.
37
Entering a Consolidated Bill (continued)

The consolidated invoice will show a summary of the invoices included.
38
Entering a Consolidated Bill (continued)

A Pro Forma Invoice is a copy of the billing invoice.
It contains the same information as a final billing
invoice.
To generate a Pro Forma Invoice, click the Pro
Forma button on the Header - Info 1 tab.
The user is not required to create and review Pro
Forma Invoices during the invoicing process.
However, running Pro Forma Invoices allows for
reviewing and correcting of any discrepancies before
the final bill is printed.
Cardinal will only generate Pro Forma Invoices for
bills that have not been invoiced or finalized.
39
Pro Forma Invoices

An invoice will not be accepted for batch processing if it
contains a Budget Check Error.
To determine if there are Budget Check Errors following
batch processing, navigate using the following path:
Main Menu > Billing > Review Billing Information >
Summary
On the Bill Summary Info 2 tab, check the Budget
Check Status.
40
Budget Check Errors

If the Budget Check Status is Error, make corrections by navigating using the following path:
Main Menu > Billing > Maintain Bills > Correct Budget Check Errors
41
Budget Check Errors (continued)

If a ChartField error(s), go to the Revenue tab to make corrections.
Once the ChartField data is correct, click the Apply Correction button.
42
Budget Check Errors (continued)

Once the transaction is corrected, run the Create Accounting Entries process to regenerate the accounting entry.
Navigate using the following path:
Main Menu > Billing > Generate Invoices > Non-Consolidated > Create Accounting Entries
Click the Run button.
43
Budget Check Errors (continued)
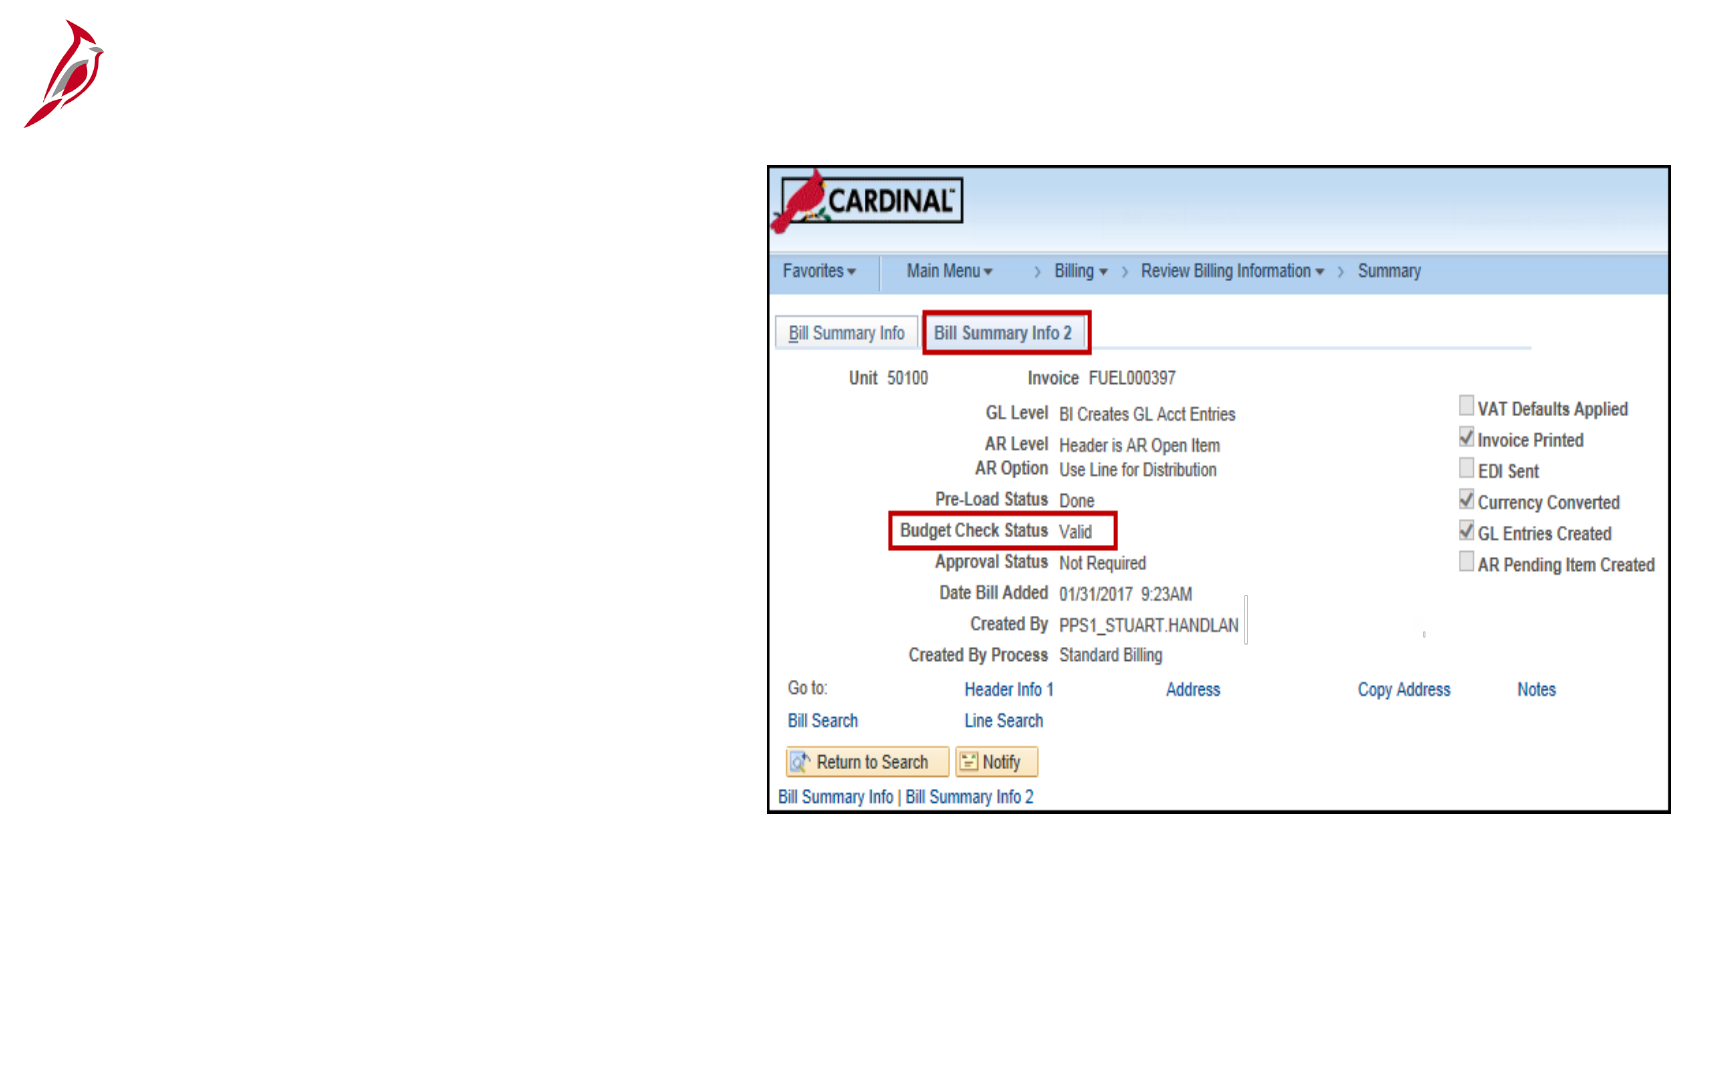
To verify that the transaction now passes budget
check, navigate to the Billing Summary 2 tab using
the following path:
Main Menu > Billing > Review Billing Information >
Summary
The Budget Check Status should read Valid.
Once the Budget Check Status is Valid,
the invoice and its receivable related accounting
entries are sent to the Accounts Receivable
module during the batch process, Load AR
Pending Items.
The invoice from the Billing module becomes
a pending item in the Accounts Receivable
module, where invoice information gets posted
to customer accounts.
44
Budget Check Errors (continued)

Posting Receivable Items is the execution of the
ARUPDATE batch process that selects pending
items generated from the billing module that are
ready for posting and creates receivable items.
When items are posted in Cardinal Accounts
Receivables, the system processes groups of
pending items to update customer balances, item
balances, and system-defined history details. In the
Accounts Receivable module, the Item ID matches
the invoice ID from the billing module.
The Item is edit checked and retains its valid Budget
Status from the Billing module.
45
Posting Receivable Items

The details of the AR items are recorded on the detail, item activity, and the accounting entries pages.
To view the item that was created, navigate to the View/Update Item Details page using the following path:
Main Menu > Accounts Receivable > Customer Accounts > Item Information > View/Update Item Details
46
Viewing the Bill in Accounts Receivable

The Details 1 tab displays. The information that was keyed on the bill displays on this page.
47
Viewing the Bill in Accounts Receivable (continued)

Next, click on the Item Activity tab. Use the Item Activity page to review all activity records for an item.
The Entry Type and Entry Reason entered on the bill are displayed here.
48
Viewing the Bill in Accounts Receivable (continued)

Next, click on the Item Accounting Entries tab. Use the Item Accounting Entries page to view the accounting entries for
each item activity.
This screen shows the receivables side of the entry created in billing; the revenue or offsetting entry has already gone to the
General Ledger.
49
Viewing the Bill in Accounts Receivable (continued)


Now you have an opportunity to practice the lessons learned today in a training environment.
Your instructor will provide direction on how to log in and complete the exercise.
If you have any questions, please ask your instructor.
51
Lesson 2: Search for a Bill Hands-On Practice

Now you have an opportunity to practice the lessons learned today in a training environment.
Your instructor will provide direction on how to log in and complete the exercise.
If you have any questions, please ask your instructor.
52
Lesson 2: Enter a Standard Bill Hands-On Practice

In this lesson, you learned:
• How to search for existing bills.
• How to create a standard bill.
• Recurring bills allow for the reproduction of bills or portions of bills and the generation of invoices using templates.
• Installment bills are used to invoice customers in segments.
• Consolidated bills are bills that are grouped or consolidated into a single invoice.
• A pro forma invoice is a copy of the billing invoice. It contains the same information as a final billing invoice. You can use
pro forma invoices to review bills before they are finalized.
• How to view and correct budget check errors.
• How to post receivables.
• How to view a bill in Accounts Receivable.
Lesson 2: Summary
2
Entering a Bill Online
53

This lesson covers the following topics:
• Documenting a billing dispute
• Selecting an entire bill for adjustment
• Selecting a bill line for adjustment
54
Lesson 3: Introduction
3
Adjusting a Bill

A dispute occurs when a customer
disagrees with the bill. This could be a
specific line, amount or the entire bill.
If a customer disputes a bill, you can
enter some basic tracking information
in Cardinal. Note that when a bill is in
dispute, the Dunning Letter is not sent.
To document a dispute on a bill in
Cardinal access the View/Update Item
Details page using the following path:
Main Menu > Accounts Receivable >
Customer Accounts > Item
Information > View/Update Item
Details
55
Documenting Billing Disputes

The Business Unit field defaults.
Enter your search criteria for the
bill you want to dispute.
For this scenario Customer ID
and Item ID are entered.
Click the Search button.
56
Accessing the View/Update Item Details page for a Dispute

The Detail 1 tab displays.
In this scenario, the customer is
disputing $50 of the balance.
To enter a dispute:
In the Customer Relations
section of the page, click the
Dispute checkbox.
57
Entering Dispute Information

Click the Reason lookup icon to
select the reason for this dispute.
For this scenario, the reason is DIS
for Dispute an Item.
58
Entering Dispute Information (continued)

The Date field defaults to the current
date.
The Dispute Amount field defaults
with the full balance. If the customer
is disputing a different amount, enter
it in this field. For this scenario, the
dispute is for $50.
After completing your entries, click
the Save button.
59
Entering Dispute Information (continued)

After clicking the Save button, a Dispute
link displays on the page next to the
Dispute Amount field.
Click the Dispute link to access information
about the dispute.
60
Entering Dispute Information (continued)

The Dispute Status Tracking pop-up window displays. This tracks information related to when a dispute is added or
removed from an item.
Information includes:
• Status: the status of the Dispute (Active or Inactive)
• Dispute Date Time: The date and time the dispute was added.
• Dispute Date: Date dispute was added/removed
• Dispute Reason: Reason that was selected from the drop down list.
• User ID: User ID of the person that entered the Dispute or removed the dispute
Click the Return button to return to the View/Update Item Dispute page.
61
Dispute Status Tracking

Once the dispute has been resolved, the
Dispute status should be updated.
To remove a Dispute:
• Access the View/Update Item Details
page.
• Uncheck the Dispute checkbox.
• The Reason, Date and Dispute Amount
fields are cleared.
• Click the Save button.
The Dispute link remains on the page. This
allows you to access the Dispute Status
Tracking pop-up window.
When the Dispute link is clicked, a new line
is added. The Status is Inactive to show
the dispute has been removed. The Dispute
Date Time field updates with the date and
time the dispute was removed. The User ID
field displays the ID of the person that
removed it.
62
Removing a Dispute

When a bill is disputed, you may need to:
• Adjust the entire bill
• Adjust a specific bill line
• Write-off the bill off
This next two topics in this lesson will address how to adjust a specific the entire bill or a specific bill line.
Write offs should be a rare occurrence and are covered in Lesson 4 of this course.
63
Adjusting a Bill

The Adjust Entire Bill function enables the
functionality to adjust the bill either by crediting the
entire bill or by crediting the original bill and rebilling.
The credit and rebill actions are performed in one
step.
The Rebill Default Action allows:
• Retain Original Invoice Value and the original
customer information, or
• Use Current Customer Value that will display
the most current customer information
After the new bill is created, make modifications as
required. The credited bill is created with a status of
RDY and the rebill is created with a status of NEW.
Navigate to this page using the following path:
Main Menu > Billing > Maintain Bills > Adjust
Entire Bill
64
Selecting an Entire Bill for Adjustment

Adjust a bill line after it has been entered, but do
so before the invoice is generated
To adjust a bill line, the bill must have a status of
RDY (Ready) or NEW. If the status is INV, the
line cannot be adjusted.
Navigate to the Adjust Selected Bill Lines page
using the following path:
Main Menu > Billing > Maintain Bills > Adjust
Selected Bill Lines
65
Adjusting Selected Bill Lines

Line Option under Line Adjustment
Parameters can be populated with:
• Create net adjustment only
• Create reversal and rebill
• Credit line
The Adjustment Reason is then
automatically set to add the lines to an
existing bill or to automatically generate a
new bill.
Possible reasons include Return for
Credit, Wrong Amount Billed, Wrong
Customer Billed, and Wrong Item Billed.
66
Adjusting Selected Bill Lines (continued)


Now you have an opportunity to practice the lessons learned today in a training environment.
Your instructor will provide direction on how to log in and complete the exercise.
If you have any questions, please ask your instructor.
68
Lesson 3: Adjusting a Bill Hands-On Practice

In this lesson, you learned:
• The Adjust Entire Bill function enables you to adjust the bill either by crediting the entire bill or by crediting the original bill
and rebilling.
• You may need to adjust a bill line after it has been entered, but do so before the invoice is generated. To adjust a bill
line, the bill must have a status of RDY (Ready) or NEW. If the status is INV, the line cannot be adjusted.
• The process for setting up and removing a dispute in Cardinal.
Lesson 3: Summary
3
Adjusting a Bill
69

This lesson covers the following topics:
• Maintaining and Updating Receivables
• Using a Maintenance Worksheet
• Writing-off a Bill
70
Lesson 4: Introduction
4
Receivables Maintenance

The Receivables Maintenance process helps users to
accurately maintain receivables.
Maintenance is performed using a maintenance
worksheet. A maintenance worksheet is a workspace
for offsetting items, write-offs, or adjustments to clean
up posted items.
In Cardinal, receivables maintenance transactions can
be credit or debit memos, adjustments, on-account
payments, or matches. Maintenance worksheets are
used to refund an item with a credit balance or to create
a new refund item for a credit remaining from
maintenance tasks.
To create a maintenance worksheet, navigate using the
following path:
Main Menu > Accounts Receivable > Receivables
Maintenance > Maintenance Worksheet > Create
Worksheet
Click the Add a New Value tab.
Click the Add button.
71
Maintaining and Updating Receivables

When creating a worksheet, specify
Customer Criteria, Reference Criteria
or a combination of the two.
For example, select a single Customer
ID and an item by Item Reference as
your search criteria.
Select all items for a customer without
narrowing searches by leaving the Item
Reference information blank.
Use the Advanced Inclusion Options
for more extensive Search criteria.
Note: If you do not need to use the
Advanced Inclusion Options, click the
Build button.
72
Maintenance Worksheet

When you click the Advanced Inclusion Options link
the Filter Items pop-up window displays. You can
create, edit, and save selection criteria for items to
include in the worksheet.
Filter items using:
• Item Selection Criteria
• Reference Data
• Item Type
• Balances
• Dates
73
Advanced Inclusions Options

After entering additional criteria, click
OK. Cardinal returns the user to the
Worksheet Application page.
Click the Build button.
74
Maintenance Worksheet

The Worksheet Application page displays.
Item(s) that match the information entered on the Worksheet Matches tab, display with a check in the Sel (Selection)
column.
75
Worksheet Application

Enter an Entry Type and Reason under Item Action.
Select an item in the Item List. Select the Type and Reason in the Item List.
Click the Save button.
Click the Worksheet Application link.
76
Worksheet Application

The Worksheet Application page displays. Enter an Entry Type and Reason under Item Action.
Select an item in the Item List. Select the Type and Reason in the Item List.
Click the Save button.
Click the Worksheet Application link.
77
Worksheet Application

The Worksheet Action page displays.
Click Create/Review Entries to view the accounting entries. Then change the Posting Action to Batch Standard. If your
role does not allow you to make this change, you will need to contact your Supervisor. This field must be changed in order for
the Batch to process.
To delete a Worksheet on this page use the Delete Worksheet button.
Click the Save button.
78
Worksheet Action

Write-offs are created using maintenance
worksheets. Write-offs are applied to items for such
reasons as the account is in collections and the
balance is over 1 year, the OAG deemed an
account uncollectible, or the department does not
have sufficient documentation to substantiate a
receivable. Even though a write-off is entered, the
debt is not forgiven, and other measures can be
taken to collect the outstanding balance.
To write off a bill start by accessing the Create a
Worksheet page. You can access this page using
the following path:
Main Menu > Accounts Receivable > Receivables
Maintenance > Maintenance Worksheet > Create
Worksheet
Click the Add a New Value tab.
The Worksheet Business Unit defaults to 50100
and does not need to be changed.
Click the Add button.
79
Writing-off a Bill

The Worksheet Selection page
displays. Enter or select the following:
• Cust ID: Enter or select the
customer ID number.
• Business Unit: Enter the business
unit of 50100
In the Item Reference section:
• Qual Code: Select I for Item
• Reference field: Enter or select the
item number
• Click the Build button.
80
Writing-off a Bill (continued)

The Worksheet Application page
displays.
• Under the Item Action section:
• Entry Type: select Write-off a
Debit or Write-off a Credit
based on which is appropriate.
For this scenario, Write-off a
Debit is selected.
• Reason: select the appropriate
reason BADDT (Bad Debt)
• In the Item Balance field, change the
amount if not writing off the full debit.
For this scenario the full debit is
being written off so there are no
changes needed.
81
Writing-off a Bill (continued)

• In the Type field, select WOFFD.
• After you select the Type, the
Reason field defaults if you selected
it in the Item Action section.
• Click the Save button.
Note: If a pop-up window displays
indicating you are not able to write-off
the amount, you will need to submit a
Help Desk ticket to have the amount
you can write off increased. This
requires the approval of the Fiscal
Division Administrator documented in
an email that can be attached to the
Help Desk ticket.
• Click the Worksheet Action link at
the bottom of the page.
82
Writing-off a Bill (continued)

The Worksheet Action page displays.
• Under the Posting Action section, in the Action field select Batch Standard. If your role does not allow you to make
this change, you will need to contact your Supervisor. This field must be changed in order for the Batch to process.
• Click the OK button.
83
Writing-off a Bill (continued)
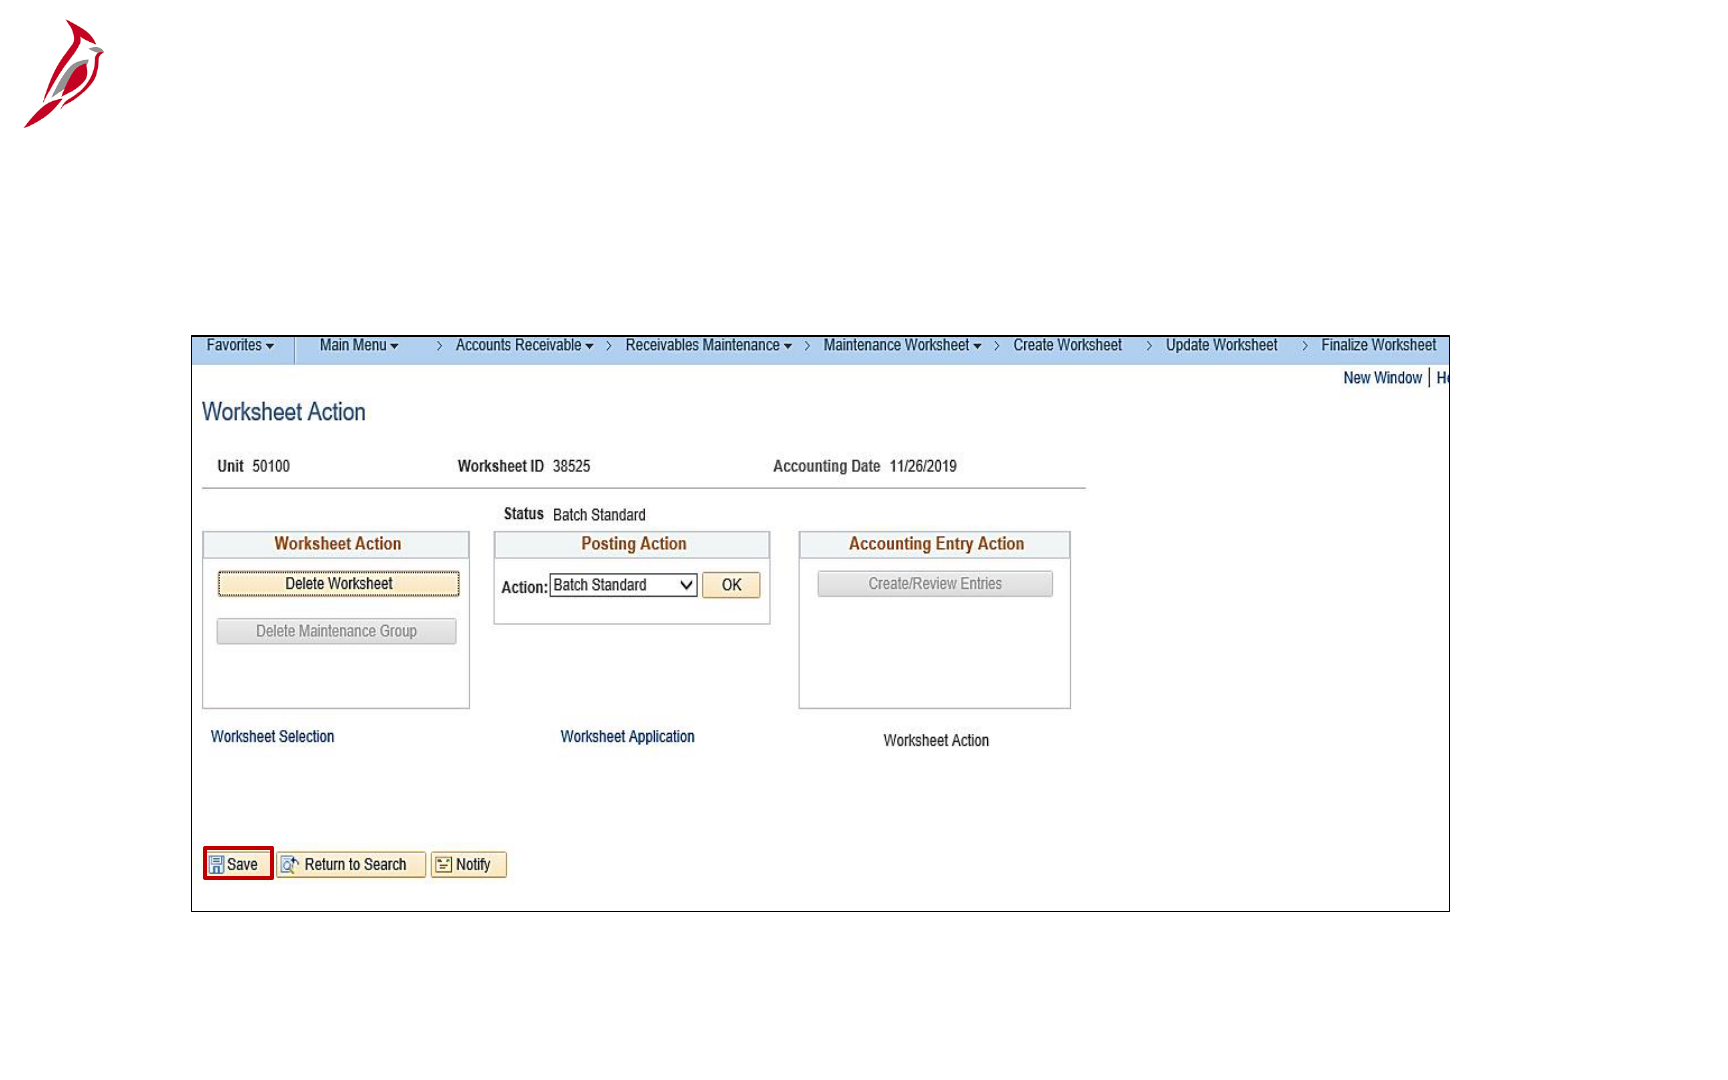
Click the Save button. The page is saved and the write off will process in batch. The batch process runs periodically during
the day and overnight.
84
Writing-off a Bill (continued)

To verify that the write-off processed,
access the View/Update Item Details
page, using the following path:
Main Menu > Accounts Receivable >
Customer Accounts > Item Information
> View/Update Item Details
• The Business Unit defaults to 50100
and should not be changed.
• Customer ID – enter the Customer ID
• Item ID – enter the item ID number
Click the Search button.
85
Reviewing a Write-Off after Processing

Click the Item Activity tab.
In the Item Activities section of the page, you will be able to see that the write-off processed.
86
Reviewing a Write-Off after Processing (continued)


In this lesson, you learned:
• How to Maintain and Update Receivables
• How to use a Maintenance Worksheet
• How to write-off a bill
Lesson 4: Summary
4
Receivables Maintenance
88

This lesson covers the following topics:
• Aging and Collection Process
• Processing Customer Statements
• Past Due Notices
89
Lesson 5: Introduction
5
Aging and Collections

The Aging Process in Cardinal tracks the number of
days a bill/invoice is unpaid.
Aging involves grouping receivables into past due
categories.
The collection process involves using the Items
Eligible for Collections Report to identify which
items need to be sent for collections.
Navigate to this report using the following path:
Main Menu > Accounts Receivable > Receivables
Analysis > Receivables Reports > Items Eligible
for Collections
90
Aging and Collections Process

Once an item is ready for the collections process, update the Detail 1 tab.
The collection code is INH (In House) until the account is sent to an outside collection agency.
91
Collections Process

Past Due/Dunning Notices are sent to customers at two different intervals:
• 31 to 59 days past due
• Over 60 days past due
If a receivable is over 60 days past due and is not written off or sent to a collection agency, additional collection activities are
initiated including:
• Sending statements of accounts
• Initiating debt set-off programs
• Follow up letters and telephone calls
• Placing customers in collection status
As receivables age, dunning letters generated by Cardinal become increasingly severe.
92
Past Due Notices

The dunning letter is used to notify customers of past due receivables as their accounts become delinquent.
A batch process runs monthly to prepare and print dunning letters. To view dunning letter history and letter content, use the
following path:
Main Menu > Accounts Receivable > Customer Interactions >
Dunning Letters > History of Letters
93
Past Due Notices (continued)

If in-house collection activities are not successful, the past due receivables are sent to the Office of the Attorney General
(OAG) or a private collection agency.
Record this on the receivable in the comments/conversation panel and on the Customer Item Inquiry Detail 1 tab by updating
the Code to OAG or EXT (for External Collection) and entering the Date sent.
94
Past Due Notices (continued)

Debt Set-Off/Taxation information is located on the Item Action page/hyperlink.
95
Past Due Notices (continued)

Debt Set-Off /Taxation information is also located on the Customer Item Inquiry in the Detail 2 tab.
96
Past Due Notices (continued)

The Debt Setoff process creates a custom extract of non-project customer and past due receivable data that is sent to
Taxation for Debt Setoff.
Taxation compares the non-project customer Social Security Number (SSN) or Employer Identification Number (EIN) to those
of payees receiving payments for any state agency. If a match is found, the payment is intercepted and used to offset the
past due debt.
Non-project receivables between 31-59 days are included in the Debt Setoff process.
97
Past Due Notices (continued)

If a non-project receivable is over 60 days past due and is manually sent to OAG (or another collection agency), this
information is recorded on the Conversations tab and Customer Relation area of the Customer Inquiry screen.
98
Past Due Notices (continued)

The Process Customer Statements function is run when
customer statements are needed.
Customer statements provide an overview of the account
status and are used by customers to verify and/or reconcile
their accounting records.
Navigate to the Create Customer Statements page using the
following path:
Main Menu > Accounts Receivable > Customer
Interactions > Statements > Create Customer Statements
99
Processing Customer Statements

The customer statement includes all the activity for
each item:
• Invoice
• Payments
• Matches
• Credit Adjustments
The statement also shows the number of items, the
aging category, and the total amount by aging
category.
100
Processing Customer Statements (continued)


In this lesson, you learned:
• The Aging and Collection Process
• How to process Customer Statements
• How to generate Past Due Notices
Lesson 5: Summary
5
Aging and Collections
102

In this course, you learned:
• Enter a Standard Bill
• Generate an Invoice
• Adjust a Bill
• Maintain and Update Receivables
• Process Customer Statements
103
Course Summary
AR323
Billing and Receivables

Congratulations! You successfully completed the 501 AR323: Billing and Receivables course.
Your instructor will provide instructions on how to access the evaluation survey for this course.
104
Course Evaluation

• Key Terms
• Allowed Extensions on Attachments in Cardinal
• Flowchart Key
105
Appendix

Accounting Distribution Code: ChartField string that defines how a transaction is charged (i.e., which fund, program,
department, account, etc.). Distribution codes simplify the process of generating accounting entries by defining a valid
combination of ChartField values.
Billing Charge Code: Identifies the item or service being billed to the customer.
Bill Header: Overall bill information that applies to all lines in the bill including:
• Where the bill came from (bill source)
• Bill type
• Where the bill is going
• Customer information
• When the bill is sent to the customer
• Payment terms
• Header - Info 1 contains general information and Header - Info 2 contains additional information. This information is
added when entering a regular bill.
Bill Line: An individual item on a bill that contains descriptive information such as name, quantity, and price.
106
Key Terms

Bill Source: Describes what the user is billing for.
Bill Source: Description:
AUDIT Audit Refund
CALCU Calculated Accident
COAL Coal Severance
EMS Equipment Management System
FED Federal
FUEL Automated Fuel Mngt System
GENER Generic Miscellaneous
GRANT Grant
INVS Inventory Sales
MG&SE Miscellaneous Goods & Services
MISC Miscellaneous
Bill Source: Description:
MISC Miscellaneous
PHOTO Photo Bills
PROJE Non-Federal Projects
PROPDMG Property Damage
RETRE Retainage Refund
REVSH Revenue Sharing Unmatched
REVSM Revenue Sharing Match
107
Key Terms (continued)

Bill Statements:
• Invoice: In the Accounts Receivable functional area, bill issued by the agency after having provided products or services
to the customer.
• Customer Statement: A periodic summary of a customer’s account activity that lists goods and/or services provided,
billings, payments, etc.
• Dunning Letter: A request for payment that is past due.
Bill Status: A classification that identifies the bill’s processing stage:
• NEW: bill has just been created
• RDY: bill is ready for batch processing
• INV: bill has been processed and is ready to go out
• PND: bill has been adjusted and is ready for review and approval
Bill Type: A category of activity that should be grouped together on a particular bill. Set default values at the bill type level.
There are four bill types entered in Cardinal:
• Standard: bill created manually for one time use
• Recurring: bills or portions of bills that can be reproduced
• Installment: bills that are used to invoice customers in segments
• Consolidated: bills that are grouped or consolidated into a single invoice
108
Key Terms (continued)

Bill Type Identifier: field is used to select the item that is being billed and the associated charge distribution.
Click the Identifier lookup icon to select the appropriate option. Example: BULLNOSE2.
• Bill Type Identifiers have a Charge Code: For the Identifier BULLNOSE2, the Charge Code is CALCOST.
− The CALCOST Charge Code populates the related accounting distributions as follows:
• Billing: Revenue Side of GL entry – goes to GL
• AR: AR side of GL entry – goes to AR
Business Unit: An operational subset of an organization. In Virginia, each state agency is an operational subset (or
business unit) of the Commonwealth. The business unit number identifies each operational subset or agency of the
Commonwealth.
Customer: Any entity responsible for paying the agency for goods and/or services. There are four general customer types in
Cardinal which are used as Bill Type Identifiers:
• CCT: City, County, Towns
• FED: Federal Billing
• OTH: Other
• STA: State Agencies
109
Key Terms (continued)

Cycle ID: Identifies the billing cycle for the bill. Options include:
• Daily
• Monthly
• Federal
• Monthly Installment
• Monthly Recurring
• Quarterly
Entry Type: Categorizes pending items that create or update posted items within the system. Every receivable transaction
must have an Entry Type associated with it. Examples of Entry Types include:
• Credit Memos (CR)
• Debit Memos (DR)
• Invoice (IN)
• Late Payment Penalty (OC)
Entry Reason: Categorizes different uses for a single entry type. The Entry Reason associated with an item defines which
accounting entries generate and can be used for reporting purposes.
• Entry Reasons are used to define accounting distributions for each Entry Type.
• Example BULLNOSE3/BULLN3 CALCOST/Acctg Distribution Code
110
Key Terms (continued)

Frequency: Entity used to determine the frequency of the billing cycle. Defaults to Once. Other options include:
• Once
• Installment
• Recurring
Note: Invoice Status uses the same codes.
Invoice Status: The processing stage of the invoice. Invoiced means that an invoice has been printed and an invoice
number has been assigned. A non-invoiced bill is one that has not been printed. Invoice Status values are the same values
used for Bill Status. The most common statuses are:
• NEW
• RDY (ready)
• PND (pending)
• INV (invoiced)
Table: Field that determines the type of options available in the Identifier field. Click the Table lookup icon and select ID
(PS/Billing Charge ID).
111
Key Terms (continued)

The following is a list of file extensions that are allowed on attachments uploaded to Cardinal. You should only attach key
supporting documents that either enhance the electronic Cardinal transaction approval process or are instrumental as part of
the transaction history. The Cardinal system should not be relied upon to maintain agency documentation and should not be
considered the official retention source of the agency. Supporting documents, as required by all applicable
regulatory/governing bodies, should be maintained by the agency apart from the Cardinal attachment functionality.
112
Allowed Extensions on Attachments in Cardinal
.BMP .CSV .DOC
.DOCX .JPE .JPEG
.JPG .MSG .PDF
.PNG .PST .RTF
.TIF .TIFF .TXT
.XLS .XLSX .XML
Allowed Extensions on Attachments in
Cardinal

Flowchart Key
113
