
IBM Cúram Social Program Management
8.0.2
IBM Universal Access Responsive Web
Application 5.2.0
IBM

Note
Before using this information and the product it supports, read the information in “Notices” on page
265
Edition
This edition applies to IBM
®
Cúram Social Program Management 8.0.2.
Licensed Materials - Property of IBM.
©
Copyright International Business Machines Corporation 2018, 2022.
US Government Users Restricted Rights – Use, duplication or disclosure restricted by GSA ADP Schedule Contract with
IBM Corp.

Contents
Figures............................................................................................................... viii
Tables.................................................................................................................. ix
Chapter1.Universal Access...................................................................................1
Chapter2.What's new and release notes for Universal Access................................2
What's new in Universal Access.................................................................................................................. 2
Release notes...............................................................................................................................................2
Chapter3.Business overview of the Universal Access Responsive Web
Application........................................................................................................3
Screen...........................................................................................................................................................3
Filtered and eligibility screening types.................................................................................................. 3
Anonymous or authenticated screening................................................................................................4
The Check what you might get page....................................................................................................6
The Here's what you might get screening results page.......................................................................6
Screening from a citizen account........................................................................................................... 7
Apply.............................................................................................................................................................8
Start an application................................................................................................................................ 8
Complete the application form.............................................................................................................. 9
Sign and submit....................................................................................................................................10
Submit application-specic documents..............................................................................................13
Verify.......................................................................................................................................................... 14
Citizen alerts and to-do messages.......................................................................................................15
Viewing verications............................................................................................................................ 15
Submitting documents.........................................................................................................................15
Caseworker tasks................................................................................................................................. 16
Track...........................................................................................................................................................16
Creating a citizen account and logging in............................................................................................ 17
The Dashboard page............................................................................................................................17
The Your benets page....................................................................................................................... 21
The 'Your documents' page.................................................................................................................21
The Notices page................................................................................................................................. 22
The Prole page...................................................................................................................................23
Selecting a language............................................................................................................................ 23
Update........................................................................................................................................................24
Enter a life event...................................................................................................................................24
Appeal........................................................................................................................................................ 25
Decide to appeal...................................................................................................................................26
Submit an appeal request.................................................................................................................... 27
View your appeals................................................................................................................................ 27
Appeals notices and notications........................................................................................................27
Requesting an appeal from the citizen account.................................................................................. 28
Chapter4.Installing the application development environment and web server....29
Prerequisites and supported software......................................................................................................29
Installing the IBM Cúram Universal Access development environment..................................................33
Upgrading the IBM Universal Access Responsive Web Application.........................................................36
iii
Install and congure IBM HTTP Server with WebSphere Application Server..........................................37
Generating an IBM HTTP Server plug-in conguration.......................................................................38
Conguring the IBM HTTP Server plug-in........................................................................................... 38
Install and congure Oracle HTTP Server with Oracle WebLogic Server.................................................39
Installing Oracle HTTP Server and its components............................................................................ 39
Conguring the Oracle HTTP Server plug-in........................................................................................40
Installing and conguring Apache HTTP Server....................................................................................... 41
Building the Universal Access Responsive Web Application for deployment..........................................42
Deploying your web application to a web server...................................................................................... 43
Chapter5.Developing with the Universal Access Responsive Web Application......45
Starter pack and packages........................................................................................................................ 45
Sample application project structure........................................................................................................47
Developing compliantly............................................................................................................................. 48
Enforce good code style with ESLint and EditorCong.............................................................................49
Universal Access UI coding conventions.................................................................................................. 50
The sampleApplication feature...........................................................................................................52
Manage state with React Hooks................................................................................................................ 54
Redux in Universal Access.........................................................................................................................55
Universal Access Redux modules........................................................................................................ 57
Social Program Management Web Development Accelerator............................................................ 60
Error handling with a React higher-order component (HOC)................................................................... 63
Connectivity handling................................................................................................................................ 64
Implementing a connectivity handler..................................................................................................64
Developing with routes.............................................................................................................................. 67
The Routes component........................................................................................................................ 67
Adding routes....................................................................................................................................... 68
Replacing routes...................................................................................................................................68
Redirecting routes................................................................................................................................ 69
Removing routes...................................................................................................................................69
Advanced routing................................................................................................................................. 69
Connecting to Universal Access REST APIs.............................................................................................. 71
The mock server API service............................................................................................................... 71
The RESTService utility........................................................................................................................ 73
Adding metadata to le uploads..........................................................................................................74
Universal Access REST API reference................................................................................................. 75
Developing toast notications................................................................................................................... 81
Localization................................................................................................................................................ 82
Conguring languages in the application.............................................................................................83
Regional settings.................................................................................................................................. 86
Customizing the application...................................................................................................................... 86
Changing text in the application.......................................................................................................... 87
Adding content to the application........................................................................................................91
Styling content with the Social Program Management Design System.............................................. 93
Changing the application header or footer.......................................................................................... 94
Creating an IBM Cúram Social Program Management API................................................................. 98
Connecting to REST APIs from the application................................................................................... 98
Testing REST API connections with Tomcat......................................................................................101
Handling failures in the application...................................................................................................103
Implementing a loading mask........................................................................................................... 105
Reusing existing features...................................................................................................................106
Implementing page view analytics......................................................................................................... 108
Implementing a test environment.......................................................................................................... 109
End-to-end test environment............................................................................................................ 110
Jest and Enzyme test environment................................................................................................... 123
React environment variable reference....................................................................................................127
iv
Chapter6.Security for the Universal Access Responsive Web Application...........137
Build secure web apps with the Social Program Management Design System.....................................137
Protect yourself during development................................................................................................137
Protect your production environment............................................................................................... 138
How to address security vulnerabilities............................................................................................ 139
Securing access to Universal Access REST APIs.................................................................................... 140
Enabling Cross-Site Request Forgery (CSRF) protection for Universal Access................................140
Universal Access authentication............................................................................................................. 140
Customizing the authentication method........................................................................................... 142
Authenticating with external security systems.......................................................................................143
Integrating with IdPs for multifactor authentication........................................................................ 144
External security authentication example for Universal Access...................................................... 144
User account types.................................................................................................................................. 148
User account authorization roles and groups.........................................................................................149
Authorization for the citizen account.................................................................................................150
Customizing account creation and management................................................................................... 151
Account management congurations................................................................................................151
Account management events............................................................................................................ 151
CitizenWorkspaceAccountManager API............................................................................................152
Data caching............................................................................................................................................ 152
Chapter7.Conguring the Universal Access Responsive Web Application...........153
Conguring the browser.......................................................................................................................... 153
Conguring service areas........................................................................................................................ 153
Conguring PDFs..................................................................................................................................... 154
Dening PDF forms............................................................................................................................ 155
Specifying a PDF application form for program applications........................................................... 155
Specifying a PDF application form for screening results.................................................................. 155
Dening PDF summary mappings for a program.............................................................................. 155
Conguring programs.............................................................................................................................. 156
Conguring a program........................................................................................................................156
Dening local ofces for a program...................................................................................................160
Dening program evidence types...................................................................................................... 160
Conguring screenings............................................................................................................................ 160
Conguring a new screening..............................................................................................................160
Conguring eligibility and screening details......................................................................................161
Conguring screening display information........................................................................................162
Dening programs for a screening.....................................................................................................162
The screening auto-save property.....................................................................................................162
Conguring rescreening..................................................................................................................... 163
Prepopulating the screening script....................................................................................................163
Resetting data captured from a previous screening......................................................................... 163
Writing Rule Sets For Screening........................................................................................................ 163
Conguring applications..........................................................................................................................165
Conguring applications in the administration application.............................................................. 165
Conguring application properties.................................................................................................... 167
Conguring other application settings.............................................................................................. 168
Conguring online categories..................................................................................................................168
Conguring life events.............................................................................................................................169
Conguring a life event...................................................................................................................... 169
Mapping life event information to evidence entities.........................................................................171
Dening a question script, answer script, and schema.................................................................... 171
Categorizing life events......................................................................................................................171
Dening Remote Systems..................................................................................................................172
Conguring the citizen account...............................................................................................................172
Conguring messages........................................................................................................................172
v
Conguring last logged in information...............................................................................................181
Conguring contact information........................................................................................................ 181
Conguring user session timeout...................................................................................................... 182
Conguring appeal requests..............................................................................................................183
Conguring communications on the Notices page............................................................................183
Conguring payments........................................................................................................................ 183
Chapter8.Customizing the Universal Access Responsive Web Application..........185
Customizing screenings...........................................................................................................................185
Track the volume, quality, and results of screenings........................................................................185
Populating a custom screening results page.....................................................................................185
Customizing applications........................................................................................................................ 186
Linking directly to an application.......................................................................................................186
Customizing application overview pages.......................................................................................... 187
Customizing the intake application workflow................................................................................... 188
Using events to extend intake application processing......................................................................192
Customizing the concern role mapping process............................................................................... 192
How to send applications to remote systems for processing...........................................................193
Customizing life events............................................................................................................................193
Enabling and disabling life events..................................................................................................... 194
How to build a life event.................................................................................................................... 194
Customizing advanced life events..................................................................................................... 195
Customizing verications........................................................................................................................ 211
Enabling or disabling verications.....................................................................................................211
Customizing le formats and size limits for le uploads.................................................................. 212
Customizing a le upload lead time for verications........................................................................ 213
Customizing how verication information is presented....................................................................213
Customizing verication names.........................................................................................................214
Customizing caseworker tasks.......................................................................................................... 215
Customizing application-specic verication polling....................................................................... 215
Customizing with web services............................................................................................................... 216
Inbound and outbound web services................................................................................................216
Web services security........................................................................................................................ 216
Process application service............................................................................................................... 217
Update Application Service................................................................................................................219
life event service................................................................................................................................ 220
Create account service.......................................................................................................................220
Link service.........................................................................................................................................221
Unlink service..................................................................................................................................... 222
Citizen message................................................................................................................................. 222
Payment service.................................................................................................................................223
Contact service...................................................................................................................................224
Case service....................................................................................................................................... 224
Sample SOAP requests...................................................................................................................... 225
Customizing appeals................................................................................................................................230
Enabling and disabling appeals......................................................................................................... 231
Customizing the citizen account............................................................................................................. 231
Messages............................................................................................................................................231
Customizing the Notices page........................................................................................................... 237
Customizing appeal request statuses............................................................................................... 239
Error logging in the citizen account................................................................................................... 239
Artifacts with limited customization scope.............................................................................................241
Chapter9.IEG in the Universal Access Responsive Web Application................... 242
IEG elements and attributes specic to the design system and Universal Access Responsive Web
Application..........................................................................................................................................242
IEG conguration not currently supported for the Universal Access Responsive Web Application..... 242
vi
Customizing the Back button in IEG forms.............................................................................................244
Conguring section navigation for forms................................................................................................ 245
Conguring progress information for forms............................................................................................245
Conguring dynamic titles on forms....................................................................................................... 245
Conguring rich text on forms.................................................................................................................246
Conguring external links to open in a new tab or window.............................................................. 246
Conguring hint text for forms................................................................................................................ 247
Conguring explainer text for forms....................................................................................................... 248
Conguring the 'Help' label for forms..................................................................................................... 248
Conguring required or optional labels for form elds...........................................................................249
Conguring input formats and constraints for form elds..................................................................... 249
Conguring phone numbers.............................................................................................................. 251
Conguring date formats................................................................................................................... 252
Conguring currency symbols........................................................................................................... 252
Conguring inputs to be obscured for privacy.................................................................................. 253
Conguring code-table hierarchies for form elds.................................................................................254
Implementing a combo box for form elds............................................................................................ 255
Implementing search functions for ComboBox components........................................................... 255
Conguring combo box scripts and schemas....................................................................................256
Customizing script behavior with BaseFormContainer.......................................................................... 258
Merging clusters with the cluster element grouping-id attribute................................................. 259
Conguring relationship pages questions...............................................................................................260
Conguring relationship starting dates on relationship summary pages.............................................. 261
Chapter10.Troubleshooting and support........................................................... 262
Examining log les...................................................................................................................................262
Connect a React development environment to an SPM server..............................................................263
Citizen Engagement components and licensing..................................................................................... 263
Citizen Engagement support strategy.....................................................................................................264
Known limitations....................................................................................................................................264
Notices..............................................................................................................265
Privacy Policy considerations..................................................................................................................266
Trademarks.............................................................................................................................................. 266
vii

Figures
1. Key business flow for Apply.......................................................................................................................... 8
2. Key business flow for Verications............................................................................................................. 14
3. Key business flow for Appeals.................................................................................................................... 25
4. Universal Access React and Java application development environments.............................................. 34
5. Intake application workflow..................................................................................................................... 188
viii

Tables
1. Compatibility with Social Program Management....................................................................................... 29
2. The withErrorBoundary parameters........................................................................................................... 63
3. Account congurations............................................................................................................................. 151
4. Account events..........................................................................................................................................151
5. Appeal request acknowledgment.............................................................................................................173
6. Appeal rejection........................................................................................................................................ 173
7. Application acknowledgment................................................................................................................... 173
8. Meeting invite............................................................................................................................................174
9. Meeting cancellation.................................................................................................................................175
10. Meeting update....................................................................................................................................... 175
11. Payment issued.......................................................................................................................................178
12. Payment canceled...................................................................................................................................178
13. Payment due........................................................................................................................................... 179
14. Case suspended......................................................................................................................................179
15. Case unsuspended..................................................................................................................................179
16. Message properties les.........................................................................................................................232
17. Payment messages and related properties........................................................................................... 236
18. Payment message expiry property.........................................................................................................236
19. Meeting messages.................................................................................................................................. 237
20. Meeting message display date property................................................................................................ 237
21. Application acknowledgment message expiry property....................................................................... 237
22. Application error codes.......................................................................................................................... 240
ix
x

Chapter 1. Universal Access
IBM Citizen Engagement provides a congurable citizen-facing application that enables agencies to
offer a web self-service solution to their citizens. It uses the IBM Universal Access Responsive Web
Application, a citizen-facing web application to provide citizens with online facilities. The Universal Access
Responsive Web Application client uses modern technologies, such as React JavaScript, and the IBM
Social Program Management Design System to enable citizens to better access services in a browser from
desktop, tablet, and mobile devices.
IBM Cúram Social Program Management Platform and the IBM Cúram Universal Access application
module provide the congurable business processes on the IBM Cúram Social Program Management
server.
The IBM Universal Access Responsive Web Application client asset is updated at more regular intervals
than IBM Cúram Social Program Management Platform and the IBM Cúram Universal Access application
module and has its own version number scheme.
Note: Online documentation for Universal Access is provided for the most recent version only. To read
the documentation for older versions of the Universal Access Responsive Web Application asset, or
IBM Cúram Universal Access with the classic client application, see the IBM Cúram Social Program
Management PDF library.
©
Copyright IBM Corp. 2018, 2022 1

Chapter 2. What's new and release notes for
Universal Access
Read about what's new and the release notes for recent versions of IBM Cúram Universal Access.
What's new in Universal Access
Read about the enhancements and improvements in IBM Cúram Universal Access with the IBM Universal
Access Responsive Web Application.
New in Social Program Management 8.0.2
Enhanced display of benet and payment information (6825)
Citizens can now more easily view their expected and previous benet payments in their account,
along with details on any adjustments. Citizens can also see how payments were calculated. The
Dashboard and All payments pages now contain new Expected payments and Previous payments
sections that display more information, including the payment dates, benet type, and payment
amount. The adjustment indicator displays whether the entitlement amount has changed. Also, the
Your benets page now displays a message about the expected next payment for active benets.
Finally, the layout of the Payment details page has been improved to show a breakdown of each
payment, and any deductions or components that make up the overall payment amount for that
benet.
For more information, see “The Dashboard page” on page 17 and “The All payments page” on page
19.
Note:
By default, the display of additional payment information is disabled. For information about how to
enable the display of additional payment information, see “Conguring payments” on page 183.
Release notes
Read about enhancements and defect xes in IBM Cúram Universal Access with the IBM Universal Access
Responsive Web Application.
For more information about changes that depend on server-side updates, see the release notes for
your specic version of IBM Cúram Social Program Management at (https://www-01.ibm.com/support/
docview.wss?uid=swg27037963).
For more information about compatibility with IBM Cúram Social Program Management versions, see
“Prerequisites and supported software” on page 29.
5.2.0 (30 June 2022)
Fixes related to the display of benet and payment information
Universal Access 5.2.0 includes various xes and improvements for the display of benet and
payment information enhancement that was introduced in 5.1.0.
2
IBM Cúram Social Program Management 8.0.2: IBM Universal Access Responsive Web Application 5.2.0

Chapter 3. Business overview of the Universal Access
Responsive Web Application
Citizen Engagement uses the IBM Universal Access Responsive Web Application, a citizen-facing web
application to provide citizens with online facilities. Citizen Engagement provides domain-specic
predened business processes that you can congure to meet your organization's needs.
IBM Cúram Social Program Management Platform and the IBM Cúram Universal Access application
module provide the congurable predened business processes on the server.
Screen
Citizens can self-check their eligibility for benets and services before they submit an application.
Checking for eligibility is implemented by using the Screening feature.
Screening has many advantages for both citizens and agencies:
• Citizens can check their eligibility for the benets that the agency offers before they apply, and without
having to go through the whole application process.
• Screening reduces the need for citizens to interact with the agency.
• Screening reduces the time and effort that caseworkers need to spend on screening tasks, freeing them
up to concentrate on their core duties.
• Screening can quickly determine whether citizens are potentially eligible for one or more benets based
on a short set of guided questions and eligibility rules. Based on this determination, citizens can then
decide whether to apply for the benets.
Click here for a video presentation that gives an overview of Screening.
Related concepts
Conguring screenings
Dene the different types of screenings that citizens can complete to identify programs that they might be
eligible to receive.
Filtered and eligibility screening types
To balance the need for quick screening results against the need to gather detailed citizen information,
IBM Cúram Universal Access supports two types of screening. Screening results indicate the programs for
which citizens might be eligible.
Filtered screening
Filtered screening allows citizens to quickly see whether they are eligible for benets before they
go through the more detailed eligibility screening process. Asking questions about their marriage or
pregnancy status can quickly identify and eliminate programs for which citizens are unlikely to be eligible.
Filtered screening is dened by specifying a simple lter script and rules. Typically, a ltered screening
script is not longer than two pages. If ltered screening is dened, the system immediately displays the
ltered screening script when citizens select the screening. The system does not prompt citizens to select
programs. Instead, the system runs the rules for all programs that are dened in the ltered screening
rule set.
You can easily and quickly customize a ltered screening. For each screening, you congure the available
programs and eligibility requirements. You then congure the script, rules, and data schema to collect and
process citizen information, and dene what information is displayed to citizens. When dened, citizens
can screen themselves to identify programs that they might be eligible to receive. For more information,
see “Conguring screenings” on page 160.
©
Copyright IBM Corp. 2018, 2022 3

Program selection takes precedence over ltered screening. For more information about program
selection, see “Screen” on page 3.
Eligibility screening
Eligibility screening determines citizens' potential eligibility to receive a program or programs. To gather
the more detailed information that is needed to determine whether citizens qualify for benets, eligibility
screening uses a longer and more detailed IEG script. Typical questions can relate to the citizen's income,
or resources, for example, savings, stocks, or bonds.
Eligibility screening consists of a script to collect data and a rule set to determine the citizen's potential
eligibility for one or more programs.
Eligibility screening rules are run upon completion of the screening script and the results are displayed for
citizens on the Here's what you might get page.
The eligibility screening rules are run only for programs that are associated with the screening.
The relationship between ltered and eligibility screening
Some points to note regarding the two screening types:
• Filtered screening is a precursor to eligibility screening.
• Filtered screening is optional. Citizens can screen for eligibility without doing a ltered screening.
• After they complete a ltered screening, citizens must then complete an eligibility screening before they
can apply for benets.
Related concepts
The screening auto-save property
Use the screening curam.citizenworkspace.auto.save.screening property to set whether
screenings are automatically saved for authenticated citizens.
Conguring screenings
Dene the different types of screenings that citizens can complete to identify programs that they might be
eligible to receive.
Related information
Natural Flow of an IEG Script
Anonymous or authenticated screening
IBM Cúram Universal Access supports both anonymous and authenticated screening. Citizens who are
not logged in, and want to retain a degree of anonymity, can screen themselves for benet eligibility while
unauthenticated. Citizens who are logged in can complete an authenticated screening.
Anonymous screening
Unauthenticated citizens can screen themselves for benets without logging in but they cannot save their
screening until they log in. Administrators can use an IEG script conguration to set if citizens have an
option to save their progress. If an administrator sets the option to save progress on a particular script,
unauthenticated citizens are taken to the Log in page when they select to save. When logged in or signed
up, citizens' screening progress is saved and they are taken to the Dashboard. For more information on
IEG script conguration, see Conguring IEG.
Related information
Conguring IEG
4
IBM Cúram Social Program Management 8.0.2: IBM Universal Access Responsive Web Application 5.2.0

Authenticated screening
Citizens who are logged in to Universal Access can complete an authenticated screening.
Pre-populating citizen data
Citizens might want the convenience of having their data pre-populated when they start screening. Use
the curam.citizenaccount.prepopulate.screening system property to pre-populate citizen data
into a screening form for linked users:
• If enabled, basic details for citizens are populated in the script.
• If disabled, citizens must complete their details.
For more information, see “Prepopulating the screening script” on page 163.
Saving screenings for authenticated citizens
Authenticated citizens can save a screening and resume it later. As citizens progress through the
script, information that is entered on the previous page is automatically saved each time that
citizens click Next in the IEG script. If there is a timeout or the browser is closed accidentally,
automatically saving the information prevents the loss of the screening information. Use the
curam.citizenworkspace.auto.save.screening system property to set whether screenings are
automatically saved in the citizen account. For more information, see “The screening auto-save property”
on page 162.
In-progress screenings
When citizens save an in-progress screening, or it is automatically saved by the system, an in-progress
screening message is displayed in the citizens' dashboard as a reminder. Citizens can complete an
in-progress screening or they can delete it. When citizens complete a screening, the Here's what you
might get page is displayed and the in-progress message is removed. The screening also appears on the
Benets checker page on the Dashboard.
The Benets you might get pane
Citizens can view completed screenings on the Benets you might get pane in the citizen Dashboard. To
ensure that the most recent results of a screening are kept relevant for the citizen, one screening of the
same type can be in the complete state at a time. Citizens can use the Benets you might get pane to
view the results of the screening or delete the screening from the pane.
Conguring rescreening
Citizens might need to change a screening if they forget to provide some information or their
circumstances change. In the administration application, you can set whether to allow citizens to change
and resubmit their screening.
• If the setting is set to Yes, citizens can rescreen from the Benets you might get pane or from the
Screening results page.
• If the setting is No, citizens do not see these links, in this case if the citizen wants to rescreen, they
must delete their screening and start again.
For more information, see “Conguring rescreening” on page 163
.
Related concepts
Prepopulating the screening script
When citizens screen from a citizen account, you can prepopulate information that is already known about
the citizen who is screening.
The screening auto-save property
Chapter 3. Business overview of the Universal Access Responsive Web Application
5

Use the screening curam.citizenworkspace.auto.save.screening property to set whether
screenings are automatically saved for authenticated citizens.
Related tasks
Conguring rescreening
Congure whether citizens can change and resubmit their screenings.
The Check what you might get page
Screening starts when citizens select Check what you might get on the organization Home page.
When citizens select to create a new account, an account creation screen is displayed. After the citizen
successfully creates the account, the citizen is automatically logged in to the system and the screening
process proceeds.
If citizens are logged in and they click Check on any screening where they have a previously completed
or in-progress screening of that type, they are alerted to the existence of that previous screening. Citizens
can then either view the current progress of that screening or they can start screening again.
If citizens start screening again, any in progress screenings are overwritten. Any completed screening is
only overwritten when citizens get to the screening results page.
The Check what you might get page lists and describes each of the screenings that are available.
Note: The Check what you might get page is laid out as follows:
• Page description - a banner indicating to citizens that they can screen themselves.
• A list of screenings with a description of what each screening is.
• A list of benets with a description of what each benet offers.
A screening might allow citizens to screen for one or more programs. Citizens are prompted to select the
programs for which they want to be screened. However, there are three situations when citizens are not
prompted to select programs:
• If ltered screening is dened for the screening. In this instance, citizens are prompted to select the
programs for which they want to be screened when ltered screening is complete.
• If a single program is dened for the screening.
• If a screening has been congured to disable program selection by citizens. The Program Selection
indicator determines whether citizens can select specic programs to screen for or whether they are
brought directly into a screening script where they are screened for all programs associated with the
screening. For more information, see Dening Program Selection.
Note: Program selection takes precedence over ltered screening. Also, if ltered screening is enabled
but only one program congured, citizens are brought directly to eligibility screening for that single
program.
Citizens select the screening and the programs for which they want to be screened and then click Check.
The system then starts the associated IEG script so that screening can start.
Related concepts
Conguring screenings
Dene the different types of screenings that citizens can complete to identify programs that they might be
eligible to receive.
The Here's what you might get screening results page
When a screening is submitted, the eligibility rules run and the list of programs is displayed with the
results on Here's what you might get page.
•
Programs that the citizens might be eligible for are marked with the Eligible icon. Citizens can
click Apply to apply for these programs online through the Apply for benets flow.
6
IBM Cúram Social Program Management 8.0.2: IBM Universal Access Responsive Web Application 5.2.0

• Programs for which eligibility cannot be determined are listed with a suitable message, which can be
congured in the administration application. For example:
Based on what you have told us, we are unable to make a determination for Child Care Assistance.
Administrators can use Cúram Express
®
Rules (CER) to provide detailed explanatory text to help citizens
understand the decisions that are made about potential eligibility.
If citizens' circumstances change, they can screen again at any time by clicking Check again for what you
might get.
How to apply
For each screening type, you can congure helpful, informative text to display on the Here's what you
might get page header. For example, "You can apply online using the Apply button, print the application
and mail it to the ofce, or visit our ofce and speak to a caseworker."
You can congure this text in the How to apply rich text editor in the administration application. For more
information, see “Conguring screening display information” on page 162
.
The How to apply editor can include links. This is useful if the agency wants citizens to visit their local
ofce. For example, the agency might choose to use Google Maps, or any maps provider of their choice, to
show citizens where their local ofce is.
Applying for benets offline
The Here's what you might get page also indicates whether benets can be applied for offline. Benets
that can be applied for offline typically have a Download application link to download the application
form, see “Specifying a PDF application form for screening results” on page 155.
Transferring data from screening to application
You can congure the application so that citizens' screening data can be reused when they apply directly
from the Here's what you might get page. When congured, some details based on the schema that is
applied are transferred into the application. This existing information saves the citizen time when they are
completing their application.
Related concepts
Conguring screening display information
You can congure the screening information display elds for each screening.
Related information
Working with Cúram Express Rules
Screening from a citizen account
Citizens can screen themselves for programs while logged in to their citizen account.
By using a short set of guided questions and eligibility rules, citizens can determine whether they might
be eligible for one or more programs. Based on this determination, the citizen can decide whether to
apply for the programs identied.
To perform a screening, citizens take the following steps:
1. Select Check what you might get on the organization Home page.
2. Select Check on the eligibility category.
3. Select the benets they think they might get on the Include benets page
4. Select Continue to start the check eligibility process.
5. Citizens then answer the questions on the screening script.
6. Select Next to navigate through the pages in the script.
Chapter 3. Business overview of the Universal Access Responsive Web Application
7

7. When the process is complete, citizens are shown the benets they might be eligible for on the Here's
what you might get page.
8. Citizens can then Apply for benets.
Related concepts
Prepopulating the screening script
When citizens screen from a citizen account, you can prepopulate information that is already known about
the citizen who is screening.
Apply
Citizens can apply for benets online by submitting an application form that includes personal details
like income, expenses, employment, and education. This information becomes evidence on the citizen's
case that agencies can use to determine their eligibility for benets. Citizens can also apply offline by
downloading the application form to send to the agency or to bring to their local agency ofce.
Figure 1. Key business flow for Apply
Related concepts
Conguring applications
Use IBM Cúram Social Program Management administration and system administration applications to
dene the applications that are available for citizens. For each application, you can congure the available
programs and an application script and data schema. You must also congure the remaining applications
details, such as application withdrawal reasons.
Start an application
Citizens can browse the available benets and apply for the benets that they need. Benet applications
can include single or multiple benets.
Note: The term benet in IBM Universal Access Responsive Web Application is synonymous with program
in IBM Cúram Social Program Management.
If congured, citizens can apply for multiple benets with a single application. For example, citizens might
use the Income Support application to apply for the Food Assistance and Cash Assistance benets.
8
IBM Cúram Social Program Management 8.0.2: IBM Universal Access Responsive Web Application 5.2.0

Applications for benets can be grouped into categories, for example Unemployment services. A
customizable icon can be displayed for each benet type along with the benet name and a description of
the benet.
Citizens can also click Learn more to learn more about each application or can click Download
application to print the application form, complete it by hand and mail it or bring it to the agency.
What can I congure or customize?
• Administrators can dene the applications, benets, and categories in the Universal Access section
of the Administration Application. The application and benet descriptions and benet icons are
congurable. Benets are displayed in alphabetical order by default, but you can override this order
when you congure the online categories.
• The conguration property Multiple application is available at the program level. If this property is set
to No and there is a pending decision for the program, the Apply option is disabled.
The multiple applications conguration property to allow multiple applications for the same
benet is available at the benet level. The Apply button is conditionally displayed if it is set to Yes or if
multiple applications set to No and the citizen has no pending applications.
• If the More Info URL setting is congured for the application, Learn more is displayed.
• If the PDF Application Form setting is congured for the application, Download application is
displayed, see “Specifying a PDF application form for program applications” on page 155
.
Complete the application form
Application forms in the Universal Access Responsive Web Application are created with IEG scripts
and rendered by IEG. When citizens click Start application to complete the form, they are starting an
IEG script, which is known as an intake script. Citizens complete the form to be ready to submit the
application.
Depending on how authentication is congured, applications are managed in one of the following ways:
• Citizens must log in to their account to apply. They are prompted to log in or sign up from the application
overview page, or at the end of the application form.
• Citizens can submit an application without an account.
Typically, an application form consists of an overview page, a form divided into sections, and a summary
page. If the application can be used for multiple benets, a page where citizens are prompted to select
the benets that they want to apply for can be shown.
By default, applications are automatically saved for logged-in citizens each time that they click Continue
in the application form. Citizens can also manually save in-progress applications. Applications are not
saved for citizens who are not logged in.
When citizens quit a benet application, three options are available depending on how the intake
application is congured.
• Save the application.
If citizens try to save the application without being logged in, the login screen opens so they can log in
or create an account. If citizens create an account, they are automatically logged in to the system and
the intake process starts. The system also checks whether they have any existing applications.
• Leave the application without saving.
If citizens try to quit the application without saving it, the application displays a warning dialog box to
prevent accidental loss of information.
Note: Citizens must click the application name on the page to see the Leave this application dialog
box. The application name is also conditionally enabled depending on whether the quit and delete
option is enabled in the IEG script.
• Cancel the application.
Chapter 3. Business overview of the Universal Access Responsive Web Application
9

Clicking Cancel returns citizens to the point at which they left the application script with the previously
entered data available. Citizens can cancel an application without saving at any point before they
submit. Citizens can cancel only when the application is in progress, if they Save and Exit, they can then
only Delete the application.
What can I congure or customize?
• The curam.citizenaccount.prepopulate.screening system property sets whether the IEG
script is pre-populated with any available citizen information.
• Where the system is congured to allow multiple benets for an application, citizens are prompted to
select benets, with the following exceptions.
– If a single benet is dened for the application.
– Each application is congured so that the citizen can select a benet or automatically select all of the
programs that are associated with the application.
The program selection conguration property is available at the application level:
– If set to Yes, an Include benets page is displayed that allows a citizen to select some or all of the
benets. If an application contains a single benet, the Include benets page is not displayed.
– If set to No and the application contains multiple programs, all the benets are automatically applied
for and the Include benets page is not displayed.
• A system property species whether applications are automatically saved.
• You can congure the application to require citizens to log in to apply for benets:
– Typically, citizens can start an application without logging in, but to save an application they must log
in or sign up for an account. Citizens who are logged in can save an application for a benet before
they submit it and then return later to complete the application.
The agency can congure the system to specify whether citizens need to be authenticated before
they apply for benets:
- If authentication is enabled, citizens must either create a new user account or log in to an account
before they start the application process.
- If authentication is disabled, citizens can proceed with the application without authentication.
The curam.citizenworkspace.authenticated.intake conguration property species
whether citizens must log in to apply for benets. If the property is set to NO, citizens do not have to
log in to apply for benets. If the property is set to YES, citizens must create an account or log in to
an existing account to apply for benets.
Sign and submit
Depending on the conguration, the application can be submitted when citizens complete the form or
when they exit a form before it completes. After citizens submit an application for a benet, the way the
intake script is processed depends on how the benet is congured.
An intake application can be congured so that it can be submitted before it is complete or only when
complete. If the property is enabled, citizens must log in to an existing account or create a new account
before the application can be sent to the agency.
When citizens send an application to the agency, either by exiting or completing a script, the screen that is
displayed depends on:
• Whether citizens are logged in.
• Whether citizens must either create or log in to an account before the application is submitted.
If citizens are not logged in, they are prompted to log in or create a new account. For more information,
see “Manage existing applications” on page 12
.
10
IBM Cúram Social Program Management 8.0.2: IBM Universal Access Responsive Web Application 5.2.0
Log-in requirements
The system can be congured as follows:
• Citizens are not required to identify themselves to the system and can send an application to the agency
without logging in or creating an account.
• Citizens must log in or create an account.
In-progress and submitted applications
If citizens log in before they submit the application, the system can determine whether they have:
• In-progress application of the same type. Citizens can choose to submit the new application or discard
it and keep the saved application. The options available are to Start again or Resume the in-progress
application.
• Previously submitted applications for the same programs that are still pending disposition, that is,
awaiting a decision by the agency. If citizens submit applications for the same programs, the system
determines whether they can still submit any of the programs to the agency for processing.
• Benets can be congured so that multiple applications can be submitted for the program at any
time. For example, submitting a new application for cash assistance for a different household unit
than a previously submitted application that the agency is processing. This screen indicates that the
application cannot be submitted for all of the programs for which the citizen wants to apply. However,
the application might still be sent to the agency. There are three options:
– Continue to submit the application for the programs for which the citizen can apply.
– Save the application.
– Delete the application.
Partial submissions
You can congure the application so citizens can submit a partial application without logging in.
If the Submit on Completion Only administration setting is selected, citizens can submit a partially
completed application. Citizens see the option to submit a partially completed application on the Save
and Exit modal when they save and exit an IEG script. If the Submit on Completion Only administration
setting is not selected, citizens cannot submit a partially completed application. Citizens don't need to be
logged in to submit the partial application.
Specify a submission script
To allow citizens to submit an application to the agency, you must specify a submission script for the
application in the administration system. The submission script is required because applications require
additional information, which does not form part of the application, to be captured before the applications
can be submitted.
For example, a Cash Assistance application requires information that relates to the citizen's ability to
attend an interview. This information would not be appropriate for another type of application that does
not require an interview to be conducted, for example, unemployment insurance. Electronic signatures
are another example of the type of information that would typically be captured by using a submission
script.
This data might not be captured as part of the script, as citizens can submit the application before they
complete the script.
Processing a submitted script
The processing that happens on completion of the submission script depends upon the conguration of
the programs for which citizens are applying. Program eligibility can be congured such that it might be
determined by using IBM Cúram Social Program Management or a remote system.
Chapter 3. Business overview of the Universal Access Responsive Web Application
11

If IBM Cúram Social Program Management is specied as the eligibility system, an application case
creation process is started. The application case creation process includes a search and match capability,
which attempts to match citizens on a new application to registered persons on the system based on
congured search criteria. When search and match nishes, one or more application cases are created. If
the programs that are applied for are congured for different application case types, multiple application
cases are created. If the application was submitted within the business hours of the root location for
the organization, the application date on the application case is set to today's date. If the application
is submitted outside of the business hours of the organization, the application date is set to the next
business date.
Mapping application data to case evidence tables
The data that is entered for the application might be mapped to case evidence tables. The mappings are
congured for a particular program by using the Cúram Data Mapping Editor. A mapping conguration is
needed for a program so that evidence entities can be created and populated in response to an online
application submission for that program.
Association of requested programs with application cases
When the application case is created, the programs that are requested by the citizen are associated with
the relevant application case. Some organizations might impose time limits within which an application
for a program must be processed. A number of timer conguration options are available for a particular
program. These timers are set when a program is associated with an application case.
If the eligibility is determined by a remote system, congurations are provided to allow a web service to
be started on a remote system.
Display submission conrmation
A submission conrmation is displayed upon successful submission of an application, which displays
the reference number that is associated with the submitted application. Citizens can use this reference
number in any further correspondence about the application with the agency.
Submission conrmation
When citizens successfully sign and submit an application, they see an overview of their application. The
stages specic to the application process are now updated with a conrmation message to indicate that
the application was successfully submitted. The message can contain:
• A customizable icon.
• An application reference number.
• Informational message for the citizen.
• A Save submitted application PDF link that allows citizens to download a PDF summary of information
that is entered as part of the application, see “Conguring PDFs” on page 154
.
Manage existing applications
When a citizen logs in, their existing applications are listed and the citizen has different options that
depend on the state of the application.
Existing applications are in one of the following categories:
• Application in progress. The application is in progress but is not yet submitted. Citizens can either
continue or delete applications in this category.
• Pending decision. The application is awaiting a decision from the caseworker. Citizens can either
download or withdraw applications in this category.
• Active. The caseworker authorized the application.
• Denied The caseworker rejected the application.
12
IBM Cúram Social Program Management 8.0.2: IBM Universal Access Responsive Web Application 5.2.0
• Authorization failed. Citizens can download applications in this state.
• Withdrawn. Citizens can withdraw an application if it is in Pending decision or Denied status.
The application lists are displayed only if there are items in the list, that is, if there are no saved
applications.
Citizens can resume or delete an incomplete application, withdraw a submitted application, or start a new
application. Citizens can apply for benets that they previously applied for.
Citizens can:
• Resume an application from where it was last saved by selecting the Continue link on the Your benets
page, or by selecting Continue on an in-progress application alert in the Dashboard. The application is
resumed from where it was last saved.
• Withdraw an application. If available, the withdraw option is displayed for the pending decision
application on the Your benets page.
• Delete an application. Citizens can delete in-progress applications only that were not yet submitted to
the agency.
Withdrawing an application
Citizens can withdraw a successfully submitted application or they can also withdraw applications for all
or any one of the programs.
Citizens can withdraw each program individually. The reasons for withdrawing the program application
can be congured for the intake application in the administration system.
The Reason eld contains a list of congurable code table values that are dened by the administrator.
The list of values is congured at application level.
The First name, Last name, and Reason elds are mandatory.
The submit action on the page withdraws the application. The system automatically updates the status of
the programs that are associated with the application case to Withdrawn and sends a notication to the
application caseworker.
Deleting an application
Citizens can delete applications before they are submitted to the agency. Deleting an application
physically deletes the application record.
Submit application-specic documents
Citizens with linked accounts can upload the required supporting documents for their application. After a
citizen signs and submits their application, they are shown the information that they need to verify and
the documents that they can upload to prove that information.
Citizens can add and submit one or more documents. If previously submitted documentation is suitable,
citizens can select and submit that documentation, or choose to submit new documentation.
When they add a document, they must specify the type of document from the list of eligible document
types. For phones or tablets, the le picker uses the native functionality of the device so they can take a
photo, select a picture, or select a le.
By default, the allowed le formats are JPG, JPEG, PNG, TIFF, and PDF and the le size limit is 5 MB. The
allowed le formats and le size limit can be customized by the organization. On desktop devices, they
select only valid le formats. On mobile devices, an error is shown if they select an unsupported le type.
Citizens can view or change their uploaded documents to check them before they submit them to the
agency.
Chapter 3. Business overview of the Universal Access Responsive Web Application
13

When citizens successfully submit documents, the caseworker is notied that documents are ready to
verify. A task is generated for the caseworker in the IBM Cúram Social Program Management caseworker
application.
Related tasks
Customizing application-specic verication polling
When a citizen submits an application, there is a delay while verications are generated for that
application. You can enable verication polling to handle this delay, allowing the page to wait and present
the verications when they become available. You can set the polling on (default) or off, and adjust the
interval and duration.
Verify
If your organization includes the online submission of documents in their business process, citizens are
notied in the Universal Access Responsive Web Application when some of their information needs to
be veried with supporting documentation. They can then provide that supporting documentation online.
Both citizens and caseworkers receive notications, alerting them to any steps to take. Case workers
control the verication of evidence, ensuring adherence to agency standards.
Figure 2. Key business flow for Verications
Click here for a video presentation that includes an overview of Citizen Verication.
Related concepts
Customizing verications
If your organization includes the online submission of documents in their business process, citizens can
upload and submit documents from the IBM Universal Access Responsive Web Application to prove
information that they provided in their benet applications. You can customize a number of aspects of the
verications functionality in the application.
Related information
Verication Engine
14
IBM Cúram Social Program Management 8.0.2: IBM Universal Access Responsive Web Application 5.2.0

Citizen alerts and to-do messages
When citizens must provide documentation to the agency, they see an alert in their dashboard, and a
to-do message for each application or benet case where documents are needed. Only linked users see
the verication alert and to-do messages.
The alert is removed when there is at least one document submitted for each verication.
To-dos are grouped by case, so a citizen can have multiple to-dos if they have multiple applications or
cases. The to-do messages for a case are removed when all documents are provided for that case.
Viewing verications
Citizens who are linked users can upload and submit documents to prove information that they provide.
For example, they can submit a birth certicate to prove a date of birth and a caseworker can then verify
the evidence with the submitted document.
Verications are displayed whenever they are generated for that user, either by online or in-person
interactions with the organization. For example, verications can be generated during an online benet
application process, or on receipt of a postal application form, or when a caseworker meets with a client
in the ofce.
Verications that are raised for any case members on a case or application for which the citizen is the
primary client are displayed to the citizen. If there are verications raised on behalf of an entire family, the
verication is raised against the primary client and are displayed as such to the citizen.
Where there are multiple people on an application or case, you can see and can submit documentation for
each person's outstanding verication requirements.
Veried and non-veried verications are displayed, but canceled verications are not displayed. When
the information is veried, the verication's status is updated. If a verication item utilization expires, the
verication is shown here again and a message indicates that more recent documentation is needed.
Related concepts
The 'Your documents' page
When a citizen who is a linked user is logged in, they see a Your documents page that provides a
consolidated view of their verications and submitted documents. Citizens can see what information
they need to provide documentation for, information for which they have submitted documentation, and
verications that were done in the past.
Submitting documents
Citizens can add and submit one or more documents. For phones or tablets, the le picker uses the
native functionality of the device so they can take a photo, select a picture or select a le. When they
submit a document, they must specify the type of document from the list of eligible document types. The
caseworker is notied that documents are ready to verify.
To prevent unnecessary submissions, citizens cannot submit further documents when the verication
status is Veried.
A verication is displayed for each item of information for which caseworkers need documentation
to verify. Citizens can see a list of the information to be veried and the eligible documents that a
caseworker can use to verify that information.
When submitting documents on desktop devices, Citizens can select only les in valid le formats. If you
are using a phone or tablet, the le picker uses the native functionality of the device so you can take a
photo, select a picture or select a le. On mobile devices, an error is shown if you select an unsupported
le format. By default, the allowed le formats are JPG, JPEG, PNG, TIFF, and PDF and the le size limit is
5 MB. You can customize the allowed le formats and le size limit.
Citizens specify the type of document from the list of eligible document types such as a passport. The
eligible document types are based on the verication item utilization.
Chapter 3. Business overview of the Universal Access Responsive Web Application
15

Citizens can check a document before they submit by clicking the thumbnail image to see the document.
They can delete a document before they submit.
On submission, the verication status is updated and a task is generated for the caseworker in the IBM
Cúram Social Program Management caseworker application.
Sharing and reusing documents
You can congure whether documents of a certain type can be shared and reused across verications that
require the same document type.
• If you choose that a document can only be used against that verication, and must be unique, then
the document is not shared across any other verications that might use the same document type. A
citizen might need to resubmit the document multiple times if they have multiple cases with the same
information.
• If you chose that a document can be shared and reused, the submitted documents can be associated
with other relevant verication items. If previously submitted documentation is suitable, citizens can
select that documentation to reuse for the verication.
Administrators can congure a verication item utilization by setting the Usage
Type to Shared or Unique, see https://www.ibm.com/support/knowledgecenter/SS8S5A_7.0.11/
com.ibm.curam.content.doc/Verication/c_VER_AdministrationUtilizations.html.
Caseworker tasks
When documents are submitted for verication by a citizen, a task is generated for the caseworker that is
assigned to the citizen’s case.
The task indicates that evidence on the case or for the person is now ready for verication, based on the
documents submitted.
A system conguration is available to determine whether the task is generated when all documents for an
evidence record are received, or when all documents for all evidence records on the case are received.
When the caseworker opens the task, details of the evidence, it’s related documentation and whether it’s
ready for verication are visible to the caseworker for review.
Click here for a video presentation that gives an overview of caseworker document verication.
Related tasks
Customizing caseworker tasks
When a citizen submits a document for a verication, a task is generated for the caseworker. Tasks are
displayed to the caseworker that is assigned to the citizen's case when they log in to the caseworker
application. System administrators can congure the system to display a task each time a citizen provides
all documents for an individual evidence record on a case, or to display the task only when a citizen has
provided all documents for every evidence record on a case.
Related information
Reviewing documents submitted for verications
Track
When citizens create a secure citizen account, they can access a range of relevant information. Citizens
can also use the citizen account to track and manage their interactions with the agency.
Related concepts
Conguring the citizen account
Although customization is required to modify some citizen account information, you can congure
information on the citizen account and the Contact Information tab.
Customizing the citizen account
16
IBM Cúram Social Program Management 8.0.2: IBM Universal Access Responsive Web Application 5.2.0

Users can use the citizen account to log in to a secure area where users can screen and apply for
programs.
Creating a citizen account and logging in
Citizens can create a citizen account at any time, including during the check eligibility and application
processes.
Creating an account
Citizens can select Sign up on the organization Home page to create an account. Citizens then enter their
rst and last names, an optional email address, and an account password. If citizens select I don't have
an email address, they can specify a user name instead.
Administration congurations
• Number of login attempts before the account is locked out: 5
• Number of remaining login attempts before a user warning is displayed: 3
• Number of break-in attempts before an account is locked: 3
• Maximum and minimum characters in a user name
• Maximum and minimum characters in a password
For more information about user name and password length, see Account management congurations.
Logging in
To log in to the citizen account, citizens select Log in on the organization Home page. Depending on how
they created their account, citizens enter either an email or user name. They then enter their password
and click Next. You can congure the number of log-in attempts citizens have before their account is
locked out. For example, if you set the number of login attempts to three, the account is locked for citizens
who make more than three unsuccessful login attempts.
On a successful login, the Citizen account dashboard is displayed.
System messages
Agencies use system messages to broadcast messages to either all public citizens who are not logged into
an account, or specically to clients who have a citizen account. System messages that are broadcast to
all public citizens are displayed on the organization Home page. For example, agencies can use system
messages to provide information and help line numbers to clients for a natural disaster, such as a flood.
You can congure system messages in the Administration application by using the New System Message
page. For more information about system messages, see “Citizen account messages” on page 19
.
Related concepts
Screen
Citizens can self-check their eligibility for benets and services before they submit an application.
Checking for eligibility is implemented by using the Screening feature.
Account management congurations
Use the following conguration properties to dene the behavior of password validations for citizen
accounts. For the Universal Access Responsive Web Application, you must implement these validations in
the application before you enable them.
The Dashboard page
When a citizen is logged in, their Dashboard shows an overview of their account.
If your organization uses Appeals, and a citizen has applied for at least one benet, they also see an
Appeals page. For more information, see “Requesting an appeal from the citizen account” on page 28.
Chapter 3. Business overview of the Universal Access Responsive Web Application
17

If your organization uses Verications, and a citizen is a linked user with at least one verication that
needs documentation, they also see a Your documents page. For more information, see “The 'Your
documents' page” on page 21.
System messages
System messages are broadcast to all logged-in citizens and are displayed at the top of the
dashboard. For example, system messages can inform citizens about planned system outages.
Citizens who are linked users can see system messages about their verications.
In-progress applications messages
Messages about current in-progress applications are displayed at the top of the screen. Citizens can
either continue or delete their in-progress applications.
The 'Check what you might get' card
Citizens can click Check what you might get to check their own eligibility for benets. For more
information, see “The Check what you might get page” on page 6.
The 'Apply for benets' card
Citizens can click Apply for benets to apply for a benet. For more information, see “Start an
application” on page 8.
The 'Review your prole' card
Citizens can click Review your prole to update their prole with a change in circumstances. For
more information, see “Enter a life event” on page 24.
The Payments pane
Lists a summary of the most recent payments to the citizen. Citizens can click All payments to view
the payment details or see their payment history. For more information, see “The All payments page”
on page 19
Expected and previous payments
Citizens can view their expected and previous benet payments in their account, and see how
the payments were calculated. The payment dates, benet type, and payment amount are always
displayed. The adjustment indicator displays whether the entitlement amount has changed.
Note:
By default, the display of additional payment information is disabled. For information about how to
enable the display of additional payment information, see “Conguring payments” on page 183.
The 'Benets you might get' pane
Lists a summary of any in-progress eligibility checks. Citizens can click recheck or delete individual
eligibility checks.
The To-Dos pane
Lists actions that citizens must take to complete an application, including action messages that
the caseworker creates for the citizen. For example, a citizen might need to provide supplementary
information to support a benet application.
Citizens who are linked users can see messages about their verications.
The Meetings pane
Lists a summary of meetings that citizens were invited to including the dates of the meetings. The
most recent meeting is shown rst.
The Notications pane
Lists acknowledgments for all of the applications that citizens make. A date is included for most
notications. The most recent notication is shown rst. Example notications include application
acknowledgment, appeal request messages, or service request messages.
Related concepts
Customizing specic message types
18
IBM Cúram Social Program Management 8.0.2: IBM Universal Access Responsive Web Application 5.2.0

Organizations can customize the default message to create a referral message or a service delivery
message.
The All payments page
The All payments page shows more details about payments to the citizen. The messages that are
associated with these payments can be retrieved from IBM Cúram Social Program Management or
another remote system. Canceled or expired payments are also displayed.
The All payments page has the same expected and previous payments sections as the user's
dashboard. Citizens can view their expected and previous benet payments in their account, and see
how the payments were calculated. The payment dates, benet type, and payment amount are always
displayed. The adjustment indicator displays whether the entitlement amount has changed.
If a payment consists of more than one benet, all benets and case numbers are included in the title.
The improved layout of the breakdown shows each payment, and any deductions or components that
make up the overall payment amount for that benet. If a benet has been adjusted, the adjustment
increase or decrease amount is displayed.
Note:
By default, the display of additional payment information is disabled. For information about how to enable
the display of additional payment information, see “Conguring payments” on page 183.
Payment type
Payments can be by check, electronic funds transfer (EFT), cash, or voucher. Depending on the payment
type, the following details can be displayed for each payment:
Check
Payee address and check number
EFT
Bank sort code and bank account number
Cash
Payee address
Voucher
Payee address and voucher number
Citizen account messages
In addition to system messages and in-progress application messages, the Payments, To-Dos, Meetings,
and Notications panes on the Dashboard display citizen account messages. Messages from remote
systems can also be displayed by using web services. For example, messages can be about meetings for
the citizen, or activities that are scheduled for the citizen.
Displaying a message
Each message has a title and an icon. In addition, the To-Dos and Notications messages have an
effective date and time that species when the message is displayed. Usually the effective date of a
message is set to the current date, but you can set the effective date by conguration settings.
For example, you might not want to display a message immediately if a service is scheduled in the future.
You can congure the message to display a specied number of days before the start date of the service.
The system uses the number of days to populate the effective date.
Messages from remote systems are displayed based on the effective date that is specied in the web
service.
Prioritization and ordering
You can assign a priority to a message so that it is displayed at the top of the Meeting listing.
Chapter 3. Business overview of the Universal Access Responsive Web Application
19

You can also congure the order of messages types in the administration system. For example, you can
congure payment messages to be displayed rst and meeting messages to be displayed second.
Message duration
The message type determines the length of time that the message is displayed. You can set the message
duration by start and end dates or by replacing one message with another.
Where items have start and end dates, you can use them to specify the duration that message is
displayed. For example, service messages are displayed until the start date of the service.
In other cases, you can replace a message with another message. Use a conguration setting to
determine whether to:
• Specify the duration for when a message is replaced.
• Specify the number of days after which the message is removed.
The duration of messages from remote systems is based on the expiry date that is dened in the web
service.
System messages
Agencies use system messages to broadcast messages to either all public citizens who are not logged into
an account, or specically to clients who have a citizen account. For example, agencies can use system
messages to provide information and help line numbers to clients for a natural disaster, such as a flood.
You can congure system messages in the Administration application by using the New System Message
page.
The Title and Message elds dene the title of the message and the message body that is displayed to a
client in the citizen application.
The Visibility eld denes the user group that a message is visible to, for example, either only
logged-in users, only public users, or only public and logged-in users.
The Effective Date and Time eld denes an effective date for the message, such as when the message
is displayed in the dashboard page. The Expiry Date and Time eld denes an expiry date for the
message, for instance, when the message no longer is to be displayed in the dashboard.
Messages are saved with a status of In-Edit. Messages must be published before they display in the
citizen account. After it is published, the message is active and is displayed either to public citizens or in
the Citizen Account, based on the visibility, effective date and expiry dates that you have dened.
Predictive Response Manager
The Predictive Response Manager (PRM) is the infrastructure that is used to build and then generate and
display messages on the Citizen Account home page.
A number of default messages are provided and are described in this information along with their
associated congurations
For more information about conguring messages, see “Customizing specic message types” on page
235.
Verications messages
Verications messages are displayed on the To-Dos pane. The messages are removed from the list when
documents for all veriable data items are supplied.
Verications are grouped by person or case, either application case or integrated case, rather than as
individual notications. A case reference number is provided where appropriate. The veriable data items
are displayed in a list.
20
IBM Cúram Social Program Management 8.0.2: IBM Universal Access Responsive Web Application 5.2.0

The Your benets page
When a citizen is logged in, they can see all of their benets applications and the application status on the
Your benets page.
The Your benets page displays applications that can be in one of the following states:
• Application in progress. The application is in progress but is not yet submitted. Citizens can either
continue or delete applications in this category.
• Pending decision. The application is awaiting a decision from the caseworker. Citizens can either
download or withdraw applications in this category.
• Active. The caseworker authorized the application.
• Denied The caseworker rejected the application.
• Authorization failed. Citizens can download applications in this state.
• Withdrawn. Citizens can withdraw an application if it is in Pending decision or Denied status.
If a submitted application is approved by the caseworker and a product delivery case is created for that
application, the application is also displayed on the Your benets page.
The Your benets page also displays a message about the expected next payment for active
benets.
The 'Your documents' page
When a citizen who is a linked user is logged in, they see a Your documents page that provides a
consolidated view of their verications and submitted documents. Citizens can see what information
they need to provide documentation for, information for which they have submitted documentation, and
verications that were done in the past.
The verication items are organized based on their status:
Documents required
Verications that require citizens to submit documentation so that their information can be veried by
a caseworker.
Documents received
Verications for which citizens submitted documents for information to be veried by a caseworker.
Documents accepted
Verications for which a citizen submitted documents, and their information was veried by a
caseworker.
Verications
Each item of information for verication is shown. If needed, you can customize how information is
presented for individual verications, see “Customizing how verication information is presented” on
page 213.
Verications show the following summary information:
• The information to be veried, which can be a single veriable data item, or a group of veriable data
items related to an evidence record.
• The status of the verication:
– Not yet submitted. One or more documents are required to verify this information but were not yet
submitted.
– Documentation submitted. The caseworker is reviewing the submitted documents or has veried
some of the required documents for multiple veriable data items.
– Veried A caseworker has successfully veried this item of information with the submitted
documents.
Chapter 3. Business overview of the Universal Access Responsive Web Application
21

• The person for which information needs to be veried, that is, the case participant. For example For
James Smith.
• The due date, that is, the date by which the documents are to be submitted by the citizen. For example,
Due 26 Sept. By default, this is the same date as the date that the information needs to be veried
by the caseworker. If needed, your organization can congure a lead time to the due date so that
document are submitted earlier to give caseworkers enough time to verify the evidence and process the
application.
• The names of any programs that are associated with an application case, or product deliveries that
are associated with an integrated case, depending on whether a citizen is applying for or receiving
benets. Application for ... <program> is shown for application cases, for example, Application for
Rent Assistance. The program name is shown for product delivery cases, for example Food Assistance.
Verication details
The following verication details are shown:
Provide documents that show
The details of the information that needs to be veried, which consists of the veriable data items,
and a description of the evidence provided and what the verication was raised against.
Eligible documents
A list of the documents that can be provided to prove the information. For example:
• Paid Medical Invoice
• Prescription Receipts
• Doctor's Letter
Add or reuse documents
To prove information is correct, you can add documents or reuse documents that you have already
submitted.
Your submitted documents
If documents were previously submitted for the validation, the documents are listed here. You can
download your previously submitted documents to see them in detail. A message indicates any
documents that are no longer valid.
Related concepts
Viewing verications
Citizens who are linked users can upload and submit documents to prove information that they provide.
For example, they can submit a birth certicate to prove a date of birth and a caseworker can then verify
the evidence with the submitted document.
The Notices page
When a citizen is logged in, they can see all communications that are relevant to them on the Notices
page, with sent, received, or normal status indicated. Notices are typically formal written communications
that are issued to meet legal, regulatory, or state requirements, which are created by using letterhead
templates.
For example, online appeal requests are shown on the Notices page.
By default, communications are listed where the logged-in citizen is the concern or is a correspondent on
the communication, in other words, for linked users.
Citizens can see the communication description and any attachment in the expanded view. They can view
or save attachments by clicking the View attachment link.
22
IBM Cúram Social Program Management 8.0.2: IBM Universal Access Responsive Web Application 5.2.0

Citizens can request that notices are sent to them by mail. The system logs the request to send the
communication to the citizen. The request includes communication (ID), date, time, and status. After a
citizen requests a notice by mail, the Request this notice by mail link is disabled.
What can you congure or customize?
You can congure the number of communications that are listed. You can also create a custom
implementation to change what communications are shown, such as showing communications for other
family members.
The processing of requests for communications by mail is customizable, so customers can add their own
logic to deal with these requests.
Related concepts
Customizing the Notices page
By default, the notices relevant to the linked user are listed on the Notices page. You can replace the
default CitizenCommunicationsStrategy implementation with your own custom implementation.
Related tasks
Conguring communications on the Notices page
You can congure the maximum number of communications that are displayed on the Notices page. By
default, up to 20 communications are displayed.
The Prole page
When a citizen is logged in, they can see their information, including contact information, on their Prole
page.
Citizen information
Citizens can see prole information, such as their contact information. Their contact information can
include information like their address, phone number, and email address. A conguration setting
determines whether the citizen's contact information is displayed on the citizen account. For example,
an agency can set the curam.citizenaccount.contactinformation.show.client.details
property to false to disable citizen contact information. For more information, see “Conguring contact
information” on page 181.
Tell us what has changed
Citizens can submit updates to their prole information and contact details. For more information, see
“Update” on page 24
.
Related concepts
Conguring contact information
Congure contact information for citizens and caseworkers.
Selecting a language
Citizens can select a preferred language from the language drop-down in the footer of the application.
When citizens select a preferred language, the application is displayed in that language. The application
retains the preferred language setting based on a cached value in the browser.
Note: The language drop-down only appears when more than one language is congured for the
application.
Note: A citizen's language preference is not saved if the browser is congured to block access to its local
storage, the application reverts to the default language (English) when the page is reloaded.
Chapter 3. Business overview of the Universal Access Responsive Web Application
23

Update
Citizens can update their details by submitting a change in their circumstances to the agency, which is
implemented by using the Life Events feature. Examples of changes in circumstances include a change
of address, a birth, or marriage. These signicant events in citizens' lives might affect the benets or
services that they are receiving or are due to receive.
Key business flow scenario
James Smith is in receipt of child benet and is also working full time. However, he just lost his job as
the company that he works for is closing. James needs to tell the agency about losing his job so that he
can get his benet reviewed. Life Events allows James to communicate this change to the agency without
visiting the ofce. This reduces the amount of interaction with the agency and saves valuable caseworker
time.
Click here for a video presentation that gives an overview of Life Events.
Related concepts
Conguring life events
For each life event, you must dene how information is collected, stored, and displayed. You can congure
life event information categories, mappings to dynamic evidence, and information sharing with internal
and external sources.
Enter a life event
Citizens who are logged in can review their existing prole information on the Prole page and make
any required changes. They can submit a change in their circumstances by selecting either Review your
prole on their dashboard or selecting Prole to open the Prole page.
The 'Tell us if anything has changed' pane
The Tell us if anything has changed pane displays the available life events, for example, Change of
Address or Change in Employment Status. Each congured life event is a card, with a description that is
congurable by an administrator in Universal Access life event administration.
The administrator can categorize life events in Universal Access life event administration. For example,
you can categorize changing jobs, income changes, and change of address life events under Employment.
If a life event is not categorized, it appears in the All category tab. If citizens cannot immediately see the
life event that they want, they can select See more to see the life events across all categories.
The life event Overview page
When citizens select a life event, the Overview page outlines the update process.
The steps list any information or documentation that they must provide, and approximately how long
the submission takes to complete. The steps can also include how the agency might inform them of the
change when the change of circumstance is complete.
When citizens read and understand the information that is presented, they can select Start to enter the
submission form.
When citizens begin a submission form, they are presented with a guided set of questions that use
Intelligent Evidence Gathering (IEG) to gather information. The IEG script for the form is dened in
Universal Access life event administration.
The life event Summary page
After they enter information, a Summary page displays so they can review their changes before
submission.
24
IBM Cúram Social Program Management 8.0.2: IBM Universal Access Responsive Web Application 5.2.0

The life event Conrmation page
On successful submission of the life event, the Conrmation page is displayed.
The conrmation page can display information that is useful and relevant to the submitted life event. This
information can be dened in Universal Access life event administration.
• Text can be added. For example, agencies can say that a change might take some time as a caseworker
review is needed.
• The Next steps pane can display information such as actions that citizens might need to take after they
submit the change. For example, citizens might need to update their rent if they move into a new home.
The Next steps pane can also include links to external websites.
Citizens don't need to have a case on the system to submit a life event. If they don’t, the submitted
information isn’t transmitted to a case owner. Instead, the submitted information is stored internally and
the agency must decide what to do with the information.
The life event Consent page
An optional Consent page can be displayed so that citizens can consent to having their details sent to
selected other agencies or third parties. Administrators can congure the Consent page to display for
a life event in Universal Access life event administration. This action constitutes the citizens' consent
to send information to the selected agencies. The information can be transmitted to a remote system
through a web service or to the relevant case owners on an IBM Cúram Social Program Management
system through the evidence broker.
The life events change history
Citizens can access their previously submitted life events from the dashboard by clicking Review your
prole > Previous changes. The list of life events is sorted by the submission date. They can select a life
event record from the history list to view a summary of the information that they submitted to the agency.
Submit documents for verication
If your organization includes the online submission of documents in their business process, citizens can
upload and submit supporting documentation for information that they provide, so caseworkers can verify
their changes. For more information, see “Submitting documents” on page 15
.
Related concepts
Conguring a life event
You can congure a life event in the administration application on the New Life Event page.
Appeal
If your organization includes appeals in their business process, citizens can appeal decisions on their
benets online from their citizen accounts on their own devices. If your organization uses the IBM Cúram
Appeals application module, your organization can process appeals through the full appeals life cycle that
is provided by that solution.
Figure 3. Key business flow for Appeals
Chapter 3. Business overview of the Universal Access Responsive Web Application
25

1. “Decide to appeal” on page 26
2. “Submit an appeal request” on page 27
3. “View your appeals” on page 27
4. “Appeals notices and notications” on page 27
Click here for a video presentation that gives an overview of Appeals and Notices.
Related tasks
Customizing appeals
You can customize appeals to suit your organization. You can integrate with an appeals system of your
choice. If you are licensed for the IBM Cúram Appeals application module, the IBM Cúram Social Program
Management appeals functionality is available on installation.
Decide to appeal
If citizens don't agree with a decision on their benets, they can appeal the decision. They can appeal for
themselves or a family member, and can appeal online regardless of how they originally applied. A citizen
must have applied for at least one benet in order to appeal.
By default, they can appeal:
• An eligibility determination.
• A change to their eligibility.
• Their calculated benet.
Citizens are informed of their rights of appeal, and an overview page explains anything that citizens need
to know before they request an appeal.
26
IBM Cúram Social Program Management 8.0.2: IBM Universal Access Responsive Web Application 5.2.0
Submit an appeal request
After they read their appeal rights and understand the appeals process, citizens complete a form with all
of the relevant information. This information can range from details of the benet itself to supplemental
information needed to establish informal reviews and hearings such as interpreters or emergency needs.
You can congure the form to ask for the specic information that is needed by your organization. The
SPM Design System accommodates a wide range of question formats to enable the citizen to easily
complete this form. You can use a summary page to provide further information in the form to help the
citizen and to alleviate specic concerns.
After they enter and review their appeal request details, citizens sign and submit the request for appeal
and get a conrmation of the submission. The conrmation page outlines the next steps and sets out the
time frames for the organization to respond, and any communications to be expected.
Appeals processing
A caseworker or hearing ofcial can receive notication of that appeal and begin processing.
• When the IBM Cúram Appeals application module is installed, the full appeals lifecycle and statuses in
that solution are supported. A task is created and assigned to an appeal request work queue when the
citizen submits the request. The appeal request is recorded against the citizen's person record. A PDF
le is generated from the IEG script and is stored for caseworker reference as a communication against
the appellant in the caseworker application.
A caseworker can then act on the request and either acknowledge the request and continue with the
appeal process or reject the request. An acknowledgment or rejection message is displayed in the
citizen's account. A list of submitted appeal requests is provided in the citizen's account and provides a
view of the request's status.
• When the IBM Cúram Appeals application module is not installed, a citizen can request an appeal.
They can receive an appeal request submitted status, and the organization must implement an appeals
solution to handle the submitted appeal requests and other appeal lifecycle processing.
• Alternatively, an organization can implement a solution to have a third-party appeals system process
the appeal and to generate the appropriate appeal lifecycle processing, statuses, and messaging.
View your appeals
Citizens can see their appeals on the Appeals page. All appeals that citizens submit are displayed and are
updated with the appropriate color-coded statuses as they move through the Appeals lifecycle of hearings
and decisions. At any stage, citizens can log in and understand what is happening with their appeal.
The Appeals page displays each appeal in a card, with copy of the original appeal details if needed.
Typically, the details that are provided in the earlier form are added to a PDF, both the citizen and the
caseworker receive a copy.
The statuses of appeals are updated as the appeal moves through the appeals lifecycle, as pre-congured
for the IBM Cúram Appeals application module, or as congured for your organization's custom appeals
process.
Appeals notices and notications
Citizens receive both formal notices and informal notications at specic milestones in the appeals
process. These updates provide them with instant status updates, while they wait for formal notice of a
decision or next steps.
Notices
Citizens can see communications in the Notices page, which are typically formal written
communications about the appeal or hearing, typically issued to meet legal, regulatory, or state
requirements. Notices are often created by using letterhead templates.
Chapter 3. Business overview of the Universal Access Responsive Web Application
27
Notications
Citizens can see messages in the Notications pane on their dashboard, which are typically informal
messages that inform the citizen of any signicant point in a process. For example, for appeals,
notication can inform citizens of any progression on their appeal request, such as when their appeal
request was rst acknowledged, or if their appeal was accepted or denied.
Requesting an appeal from the citizen account
When logged into their citizen account, a citizen can review their rights of appeal. They can request
an appeal on a benet decision if they are a participant on a IBM Cúram Social Program Management
application or case.
Before you begin
For example, a citizen might be deemed ineligible on application, or have their benet payments reduced.
If they don't agree with the decision or the circumstances of the decision, they can appeal the decision.
Procedure
1. Go to the Appeals page.
2. Click Request an appeal. The appeals process overview page is displayed.
3. Review the overview of the appeals process, and when you are ready, click Start. The appeal request
form opens.
4. Complete the appeal request form.
5. Sign and submit the form.
6. Your appeal request is complete. Review the Conrmation and next steps information.
28
IBM Cúram Social Program Management 8.0.2: IBM Universal Access Responsive Web Application 5.2.0

Chapter 4. Installing the application development
environment and web server
The IBM Universal Access Responsive Web Application requires a React JavaScript development
environment in addition to the IBM Cúram Social Program Management Java development environment.
You can deploy your web application on a web server in a production-like environment as part of
your development process. Deployment in a production environment is outside the scope of this
documentation, but you can refer to the instructions for guidance.
Note: The IBM Universal Access Responsive Web Application installation includes the IBM Social Program
Management Design System so you don't need to install the design system separately.
Prerequisites and supported software
Before you install or upgrade, review the prerequisites and supported software to ensure compatibility.
IBM Cúram Social Program Management Platform and the IBM Cúram Universal
Access application module
IBM Cúram Social Program Management Platform and the IBM Cúram Universal Access application
module installed on the server are prerequisites for the IBM Universal Access Responsive Web
Application client asset that is needed for IBM Citizen Engagement.
IBM Universal Access Responsive Web Application is released at more frequent intervals and requires
specic IBM Cúram Social Program Management and IBM Cúram Universal Access application module
versions to benet from server-side enhancements, security updates, and defect xes.
Note:
• From IBM Universal Access Responsive Web Application 5.0.0 onwards, new features, server-side
enhancements, and defect xes are supported only in the most recent IBM Cúram Social Program
Management version lines. Security xes and defect xes are supported on IBM Cúram Social Program
Management 7.0.10-7.0.11.
• The IBM Universal Access Responsive Web Application 3.x.x version line continues to be supported for
security updates and critical defect xes only on the older compatible version lines of IBM Cúram Social
Program Management, 7.0.10-7.0.11.
• The IBM Universal Access Responsive Web Application 2.6 version line continues to be supported for
security updates and critical defect xes only on the older compatible version lines of IBM Cúram Social
Program Management, 7.0.4 -7.0.9.
For more information about the support strategy, see “Citizen Engagement support strategy” on page
264.
Table 1. Compatibility with Social Program Management
Asset versions Compatible Social Program Management
versions
5.2.0
5.1.0
• 8.0.2 for all new features, enhancements, and
defect xes.
• 7.0.10-7.0.11 for security xes and defect xes
5.0.0 • 8.0.1 for all new features, enhancements, and
defect xes.
• 7.0.10-7.0.11 for security xes and defect xes
©
Copyright IBM Corp. 2018, 2022 29

Table 1. Compatibility with Social Program Management (continued)
Asset versions Compatible Social Program Management
versions
4.1.4
4.1.3
4.1.2
4.1.1
4.1.0
• 8.0.1 for all new features, enhancements, and
defect xes.
4.0.3
4.0.2
4.0.1
4.0.0
• 8.0.0 for all new features, enhancements, and
defect xes.
3.0.7
3.0.6
• 7.0.11 iFix 5 for essential maintenance, security
updates and critical defect xes.
• 7.0.10 iFix 8 for essential maintenance, security
updates and critical defect xes.
3.0.5
3.0.4
• 7.0.11 iFix 3 for all new features, enhancements,
and defect xes.
• 7.0.10 iFix 7 for essential maintenance, security
updates and critical defect xes.
3.0.3 • 7.0.11 iFix 3 for all new features, enhancements,
and defect xes.
• 7.0.10 iFix 6 for essential maintenance, security
updates and critical defect xes.
3.0.2 • 7.0.11 iFix 2 for all new features, enhancements,
and defect xes.
• 7.0.10 iFix 5 for essential maintenance, security
updates and critical defect xes.
3.0.1
3.0.0
• 7.0.11 iFix 1 for all new features, enhancements,
and defect xes.
• 7.0.10 iFix 4 essential maintenance, for security
updates and critical defect xes.
2.9.1 • 7.0.11 for all new features, enhancements, and
defect xes.
• 7.0.10 iFix 3 for essential maintenance, security
updates and critical defect xes.
2.9.0
30IBM Cúram Social Program Management 8.0.2: IBM Universal Access Responsive Web Application 5.2.0

Table 1. Compatibility with Social Program Management (continued)
Asset versions Compatible Social Program Management
versions
2.8.6 • 7.0.10 iFix 3 for all new features, enhancements,
and defect xes.
2.8.5
(Including the 2.8.4 internal release)
2.8.3
2.8.2
2.8.1
2.8.0
2.7.0
Note: Universal Access does not support the dual deployment of the classic client application and the
IBM Universal Access Responsive Web Application client against the same instance of the IBM Cúram
Social Program Management server. You can build and deploy your server without the classic client
application as described in Alternative Targets for IBM WebSphere
®
Application Server or Multiple EAR
les for Oracle WebLogic Server. Alternatively, you must use another strategy to block access to the
classic client application URLs to ensure that users cannot concurrently access both clients.
Node.js
Node.js is a prerequisite for installing the React application and for developing and deploying your web
application.
Supported software
Version Prerequisite
minimum
Operating system restrictions
Node.js 14 LTS (latest) 14.16.0 LTS
(Fermium)
No
12 LTS (latest) 12.13.0 LTS
(Erbium)
No
Platforms
There is no dependency on specic hardware platforms, but some minimum hardware requirements
apply:
• Desktop devices that meet Microsoft Windows 10 specications.
Interactive Development Environment (IDE)
The Universal Access Responsive Web Application does not depend on a specic IDE, you can choose
your own. There are many IDEs that you can choose, for example Microsoft Visual Studio Code, Atom,
and Sublime. However, IBM uses Microsoft Visual Studio Code to develop the reference application, it
supports many plugins that make development faster and easier, for example it supports the following
tools:
• Linting tools (ESLint)
• Code formatters (Prettier)
Chapter 4. Installing the application development environment and web server
31

• Debugging tools (Debugger for Chrome)
• Documentation tools (JSDoc)
IBM does not own, develop, or support these tools.
Application server, web server, and database
Deploying the web application requires a web server in the IBM Cúram Social Program Management
topology. The following application server, web server, and database combinations are supported for
developing and deploying your custom application.
• IBM WebSphere Application Server, IBM HTTP Server or Apache HTTP Server, and IBM Db2
®
• IBM WebSphere Application Server, IBM HTTP Server or Apache HTTP Server, and Oracle Database
• Oracle WebLogic Server, Oracle HTTP Server or Apache HTTP Server, and Oracle Database
For more information about installing an application server or database for SPM, see Installing
prerequisite products.
HTTP servers
These HTTP servers are supported for deployment.
Supported software Version Prerequisite minimum Operating
system
restrictions
IBM HTTP Server 9.0 9.0.0.5 No
8.5.5 8.5.5.9 No
Oracle HTTP Server 12.2.1.3.0 and future
x packs
12.2.1.3.190808 No
Apache HTTP Server 2.4 and future
patches
2.4 No
Web browsers
IBM Cúram Universal Access with the Universal Access Responsive Web Application is developed for
public-facing applications. Every effort was made to ensure that the application pages use standard web
technologies and formats to be compatible with all browsers that are listed. However, the browsers that
are listed in the following table are the only browsers that are ofcially supported.
Note: The browser Back and Forward buttons, and browser refresh, are now supported on IEG pages
in the Universal Access Responsive Web Application. Information that is entered in IEG forms is now
retained when the citizen clicks Next or goes back or forward through a form.
Chrome, Firefox, Edge, and Safari release new versions more frequently than Internet Explorer, and
they install updates automatically by default. Universal Access Responsive Web Application releases are
tested on the latest browser versions that are available at the start of the IBM development cycle.
Note: Only stable Chrome releases are tested.
If no issues result from the tests, IBM certies the browser version.
For each new product release, the prerequisites list the version that is certied. If IBM cannot certify that
version for any reason, you might need to revert to a previous version that is fully certied. While IBM
supports customers who use newer versions of these browsers than the last certied version, customers
must understand that the versions are not fully tested.
32
IBM Cúram Social Program Management 8.0.2: IBM Universal Access Responsive Web Application 5.2.0

Supported software Version Operating system restrictions
Apple Safari 14 and future x
packs
No
Google Chrome 91 and future x
packs
No
Microsoft Edge 91 and future x
packs
No
Microsoft Internet Explorer 11 and future x
packs
No
Mozilla Firefox 89 and future x
packs
No
Accessibility
This accessibility software is supported.
Supported
software
Version Prerequisite
minimum
Operating system
restrictions
Browser
Freedom Scientic
JAWS screen
reader
2020 and
future x
packs
2020 No Microsoft Internet
Explorer 11
Apple VoiceOver Any version
and future x
packs
Any version Any version
Microsoft Edge and
JAWS 2020 is the
only certied screen
reader and browser
combination.
Note:
The combination of Internet Explorer 11 and JAWS 2019 is the only certied screen reader and
browser combination.
Previous versions
To see the prerequisites and supported software for previous versions, see the IBM Cúram Social Program
Management PDF library.
Installing the IBM Cúram Universal Access development
environment
You can install a lightweight or a full development environment. The IBM Social Program Management
Design System is installed as part of the IBM Universal Access Responsive Web Application installation
and doesn’t need a separate installation.
Before you begin
Lightweight development environment
The lightweight development environment replaces the Social Program Management application with
a Node.js hosted mock server. This accelerates set up and development, but can't fully replicate
integration testing with the Social Program Management application. Use this environment to get
started quickly.
1. Install the IBM Universal Access Responsive Web Application React development environment.
Chapter 4. Installing the application development environment and web server
33

2. Congure the IBM Universal Access Responsive Web Application to connect to the mock server,
see “The mock server API service” on page 71.
Full development environment
In the full development environment, you install the Social Program Management Java
™
development
environment to develop and test your APIs instead of using mock APIs. For more information
about installing the Social Program Management Java development environment, see Installing a
development environment.
Note: If you are working with a non-English version, you must ensure that the appropriate language is
installed on Social Program Management.
1. Install the IBM Universal Access Responsive Web Application React development environment.
2. Install the IBM Cúram Social Program Management Platform.
3. Install the IBM Cúram Universal Access Application Module.
4. Install any additional SPM components that you need:
• To use SPM Appeals, install IBM Cúram Appeals Application Module.
• To use SPM Verications, IBM Cúram Verication Engine Application Module.
5. Congure the REST APIs, see “Connecting to Universal Access REST APIs” on page 71.
SPM Database
Universal Access
packages
Node.js
universal-access-starter-pack
Universal Access mock APIs
mock-server API service
REST APIs
SPM Server
SPM Design System
packages
SPM Java IDE
(Eclipse and Tomcat)
JavaScript IDE
(Visual Studio Code, Atom)
Main SPM Client
Apache Tomcat
Figure 4. Universal Access React and Java application development environments
Troubleshooting environment
For troubleshooting, it can sometimes be useful to connect your lightweight or full development
environment directly to an SPM server. For more information, see “Connect a React development
environment to an SPM server” on page 263.
About this task
To install the IBM Universal Access Responsive Web Application, rst extract the spm-universal-
access-starter-pack React starter application. Then, install all of the IBM Social Program
Management Design System and IBM Universal Access Responsive Web Application Node packages into
the starter application.
Attention:
When you work with npm packages, it is important that you familiarize yourself with
the npm ecosystem and how package dependencies work so you can adopt a suitable security
strategy for your project.
34IBM Cúram Social Program Management 8.0.2: IBM Universal Access Responsive Web Application 5.2.0

Procedure
1. Download the Universal Access Responsive Web Application and IBM Social Program Management
Design System Node packages.
a) Open IBM Fix Central, select Cúram Social Program Management, select your installed version
and platform, and click Continue.
b) Ensure that Browse for xes is selected, and click Continue.
c) Select the check boxes for IBMUniversalAccessResponsiveWebApplication and
IBMSocialProgramManagementDesignSystem and click Continue.
d) Only versions that are compatible with your IBM Cúram Social Program Management version are
shown. Download SPM_DS_<version>.zip and UA_Web_App_<version>.zip and extract the
packages in the archive les to any directory.
2. Extract the spm-universal-access-starter-pack_version.tgz le.
The extracted package directory forms the React starter application. You must install all of the other
packages into this directory.
3. Rename the extracted package directory to reflect your project.
For example, universal-access-custom-app.
4. From your custom application directory, install the IBM Social Program Management Design System
Node packages by entering the following commands:
npm install <path>/govhhs-govhhs-design-system-core-<version>.tgz
npm install <path>/govhhs-govhhs-design-system-react-<version>.tgz
npm install <path>/spm-core-<version>.tgz
npm install <path>/spm-core-ui-<version>.tgz
npm install <path>/spm-core-ui-locales-<version>.tgz
npm install <path>/spm-intelligent-evidence-gathering-<version>.tgz
npm install <path>/spm-intelligent-evidence-gathering-locales-<version>.tgz
Where <path> is the download path and <version> is the package version.
Enter the remaining commands in this order:
npm install <path>/spm-eslint-config-<version>.tgz
npm install <path>/spm-test-framework-<version>.tgz
npm install <path>/spm-web-dev-accelerator-scripts-<version>.tgz
npm install <path>/spm-web-dev-accelerator-<version>.tgz
Note: Ignore any Node package dependency warnings for now. If needed, you can resolve them later.
5. From your custom application directory, install the IBM Universal Access Responsive Web Application
Node packages by entering the following commands. Ignore any warnings for now.
npm install <path>/spm-universal-access-<version>.tgz
npm install <path>/spm-universal-access-ui-<version>.tgz
npm install <path>/spm-universal-access-ui-locales-<version>.tgz
npm install <path>/spm-mock-server-<version>.tgz
npm install <path>/spm-universal-access-mocks-<version>.tgz
Where <path> is the download path and <version> is the package version.
6. Run the following command to install the package dependencies.
npm install
7. You can run the Universal Access starter application by entering the following command from your
application directory.
npm start
Chapter 4. Installing the application development environment and web server
35

If the local host does not start automatically, browse to http://localhost:3000/ to see the running
application.
Results
You can now start to customize the Universal Access reference application for your organization.
Upgrading the IBM Universal Access Responsive Web Application
You can upgrade your custom React application with the latest versions of the IBM Universal Access
Responsive Web Application and IBM Social Program Management Design System Node packages to
benet from the most recent updates.
Before you begin
Before you upgrade, ensure that you review your custom application for any potential upgrade impacts.
For more information, see “Developing compliantly” on page 48.
Procedure
1. Download the IBM Universal Access Responsive Web Application and IBM Social Program
Management Design System Node packages.
a) Open IBM Fix Central
, select Cúram Social Program Management, select your installed version
and platform, and click Continue.
b) Ensure that Browse for xes is selected, and click Continue.
c) Select the check boxes for IBMUniversalAccessResponsiveWebApplication and
IBMSocialProgramManagementDesignSystem and click Continue.
d) Only versions that are compatible with your IBM Cúram Social Program Management version are
shown. Download SPM_DS_<version>.zip and UA_Web_App_<version>.zip and extract the
packages in the archive les to any directory.
2. Read all relevant Chapter 2, “What's new and release notes for Universal Access,” on page 2 to review
the changes between your current version and the new version .
3. Extract the universal-access-starter-pack package to a temporary directory and compare it to
your working custom application directory. Apply any differences you nd to your custom application
directory.
4. From your custom application directory, install the IBM Social Program Management Design System
Node packages by entering the following commands:
npm install <path>/govhhs-govhhs-design-system-core-<version>.tgz
npm install <path>/govhhs-govhhs-design-system-react-<version>.tgz
npm install <path>/spm-core-<version>.tgz
npm install <path>/spm-core-ui-<version>.tgz
npm install <path>/spm-core-ui-locales-<version>.tgz
npm install <path>/spm-intelligent-evidence-gathering-<version>.tgz
npm install <path>/spm-intelligent-evidence-gathering-locales-<version>.tgz
Where <path> is the download path and <version> is the package version.
Enter the remaining commands in this order:
npm install <path>/spm-eslint-config-<version>.tgz
npm install <path>/spm-test-framework-<version>.tgz
npm install <path>/spm-web-dev-accelerator-scripts-<version>.tgz
npm install <path>/spm-web-dev-accelerator-<version>.tgz
Note: Ignore any Node package dependency warnings for now. If needed, you can resolve them later.
5. From your custom application directory, install the IBM Universal Access Responsive Web Application
Node packages by entering the following commands. Ignore any warnings for now.
36
IBM Cúram Social Program Management 8.0.2: IBM Universal Access Responsive Web Application 5.2.0

npm install <path>/spm-universal-access-<version>.tgz
npm install <path>/spm-universal-access-ui-<version>.tgz
npm install <path>/spm-universal-access-ui-locales-<version>.tgz
npm install <path>/spm-mock-server-<version>.tgz
npm install <path>/spm-universal-access-mocks-<version>.tgz
Where <path> is the download path and <version> is the package version.
6. Run the following command to install the package dependencies.
npm install
What to do next
Note: After an upgrade, the react-scripts@^3.0.0 package can display an error when building the
application with npm run build or starting webpack-dev-server with npm run start. This error
is due to optional package installation checks. To avoid this issue with react-scripts, use one of the
following options:
• Set the SKIP_PREFLIGHT_CHECK=true environment variable in the .env le.
• Run npm update --no-save babel-eslint babel-jest babel-loader eslint jest
webpack webpack-dev-server to update the packages respecting the semver, and then run npm
dedupe.
For more information, see the create-react-app issue at https://github.com/facebook/create-react-
app/issues/4167.
Related tasks
Installing the IBM Cúram Universal Access development environment
You can install a lightweight or a full development environment. The IBM Social Program Management
Design System is installed as part of the IBM Universal Access Responsive Web Application installation
and doesn’t need a separate installation.
Install and congure IBM HTTP Server with WebSphere
Application Server
Install and congure IBM HTTP Server either on the same server as WebSphere Application
Server or on a remote server. To enable cross-origin resource sharing (CORS), you can set the
curam.rest.allowedOrigins property for the REST application on your application server, or install
the IBM HTTP Server plug-in for WebSphere Application Server.
Before you begin
WebSphere Application Server must be installed and congured.
You must install IBM Installation Manager. For more information, see the IBM Installation Manager
documentation. You can download IBM Installation Manager from Installation Manager and Packaging
Utility download documents.
Note:
When the React application and the SPM server are deployed in different hosts that don't share the
same top-level domain+1, and the web server where the React app is hosted doesn't run a proxy
plug-in towards the SPM application servers, you must change the Cross-Site Request Forgery (CSRF)
and session cookies for cross-origin requests, from the default Samesite=Lax to Samesite=None.
An alternative solution is to deploy a gateway web server in front of SPM to modify the cookie by using
this directive:
Header edit Set-Cookie ^(.*)$ $1;SameSite=None;Secure
Chapter 4. Installing the application development environment and web server
37

For SPM clusters, place this directive in the web servers where SPM applications are mapped.
About this task
To enable cross-origin resource sharing (CORS), choose one of the following options:
• Set the curam.rest.allowedOrigins property for the REST application that is deployed on the
application server. For more information about setting the curam.rest.allowedOrigins property,
see Cúram REST conguration properties.
• Install and congure the IBM HTTP Server plug-in for WebSphere Application Server to enable IBM
HTTP Server to communicate with WebSphere Application Server. WebSphere Customization Toolbox is
needed to congure the plug-in.
Procedure
1. Install IBM HTTP Server. For more information, see Migrating and installing IBM HTTP Server
.
2. Optional: If you don't set the curam.rest.allowedOrigins property, you must install the following
software:
a) Install the IBM HTTP Server plug-in for WebSphere Application Server.
For more information, see Installing and conguring web server plug-ins.
b) Install the WebSphere Customization Toolbox.
For more information, see Installing and using the WebSphere Customization Toolbox.
3. Start IBM HTTP Server. For more information, see Starting and stopping the IBM HTTP Server
administration server.
4. To secure IBM HTTP Server, see Securing IBM HTTP Server.
Generating an IBM HTTP Server plug-in conguration
This task is needed only if you install the IBM HTTP Server plug-in for WebSphere Application Server. Use
WebSphere Customization Toolbox to generate a plug-in conguration.
Before you begin
Start WebSphere Application Server. For more information, see Starting a WebSphere Application Server
traditional server.
Procedure
To generate the IBM HTTP Server plug-in conguration, complete the steps at the WebSphere Application
Server Network Deployment plug-ins conguration topic.
Conguring the IBM HTTP Server plug-in
Congure the IBM HTTP Server plug-in for WebSphere Application Server and WebSphere Customization
Toolbox. This task is necessary only if you have chosen to install the IBM HTTP Server plug-in, instead
of setting the curam.rest.allowedOrigins property for the REST application that is deployed on the
application server. Also, for information about how to congure the web server's HTTP verb permissions
to mitigate verb tampering, see Enabling HTTP verb permissions.
About this task
You can run the configurewebserverplugin target to complete the following tasks:
• Add the web server virtual hosts to the client hosts conguration in WebSphere Application Server.
• Propagate the plug-in key ring for the web server.
• Map the modules of any deployed applications to the web server.
38
IBM Cúram Social Program Management 8.0.2: IBM Universal Access Responsive Web Application 5.2.0

Procedure
1. Start IBM HTTP Server.
For more information, see Starting and stopping the IBM HTTP Server administration server.
2. On the remote WebSphere Application Server, run the following command.
build configurewebserverplugin -Dserver.name=server_name
The configurewebserverplugin target requires a mandatory server.name argument that
species the name of the server when the target is invoked. For more information about the
configurewebserverplugin target, see Conguring a web server plug-in in WebSphere Application
Server.
3. Consider adding extra aliases to the client_host, as shown in the following examples:
• For WebSphere Application Server, add port number 9044.
• For the default HTTP port, add port number 80.
• For HTTPS ports, add port number 433.
For more information about client host setup, see step 19 in the WebSphere Application Server port
access setup topic.
4. To avoid port mapping issues from web applications, restart WebSphere Application Server and IBM
HTTP Server.
For more information, see Starting and stopping the IBM HTTP Server administration server.
Install and congure Oracle HTTP Server with Oracle WebLogic
Server
Install and congure Oracle HTTP Server on either the same server as Oracle WebLogic Server or on a
remote server.
Before you begin
Oracle WebLogic Server must be installed and congured. For more information, see Installing and
Conguring Oracle WebLogic Server and Coherence for Oracle HTTP Server 12.1.3, and Installing and
Conguring Oracle HTTP Server for Oracle HTTP Server 12.2.1.3.
Note:
When the React application and the SPM server are deployed in different hosts that don't share the
same top-level domain+1, and the web server where the React application is hosted doesn't run a proxy
plug-in towards the SPM application servers, you must change the Cross-Site Request Forgery (CSRF) and
session cookies for cross-origin requests, from the default Samesite=Lax to Samesite=None.
An alternative solution is to deploy a gateway web server in front of SPM to modify the cookie by using
this directive:
Header edit Set-Cookie ^(.*)$ $1;SameSite=None;Secure
For SPM clusters, place this directive in the web servers where SPM applications are mapped.
Installing Oracle HTTP Server and its components
Install and congure Oracle HTTP Server in either a stand-alone domain, or in an Oracle WebLogic Server
domain. You must install and congure an Oracle web server plug-in for proxying requests.
About this task
The Oracle web server plug-in allows requests to be proxied from Oracle HTTP Server to Oracle WebLogic
Server. If you install and congure the Oracle web server plug-in, requests that are delegated to Oracle
Chapter 4. Installing the application development environment and web server
39

WebLogic Server still appear to originate from the Oracle HTTP Server, even if Oracle HTTP Server and
Oracle WebLogic Server are hosted on two different servers.
Because of the web browser same-origin policy, cross-origin resource sharing (CORS) is restricted in
many browsers by default. The web server plug-in enables CORS where Oracle HTTP Server and Oracle
WebLogic Server are installed on different computers.
CORS enables an instance of your web application that is deployed on Oracle HTTP Server in one domain
to request the REST services that are deployed on Oracle WebLogic Server in another domain.
Procedure
1. Install Oracle HTTP Server for Oracle WebLogic Server. For more information, see Installing and
Conguring Oracle HTTP Server for Oracle HTTP Server 12.1.3, and Installing and Conguring Oracle
HTTP Server for Oracle HTTP Server 12.2.1.3.
2. To congure Oracle HTTP Server, choose one of the following options:
• To congure Oracle HTTP Server in a stand-alone domain, follow the instructions at Conguring
Oracle HTTP Server in a Standalone Domain for Oracle HTTP Server 12.1.3, or Conguring Oracle
HTTP Server in a Standalone Domain for Oracle HTTP Server 12.2.1.3.
• To congure Oracle HTTP Server in an Oracle WebLogic Server domain, follow the instructions at
Conguring Oracle HTTP Server in a WebLogic Server Domain for Oracle HTTP Server 12.1.3, or
Conguring Oracle HTTP Server in a WebLogic Server Domain for Oracle HTTP Server 12.2.1.3.
3. If Oracle HTTP Server and Oracle WebLogic Server are installed in different domains, to enable CORS,
install a web server plug-in.
For more information about conguring an Oracle WebLogic Server proxy plug-in, see Conguring the
Plug-In for Oracle HTTP Server for Oracle HTTP Server 12.1.3, or Conguring the Plug-In for Oracle
HTTP Server for Oracle HTTP Server 12.2.1.3.
4. To secure Oracle HTTP Server, follow the procedure at Managing Application Security 12.1.3, or
Managing Application Security for Oracle HTTP Server 12.2.1.3.
Results
The Oracle HTTP Server instance is now ready to for you to deploy the application. The
default location for deploying the application is OHS_INSTANCE/config/fmwconfig/components/
${COMPONENT_TYPE}/instances/${COMPONENT_NAME}/htdocs. However, you can congure the
default location value to a different location.
What to do next
Start Oracle HTTP Server. For more information, see Next Steps After Conguring an Oracle HTTP Server
Domain for Oracle HTTP Server 12.1.3, and Next Steps After Conguring the Domain for Oracle HTTP
Server 12.2.1.3.
Conguring the Oracle HTTP Server plug-in
If a web server such as Oracle HTTP Server is congured in the topology, you must congure a web
server plug-in in Oracle WebLogic Server. The web server plug-in enables Oracle WebLogic Server to
communicate with Oracle HTTP Server. Also, for information about how to congure the web server's
HTTP verb permissions to mitigate verb tampering, see Enabling HTTP verb permissions.
About this task
To enable an Oracle HTTP Server web server plug-in in Oracle WebLogic Server, you can run the
configurewebserverplugin target.
Procedure
1. Ensure the remote Oracle WebLogic Server Oracle WebLogic Server is running.
40
IBM Cúram Social Program Management 8.0.2: IBM Universal Access Responsive Web Application 5.2.0

For more information, see Starting and stopping Web Logic servers.
2. On the remote Oracle WebLogic Server, run the following command.
The configurewebserverplugin target requires a mandatory server.name argument that
species the name of the server when the target is invoked.
build configurewebserverplugin -Dserver.name=server_name
For more information about the configurewebserverplugin target, see Conguring a web server
plug-in in Oracle WebLogic Server.
3. Restart the remote Oracle WebLogic Server.
For more information, see Starting and stopping Web Logic servers .
Installing and conguring Apache HTTP Server
Install and congure Apache HTTP Server on either the same server as the application server
or on a remote server. To enable cross-origin resource sharing (CORS), you can set the
curam.rest.allowedOrigins property for the REST application on your application server, or install
the appropriate plug-in for your web server. Also, for information about how to congure the web server's
HTTP verb permissions to mitigate verb tampering, see Enabling HTTP verb permissions for guidance.
Before you begin
An application server must be installed and congured.
Note:
When the React application and the SPM server are deployed in different hosts that don't share the
same top-level domain+1, and the web server where the React application is hosted doesn't run a proxy
plug-in towards the SPM application servers, you must change the Cross-Site Request Forgery (CSRF) and
session cookies for cross-origin requests, from the default Samesite=Lax to Samesite=None.
An alternative solution is to deploy a gateway web server in front of SPM to modify the cookie by using
this directive:
Header edit Set-Cookie ^(.*)$ $1;SameSite=None;Secure
For SPM clusters, place this directive in the web servers where SPM applications are mapped.
About this task
To enable cross-origin resource sharing (CORS), choose one of the following options:
• Set the curam.rest.allowedOrigins property for the REST application that is deployed on the
application server. For more information about setting the curam.rest.allowedOrigins property,
see Cúram REST conguration properties
.
• Install and congure the plug-in for your server.
Procedure
1. Install Apache HTTP Server. For more information, see Compiling and Installing in the Apache HTTP
Server documentation.
2. Optional: If you don't set the curam.rest.allowedOrigins property, you must choose one of the
following options:
• WebSphere Application Server
Install the plug-in for WebSphere Application Server, see Installing and conguring web server
plug-ins.
Chapter 4. Installing the application development environment and web server
41

Install the WebSphere Customization Toolbox, see Installing and using the WebSphere
Customization Toolbox.
To congure Apache HTTP Server with WebSphere Application Server, see Conguring Apache
HTTP Server.
• Oracle WebLogic Server 12cR1 (12.1.3):
For more information about conguring an Oracle WebLogic Server proxy plug-in, see Conguring
the Plug-In for Oracle HTTP Server.
To congure Apache HTTP Server with Oracle WebLogic Server, see Conguring the Plug-In for
Apache HTTP Server.
• Oracle WebLogic Server 12cR2 (12.2.1.3):
For more information about conguring an Oracle WebLogic Server proxy plug-in, see Conguring
the Plug-In for Oracle HTTP Server.
To congure Apache HTTP Server with Oracle WebLogic Server, see Conguring the Plug-In for
Apache HTTP Server.
3. Start Apache HTTP Server. For more information, see Starting Apache in the Apache HTTP Server
documentation.
4. To secure Apache HTTP Server server, see Security Tips and Apache SSL/TLS Encryption in the Apache
HTTP Server documentation.
Building the Universal Access Responsive Web Application for
deployment
Build the Universal Access Responsive Web Application for deployment on an HTTP server. To quickly
congure the universal-access-starter-pack application for deployment, follow these basic steps.
Before you begin
For the relative URL, assuming that you want to deploy the application in https://
yourhostname.com/universal, set the environmental variable PUBLIC_URL=/universal for the
application build, or set the package.json homepage attribute to "/universal". Otherwise, set your
own specic value. For more information about build location options, see Building for Relative Paths
in
the Create React App documentation.
For production builds, review all of the environment variables in your .env les, and check the order of
the environment variables where you have multiple .env les. For more information about the priority of
different .env les in react-scripts, see What other .env les can be used? in the Create React App
documentation.
Procedure
1. Edit the .env conguration le in the root of your app, and update the REACT_APP_REST_URL
environment variable with the hostname and port of the server where the REST services are deployed,
for example:
# Where the Curam SPM Rest API application is hosted/mapped
# in the same server or domain as the Universal Access Responsive Web Application:
REACT_APP_REST_URL=/Rest
# Where the Curam SPM Rest API application is hosted/mapped in a different server or domain:
REACT_APP_REST_URL=https://restapplication.com/Rest
2. Enter the following command to install dependent packages:
npm install
42
IBM Cúram Social Program Management 8.0.2: IBM Universal Access Responsive Web Application 5.2.0

3. Enter the following command to build the application into a build folder in the universal-access-
starter-pack:
npm run build
4. Copy the build folder to the HTTP Server and deploy, see “Deploying your web application to a web
server” on page 43.
Deploying your web application to a web server
To test your web application against an existing IBM Cúram Social Program Management application
that is deployed on an enterprise application server, you can deploy the web application on one of
the supported web servers. The supported web servers are all based on Apache HTTP server so the
deployment procedure is similar.
Before you begin
You must have built your application for deployment.
About this task
The universal-access-starter-pack package includes a precongured .htaccess le under the
public folder that gets added to the built application. This le contains comments to explain the web
server conguration requirements for React Router BrowserRouter enablement.
For more information about how to congure .htaccess les in a web server, see the Apache HTTP
Server Tutorial: .htaccess les related link.
For more information about React Router BrowserRouter, see Serving Apps with Client-Side Routing
.
Procedure
1. Copy the contents of the build directory to the appropriate directory for your HTTP server.
For more information about the <directory> directive, see the related links.
2. Congure the web server.
• If you use .htaccess, enable the directives in .htaccess by editing httpd.conf and setting an
appropriate value for the AllowOverride directive in the Directory section for the HTTP server's
DocumentRoot, or the corresponding Directory where the resources are being deployed.
In addition, you must load the mod_rewrite module for the React Router BrowserRouter.
# Enables mod_rewrite for React Router's BrowserRouter directives
<IfModule !mod_rewrite.c>
LoadModule rewrite_module modules/mod_rewrite.so
</IfModule>
# "/opt/IBM/HTTPServer/htdocs/universal" is the location
# where the web application is deployed under the DocumentRoot.
# Alternatively you can specify the DocumentRoot "/opt/IBM/HTTPServer/htdocs"
<Directory "/opt/IBM/HTTPServer/htdocs/universal">
AllowOverride FileInfo Options=MultiViews
</Directory>
• If you do not use .htaccess, you can copy the directives in .htaccess and put them in a
LocationMatch section for your application in httpd.conf.
# Enables mod_rewrite for React Router's BrowserRouter directives
<IfModule !mod_rewrite.c>
LoadModule rewrite_module modules/mod_rewrite.so
</IfModule>
# Below LocationMatch is set to "/universal" because the application
# will be served from https://youhostname.com/universal
<LocationMatch /universal>
#
# place here your .htaccess directives
Chapter 4. Installing the application development environment and web server
43

#
</LocationMatch>
3. Tune your HTTP server for improved performance, see performance tuning.
Related information
GitHub documentation: npm run build
Content Security Policy Quick Reference Guide
Apache core features V2.0: <Directory> Directive
Apache core features V2.4: <Directory> Directive
Apache HTTP Server Tutorial: .htaccess les
44IBM Cúram Social Program Management 8.0.2: IBM Universal Access Responsive Web Application 5.2.0

Chapter 5. Developing with the Universal Access
Responsive Web Application
Find out how to use the provided development resources to customize the IBM Universal Access
Responsive Web Application reference application and build your custom application.
Related information
IEG in the Universal Access Responsive Web Application
Starter pack and packages
Using the IBM Universal Access Responsive Web Application starter pack and packages, and Social
Program Management Design System packages, as your starting point, you can customize Universal
Access for your organization.
Each package includes a package-lock.json.sample le, which lists the packages and versions that
the release was built with. This le is for reference only and is not to be used directly for building.
universal-access-starter-pack
This package contains a development environment and a fully functional and deployable reference
application. The starter application uses the other provided modules to provide an external web
application for Universal Access.
The starter pack demonstrates how a modern and responsive Universal Access client can be built by using
React, Redux, and the IBM Social Program Management Design System. It includes a sample feature
that demonstrates coding conventions and the correct usage of the IBM Social Program Management
Web Development Accelerator tool to help you to get started with developing your own custom features,
see “The sampleApplication feature” on page 52. You can rename, modify, and extend the starter
application to suit the needs of your organization.
universal-access
This package contains a module that connects the Universal Access Responsive Web Application to the
IBM Cúram Social Program Management server. universal-access makes HTTP requests to the server
to allow the web application to interact with the IBM Cúram Universal Access installation. Redux is the
storage mechanism for requests and responses. For more information, see “Redux in Universal Access”
on page 55 and “Universal Access Redux modules” on page 57. This module does not render content,
it depends on universal-access-ui to render the content.
universal-access-ui
This package contains a set of Universal Access Responsive Web Application features that presents views
to the user, it depends on universal-access to provide the data that it needs for those views.
universal-access-ui-locales
This package contains translated UI artifacts for the universal-access-ui package.
universal-access-mocks
This package contains a module that provides mock data specic to Universal Access business scenarios
for testing purposes. It is used by the mock server to provide mock APIs in the development environment
so you don't need to host an IBM Cúram Social Program Management server during development.
©
Copyright IBM Corp. 2018, 2022 45
mock-server
This package contains a lightweight server that can serve HTTP requests and return mock data as a
response. You can use mock-server during client development as a substitute for a real server to test
features.
core
This package provides JavaScript utilities to help you develop your application. For example, use the
RESTService utility to connect to a IBM Cúram Social Program Management server-side REST API. Use
IntlUtils to format numbers and dates for globalization.
For more information about the core package utilities, see the JSDoc API documentation in spm/core/
doc.
core-ui
This package provides common React UI components to help you develop your application. For example,
use the AppSpinner component to display a spinning animation while a page loads, or use the Toaster
component to display notications to the user.
For more information about the core-ui components, see the JSDoc API documentation in spm/core-
ui/doc.
core-ui-locales
This package provides translated artifacts for the core-ui components.
intelligent-evidence-gathering
This package enables IEG scripts that are congured in the IBM Cúram Social Program Management
application to run in your application. An API is provided to call the IEG scripts.
For more information, see the API documentation in spm/intelligent-evidence-gathering/doc.
intelligent-evidence-gathering-locales
This package contains translated artifacts for the intelligent-evidence-gathering package.
spm-web-dev-accelerator
This package contains the Social Program Management Web Development Accelerator rapid feature
development tool, which generates Redux modules to handle the communication between your
application and IBM Cúram Social Program Management REST APIs.
spm-web-dev-accelerator-scripts
This package contains a Swagger parser to retrieve information from IBM Cúram Social Program
Management REST APIs, and scripts to generate the features and modules code from conguration
information in the spm-web-dev-accelerator package.
spm-test-framework
This package contains a number of reusable les to help you to set up a test environment for testing
with Test Cafe, Jest, and Enzyme. You can use the provided helper les to help you to develop and write
end-to-end tests, unit tests, or snapshot tests for your project.
46
IBM Cúram Social Program Management 8.0.2: IBM Universal Access Responsive Web Application 5.2.0

spm-eslint-config
This package contains an ESLint conguration with predened coding style rules and an EditorCong
conguration le.
Related information
Design system packages
Sample application project structure
The project structure is based on the Facebook create-react-app.
For more information about create-react-app, see create-react-app.
.
├── mock
├── node_modules
├── package.json
├── public
├── src
| └── App.js
| └── Config
| └── css
| └── Features
| | └── sampleApplication
| | | └── confirmation
| | | | └── SampleApplicationConfirmation.js
| | | └── form
| | | | └── SampleApplicationForm.js
| | | └── overview
| | | | └── SampleApplicationOverview.js
| └── index.js
| └── intl
| └── modules
| └── paths.js
| └── redux
| └── routes.js
| └── routesMessages.js
| └── /sass
| └── serviceWorker.js
├── tests
├── .env
├── .env.development
The main les in the project are as follows:
package.json
The package.json le is customized to support the Universal Access starter application. For more
information on standard package.json, see package.json
.
/mock
/mock contains the wiring that is needed to interact with the mock-server module. The mock server
replicates the SPM APIs, providing the mocked end points that are used by the sample application.
For more information about the mock server, see “The mock server API service” on page 71.
/public
/public is part of the create-react-app boilerplate. For more information, see create-react-app
.
/src
/src is your working folder. The starter pack provides the basic infrastructure that interacts with the
universal-access modules that are the platform for your development effort. /src contains the following
components:
Chapter 5. Developing with the Universal Access Responsive Web Application
47

• /src/index.js Initiates the application and adds the following capabilities:
– Connection to a Redux store by using the react-redux module Provider component.
– Globalization is added by using react-intl and the LanguageProvider component.
– The universal-access module has a limited set of congurations that can be modied by using the
AppConfig component.
• src/App.js is launched from the index.js le and wraps the main application in the react-
router.
• src/css contains the compiled CSS styles.
• src/config contains theintl conguration les.
• src/features contains a sample feature to demonstrate how to implement a simple version of the
Apply for benets feature, see “The sampleApplication feature” on page 52.
• src/redux contains the conguration for Redux reducers and the store.
• src/intl handles React-Intl Initialization.
• src/routes.js provides a point of customization for adding, replacing, or removing routes in your
application.
• src/paths.js provides access the URLs that are mapped to each page by the route conguration.
• src/routesMessages.js contains the text Routes to be displayed on the window's title.
• src/appconfig.sample.json allows parts of universal-access to be customized, for example,
specifying the default and other supported languages.
• src/sass/styles.scss contains the SCSS style denitions.
• src/sass/custom_variables.css provides a conguration point for CSS variables.
.env and .env.development
The .env le contains the environment variables for production. The .env.development le
supersedes the environment variables in .env and sets specic environment variables for development.
For more information about environment variables, see the “React environment variable reference” on
page 127.
Developing compliantly
Follow these guidelines to protect your project from making customization changes that are incompatible
with the base product, or have the potential to incur upgrade impacts.
Never use undocumented APIs
JavaScript does not have access modiers such as public, private. or protected. It is possible to call
functions in SPM modules that are not intended for public use. Calling these functions is not supported as
those APIs can change in a future release and break your code.
The only JavaScript APIs that are intended for public use are documented in the docs folder of the SPM
node_modules. For example, node_modules/@spm/core/docs/index.html.
Observe the Redux reducer namespace
If you use Redux, your Reducer names must not infringe on the namespace for Universal Access reducers.
All Universal Access reducers are prexed with UA, for example. UABenefitSelection. When Universal
Access and custom reducers are combined, clashing names override the Universal Access reducers.
Customizing universal-access reducers is not supported.
48
IBM Cúram Social Program Management 8.0.2: IBM Universal Access Responsive Web Application 5.2.0

Don't modify the starter application les
While you can modify the starter application les in place, it is better to copy the les and change the
copy. Your upgrades will then be easier as you can compare les between the current and previous
version of the product without the added complexity of your customization changes. Where upgrade
changes are needed, manually apply the changes to your custom version.
Don't modify or source control any code that is generated
The IBM Social Program Management Web Development Accelerator tool generates code from the
metadata in the modules_config.json le, which is the only le that you need to source control.
The code is generated each time that you click Generate in the tool, or run the npm install, npm run
build, or npm run wda-generate commands.
Enforce good code style with ESLint and EditorCong
To help you to run static code analysis on your code, the spm-eslint-config package contains an
ESLint conguration with predened coding style rules and an EditorCong conguration le.
ESLint
Most code editors support plug-ins for linting. ESLint plugin
is a useful plug-in for Microsoft Visual
Studio Code. Code editor plug-ins highlight errors in the editor so they can be seen and xed during
development. When all the developers in a team use a plug-in, it helps to maintain a consistent code
style.
If you use Microsoft Visual Studio Code, the provided conguration les prompt you to install the
recommended ESLint plug-in for code styling. If you use a different editor, you can manually congure the
plug-in. For example, for Atom you can congure the Atom ESLint plug-in.
The rst time that you run a static code analyzer on your code, particularly if coding style was not
previously enforced, you might see numerous errors. Don't get discouraged, while it might take some time
to x all of the violations, ensuring that your team uses a consistent coding style has signicant long-term
benets.
The ESLint conguration is in the ./node_modules/@spm/eslint-config/index.js le.
Running ESLint
To check the code for ESLint violations, run the following command in the application root directory.
Errors are listed in the console.
npm run lint
Fixing ESLint violations
Run the following command for ESLint to x syntactic problems automatically:
npm run lint -- --fix
You must manually x any violations that can't be resolved automatically.
Overriding ESLint cong rules in the sample cong
The sample .eslintrc.js le in the universal-access-sample-app is used for linting by default
when you run ESLint through an npm script or by using an editor ESLint plug-in. The sample extends the
conguration le in the spm-eslint-config package, which contains a set of predened coding style
rules. You can override rules that are inherited from this conguration le by using the instructions at
https://eslint.org/docs/user-guide/conguring/conguration-les#conguration-based-on-glob-patterns.
Chapter 5. Developing with the Universal Access Responsive Web Application
49

An example of overriding a rule is shown.
module.exports = {
extends: ["./node_modules/@spm/eslint-config/index.js"],
overrides: [
{
files: ['src/**/*.js'],
rules: {
// 0 is off / 1 is warn / 2 is error
'react-hooks/exhaustive-deps': 2,
},
},
],
};
EditorCong
EditorCong
helps maintain consistent coding styles for multiple developers who work on the same
project. The .editorconfig EditorCong setup le is in the root directory of the sample application.
The included EditorCong conguration le ensures consistent coding style when it comes to indentation,
spacing, and quotation types. For more information about available Editor Cong plug-ins, see the
EditorCong downloads.
Automation
If you have a CD/CI pipeline, you can include linting as part of the testing phase. It is a good idea to
correct code with linting issues before you merge it into the codebase.
Universal Access UI coding conventions
The universal-access-ui package is responsible for the presentation of the UI in the application.
Coding conventions ensure that the UI code is separated by responsibilities, which gives benets such
as easier maintenance. Features, Components, and Messages are coded to render each page of the
application.
Each page represents a business process function along a specic URL route. It is presented by using
individual IBM Social Program Management Design System components, embedded with localizable
messages, and connected to the Redux store, in the universal-access package, to access and manage
data in the application state (where applicable).
Features
A feature is an intangible concept of individual business functionality that is translated into a view
navigable by a route.
A feature maps a particular business process or functionality, such as showing a user their payments, and
makes it visible to the user in a collection of les that work together and are navigable by a URL route. For
example /payments.
Multiple features can be used to implement a larger or more encompassing business process, such as Life
Events, depending on how many separate views or business process functions are required.
Features are mainly dened through a path, a Routes.js entry, and a directory that references the feature’s
top-level React component.
Paths.js
A simple JavaScript le that exports a JSON object that contains the properties with each navigable
path a user might traverse to in the application.
For a feature, the rst step is to declare the appropriate navigable route here, for example:
const PATHS = {
...
50
IBM Cúram Social Program Management 8.0.2: IBM Universal Access Responsive Web Application 5.2.0

USER_ENROLMENT: '/user_enrolment'
...
}
Routes.js entry
At a high-level, the Routes.js le in universal-access-ui (not the customizable Routes.js le
in the sample application) renders the feature’s top-level React component (which is exported from
the feature’s index.js le) depending on the current URL route.
react-loadable
is used for component-centric code splitting. The feature’s top-level React component
is dynamically imported.
// UserEnrolmentContainer exported by /features/UserEnrolment/index.js
const UserEnrolment = Loadable({
loader: () =>
import(/* webpackChunkName: "SomeFeature" */ "../features/UserEnrolment"),
loading: LoadingPage
});
Declare the route within the render() function, either as a TitledRoute or an
AuthenticatedRoute. Those familiar with React-Router
might recognize some of the props.
...
render() {
return (
...
<TitledRoute
component={UserEnrolment}
exact
path={PATHS.USER_ENROLMENT}
title={localisableRoutesMessageFile.userEnrolmentTitle}
/>
...
)
}
This effectively wires up the feature’s route to the feature’s React components in the internal
Routes.js le.
Adding features, or customizing existing features, for example overriding the FAQs, require some
implementation in your sample-app/src/routes.js le. You must add the new feature or redirect
a route of an existing feature to your custom feature. For information about implementing similar
routing in your custom application, see Developing with routes.
Directory reference
The location of the feature in the le system. Each feature in universal-access-ui is a directory
within /universal-access-ui/src/features. The directory is named after the business process
function. It contains the les responsible for rendering the actual view to the user. A single React
component , typically the Container, is exported by the feature’s index.js to represent the feature at
higher levels, for example Routes.js.
The universal-access-ui package does contain other high-level directories that are responsible
for other functionality, but these are separate or complementary to the base feature concept.
Components
A component is a React component whose responsibility is to manage the data concerns for the piece of
business functionality and render the user’s view of the business functionality by using the data passed
as props, text dened in Messages, and components from the IBM Social Program Management Design
System.
Components are typically the highest-level React component that are exported from a feature (and act as
the starting renderable component) as generally every business process function requires some type of
data to retrieve, manipulate, and display. There are a few exceptions to this rule when the feature is only
an informational or static text view.
Chapter 5. Developing with the Universal Access Responsive Web Application
51

Components render the view of the business process function to the user.
By default, layouts, HTML elements, and more complex UI widgets (like buttons, cards, badges, panels,
sections, headers, etc.) are taken from the IBM Social Program Management Design System. This provides
a standardized theme to the look-and-feel of all our features and benet from common concerns, such
as accessibility and differing screen size layouts. We reference text dened in a separate Messages le to
render any text content.
Messages
Messages les dene a JSON object that contains individual properties for each portion of text that is
used by a component and exported as a parameter to an API of the react-intl library.
Typically, every component renders text as part of it’s view. Each portion of text must be translatable
depending on the user’s language. Universal Access uses the react-intl
library to help manage the text
content for translation.
For each component, there is a similarly created messages le, which contains the text that is wrapped in
the react-intl deneMessages() API. For example, UserEnrolmentComponentMessages.js.
import { defineMessages } from 'react-intl';
export default defineMessages({
userEnrolmentTitle: {
id: 'UserEnrolment_Title',
defaultMessage: 'User Enrolment',
},
userEnrolmentDescription: {
id: 'UserEnrolment_Description',
defaultMessage: "You can enrol in our user's program.",
},
userEnrolmentButtonLabel: {
id: 'UserEnrolment_Button',
defaultMessage: 'Continue',
},
...
});
The sampleApplication feature
The sample feature illustrates the principles, tools, and technologies for developing features in the
application. It implements a simple Apply for Benets workflow that complies with the coding
conventions.
The IBM Social Program Management Web Development Accelerator tool signicantly speeds up
the development of the Redux modules that connect the application to the REST APIs. The
BaseFormContainer component is used to implement IEG forms. The test framework speeds up the
development of tests with less code. Where possible, replacing React containers with standard and
custom React hooks can reduce complexity and further speeds up development.
Apply for Benets workflow
Landing page
The /sample-application page shows a list of application types, which were obtained by using
an API call. The code for that API call was generated with the Social Program Management Web
Development Accelerator tool. Select an application type to go the Overview page. When you select
the application type, the type is stored in a custom Redux store object that was also congured with
the tool.
Overview page
The /sample-application/overview page describes the benet and provides the option to start
the application. Applying for the benet starts an IEG script with a script ID that is obtained from
an API call. This API call is congured by using the Social Program Management Web Development
Accelerator.
52
IBM Cúram Social Program Management 8.0.2: IBM Universal Access Responsive Web Application 5.2.0

The Apply for Benets form
The form is rendered from the IEG script by using the BaseFormContainer component. Enter any
needed values to complete the form. When the form is complete, the conrmation page opens.
Conrmation page
The /sample-application/confirmation page summarizes the information that you entered.
Looking at the SampleModule module
To review the Redux module for the sample feature in Social Program Management Web Development
Accelerator, start the tool by running npm run wda. From the home page, select View Modules and then
Edit on SampleModule module. On the APIs tab, you can see the two APIs for the Apply for Benets
workflow.
• The v1/ua/online_categories API returns a list of online categories where each online category
includes details of applications that a user can apply for. This API is used on the landing page.
• The v1/ua/application_form API is used to start a new application form for the logged in user. The
selectedApplicationType value is dened when you click an application type on the landing page
and is then used on subsequent pages.
On the Store tab, you can see the selector and action for the selectedApplicationType.
Overview of the sample application code
SampleApplicationComponent.js
Displays a list of benet application types. This component shows you how to do the following tasks:
• To generate a temporary user if the current user is not logged-in by using the
useGeneratedUserIfNotLoggedIn React hook.
• To retrieve information from the API and Redux store state by using the
SampleModuleHooks.useFetchOnlineCategories hook.
• To verify whether the Rest API is still fetching information by using the
SampleModuleHooks.useFetchOnlineCategories hook.
• To wrap the complete component with a React Higher Order Component (HOC). In this case, the
withErrorBoundary error boundary HOC.
SampleApplicationConfirmation.js
A conrmation page with the identier of the application submitted.
SampleApplicationFormComponent.js
This component handles the application IEG scripts. General rendering and handling for IEG is
delegated to the BaseFormContainer component.
SampleApplicationOverviewComponent.js
This component gives an end-to-end view of the application process to the user, along with a
summary of the application type and program types that they are applying for. This component shows
how to dispatch an action and create an application form by calling the useCallback hook that is
associated with a button onClick handler.
Related concepts
Generating custom hooks
To abstract the complexity of working with Redux, the IBM Social Program Management Web
Development Accelerator automatically generates React Hooks to be imported directly into React
Chapter 5. Developing with the Universal Access Responsive Web Application
53

components. You don't need to know about Redux to use these hooks for state management in the
application.
Manage state with React Hooks
React Hooks enable you to use state, execute effects, and other React features without writing a class.
You can use hooks to subscribe to the Redux store and dispatch actions, without having to wrap your
components in connect().
For more information about React Hooks, see Introducing Hooks in the React documentationIntroducing
Hooks in the React documentation at https://reactjs.org/docs/hooks-intro.html.
If you use containers, you need to:
• Use a React Class Component.
• Implement mapDispatchToProps to have access to the dispatch object to call actions.
• Implement mapStateToProps to have access to the state object to call selectors.
• Use the connect higher-order component when you export the component to wire it with Redux.
For example:
class SampleContainer extends Component {
componentDidMount() {
//Initializations
//Calling Action
this.props.sampleAction();
}
...
render() {
//Calling selector
const selectorValue = this.props.sampleSelector();
return <>Component body</>;
}
...
}
// We need to implement this function to have access to the `dispatch` object
const mapDispatchToprops = dispatch => ({
// Call actions using the dispatch object
sampleAction: () => SampleModuleActions.actionName(dispatch);
})
// We need to implement this function to have access to the `state` object
const mapStateToProps = state => ({
// Call selectors using the state object
sampleSelector : () => SampleModuleSelectors.selectorName(state);
})
// To do the wiring with redux, we need to use the `connect` HOC passing the two functions:
`mapStateToProps` and `mapDispatchToProps`
export connect(mapStateToProps, mapDispatchToProps)(SampleContainer);
To do the same with hooks:
• You don't use class components.
• You don't need to use connect, mapStateToProps or mapDispatchToProps.
• Use useDispatch to get the dispatch objects and call the actions.
• Use useSelector to get the state object and call the selectors.
• Use useEffect to simulate the life cycle events, for example componentDidMount
54
IBM Cúram Social Program Management 8.0.2: IBM Universal Access Responsive Web Application 5.2.0

For example:
const SampleComponent = props => {
//Get the dispatch object to call actions
const dispatch = useDispatch();
// Initializations - Calls on initial render (like componentDidMount) and only if dispatch
function ever changes
useEffect(() => {
//Calling action
SampleActions.actionName(dispatch);
} , [dispatch])
//To call the selectors you do:
const selectorValue = useSelector(state => SampleSelectors.selectorName(state));
return (<>Component body</>);
}
In addition to the reduced code, you can create custom hooks to further reduce the amount of code.
Custom hooks
The following custom login hooks are provided.
• useGeneratedUserIfNotLoggedIn: On mounting a component, checks whether the user is logged
in. If not, calls REST APIs to create a temporary user and automatically authenticate the user. This is
useful for anonymous IEG forms.
• usePublicCitizenIfNotLoggedIn: On mounting a component, checks whether the user is logged
in. If not, automatically authenticates the user as a publicCitizen. For example, this is useful for
landing pages that need to call REST APIs to populate lists.
If you don't want to log out the existing generated user, you can set the keepExistingGeneratedUser
argument for these login hooks to true. By default, it is set to false.
It is not possible to implement these two custom functions without hooks, as a utility JavaScript le for
example, because they need to modify the React component state.
Redux in Universal Access
Redux is used as a client-side store to store data that is retrieved by IBM Cúram Social Program
Management APIs and data that is used to present a consistent user experience.
What is Redux?
Redux is a client-side store that provides a mechanism for holding data in the browser.
• The store is typically used to manage state in the client application. State can include the following
types of data:
– System data that is returned from an API request.
– User input data that is collected before it is posted to APIs.
– Application data that is not sent from or to the server, but is created and maintained to control how
the application works. For example, transient user selections like hiding or showing a side pane.
• Redux uses a unidirectional architecture, which simplies the process of managing state.
• Redux can be used as a caching mechanism to avoid unnecessary network round-trips, although
consider this usage carefully to ensure the data that is presented is always current.
• Redux proves to be benecial as your application grows and becomes more complex. By centralizing
state management and offering tools that give a holistic view of the application state, development can
scale more easily.
Chapter 5. Developing with the Universal Access Responsive Web Application
55

Note: This topic assumes that you are familiar with Redux and using Redux with React components. If you
are not familiar with these technologies and how they work together, you should complete tutorials from
the ofcial sources for these technologies.
How is Redux used in Universal Access?
IBM Cúram Universal Access uses Redux to store the data that is retrieved by the IBM Cúram Social
Program Management APIs.
Each GET API used by Universal Access has an associated ‘store slice’ where the response of the API
is stored. React components can monitor the store for updates relevant to them and automatically
update as data changes. The store is also used for collecting user input, such as user information that
is requested while users sign up. This data can then be retrieved from the store and posted to the IBM
Cúram Social Program Management server.
Other parts of the store are not tied to IBM Cúram Social Program Management APIs, and track data that
is used to present a consistent user experience.
Creating a Redux store
By default, the Universal Access starter pack is congured to use a Redux store. This conguration is
needed to allow it to use the universal-access and universal-access-ui packages. The store
conguration is initiated from the src/redux/ReduxInit.js le in the starter pack.
...
import configureStore from './store';
...
// ===================================
// 1. Create the store and initialize the universal-access module.
// ==================================
// Create a Redux store
// This is optional, if you don't want to create your own Redux store you can remove this,
const appStore = configureStore();
// Configure the UA package
// 1. If you are using your own store, you must share it with UA
UAReduxStore.configureStore(appStore);
...
For more information on Redux, see https://redux.js.org/.
Conguring the store
Congure the store in the src/redux/store.js le, which exports the configureStore function that
can be called to create a new Redux store. The congure store function can be modied to:
• Add Redux 'middleware'.
• Provide a custom set of reducers.
Note: To work with the universal-access packages, the store must use the reducers that are
exported from the universal-access package.
Clearing Redux store data
The Redux store is a JavaScript object that is stored in the global object for the browser window. The
content of the store is visible through inspection, either programmatically or by browser plug-in tools,
such as the developer tools. It is critical that the store is cleared for the current user when they log out
to ensure that no sensitive user data is left on the device for malicious actors. The log-out feature that is
provided by the starter app triggers a Redux action that clears the store.
56
IBM Cúram Social Program Management 8.0.2: IBM Universal Access Responsive Web Application 5.2.0

Adding reducers
If you decide to use Redux with your custom React components, you must create custom
reducers and add them to the store. All Universal Access reducers are prexed with UA, for
example UAPaymentsReducer. The intelligent-evidence-gathering package also exposes
IEGReduxReducers reducers, prexed with IEG. When adding custom reducers, you can combine your
custom reducers with existing reducers. Do not use the UA or IEG prexes in custom reducers to avoid
overriding existing reducers. Overriding reducers is not supported, see “Developing compliantly” on page
48.
The src/redux/rootReducer.js le denes the set of reducers for the store, and combines them into
a single root reducer that can be passed to the configureStore function in the src/redux/store.js
le.
For convenience, the le denes an AppReducers object where you can add custom reducers. The
custom reducers that are dened in the AppReducers object are combined with the UAReducers
imported from the universal-access package, and the superset of reducers is returned.
The following code excerpt shows the rootReducer function that returns the combination of Universal
Access reducers and custom reducers.
const AppReducers = {
// Add custom reducers here...
// customReducer: (state, action) => state,
};
/**
* Combines the App reducers with those provided by the universal-access package
*/
const appReducer = combineReducers({
...AppReducers,
...UAReduxReducers,
});
/**
* Returns the rootReducer for the Redux store.
* @param {*} state
* @param {*} action
*/
const rootReducer = (state, action = { type: 'unknown' }) => {
...
return appReducer(state, action);
};
Universal Access Redux modules
Modules in the Universal Access Responsive Web Application communicate between the application and
the IBM Cúram Social Program Management REST APIs and manage data for the API in the Redux store.
This design allows the React components to focus on presentation and reduces the complexity of the
code in the presentation layer. Modules manage the communication between the client application and
the IBM Cúram Social Program Management REST APIs, including authentication, locale management,
asynchronous communication, error handling, Redux store management and more.
Modules typically follow the re-ducks pattern for scaling with Redux
Modules and APIs
Modules consist of collection of artifacts that work together to communicate withIBM Cúram Social
Program Management REST APIs and manage the storage and retrieval of the response in the application
state. For example, the Payments module is responsible for communicating with the /v1/ua/payments
API. For more information about IBM Cúram Social Program Management APIs, see Connecting to a
Cúram REST API.
Chapter 5. Developing with the Universal Access Responsive Web Application
57

Models
The models.js le is your data representation of the response from the API. It must map the JSON
response properties to an object that can be referenced within your web application.
class UserProfile {
constructor(json = null) {
if (json) {
this.personFirstName = json.personFirstName;
this.personMiddleName = json.personMiddleName;
this.personSurname = json.personSurname;
this.personDOB = json.personDOB
this.userName = json.userName;
this.userType = json.userType;
...
}
}
}
export default UserProfile;
Utils
The utils.js le is responsible for the actual communication to the required API. On successful
contact with the API, it constructs the model with the response. For simple GET calls, you can use
RESTService.get to handle the API call. For more information, see the RESTService utility.
import { RESTService } from "@spm/core";
import UserProfile from "./models";
const fetchUserProfileUtil = callback => {
const url = `${process.env.REACT_APP_REST_URL}/user_profile`;
RESTService.get(url, (success, response) => {
const modelledResponse = new UserProfile(response);
callback(success, modelledResponse);
});
};
export { fetchUserProfileUtil };
ActionTypes and Actions
Module actions are used to modify the Redux store, like inserting, modifying, or deleting data from the
store. For example, the PaymentsActions action modies the payments slice of the store.
Some actions include calls to APIs. For example, PaymentsActions.getData action calls the
v1/ua/payments API and dispatches the result to the payments slice of the store, or sets an error if
the API call fails.
The actionTypes.js le represents the type of action that is being performed. At its core, they are
simple string types. For more information, see the Redux Glossary
.
const FETCH_USER_PROFILE = "UA-CUSTOM/USER_PROFILE/FETCH_USER_PROFILE";
export { FETCH_USER_PROFILE };
The actions.js le contains the Redux actions, which are objects that represent an intention to
change the application state. They are exported to be accessible to call from a Container component.
The following example is a representation of the action that calls the API and attaches the response to
the dispatch, but you might further improve by adding fallback behavior.
import { FETCH_USER_PROFILE } from "./actionTypes";
import { fetchUserProfileUtil } from "./utils";
export default class actions {
static fetchUserProfile = dispatch => {
fetchUserProfileUtil((success, payload) => {
if (success) {
dispatch({
type: FETCH_USER_PROFILE,
payload: payload
});
58
IBM Cúram Social Program Management 8.0.2: IBM Universal Access Responsive Web Application 5.2.0

}
});
};
}
Reducer
The reducers.js le contains the Redux Reducers. Redux Reducers are just functions that take the
existing state and current actions and calculate a new state, thus updating the application state.
The following example represents a data reducer that updates the state based on the API result. You
can implement more complex reducers based on the action to represent API errors or failures or if the
API is awaiting a response, like an isFetchingUserProfile reducer.
Reducers aren’t called from Container components.
import { combineReducers } from "redux";
import { FETCH_USER_PROFILE } from "./actionTypes";
const fetchUserProfileReducer = (state = {}, action) => {
if (action.type === FETCH_USER_PROFILE) {
return { ...state, payload: action.payload };
} else {
return state;
}
};
const reducers = combineReducers({
fetchUserProfile: fetchUserProfileReducer
// room for more reducers!
});
export default { reducers };
Selectors
Module selectors are used to query the Redux store. They provide the response to predened store
queries. For example, the PaymentsSelector.selectData selector returns the /payments/data
slice from the store, and the PaymentsSelector.selectError selector returns the value of the /
payments/error slice of the store.
The selectors.js le is responsible for retrieving the data from the application state for use in
the Container component (and likely passed as props to the Presentational component). It selects
information from the state by using the state’s ‘slice’ identier.
export default class selectors {
static moduleIdentifier = "UACustomUserProfile";
static fetchUserProfile = state =>
state[selectors.moduleIdentifier].fetchUserProfile.payload;
}
Index
You must export the parts of a module that must be accessible. Instead of creating an index.js
per module, create one in the module directory that exports the Actions, Model, and Selectors of
each custom module. These classes or functions are the only ones that need to be accessed from the
container components.
// Modules
export { default as UserProfileActions } from "./UserProfile/actions";
export { default as UserProfileSelectors } from "./UserProfile/selectors";
export { default as UserProfileModels } from "./UserProfile/models";
Blackbox
Modules are blackbox so are not open to customization or extension. The modules expose actions and
selectors to interact with the module. The actions and selectors are APIs that are documented in the
<your-project-root>/node_modules/@spm/universal-access/docs/index.html le.
Chapter 5. Developing with the Universal Access Responsive Web Application
59

Reusing Universal Access modules in your custom components
You can use the actions and selectors from the universal-access package to connect your custom
components to existing IBM Cúram Social Program Management APIs and the Redux store. You can
use the react-redux module to connect your components. Examples of this technique can be found in
the universal-access-ui features.
For example, the following code is from the PaymentsContainer le in the Payments feature. The code
shows how the actions and selectors from the Payments module are connected to the properties of the
Payments component.
This pattern is documented extensively in the ofcial Redux documentation.
import { connect } from 'react-redux';
import React, { Component } from 'react';
...
/**
* Retrieves data from the Redux store.
*
* @param state the redux store state
* @memberof PaymentsContainer
*/
const mapStateToProps = state => ({
payments: PaymentsSelectors.selectData(state),
isFetchingPayments: PaymentsSelectors.isProcessing(state),
paymentsError: PaymentsSelectors.selectError(state),
});
/**
* Retrieve data from related rest APIs and updates the Redux store.
*
* @export
* @param {*} dispatch the dispatch function
* @returns {Object} the mappings.
* @memberof PaymentsContainer
*/
export const mapDispatchToProps = dispatch => ({
loadPayments: () => PaymentsActions.getData(dispatch),
resetError: () => PaymentsActions.resetError(dispatch),
});
/**
* PaymentsContainer initiates the rendering the payments list.
* This component holds the user's payment details list.
* @export
* @namespace
* @memberof PaymentsContainer
*/
export default connect(
mapStateToProps,
mapDispatchToProps
)(PaymentsContainer);
Related information
Connecting to a Cúram REST API
Social Program Management Web Development Accelerator
The IBM Social Program Management Web Development Accelerator is a tool that automatically
generates code for application state, such as custom hooks and Redux modules. Select and congure
Social Program Management REST APIs and automatically generate all of the hook or module code.
Click here for a video presentation that gives a deep dive for the Social Program Management Web
Development Accelerator.
How it works
1. Add a module and provide a module name and description.
2. Click Add API and select and congure the Social Program Management REST APIs that are required
for the module.
60
IBM Cúram Social Program Management 8.0.2: IBM Universal Access Responsive Web Application 5.2.0

3. Select the Store the API response in Redux? checkbox if you want to store the API response in the
Redux store. If you select this option, hooks cache the responses of APIs.
4. Save the module. Your conguration is saved as metadata in a JSON le, which is the only code that
you need to source control.
5. Generate the code. The module and hooks code is generated from the metadata and placed into a
specied directory in the project.
6. Review the generated code in the Code preview tab. The tab contain the following sub-tabs, Hooks,
Actions, ActionTypes, Utils, Models, Reducers, and Selectors.
7. Import the module or hook into your React components.
Note: You don't need to source control the generated code. The code is generated each time that you click
Generate in the tool, or when you run npm install, npm run build or npm run wda-generate.
Generating custom hooks
To abstract the complexity of working with Redux, the IBM Social Program Management Web
Development Accelerator automatically generates React Hooks to be imported directly into React
components. You don't need to know about Redux to use these hooks for state management in the
application.
The generated hooks are responsible for the integration with the Redux modules, and handle all the
caching that is needed to avoid unnecessary HTTP calls to REST APIs.
React Hooks are generated for each API and store objects that are added to the modules by using the IBM
Social Program Management Web Development Accelerator. The hooks provide all data and functions that
are needed by the React components. There is no need to interact directly with the Redux les, that is,
Actions or Selectors.
For each API, a hook is generated with the following structure:
GET APIs:
const { data, isFetching, error, reFetchData, resetData } = useActionName([params], deps
= []);
For DELETE, POST, PUT APIs:
const { actionName, data, isFetching, error } = useActionName();
Hooks are also generated for custom store objects that are dened in the Store tab of the IBM Social
Program Management Web Development Accelerator:
const { object, setObject } = useSetObject();
For more information about how to interact with the React Hooks, see the Sample Application Feature
at: /src/features/sampleApplication
Related concepts
The sampleApplication feature
Chapter 5. Developing with the Universal Access Responsive Web Application
61

The sample feature illustrates the principles, tools, and technologies for developing features in the
application. It implements a simple Apply for Benets workflow that complies with the coding
conventions.
Generating Universal Access Redux modules
In the IBM Social Program Management Web Development Accelerator, you can create a module, select
and congure your REST APIs, and generate all of the code that is needed to handle the API requests and
manage your application state with Redux.
Before you begin
Check that the Social Program Management Web Development Accelerator environment variables are set
correctly, see “React environment variable reference” on page 127
.
Procedure
1. In the root directory of the universal-access-starter-app, run the command:
npm run wda
The Social Program Management Web Development Accelerator opens locally at http://
localhost:3000/.
2. On the home page, click View modules.
3. Click Add module or click an existing module to edit the module.
4. To add APIs, select the APIs tab and click Add API.
5. From the list of available APIs that is dened by the Swagger specication in the WDA_SPM_SWAGGER
environment variable, select the APIs that you need.
The APIs are added to the model metadata JSON le that is specied in the WDA_MODULES_CONFIG
environmental variable.
6. You can customize the default Action functions, Selectors, and Reducers for an API by changing their
names, or by specifying whether the API response is stored in Redux.
a) By default, function names are dened by a convention based on the API URI and verb. Click a
function name to rename the function.
b) By default, each REST API response is cached in the Redux store. If you don't want to store the API
response, clear the Store the API response in Redux? check box. The corresponding functions are
removed from the model.
The APIs are dened in the model.
7. To create a custom store object to cache JavaScript objects, select the Store tab, click Add Store,
enter a name for the store object, and click Conrm.
8. You can preview the code to be generated from the modules metadata by selecting the Code Preview
tab.
9. You can generate the code as follows:
a) From the Modules page, click Generate
b) By using npm, run the command:
npm run wda-generate
The code is also generated each time that the project is installed or built by running npm run
start or npm run build.
The modules and the generated code are written directly to the directory that is dened in the
WDA_MODULES_OUTPUT environment variable.
62
IBM Cúram Social Program Management 8.0.2: IBM Universal Access Responsive Web Application 5.2.0

Error handling with a React higher-order component (HOC)
You can use the withErrorBoundary function as a higher-order component (HOC) to handle API
errors on features. You can then focus on implementing components and delegate the error handling to
the function. Additionally, this approach reduces the amount of code that is needed to implement the
component and its tests.
The withErrorBoundary function is provided in the @spm/core-ui package and provides the
following functions:
• Retrieves the list of all errors from the Redux Store by calling the
ReduxUtils.generateGlobalErrorSelector selector, or you can provide a single selector that
is generated by the Social Program Management Web Development Accelerator.
• For any errors that are stored on the Redux store, the withErrorBoundary function throws a
JavaScript exception that is caught by the nearest ErrorBoundary.
• Wraps a component in an ErrorBoundary.
• Clears the errors from the Redux Store when the component is unmounted.
Table 2. The withErrorBoundary parameters
Parameter Mandatory Details
wrappedComponent Yes The component or container to
wrap.
errorSelector No The selector to get the errors. If
you don't provide an error
selector,
ReduxUtils.generateGlobal
ErrorSelector is used.
resetErrorAction No The action to reset the errors.
Examples
Exporting a component with the withErrorBoundary function.
Default values
import withErrorBoundary from '@spm/core-ui';
class Container extends Component {
...
...
...
}
export default withErrorBoundary(Container)
);
With parameters
import withErrorBoundary from '@spm/core-ui';
import { SampleModuleSelectors, SampleModuleActions} from '../../modules/generated';
class Container extends Component {
...
...
...
}
export default withErrorBoundary(Container,SampleModuleSelectors.fetchCustomAPIError ,
SampleModuleActions.resetFetchCustomAPIError)
);
Chapter 5. Developing with the Universal Access Responsive Web Application
63

This example handles errors that are related only to the specied API error selector, rather than
listening for errors in the data store.
Connectivity handling
By default, a connectivity handler prevents data loss in IEG forms and provides offline detection for the
rest of the application. You see a warning message when you are disconnected, giving you a chance to
check your internet connectivity. You see a success message when you recover connectivity. You can
choose to prevent data loss in pages outside IEG forms by implementing the connectivity handler for
other pages in the application.
If internet connectivity is lost or the service becomes unavailable when you are in the application, a
warning message is displayed.
You're disconnected. Check your internet connection or wait while we try to reconnect.
By default, connectivity is tested by pinging the server but you can customize this behavior with a custom
function. For example, to change the server URL or to ping a static le.
While connectivity is not strictly required for every page in the application, the connectivity polling ping is
used to detect if users are online. You can enable or disable connectivity handling for all pages, but not for
specic pages. The ping continues after session expiry. If the server can respond with an error then there
is still connectivity. If there is no response from the server, then the application is set offline.
Preventing data loss in IEG
To prevent you from losing information that you enter in IEG forms, you are now prevented from leaving
IEG pages with unsubmitted changes when you are disconnected. An error message is displayed and you
remain on the page where you entered the information. You must check your internet and get online or
wait for the service to become available before you can continue. If internet connectivity or the service
remains unavailable, the error message persists.
You're still disconnected. Check your internet connection or try again later.
When you recover connectivity or the service becomes available, a success message is displayed and you
can save your changes.
You are now connected.
Implementing a connectivity handler
You can implement loss-of-connectivity handling to improve the resilience of the application. Users are
notied when they lose or recover internet connectivity or access to the service. In addition, you can
prevent user actions when they are offline to avoid errors or data loss. By default, user actions are
prevented in IEG forms to prevent information loss if users go offline when in IEG forms.
Before you begin
The implementation consists of two components.
The ConnectivityHandler component
Use the ConnectivityHandler React component in packages/core-ui/src/Connectivity/
ConnectivityHandler to detect offline and online events and to notify the user. The
ConnectivityHandler component wraps the application with the logic to call the appropriate
messages.
The ConnectivityHandler component provides the following functions:
• Registers browser offline and online events and runs the corresponding callback functions. Internet
connectivity is checked by making a periodic request to the server, by default every 5 seconds.
– If the server request fails, it triggers the offline event callback. A dismissable warning message is
displayed:
64
IBM Cúram Social Program Management 8.0.2: IBM Universal Access Responsive Web Application 5.2.0

You are offline, check your internet connection and try again.
– After connection is lost, a successful server request triggers the online event callback. A
dismissable success message that expires after 7 seconds is displayed:
You are back online.
• Reads the preventActionOnOffline Redux global state variable that is managed by the
Connectivity Redux module. When this state is true and a user tries to interact with a page
when they are offline, an error message is displayed:
You are still offline, check your internet connection and try again.
The Connectivity Redux module
Use the Connectivity Redux module in packages/core/src/modules/Connectivity to
manage the connectivity global state of the application, and to provide an option to prevent unwanted
actions.
The Connectivity module has two selectors and two actions:
• The setOnline action sets the connectivity state of the application. Set to true for online and
false for offline.
• The getOnline selector returns the connectivity state of the application.
• The setPreventActionOnOffline action sets the prevent action state of the application. Set
true to prevent user actions while offline and false to allow user actions.
• The getPreventActionOnOffline selector returns the prevent action state of the application.
Procedure
1. Wrap your application in the ConnectivityHandler component.
Place theConnectivityHandler component between the ErrorBoundary and SSOVerifier
components in the application tree as follows:
```
<ReduxInit>
<IntlInit>
<Router basename={process.env.PUBLIC_URL}>
<ScrollToTop>
<ErrorBoundary
footer={<ApplicationFooter />}
header={<ApplicationHeaderComponent hasErrorBeenCaught />}
isHeaderBoundary
>
<ConnectivityHandler>
<SSOVerifier
placeholder={
<ApplicationHeaderComponent
isALinkedUser={() => false}
isAppealsEnabled={false}
isEmpty
/>
}
>
{/* Rest of the application tree */}
</SSOVerifier>
</ConnectivityHandler>
</ErrorBoundary>
</ScrollToTop>
</Router>
</IntlInit>
</ReduxInit>
```
The application now noties users of online and offline events.
2. Optional: Congure connectivity polling, which pings the server at intervals to check connectivity. You
can change the ping behavior and the interval for connectivity polling.
a) You can create a custom function to override the default polling behavior. For example, to ping
a static le, to use a different URL, or even to generate a URL for every instance that includes a
Chapter 5. Developing with the Universal Access Responsive Web Application
65

timestamp. To implement this, import the registerConnectivityPollingFunction function
in your App.js le, which receives your custom function as a parameter.
import { registerConnectivityPollingFunction } from '@spm/core-ui’;
Refer to the following three examples for how to use this function:
• Example 1: Use the same application server but ping a different URL
import { registerConnectivityPollingFunction } from '@spm/core-ui';
import { RESTService } from '@spm/core';
const customPollingFunction = pingCallback => {
const url = `${process.env.REACT_APP_REST_URL}/v1/ua/<NEW_API_ROUTE>`;
RESTService.get(url, pingCallback);
};
registerConnectivityPollingFunction(customPollingFunction)
In the URL constant, replace <NEW_API_ROUTE> with the new route. The polling function is
called with the pingCallback function, which is responsible for notifying users about online
or offline events and must be used in this function as part of the RESTService function
parameters.
Make the REST request by using the RESTService.get(url,pingCallback) function. This
function receives the new URL and the pingCallback for online or offline notications as
parameters.
• Example 2: Use a static le such as the fav icon
import { registerConnectivityPollingFunction } from '@spm/core-ui';
import { RESTService } from '@spm/core';
const customPollingFunction = pingCallback => {
const url = ${window.location.origin}/fav.ico?_="${new Date().getTime()}";
RESTService.getWithoutCredentials(url, pingCallback);
};
registerConnectivityPollingFunction(customPollingFunction)
Set the URL constant with the corresponding URL origin to access the public folder resources
where fav.ico is typically located.
You don’t need to pass the application credentials for this request so you can use
RESTService.getWithoutCredentials(url, pingCallback). This function receives the
generated URL and the pingCallback for online or offline notications as parameters.
• Example 3: Use a different server
import { registerConnectivityPollingFunction } from '@spm/core-ui';
import { RESTService } from '@spm/core';
const customPollingFunction = pingCallback => {
const url = `${new_server_origin}/${api_route}`;
RESTService.getWithoutCredentials(url, pingCallback);
};
registerConnectivityPollingFunction(customPollingFunction)
In the URL constant, replace <NEW_API_ROUTE> with the new route. The polling function is
called with the pingCallback function, which is responsible for notifying users about online
or offline events and must be used in this function as part of the RESTService function
parameters.
On your server, you must address any CORS issues and include a status parameter in the API
response, for example status:200. The pingCallback function reads this value and sets the
application to offline mode only when the value doesn’t exist.
b) By default, the system_configuration API is pinged at a sensible interval of 5 seconds. If
your testing indicates that an interval of 5 seconds is not suitable for your application, you can
change the interval by setting the REACT_APP_CONNECTIVITY_INTERVAL environment variable,
for example:
66
IBM Cúram Social Program Management 8.0.2: IBM Universal Access Responsive Web Application 5.2.0

REACT_APP_CONNECTIVITY_INTERVAL=7000
For more information about environment variables, see “React environment variable reference” on
page 127.
3. Optional: You can prevent user actions when they are offline with the Connectivity Redux module.
You can display a danger message to tell users that they are offline and that they need to check their
internet connection.
a) Use the getOnline selector to read the connectivity global state of the application.
b) Use the setPreventActionOnOffline action to notify ConnectivityHandler to display the
prevent action message.
For example:
preventOffline = callback => {
const { isOnline, preventActionOnOffline } = this.props;
return isOnline === false ? preventActionOnOffline() : callback;
};
The example function uses { connect } from 'react-redux’. Its implementation helps you
to inject the selectors and actions from the connectivity global state of the application as props.
isOnline is the value that is returned by getOnline, and preventActionOnOffline() calls
getPreventActionOnOffline(true).
The preventOffline function receives the function to run or prevent when online or offline as a
callback.
The online status is received from props and the preventActionOnOffline function displays the
message.
When isOnline is false, call the function to display the message, otherwise call the callback
function.
Developing with routes
Routes dene the valid endpoints for navigation in your application. Your application consists of a network
of routes that can be traversed by your users to access the application's pages.
IBM Cúram Universal Access uses the react-router and react-router-dom packages to manage navigation.
React Router denes and works with routes. For more information, see the React Router documentation
at https://reacttraining.com/react-router/web/guides/philosophy.
The Routes component
The module for Universal Access exports the Routes component, which exposes the routes dened by the
module. The dened routes are the suite of pages that are prebuilt and available for reuse in Universal
Access.
Routes component
You can import and reuse the Routes component in your application. The code example shows how
import and reuse the Routes component in a sample application.
import React from 'react';
import { injectIntl, intlShape } from 'react-intl';
import { BrowserRouter } from 'react-router-dom';
import '@spm/web-design-system/js/govhhs-design-system-core.min';
import { Routes } from '@spm/universal-access';
const App = (props) => {
return (
{/** You must define your routes controller (Hash vs Browser) */}
<BrowserRouter>
<div className="app">
<div className="my-header-navigation">
Chapter 5. Developing with the Universal Access Responsive Web Application
67

<a href="/">Home</a> | <a href="/faq">Faq</a>
</div>
<Routes />
</div>
</BrowserRouter>
);
};
App.propTypes = {
intl: intlShape.isRequired,
};
export default injectIntl(App);
Adding routes
You can add a route by including a new route anywhere inside your Router component.
The following code example adds a route to MyNewPageComponent into the router component:
import { BrowserRouter, Route } from 'react-router-dom';
…
<BrowserRouter>
<div className="app">
<div className="my-header-navigation">
<a href="/">Home</a> | <a href="/my-new-page">New Page</a>
</div>
<UARoutes />
<Route path="/my-new-page" component={MyNewPageComponent} />
</div>
</BrowserRouter>
Replacing routes
You can replace existing paths from the Universal Access module’s Routes component with your preferred
component.
Wrap your routes in a <Switch> component
You can replace existing paths from the Routes component with your preferred component. To achieve
this, you must rst wrap your routes in a <Switch> component from react-router. This action ensures that
the rst match of the requested path that is found in your application is used to resolve the path. For more
information on Switch, see https://reacttraining.com/react-router/web/guides/philosophy.
Add a route with the same path
When you have wrapped in Switch, you add a route with the same path as the page you are overriding.
Note: This route must come before the <Routes/> component to ensure it is matched rst.
The following code example shows a replacement route to MyHomePageComponent enclosed in a
<Switch>:
import { BrowserRouter, Route, Switch } from 'react-router-dom';
…
<BrowserRouter>
<div className="app">
<div className="my-header-navigation">
<a href="/">Home</a> | <a href="/my-new-page">New Page</a>
</div>
<Switch>
<Route path="/" component={MyHomePageComponent} />
<Routes />
<Route path="/my-new-page" component={MyNewPageComponent} />
</Switch>
</div>
</BrowserRouter>
68
IBM Cúram Social Program Management 8.0.2: IBM Universal Access Responsive Web Application 5.2.0

Redirecting routes
You can redirect existing paths by using the react-router Redirect component.
Redirecting a route
The following code example imports the Redirect component and redirects the path '/bring-me-
home' to "/".
import { BrowserRouter, Route, Switch, Redirect } from 'react-router-dom';
…
<BrowserRouter>
<div className="app">
<div className="my-header-navigation">
<a href="/">Home</a> | <a href="/my-new-page">New Page</a>
</div>
<Switch>
<Route path="/" component={MyHomePageComponent} />
<Redirect from="/bring-me-home" to="/" />
<Routes />
<Route path="/my-new-page" component={MyNewPageComponent} />
</Switch>
</div>
</BrowserRouter>
Removing routes
You can remove unwanted routes from IBM Cúram Universal Access.
You might want to reuse some but not all of the Universal Access <Routes/>. For those routes that you
want to remove instead of replacing, use the react-router <Redirect> component to send users to a ‘404’
style page, or some other valid end point.
You must declare the redirect before the <Routes/> component. You must also wrap the redirect in a
<Switch> component. The following code example removes the route to "FAQ" by redirecting to a 404
page:
<BrowserRouter>
<div className="app">
<div className="my-header-navigation">
<a href="/">Home</a> | <a href="/faq">FAQ</a>
</div>
<Switch>
<Redirect path="/faq" to="/404page" />
<Routes />
</Switch>
</div>
</BrowserRouter>
Advanced routing
IBM Cúram Universal Access is now code-split based on routes.
Code splitting
Code-split based on routes is achieved using react-loadable and the @spm/universal-access-ui
package that is in the default LoadingPage component. For more information, see https://create-react-
app.dev/docs/code-splitting and https://github.com/jamiebuilds/react-loadable. The following example
shows how to achieve the same split with the routes that you added:
import { LoadingPage } from ‘@spm/universal-access-ui’;
…
const MyNewPageComponent = Loadable({
loader: () => import(/* webpackChunkName: “MyNewPageComponent” */ '../features/
MyNewPageComponent’),
loading: LoadingPage,
});
…
<Route
Chapter 5. Developing with the Universal Access Responsive Web Application
69

component={MyNewPageComponent}
exact
path=‘/my-new-page’
/>
Titled routes
Accessibility rules require that a web page should have a descriptive title. You can implement a
descriptive title using the TitledRoute component of the @spm/universal-access-ui package. To localize
the title, TitledRoute exposes a title prop that accepts a react-intl message () and can be used with or
without code-split routes as shown in the following example:
import { TitledRoute } from ‘@spm/universal-access-ui’;
import { defineMessages } from 'react-intl';
…
const titles = defineMessages({
myNewPage: {
id: 'app.titles.myNewPage’,
defaultMessage: ‘My New Page’,
},
});
…
<TitledRoute
component={MyNewPageComponent}
exact
path=‘/my-new-page’
title={titles.myNewPage}
/>
Authenticated routes
You can protect parts of the application in two ways:
1. On access, handle authentication failures to a REST API and redirect to a login page.
2. Block access to specic routes to avoid any cost in running the REST API.
The following example shows how to block access to specic routes. The @spm/universal-access-ui
package provides an AuthenticatedRoute component that accepts an authUserTypes array prop of the
allowed user types to access this route. AuthenticatedRoute also wraps TitledRoute and therefore offers a
title prop. The following is an example of using AuthenticatedRoute:
import { AuthenticatedRoute } from ‘@spm/universal-access-ui’;
import { Authentication } from '@spm/universal-access';
import { defineMessages } from 'react-intl';
…
const titles = defineMessages({
myNewPage: {
id: 'app.titles.myNewPage’,
defaultMessage: ‘My New Page’,
},
});
…
<AuthenticatedRoute
authUserTypes={[Authentication.USER_TYPES.STANDARD, Authentication.USER_TYPES.LINKED]}
component={MyNewPageComponent}
exact
path=‘/my-new-page’
title={titles.myNewPage}
/>
The example blocks access to the /my-new-page routes for all users who are not of type STANDARD or
LINKED, these users are redirected to the /login route.
70
IBM Cúram Social Program Management 8.0.2: IBM Universal Access Responsive Web Application 5.2.0

Connecting to Universal Access REST APIs
You must connect your web application to IBM Cúram Social Program Management Universal Access
REST APIs. You can use the RESTService utility, and the mock server API service or Social Program
Management APIs to help you to develop and test your REST API connections.
For information about securing your Universal Access REST APIs, see “Securing access to Universal
Access REST APIs” on page 140.
Conguring the Universal Access API end point
Use the REACT_APP_REST_URL environment variable in the .env or .env.development le to
nominate the host for the Social Program Management APIs.
For example, in a development environment where the Universal Access Responsive Web Application is
running on Node.js on a developer's local machine, and Social Program Management is running on port
9080 in Eclipse/Tomcat on the local machine, add the following to the .env.development le in the
React application.
REACT_APP_REST_URL=http://localhost:9080/Rest
And in a "deployed environment", such as IBM HTTP Server hosting the Universal Access Responsive Web
Application and IBM WebSphere Application Server hosting the Social Program Management application
on port 9044 with hostname citizenportal.myorg.com, add the following:
REACT_APP_REST_URL=https://citizenportal.myorg.com:9044/Rest
For more information about environment variables, see “React environment variable reference” on page
127.
The mock server API service
The mock server is a mock API service that is provided to aid rapid development. The mock server serves
APIs that simulate calling real web APIs. When you are developing your application, the mock server
provides a lightweight environment against which the React components can be tested communicating
with the services that provide their data.
Conguring the mock server
Congure the mock server location through the following properties in the .env.development le. You
can change these values to suit your needs.
• REACT_APP_REST_URL=http://localhost:3080
• MOCK_SERVER_PORT=3080
Running the mock server
Run the mock server by using the following command from the root directory of your project:
npm run start:mock-server
However, when you are developing locally, you can use the following command that starts both the mock
server and the client:
npm run start
See the package.json le in your project for the full list of commands.
Chapter 5. Developing with the Universal Access Responsive Web Application
71

Adding mock APIs
The universal-access project includes a number of mock APIs that simulate calling the SPM Universal
Access APIs. These mock APIs support running some basic scenarios in development mode for the
existing set of features.
As you develop your application, you typically create new APIs that you also want to mock. When the
mock server starts, it looks to import the /mock/apis/mockapis le relative to the folder the command
was started from. In this le, the mock-server expects to nd three objects, GET, POST, and DELETE, that
it can query to serve API requests for those HTTP methods.
The format of the mock denition is a relative URL that is assigned a JavaScript object. For example, the
following code assigns the object user to the URL /user, and the object payments.json, which is read
from a le, to the /payments URL.
const user = {
'firstname': 'James',
'surname': 'Smith',
'gender': 'male',
...
}
const mockAPIsGET = {
// ADD YOUR GET MOCKS HERE
// Example of providing mock data in response to an API request in
// the format uri:mockobject
'/user': user,
'/payments': readFile('./payments/payments.json)
};
If you use mocking extensively, it is better to use separate les and folders to structure your mocks.
Using universal-access mock APIs
The mockapis.js le is precongured to import and use mock APIs dened and exported by the
universal-access package. This allows your project to reuse and extend the set of universal-access mock
APIs.
const mockAPIs = require('@spm/universal-access-mocks');
// Extract the existing universal access GET,POST and DELETE mocks for merging.
const UAMockAPIsGET = mockAPIs.GET;
const UAMockAPIsPOST = mockAPIs.POST;
const UAMockAPIsDELETE = mockAPIs.DELETE;
...
//create custom mocks
...
// Merge UA mocks with custom mocks
const GET = Object.assign({}, UAMockAPIsGET, mockAPIsGET);
const POST = Object.assign({}, UAMockAPIsPOST, mockAPIsPOST);
const DELETE = Object.assign({}, UAMockAPIsDELETE, mockAPIsDELETE);
module.exports = { GET, POST, DELETE };
Where the same URL is used by a custom mock that was previously assigned to a universal-access
package mock, the custom mock replaces the universal access version.
72
IBM Cúram Social Program Management 8.0.2: IBM Universal Access Responsive Web Application 5.2.0

The RESTService utility
The @spm/core package provides the RESTService utility, which you can use to connect your
application to a REST API. The RESTService utility provides important functions for securing and
connecting to IBM Cúram Social Program Management REST APIs, such as CSRF protection and SSO
support. You can fetch resources with alternatives such as Fetch API, SuperAgent, or Axis, but you must
consider implementing functionality that is handled by the RESTService utility, like CSRF protection and
SSO support.
The RESTService utility supports the GET, POST, and DELETE HTTP methods through the following
JavaScript methods:
• RESTService.get(url, callback, params)
• RESTService.post(url, data, callback)
• RESTService.del(url, callback)
See the full RESTService class documentation in the doc folder in the @spm/core package.
The RESTService utility hides details of calls, such as passing credentials, language, and errors. The
callback that is passed to the GET, POST, or DELETE methods is started after the API calls return. API calls
are asynchronous, so write your code to expect and handle a delay in receiving a response.
The RESTService utility provides functions during communications for authentication, handling
responses, and user language.
Authentication
Authentication of the user is handled transparently by the RESTService utility. After a user is
authenticated, the REST APIs automatically send the needed 'credentials', that is, the authentication
cookies, with each request. For information about how authentication is handled for REST, see Cúram
REST API security.
If a user's session is invalidated before a new request is made to a REST API, then the '401 unauthorized'
response is returned by the server. The RESTService utility relays the response to the callback function
passed by the caller.
Handling responses
The RESTService utility formats the response from the server to ensure that callbacks receive the
response in a consistent manner.
Each GET, POST, and DELETE method accepts a callback function from the caller. When called by the
RESTService utility, the callback function receives a Boolean value that indicates the success or failure
of the API call and the response. The callback function can then deal with the result. For example, a
failure can be used to trigger your code to throw an error with the response data that can be used to
trigger an error boundary. For more information about the callback function parameters, see the API
documentation for the RESTService utility.
User Language
The 'Accept-Language' HTTP header is automatically set by the RESTService utility based on the user's
selected language, which the user can select with the language picker in the application. This approach
lets the server respond in the correct locale where locale sensitive information is being handled on the
server.
The locale that is passed in the header is set in the transaction that is initiated by that REST request, and
is used for the duration of that transaction. For more on transactions, see Transaction control
.
Cross-Site Request Forgery (CSRF)
The RESTService utility manages REST API CSRF protection for Universal Access that includes:
Chapter 5. Developing with the Universal Access Responsive Web Application
73

• Managing conditions on when to fetch a CSRF token.
• Pausing requests to fetch the CSRF token from the SPM server when needed.
• Storing the CSRF token in the application.
• Appending the CSRF token to the HTTP request header when appropriate.
Handling timeouts
The RESTService utility can manage unresponsive calls to the server. You can set environment variables
in the .env les to set thresholds for timeouts.
• REACT_APP_RESPONSE_TIMEOUT=10 Wait 10 seconds for the server to start sending.
• REACT_APP_RESPONSE_DEADLINE=60 but allow 1 minute for the le to nish loading.
Simulating slow responses
During development, it is important to test that your application continues to operate in an acceptable
way even when network responses are slow. You can simulate a slow network connection by setting a
property in the .env.development le in the root of your project.
For example, set REACT_APP_DELAY_REST_API=2 to delay the response from all GET requests for 2
seconds. The value can be set to any positive integer to adjust the delay.
Related concepts
Universal Access authentication
The universal-access package exports the Authentication module, which can be used to log in
and out of the application and to inspect the details of the current user. The login service is passed
a username and password, and optionally a callback function that is called when the authentication
request is completed.
Related reference
React environment variable reference
A full list of Universal Access React environment variables categorized by function. You can set
environmental variables in .env les in the root directory of your application. If you omit environment
variables, either they are not set or the default values apply.
Adding metadata to le uploads
You can add metadata to les that you upload with the Document Service APIs by using the X-IBM-
Curam-File-MetaData attribute. That metadata can then be used, for example, as search criteria in a
content management system.
When a user wants to upload a le by using the Document Service API, a request is made to the following
API endpoint:
POST /v1/dbs/files
The body of the request is the le that you want to upload in binary format. The Content-Type of the
request is set to application/octet-stream.
// file data JSON object
const fileData = {
caseReference,
loggedInUserName,
loggedInUserId,
relatedPersonId,
relatedPersonName,
filename,
classification,
dateOfUpload: new Date(),
}
// Stringify the file data
const metadata = JSON.stringify(fileData);
74
IBM Cúram Social Program Management 8.0.2: IBM Universal Access Responsive Web Application 5.2.0

// Set headers
const headers = {
'X-IBM-Curam-File-MetaData': encodeURIComponent(metadata),
};
To add metadata that relates to the le being uploaded, the X-IBM-Curam-File-MetaData header is
set to a URI encoded JSON string. The URI encoded JSON string is decoded on the server so it is expected
to be URI encoded before sending the request.
// POST request
RESTService.post(
'/v1/dbs/files',
// File being uploaded
data,
(success, body, header) => {
callback(success, body, header);
},
// Set request body format
'application/octet-stream',
null,
// Headers including metadata string
headers
);
The headers are then included in the POST request to /v1/dbs/files. These headers are not parsed
or used in the default POST /v1/dbs/files API endpoint.
For more information, see encodeURIComponent().
Universal Access REST API reference
The following IBM Cúram Social Program Management REST APIs are relevant to the key business
functions of IBM Universal Access Responsive Web Application.
For the full list of supported Social Program Management APIs, see the Swagger specication, which
is available from a running Social Program Management instance at http://<hostname>:<port>/
Rest/api/definitions/v1.
Appeals
POST /v1/ua/appeals_form
Starts a new IEG execution for an appeal.
POST /v1/ua/appeals_form/exit
Exits the Appeals IEG Form.
GET /v1/ua/appeals
Returns the list of appeals for the logged in user.
GET /v1/ua/appeals/{online_appeal_request_id}/attachment
Returns the attachment document for an appeal request.
Applications
GET /ua/online_categories
Returns a list of Online Categories. Each category includes details of the applications that a user can apply
for.
GET /ua/submitted_applications
Chapter 5. Developing with the Universal Access Responsive Web Application
75

Returns a list of applications that were previously submitted by the logged in user.
POST /ua/submitted_applications/{application_id}/application_programs/{application_program_id}/
withdrawal_request
Creates a withdrawal request for the specied program in a submitted application. The application can
be withdrawn only if it has a status of pending, and if there is not already a pending withdrawal request
for this application. For each program associated with the submitted application, a separate withdrawal
request must be created. Either a withdrawalReason or reasonText value must be supplied, but
not both. See /withdrawal_request_reasons for the list of possible withdrawal reasons that were
congured for the associated application type.
GET /ua/submitted_applications/{application_id}/application_programs/{application_program_id}/
withdrawal_request_reasons
Returns a list of possible withdrawal reasons that a user can choose when they withdraw an application.
GET /ua/application_types
Returns details of the application type denition of the specied draft or submitted intake application.
GET /ua/application_types/{application_type_id}
Returns details of the specied application type.
GET /ua/application_submission_message
Returns details of an application submission message.
GET /ua/application_confirmation_message
Returns details of an application conrmation message. The details are congurable by an administrator,
by updating the details for the associated application type denition.
GET /ua/draft_applications
Returns a list of draft applications that are currently in-progress for the logged in user.
GET /ua/submitted_applications/{application_id}/attachment
Returns the attachment for the specied submitted application.
GET /ua/form_details/{application_form_id}
Gets details of a form instance.
POST /ua/application_form
Starts a new intake application form for the logged in user. Under the hood, a new datastore is created
to store the data provided in the application form, for later use for when the user is ready to submit their
intake application.
DELETE /ua/application_form/{application_form_id}
Cancels the specied intake application form without saving the details, which means the application
form cannot be retrieved or resumed at a later stage.
POST /ua/submission_form
Starts a submission form for the logged in user, which is used in association with the specied intake
application form.
76
IBM Cúram Social Program Management 8.0.2: IBM Universal Access Responsive Web Application 5.2.0
GET /ua/submission_form/{submission_form_id}
Gets details of a submission form instance.
GET /ua/submission_form/{submission_form_id}/page_details
Returns details of questions for a single page of the specied form. If the page query parameter value
is next, or is empty, then questions are returned for the next unanswered page, or for the rst page if
no answers were yet submitted. If the page query parameter value is previous, questions are returned
for the page before the last answered page. In this way, you can navigate through the pages of a form.
However, you cannot jump directly to a specic page.
POST /ua/applications
Creates an intake application based on the data that was previously supplied in the specied intake
application and submission forms.
Document service
POST /v1/dbs/files
Uploads a le and returns the URL for the le.
This API is disabled by default for security purposes, so you must ensure that you have implemented the
appropriate le security and validations for document uploads and enabled the API before you can upload
les to your system for verication, see .Securing and enabling the Files API
GET /v1/dbs/files/{file_id}
Retrieves a specied le.
DELETE /v1/dbs/files/{fileId}
Deletes a specied le. The DELETE method is not currently used by the Universal Access Responsive
Web Application.
Life events
GET /ua/life_event_categories
Gets the list of life event categories and the life event contexts (of type Citizen/Online) that are
contained inside those categories, and the life event contexts that are not associated with any category.
POST /ua/life_events_form
Get the formId given the lifeEventsContextId.
GET /ua/life_events_form/{formId}
Gets the Life Event Context record based on the IEG form.
POST /ua/life_events_form/exit
Submits the Life Event IEG form.
GET /ua/life_events_history
Get the life event history.
GET /ua/life_event_remote_systems/{formId}
Chapter 5. Developing with the Universal Access Responsive Web Application
77

Gets the list of Remote Systems that are associated with the Life Event Context of the specied Life Event
Form.
POST /ua/life_event_remote_systems/{formId}
Sends the Life Event data to the selected Remote Systems.
Messages
GET /ua/messages
Returns a list of messages that are applicable to logged-in users. The list includes account
messages and system messages whose visibility value is either Logged-in users, Public and
logged-in users, or an empty null value.
GET /ua/public_messages
Returns a list of public messages that are applicable to public users. The list includes system messages
whose visibility values are either Public users, or Public and logged-in users.
Notices
POST /v1/ua/communications/{communication_id}/mark_send_by_post
Mark a communication to be sent by mail. An attribute on the return of the API indicates whether a send
by mail request exists for the communication.
GET /v1/ua/communications/
Returns the list of communications for the logged in user.
GET /v1/ua/communications/{communication_id}
Returns a communication.
GET /v1/ua/communications/{communication_id}/attachments/{attachment_id}
Returns the communication attachment details.
Organization
GET /ua/organisation
Returns the details of the organization.
GET /ua/local_offices
Returns a list of local ofces. The list can be ltered either by county or by ZIP/postal code.
Payments
GET /ua/payments
Returns a list of payments for the logged in user. The returned list is ordered by payment date, with the
most recent payment listed rst. The list can be ltered to return a single payment by supplying both
query parameters of payment_id and isPaymentByExternalParty.
78
IBM Cúram Social Program Management 8.0.2: IBM Universal Access Responsive Web Application 5.2.0

GET /ua/payment_messages
Returns details of the user's next payment.
/ua/payments/{payment_id}
Returns payment-specic details by payment ID. For an external payment identication, append the sufx
\“E\” to payment_id.
/ua/payments_summaries
Returns a list of payment summaries for the logged-in user.
/ua/next_payments_summaries
Returns a list of next payment summaries for the logged-in user. Includes an adjustment indicator to
highlight where payments differ from the previous payment.
/ua/payments/simulate_payments
Generates the projected next payments based on current circumstances. Use this API to get detailed
information about next payments. You must supply a list of benet IDs for simulation to be performed for
each benet. Payment simulation is an expensive instruction, so use this API judiciously.
System
GET /ua/system_configurations
Returns a list of system properties. The list can be ltered to return a single system property by supplying
the property ID.
GET /ua/app_image_resource
Returns the requested image resource.
GET /ua/icons/{icon_id}
Returns the requested icon.
User
GET /v1/ua/user
Returns information that is related to the current user, such as user permissions.
GET /ua/profile
Returns details of the logged in user.
GET /ua/profile_image/{image_id}
Returns the requested prole photo. This photo must belong to the logged in user. See /profile for
retrieving the details for the value to use for {image_id}.
POST /ua/user_account
Creates a user account.
POST /ua/email_password_reset
Chapter 5. Developing with the Universal Access Responsive Web Application
79

Sends a reset password email to the email address registered for the user.
POST /ua/secret_question_password_reset
Resets the user's password, with the new password specied. The user's secret question and answer
must be valid, in order for the password to be successfully reset.
POST /ua/password_reset
Resets the user's password, with the new password specied. The specied existing password must be
valid, in order for the password to be successfully reset.
POST /ua/generated_user_accounts
Generates a temporary user account to be used to log in to the Social Program Management system
under the hood, when the citizen user has not logged in or created their own user account. This account
temporarily stores the details of the citizen user, for example any intake applications or benets they
start, and transfers these details to a permanent user account if the user signs up or logs in with their own
account at a later stage.
POST /ua/application_form_ownership
Changes the ownership of the specied intake application form to the currently logged in user. This action
can be completed only if the previous owner of the intake application form is a system-generated user, it
is not permissible to use this API to change the ownership from one citizen account user to another.
GET /ua/user_account_login
Retrieve the users last successful login date time.
GET /ua/case_contacts
Returns a list of contact information for the caseworkers that are related to the logged in user's cases.
Screening
GET /ua/screening_form
List all screening forms for the current user.
POST /ua/screening_form
Starts a new IEG execution based on the Screening Type.
GET /ua/screening_form/{formId}
Gets the Screening Type and Program selection for a specied Screening Form.
POST /ua/screening_form/{formId}
Updates the Program selection for specied Screening Form.
DELETE /ua/screening_form/{formId}
Delete a screening form.
POST /ua/filter_screening_form
Starts a new Filter Screening IEG execution based on the Screening Type.
80
IBM Cúram Social Program Management 8.0.2: IBM Universal Access Responsive Web Application 5.2.0

POST /ua/screening_form/exit
Exits the Screening IEG Form.
GET /ua/screening_form/{formId}/results
Get the Screening Results.
Verications
POST /v1/ua/verifications/link_file
Links an existing le on the system to a specied verication. A link record is created to link the le and
the verication.
GET /v1/ua/verifications
Returns details for all verications for a specied person or case.
Universal Access passes in the ConcernRoleID for the primary participant, which returns verications
for all case participants on all active cases where the person is the primary participant.
GET /v1/ua/verifications/{verificationId}
Returns details for a specied verication.
DELETE /v1/ua/verifications/{verificationId}/file_links/{link_id}
Removes a link between a le and a verication without deleting the le. The link record is deleted. You
can delete the le by using the document service DELETE /v1/dbs/files/{fileId}
API.
Developing toast notications
A toast as a computing term refers to a graphical control element that communicates certain events
to the user without forcing them to react to the notication immediately. In the Universal Access
Responsive Web Application, we use the design system Alert component as a base to represent our
toast notications and allow capability to display these notications independent of the main display
content in any function within the application.
The <Toaster> component
The exposed <Toaster> component is used in App.js and is responsible for rendering toast
notications retrieved directly from the Redux store. These notications are displayed independent of
page content. This means that a deeply nested function can be used to display a notication without
regard to the current component render and/or functionality that is used to navigate to different pages.
The <Toaster> component handles the retrieving of toast slice within the store, and in passing
functionality to remove toast notications after they are dismissed.
The <Toast> component
The exposed <Toast> is the preferred component to display toast notications. It accepts properties as
dened by the web design system Alert component, without requiring the need to specify the component
as an Alert and the banner, center, and toast properties. It also requires a text property to be
dened.
Chapter 5. Developing with the Universal Access Responsive Web Application
81

The Toaster module
Any component that intends to display a toast notication within it's processing must use the Toaster
module action fillToaster function. This can be either passed to the component as a property, or
connected to the Redux store and dening the action as a property. For more information, see “Universal
Access Redux modules” on page 57.
An example of a page that implements the Toaster module action fillToaster and a service
unavailable toast notication is shown.
import React from 'react';
import { connect } from 'react-redux';
import { ToasterActions } from '@spm/universal-access';
import { Toast } from '@spm/universal-access-ui';
...
/**
* Updates the Toast slice of Redux store
* @param {*} dispatch the dispatch function
*/
export function mapDispatchToProps(dispatch) {
return {
fillToaster: data => {
ToasterActions.fillToaster(dispatch, data);
},
};
}
class MyComponent extends React.Component {
...
doSomething({ success }) {
if (success) {
...
}
else {
this.props.fillToaster(
<Toast
dismissable={false}
expireAfter={5}
text="This service is currently unavailable"
type="danger"
/>
);
}
}
...
export default connect(
null,
mapDispatchToProps
)(MyComponent);
Localization
You can add languages to the application, and apply regional settings for calendar and date formats, and
for currencies.
Related information
Developing for Regional Support
82
IBM Cúram Social Program Management 8.0.2: IBM Universal Access Responsive Web Application 5.2.0

Conguring languages in the application
You can add languages to the application or change the default language. You must create a src/
config/intl.config.js le to be read by the src/intl/IntlInit.js component, which handles
storage of the conguration and creates the react-intl IntlProvider.
About this task
Review the src/config/intl.config.js.sample.md le, which contains the intl.config.js
object schema and an example src/config/intl.config.js le.
Translated messages for the default supported languages are provided in the following locations:
• For universal-access-ui components, in the universal-access-ui-locales package at /
node_modules/@spm/universal-access-ui-locales.
• For the core-ui components, in the core-ui-locales package at /node_modules/@spm/core-
ui-locales.
• For the intelligent-evidence-gathering components, in the intelligent-evidence-
gathering-locales package at /node_modules/@spm/intelligent-evidence-gathering-
locales.
Procedure
Create a src/config/intl.config.js le with reference to the following example from the src/
config/intl.config.js.sample.md le.
export default {
defaultLocale: 'en',
locales: [
{
locale: 'en',
displayName: 'English',
localeData: () => {
require('@formatjs/intl-pluralrules/locale-data/en');
require('@formatjs/intl-numberformat/locale-data/en');
require('@formatjs/intl-relativetimeformat/locale-data/en');
}
},
{
locale: 'de',
displayName: 'German',
localeData: () => {
require('@formatjs/intl-pluralrules/locale-data/de');
require('@formatjs/intl-numberformat/locale-data/de');
require('@formatjs/intl-relativetimeformat/locale-data/de');
},
messages: {
...require('@spm/core-ui-locales/data/messages_de'),
...require('@spm/intelligent-evidence-gathering-locales/data/messages_de'),
...require('@spm/universal-access-ui-locales/data/messages_de')
}
},
{
locale: 'ar',
displayName: 'Arabic',
direction: 'rtl',
localeData: () => {
require('@formatjs/intl-pluralrules/locale-data/ar');
require('@formatjs/intl-numberformat/locale-data/ar');
require('@formatjs/intl-relativetimeformat/locale-data/ar');
},
messages: {
...require('@spm/core-ui-locales/data/messages_ar'),
...require('@spm/intelligent-evidence-gathering-locales/data/messages_ar'),
...require('@spm/universal-access-ui-locales/data/messages_ar')
}
},
{
locale: 'ht',
displayName: 'Haitian',
/*
Chapter 5. Developing with the Universal Access Responsive Web Application
83

Custom locale data
Where the locale you need to support is not found in the react-intl locale data you can
create your own locale data to handle this. Simply create an object with the locale property.
You must include at a minimum the pluralRuleFunction
See https://github.com/yahoo/react-intl/issues/1050
*/
localeData: () => {
return {
locale: 'ht',
pluralRuleFunction(arg1, arg2) {
return arg1 && arg2 === 1 ? 'one' : 'other';
}
};
},
messages: require('../locale/messages_ht')
}
]
};
Translating your application
Use react-intl and babel-plugin-react-intl to extract text from your application. You can then translate the
text into another language and include that translation in the application.
Extracting translatable content
You can follow the same method that IBM uses during development to extract the translatable content
from your application.
About this task
react-intl (https://github.com/formatjs/babel-plugin-react-intl
) and babel-plugin-react-intl
(https://github.com/yahoo/babel-plugin-react-intl) are used to globalize the application during
development.
Note: react-intl provides React components and an API to format dates, numbers, and strings,
including pluralization and handling translations. babel-plugin-react-intl extracts string messages
from React components that use react-intl.
Procedure
1. Use the react-intl defineMessages API to dene the default message string entry within the
application.
2. Add babel-plugin-react-intl version ˆ5.0.0 and its dependencies babel-cli version ˆ7.0.0
and babel-preset-react-app version ˆ7.0.0 to the application’s devDependencies.
npm install --save-dev @babel/cli@^7.0.0 @babel/core@^7.0.0 babel-plugin-react-intl@^5.0.0
3. Add a .babelrc le in the root of your project. Use .babelrc to congure the settings for the
babel-plugin-react-intl as shown in the following example .babelrc le:
{
"presets": ["react-app"],
"plugins": [
[
"react-intl", {
"messagesDir": "translations/messages",
}
]
]
}
4. Add the following line to your package.json "scripts":
“extractTranslations”: "NODE_ENV=production babel ./src >/dev/null"
84
IBM Cúram Social Program Management 8.0.2: IBM Universal Access Responsive Web Application 5.2.0

"extractTranslations": "set NODE_ENV=production&&babel ./src > NUL"
5. Run the following extraction command to extract all translations to the translations/messages
directory, as specied in the .babelrc conguration:
npm run extractTranslations
Including translated content in your application
IBM Cúram Universal Access exposes a src/intl/IntlInit component. This component reads the
conguration provided in the custom src/config/intl.config.js to seed your application with
messages for all the languages that you want your application to support.
Procedure
1. Ensure that translations are returned for use in your product in the format of a single JSON le
per locale. The JSON le must be in the format that is expected by react-intl, which is {[id:
string]: string}, as shown in the following example:
{
“label1”: “Translated text1“,
“label2”: "Translated text2”,
}
Where id is the ID that is used in your defineMessages entry and subsequent extracted message
ID.
Note: The id in this le format {[id: string]: string} must match the ID that you dene in
your code as in the defineMessages structure. For more information, see https://formatjs.io/docs/
react-intl/api/#formatmessag.
This le and its location in the application forms the entry to the messages value with the
intl.config.js for your congured locale, for example:
{
locale: "de",
displayName: "German",
localeData: () => {
require('@formatjs/intl-pluralrules/locale-data/de');
require('@formatjs/intl-relativetimeformat/locale-data/de');
},
messages: require("../locale/messages_de")
},
2. react-intl also requires that its own locale conguration is provided to support some of its internal
functions. For more information, see https://formatjs.io/docs/react-intl and https://formatjs.io/docs/
polylls/.
Results
When you have congured it correctly with the src/config/intl.config.js le, the
ApplicationFooter language selection drop-down should expose your new locale selection, it should
also load and apply the congured translation messages to the application.
Note: If your application does not nd messages for the currently selected language at run time, react-
intl defaults to the text of the defaultMessage entry that was used when the message was dened in
the source code.
Chapter 5. Developing with the Universal Access Responsive Web Application
85

Translating the multilingual messages for when JavaScript is disabled
The translation process is different for the multilingual messages that are displayed when JavaScript is
disabled in the browser. Because JavaScript is not available, the messages are implemented in the static
index.html le. You must customize this le to include translated messages for each of your supported
languages.
Procedure
1. Open the universal-access-sample-app/public/index.html le and review the message and
the provided languages.
2. Update the message if required and translate the message into all of your supported languages.
3. Edit the universal-access-sample-app/public/index.html le, and follow the provided
format to add messages.
<noscript>
<div lang="en">
<h1>
<svg" focusable="false" aria-hidden="true"><use xlink:href="../../dist/icons/icon-
sprite-sheet.svg#info-16"></use></svg>
JavaScript is switched off in your browser</h1>
<p>To use this service, you must enable JavaScript in your browser setting and try
again.
For instructions to enable JavaScript, check your browser support website.</p>
</div> ...
</noscript>
Screen readers that switch language proles use the lang attribute to provide the correct accent and
pronunciation. Most language tags consist of a two- or three-letter language subtab, often followed by
a two-letter or three-digit region subtag. For information about choosing a language tag, see: Choosing
a Language Tag.
4. To change the style of the messages, update the noscript.css le that is referenced in the header.
For more information about styling the application, see “Customizing the color scheme or typography”
on page 89.
Regional settings
The universal-access module and its components respect the regional settings that are dened in IBM
Cúram Social Program Management to ensure your application is synchronized with the Social Program
Management instance on which it depends.
Regional settings for currencies, and for calendar and date formats in the user interface, are dened in
Social Program Management. For more information, see Developing for Regional Support.
Related information
Developing for Regional Support
Customizing the application
As a developer, use these simple scenarios to learn how customize the IBM Universal Access Responsive
Web Application.
The rst scenario shows how to change default text on the My Details page. Each subsequent scenario
adds to the previous one to build out new content in your application.
Note: Follow the scenarios in sequence. If you start in the middle of the scenario list, you might have to go
back through previous scenarios.
86
IBM Cúram Social Program Management 8.0.2: IBM Universal Access Responsive Web Application 5.2.0

Changing text in the application
You can change the default text, images, colors, or typography in the application. In this scenario, an
English language message is changed. Text is changed by providing custom text that overrides the default
text for any language.
Before you begin
You can nd text in the application components and in IEG forms.
• Text in IEG scripts. For more information, see Changing Static Text
.
• Text in IEG conguration settings. For more information, see Using conguration properties to
customize IEG pages.
About this task
Message or text strings in the application use the react-intl package, which supports globalization of
React applications. react-intl allows the messages to be extracted and translated to other supported
languages, it can also add placeholders for data.
To change the existing text of any of the languages that are provided by IBM, you must provide a custom
version of the message that is mapped to the same message id.
Procedure
1. To change an English language message, nd the ID of the message you want to replace. In your
project, go to /node_modules/@spm/universal-access-ui/locale.
a) The locale folder contains message les for each supported locale. For your chosen language,
search the appropriate message_xx.json for the text string that you want to replace. For
example, to change the English text Apply for a benet, search messages_en.json for that
string as shown in the following example. If there is more than one instance of the string, you must
nd the correct message ID for the text you want to change. The simplest way to nd the correct
instance is to try replacing each ID one by one, reloading the page each time to see whether the
new string is displayed.
"System_Messages_Alert_Description": "System messages alert description",
"Payments_NoPaymentMessages": "No payment messages",
"Payments_ApplyForABenefitLink": "Apply for a benefit",
"TODO_NoTODOMessages": "No to-dos",
"TODO_CaseworkerMessage": "Your caseworkers can create to-dos for you.",
"Meetings_NoMessages": "No meetings",
b) For the Apply for a benet string, use the associated ID "Payments_ApplyForABenefitLink"
to override the message in your custom messages_en.json.
2. Create a custom message le by creating a messages_en.json le in the src/locale folder.
Custom messages are injected into the application at application start. For more information, see
“Localization” on page 82. By default, the starter application provides a locale folder from where
custom messages les are automatically loaded. You can add your custom le to this folder: src/
locale.
3. To replace the message, create a new id:message mapping in your custom message le by using the
same ID value as shown in the following example.
Chapter 5. Developing with the Universal Access Responsive Web Application
87

"Payments_ApplyForABenefitLink": "Click here to apply for a benefit",
4. Update the src/config/intl.config.js le in the English locale to point to the custom messages
le.
// [...]
{
locale: 'en',
displayName: 'English',
localeData: () => {
require('@formatjs/intl-pluralrules/locale-data/en');
require('@formatjs/intl-relativetimeformat/locale-data/en');
},
messages: require('../locale/messages_en'),
},
// [...]
Related concepts
Localization
You can add languages to the application, and apply regional settings for calendar and date formats, and
for currencies.
Customizing images, fonts, and les
As the Universal Access Responsive Web Application is based on create-react-app, you can follow
one of their standard approaches for adding images, fonts, fonts and les, depending on whether you are
adding images for IEG scripts.
For the application in general, you can co-locate the image or le with the component that requires the
resource, then import this resource within the component as follows:
import React from 'react';
import image from './image.png';
const Component = () => {
return <img src={logo} alt="Logo" />;
};
export default Component;
For more information, see Adding Images, Fonts, and Files in the create-react-app documentation.
Adding images for IEG scripts
Some IEG <Text> elements support rich text content that might include HTML tags. If you need to add
an image as part of the text, the URL of the image must target to a resource in the public folder of the
application, for example:
• Create an img folder in the public directory of your application. The relative path should look like this
universal-access-sample-app/public/img.
• Store the image in the img folder, for example universal-access-sample-app/public/img/
image.png.
• Dene an IEG text element in the script, for example <display-text
id="DisplayText.Image"/>.
• Dene the content of the property as an HTML image tag in the property le :
DisplayText.Image=<img src=“img/image.png “/>
Where the src path points to the folder created on the public folder.
Images added in this way are not sized to device screen sizes, therefore take a mobile-rst approach
when adding images to IEG Scripts.
For more information about adding resources to the public folder, see Using the Public Folder in the
create-react-app documentation.
88
IBM Cúram Social Program Management 8.0.2: IBM Universal Access Responsive Web Application 5.2.0

Customizing the color scheme or typography
You can customize the color scheme to display different colors and typography by using Sass. Do not
modify CSS les directly. You can use CSS in the Sass les if you prefer to use CSS.
Note: The styling process is different for the multilingual messages that are displayed when JavaScript
is disabled in the browser. Because JavaScript is not available, the messages are implemented in the
static index.html le. To change the style of those messages, update the noscript.css le that is
referenced in the header. See “Translating the multilingual messages for when JavaScript is disabled ” on
page 86.
Sass
The design system uses the Sass CSS preprocessor. You can use Sass to declare variables
in CSS. You can dene variables for colors, spacing, and typography in a single place and
then reuse the variables throughout the design system stylesheets. To see the variables that
are dened, view the node_modules/@govhhs/govhhs-design-system-core/src/stylesheets/
core/_variables.scss le in your application. The Sass les are compiled into CSS at build time and
your application uses the compiled CSS.
The le structure of the starter pack
The starter pack is congured to use Sass. The relevant les are in a css and sass folders under the src
folder in the le structure.
.
├── src
| └── css
| | └── styles.css
| └── sass
| | └── customVariables.scss
| | └── styles.scss
The css folder contains the styles that your application uses.
Note: The contents of the css folder are generated at build time. Don't directly edit any les inside the
css folder. For more information, you can view the build-css script in the project’s package.json le.
You must edit the Sass les to make changes. If you don’t want to use Sass features or if you don’t have
previous experience of SaaS, you can still write regular CSS into these les. By default, the sass folder
contains two les:
• styles.scss. Use this le to import the design system stylesheets and all other styles that the app
might use.
• custom-variables.scss. Customize the le by overriding the design system variables values with
your intended values.
Other than changing the design system variables, do not add styling. However, if you do need to add extra
styling, create a le in the sass folder. For example, my-custom-styles.scss. Then, import the new
le in styles.scss. The order of the style import matters, import the new le after the design system
styles in the following order:
@import 'custom-variables';
@import '@govhhs/govhhs-design-system-core/src/stylesheets/govhhs-wds';
@import '@spm/intelligent-evidence-gathering/sass/styles';
@import "my-custom-styles.scss";
Changing the color palette
When you select a color scheme for your site, ensure that color contrast is satisfactory. For users with
low vision, low-contrast text is difcult or impossible to read. For more information about color contrast,
see the Text elements must have sufcient color contrast against the background. The color-related
Chapter 5. Developing with the Universal Access Responsive Web Application
89

variables are in the color section of the design system’s variables le, that is, node_modules/@govhhs/
govhhs-design-system-cre/src/stylesheets/core/_variables.scss.
// node_modules/@govhhs/govhhs-wds-design-system-core/src/core/_variables.scss
//-------------------------
// Color
//-------------------------
$color-primary: color('blue', 50) !default;
$color-primary-darker: color-shade($color-primary, 10) !default;
$color-primary-darkest: color-shade($color-primary, 20) !default;
$color-primary-light: color-tint($color-primary, 10) !default;
$color-primary-lightest: color-tint($color-primary, 50) !default;
........
The -darker, the darkest, the light, and the lightest variants are derived from the base color-
primary. To obtain the derived color values, use the Sass lighten and darken utilities. Alternatively,
use hardcoded values. To customize, override the values for the variables.
Example
This example shows how to update both the color scheme the typography of the application.
The primary, secondary, and link colors are updated with the following color scheme:
• #051380 as the primary color, that is, used on page headers, primary buttons, and hover states.
• #37056b as the application's secondary color, that is, used for avatar backgrounds.
• #2b4380 for the link colors, #0535d2 for the link hover color, and #7834bc for visited links.
The following typography changes are made:
• 20px font size with a 33px line height for the body text with a 400 font weight
• 16px font size with a 26px line height for small text with a 400 font weight
1. To start the application, enter the following command from your application. The application is
accessible on your local host.
npm start
2. Edit the sass/custom-variables.scss.
3. Add the intended value to the primary color:
$color-primary: #051380;
4. Dene the –darker, the -darkest, the light, and the lightest variants by using the lighten or
the darken utilities.
$color-primary-darker: darken($color-primary, 10%);
$color-primary-darkest: darken($color-primary, 20%);
$color-primary-light: lighten($color-primary, 10%);
$color-primary-lightest: lighten($color-primary, 50%);
5. Dene the secondary colors.
$color-secondary: #37056b;
$color-secondary-dark: darken($color-secondary, 10%);
$color-secondary-darkest: darken($color-secondary, 20%);
$color-secondary-light: lighten($color-secondary, 10%);
$color-secondary-lightest: lighten($color-secondary, 50%);
6. Save the le. The app is reloaded in the browser so you can see your changes.
7. To dene the link colors, use the proceeding color-link, the color-link-hover, and the color-
visited variables.
$color-link: #2b4380;
$color-link-hover: #0535d2;
$color-visited: #7834bc;
90
IBM Cúram Social Program Management 8.0.2: IBM Universal Access Responsive Web Application 5.2.0

8. To change the typography, override the body-font and small-font variables.
// Body font
$body-font: (
'font-size': 20px,
'line-height': 33px,
'font-weight': 400
);
//Small Font
$small-font: (
'font-size': 16px,
'line-height': 26px,
'font-weight': 400
);
9. Save the le to see your changes.
The nal custom-variables.scss le for the example is shown.
$icon-path: "~@govhhs/govhhs-design-system-core/dist/icons";
$image-path: "~@govhhs/govhhs-design-system-core/dist/img";
.success-icon-color {
fill: #3dc06e !important;
}
// Primary color
$color-primary: #051380;
$color-primary-darker: darken($color-primary, 10%);
$color-primary-darkest: darken($color-primary, 20%);
$color-primary-light: lighten($color-primary, 10%);
$color-primary-lightest: lighten($color-primary, 50%);
// Secondary color
$color-secondary: #37056b;
$color-secondary-dark: darken($color-secondary, 10%);
$color-secondary-darkest: darken($color-secondary, 20%);
$color-secondary-light: lighten($color-secondary, 10%);
$color-secondary-lightest: lighten($color-secondary, 50%);
// Link colors
$color-link: #2b4380;
$color-link-hover: #0535d2;
$color-visited: #7834bc;
// Body font
$body-font: (
'font-size': 20px,
'line-height': 33px,
'font-weight': 400
);
//Small Font
$small-font: (
'font-size': 16px,
'line-height': 26px,
'font-weight': 400
);
Adding content to the application
Build on the text change scenario from Changing application text to add a route. You also add content that
is displayed when the route is loaded.
Before you begin
If you are not familiar with React and React Router, you must take a basic course in building a web
application with React and React Router.
The term "feature" refers to the content that is displayed when a route is loaded, this content is what
citizens see on the user interface. A feature is an abstraction that includes all the content that comes
together to create the user experience. A feature can be a collection of JavaScript les, JSON les, and
Chapter 5. Developing with the Universal Access Responsive Web Application
91

APIs that work together to generate the user experience. The term "feature" can be referred to as a page,
view, or component in other application environments.
This scenario adds a feature that presents a logged-in person's details in the main content area when
a /person URL is loaded. This scenario is built on in later scenarios by calling APIs, by using client-side
stores, error handling, or globalization.
About this task
When you extend the IBM Cúram Universal Access reference application, you might want to introduce
new content that is displayed when citizens click a link.
Procedure
1. Create the content for the feature, take the following steps:
a) Create a folder called features under the /src folder in your project
b) Create a person subfolder and create PersonComponent.js in the folder.
src/features/Person/PersonComponent.js
c) Add some HTML to display when the component is loaded. The following example displays some
data that is returned by an API:
import React from 'react';
const Person = () => { return (
<div>
<h1>James Smith</h1>
<h2>Gender: Male</h2>
<h2>Born: April 1st 1996</h2>
</div>
)};
export default Person;
2. Add a route to link to your feature, take the following steps:
a) Declare an associated URI for each feature in the application. The URI allows React to present the
feature when the URI is requested in the browser. This technique is standard 'React Routing'
for displaying features. For more information about routes, see “Developing with routes” on page
67. Add a simple component that displays when the route is loaded:
i) Open routes.js in your project.
ii) Import a Person component from the folder features/person.
iii) Add a "/person" route that loads the Person component as shown in the following example:
import React from 'react';
import { Route, Switch } from 'react-router-dom';
import { Routes as UARoutes } from '@spm/universal-access-ui';
import Person from './features/PersonComponent'
export default (
<Switch>
<Route path="/person" component={Person} />
<UARoutes />
</Switch>
);
3. Load the new feature by using the route, take the following steps:
a) Run your application, enter the following command:
npm run start
b) Start a browser and enter the full URL for the feature, for example: http://localhost:8888/person
92
IBM Cúram Social Program Management 8.0.2: IBM Universal Access Responsive Web Application 5.2.0

Results
When the application loads, the person details are displayed in the main content area.
Related concepts
Developing with routes
Routes dene the valid endpoints for navigation in your application. Your application consists of a network
of routes that can be traversed by your users to access the application's pages.
Styling content with the Social Program Management Design System
Build on the route and person content scenario that you added in Adding content to the application by
styling the content of a person's details.
Before you begin
The IBM Social Program Management Design System is a design framework that helps you to build a
cohesive and consistent application. By selecting components from a design catalog and applying design
principles, design and development is faster and user experience is improved.
About this task
The full catalog of Social Program Management Design System components, including descriptions of
when and where to use them, is documented in the govhhs-design-system-react package. You can access
these packages through index.html le in /node_modules/@govhhs/govhhs-design-system-
react/docs. This scenario uses a number of Social Program Management Design System components to
improve the person feature.
Procedure
1. Import contents from the Social Program Management Design System. Enter the following command
to import the Avatar and MediaObject components from the package @govhhs/govhhs-design-
system-react:
import {Avatar, MediaObject} from '@govhhs/govhhs-design-system-react'
2. Update PersonComponent.js to use the Grid, Column, Card, MediaObject, Avatar, and List
components to display the person's details. You can also include an address in a separate card.
Use the following code to replace the previous PersonComponent.js:
import React from 'react';
import {Grid, Column, Card,CardBody,CardHeader, List, ListItem, Avatar, MediaObject } from
'@govhhs/govhhs-design-system-react'
const avatarMediaJames = <Avatar initials="JS" size="medium" tooltip="profile photo" />;
const Person = () => {
return (
<Grid className="wds-u-p--medium">
<Column width="1/2">
<Card>
<MediaObject media={avatarMediaJames} title="James Smith">
<List>
<ListItem>Gender: Male</ListItem>
<ListItem>Born: April 1st 1996</ListItem>
</List>
</MediaObject>
</Card>
</Column>
<Column width="1/2">
<Card title="Address">
<CardHeader title="Address"/>
<CardBody>
<List>
<ListItem>1074, Park Terrace</ListItem>
<ListItem>Fairfield</ListItem>
<ListItem>Midway</ListItem>
<ListItem>Utah 12345</ListItem>
Chapter 5. Developing with the Universal Access Responsive Web Application
93

</List>
</CardBody>
</Card>
</Column>
</Grid>
)};
export default Person;
3. Save PersonComponent.js.
Results
When you reload the application, you see the updated application style.
Changing the application header or footer
Build on the styling scenario from Using the Social Program Management Design System to style content by
adding a link to the application header or footer.
Before you begin
For more information about the application header and footer, see Developing with headers and footers.
To customize the header, you must create your own custom version. To keep this scenario brief, work on
the header only and copy the existing header from universal-access-ui. Make some small changes
to the header to show how it can be customized. Alternatively, completely replace the header or footer
with your own version.
About this task
Change the application header to include a new link that to take you to the My Details page.
Procedure
1. Copy the Universal Access header by copying the node_modules/@spm/universal-access-
ui/src/features/ApplicationHeader folder to src/features.
2. Fix any broken imports. Take the following steps:
a) Use ESLint or a similar linting tool to nd any errors where imports are not found.
Note: If you do not use a linting tool, you get build errors.
b) Errors are generated because the universal-access-ui uses relative paths when it imports
dependencies from its own project. For imports that are within the universal-access-ui
module, but outside the features/ApplicationHeader folder, you must change the imports
to reference the ofcial exported version of those dependencies from the universal-access-ui
node module.
c) For each import that is not resolved, nd the equivalent export in the universal-access-ui
package. Inspect node_modules/@spm/universal-access-ui/src/index.js to nd the list
of exported artifacts and their exported names.
The Paths module is referenced in the ApplicationHeader by using the default import from a
relative path as shown in the following example: import PATHS from '../../router/Paths'
Amend module as shown in the following example: import { Paths } from 'universal-
access-ui'
d) Repeat this procedure for all the les in the ApplicationHeader folder, some of the imports of
'Paths', and for some other references such as 'ErrorBoundary' and 'AppSpinner'.
3. Replace the existing header with your custom version, take the following steps:
a) Open src/App.js file and remove the imported ApplicationHeader from universal-
access-ui.
94
IBM Cúram Social Program Management 8.0.2: IBM Universal Access Responsive Web Application 5.2.0

b) Import your cloned version from ./features/ApplicationHeader as shown in the following
example:
import ApplicationHeader from './features/ApplicationHeader';
Import ApplicationHeader as a default import, without curly brackets, rather than a named
import. Alternatively, you can add a named export to your ApplicationHeader feature.
4. Update the header feature to include a tab that loads the /person page take the following steps:
a) Open constants.js in src/features/ApplicationHeader/components. constants.js
denes an object that represents a navigation item for the header.
b) Add and entry for the new page My Details as shown in the following example:
/**
* Application navigation header tabs.
*/
const NAVIGATION_HEADER_TABS = {
...
PROFILE: { NAME: 'PROFILE', ID: 'navigation-profile' },
CHANGE_PASSWORD: { NAME: 'CHANGE_PASSWORD', ID: 'navigation-change-password' },
MYDETAILS: { NAME: 'MYDETAILS', ID: 'my-details' },
};
c) Open ApplicationHeaderLogic.js. ApplicationHeaderLogic.js. contains the logic that
tracks which tabs are selected so they can be highlighted as active.
d) Update the isTabActiveForUrlPathname function to include the new My Details page in the
Your Account section. For brevity, the value is hardcoded in the following example. However, you
can replicate the pattern that is used by the universal-access code to add it to Paths.
const isTabActiveForUrlPathname = (urlPathname, navigationTabName) => {
...
switch (navigationTabName) {
case FIND_HELP.NAME:
return (
urlPathname === Paths.HOME ||
urlPathname === Paths.APPLY ||
urlPathname === Paths.BENEFIT_SELECTION ||
urlPathname === Paths.APPLICATION_OVERVIEW
);
case YOUR_ACCOUNT.NAME:
return (
urlPathname === Paths.ACCOUNT ||
urlPathname === Paths.BENEFITS ||
urlPathname === Paths.PAYMENTS.ROOT ||
urlPathname === Paths.PAYMENTS.DETAILS ||
urlPathname === '/person'
);
Open ApplicationHeaderComponent.js, which renders the header, and nd the
PrimaryNavigation component.
e) Add a tab called 'My Details' with a link to the person feature inside
ApplicationHeaderComponent.js. For brevity, the example is hardcoded values, but you can
replace these values with variables. If you want, you can also globalize the tab.
..
<PrimaryNavigation>
<Tabs>
...
<Tab
id={NAVIGATION_HEADER_TABS.YOUR_BENEFITS.ID}
href={HASH_SYMBOL + LOCATIONS.BENEFITS}
label={formatMessage(translations.headerYourBenefitsLabel)}
/>
Chapter 5. Developing with the Universal Access Responsive Web Application
95

<Tab
id="person_tab"
href="/person"
label="My Details"
/>
</Tabs>
...
</PrimaryNavigation>
...
5. Save your le and restart the application.
6. You can modify the application footer in the same way by replacing the universal-access-ui
version in src/App.js with your own custom version.
Results
Go to the home page. A new tab that is called My Details is in the primary navigation area. When you
select My Details, the person feature is loaded in the main content area.
Related reference
Customizing headers and footers
IBM Cúram Universal Access contains a predened header and footer. You can customize your application
headers and footers by replacing the sample components with your own custom versions.
Customizing headers and footers
IBM Cúram Universal Access contains a predened header and footer. You can customize your application
headers and footers by replacing the sample components with your own custom versions.
Headers and footers
The header and footer contain content such as links, Log in, and Sign up buttons, and menus for logged-in
users.
The App.js le in the universal-access-sample-app module, reuses the sample ApplicationHeader and
ApplicationFooter components that are provided by the universal-access module by placing them above
and below the main content of the application:
App.js
<BrowserRouter>
<ScrollToTop>
<div className="app">
<a className="wds-c-skipnav" href="main-content">
{formatMessage(translations.appSkipLink)}
</a>
<Route path="/" component={ApplicationHeader} />
<main id="main-content" className="main-content">
<Content>{routes}</Content>
</main>
<ApplicationFooter />
</div>
</ScrollToTop>
</BrowserRouter>
Header
Typically, an application header has two views. One view has items relevant to users who are not logged in
or signed up, for example a Sign Up button. The second view shows items that are relevant to users who
are signed up and logged in, for example an Update your prole button.
To facilitate the separate views, use a react-router-dom Route component. The App.js sample
demonstrates wrapping the ApplicationHeader component in a Route component and passing Route
96
IBM Cúram Social Program Management 8.0.2: IBM Universal Access Responsive Web Application 5.2.0

information to the ApplicationHeader. This allows the ApplicationHeader to query the Route properties
and decide what to display based on the current location in the application. For example, you might want
to show a different view for the login page route (‘my-app-domain/login’) from the application home page
route (‘my-app-domain/’).
The following code sample shows how the ApplicationHeader queries its location property to nd out
what page the application is displaying. The sample code then uses this information to decide what to
show in the header.
get isOnLoginPage() {
return this.props.location.pathname === '/login';
}
render() {
return (
<Header
title={this.pageTitle}
type="scrollable"
logo={<img src={logo}
alt="agency"
id={this.props.loggedInUser} />}>
<PrimaryNavigation type="scrollable">
<TabList scrollable>
<Tab
id="tab1"
href="/"
text={
this.props.intl.formatMessage(translations.headerHomeLabel)}/>
<Tab
id="tab2"
href="/my-applications"
text={this.props.intl.formatMessage(
translations.headerBenefitsLabel)}/>
</TabList>
</PrimaryNavigation>
<SecondaryNavigation type="Scrollable"/>
{/* Show signed out menu */}
{!this.isOnLoginPage &&
this.props.loggedInUser === null &&
!this.isUserProfileLoaded &&
this.signInMenu}
{/* Show signed in menu */}
{this.props.loggedInUser &&
this.isUserProfileLoaded &&
this.profileMenu}
</SecondaryNavigation>
</Header>
);
}
Login and sign up in the header
If you are building your own customer header, you must identify which page you are currently displaying
the Header on, you must also differentiate between logged in and logged out users. Whether a user is
logged in or out can be determined by using the authentication API provided by the universal-access
module. The Authentication API provides functions to allow you to log in and out of the application,
and also allows you to query if a user is logged in and who that user is. For more information, see the
Authentication API documentation.
The following code sample shows how the ApplicationHeader uses the Authentication API. In this
function, a check is made to see whether a user is logged in before it loads that user's prole. The
user's prole is needed to display the user's full name in the header.
fetchProfile() {
if (Authentication.isLoggedIn() && !this.isUserProfileLoaded) {
this.props.loadProfile();
}
}
Chapter 5. Developing with the Universal Access Responsive Web Application
97

Footer
You can add a footer to the bottom of the application page in the same way as you add the header to
the top of the page. The universal-access module provides a sample application footer that is used in the
universal-access-sample-app, see the App.js sample. The sample footer is static and does not change
based on the location or the authentication state, however the footer can be made dynamic by following
the example from the header.
Creating an IBM Cúram Social Program Management REST API
Build on the scenario from Changing the application header or footer, use a REST API to get data to your
application.
About this task
The most common way to get data to your application is to use a REST API to receive the requested data
as a JSON string that your application then parses and renders. IBM Cúram Social Program Management
provides development tools and the runtime infrastructure that you can use to build and deploy a REST
API with your IBM Cúram Social Program Management server. The REST API can be called by using
standard HTTP verbs such as GET, POST, and DELETE. The REST API returns data as a JSON string in the
response body. For more information, see Developing Cúram REST APIs.
Related information
Developing Cúram REST APIs
Connecting to REST APIs from the application
Build on the IBM Cúram Social Program Management REST API that you created in the scenario Creating
an IBM Cúram Social Program Management REST API by calling it from your application.
About this task
Features in your application rely on passing data to and from the IBM Cúram Social Program Management
server or another service. The reference application already consumes a number of Universal Access APIs
to support business features.
This scenario updates the person feature to read the data from an API instead of just displaying
hardcoded values. The scenario shows you how to create and use the following items:
• Use the RESTService utility to helps you call APIs.
• Use the mock server to show you how to create a mock API so you can quickly develop your feature
without spending time building and deploying the real API that it eventually uses.
• Connect your application to a Social Program Management development environment that hosts the
APIs by using Tomcat to enable real integration testing in the development environment.
Procedure
1. Create a mock API by completing the following steps:
a) In your project, open /mock/apis/mockAPIs.js.
The mock server consumes mockAPIs.js, it contains the mappings from APIs to the mock data.
The mock server uses this information to provide the correct data when an API call is made
in development mode. mockAPIs.js also contains an import from the universal-access-ui
package and assignments for GET, POST, and DELETE APIs as shown in the following example:
const mockAPIs = require('@spm/universal-access-mocks');
// Extract the existing universal access GET,POST and DELETE mocks for merging.
const UAMockAPIsGET = mockAPIs.GET;
98
IBM Cúram Social Program Management 8.0.2: IBM Universal Access Responsive Web Application 5.2.0

const UAMockAPIsPOST = mockAPIs.POST;
const UAMockAPIsDELETE = mockAPIs.DELETE;
Use these APIs to test the Universal Access application. For more information, see “The mock
server API service” on page 71.
b) To add more mock data, add your mocks to the placeholders provided. This scenario adds the
person data for a person James Smith that is returned when the '/person' path is loaded.
c) Add an object in mockAPIs.js to represent James Smith. For simplicity, do not normalize the
dates, or use code tables, later scenarios show you how to globalize and handle code tables.
const user = {
firstname: 'James',
surname: 'Smith',
dob: 'April 1st 1996',
gender: 'male',
address: {
addr1:'1074, Park Terrace',
addr2:'Fairfield',
addr3:'Midway',
addr4:'Utah 12345',
}
}
d) Include a value for the URI '/user' in the mockAPIsGET object to return the mock object as
shown in the following example:
const mockAPIsGET = {
'/user': user,
}
The new '/user' mock API is merged with the mocks from universal-access-ui and is
deployed by the mock server on port 3080.
e) Test that the new API is working, start the application by using npm start.
f) Using the browser, load the /person URL: http://localhost:3080/person. If successful, the browser
displays the response.
2. Use the RESTService utility from the core package to make an Ajax call to the API.
You can use many agents to make Ajax calls. The RESTService utility uses Superagent. The
RESTService utility handles the following functions:
• Authentication credentials are automatically handled for each call, and users are redirect to log in
when appropriate.
• The user's locale is passed to ensure that the response is in the correct locale.
• Timeouts are managed with environment variables in the .env le.
• Errors are captured and thrown in a standard fashion so that the error handling infrastructure is
invoked.
For more information about the RESTService utility, see “The RESTService utility” on page 73.
3. Open PersonComponent.js le. Make the following changes, checking that your application still
displays the page after each step:
a) To enable lifecycle methods that are required to manage the API calls, convert the old stateless
component to a stateful React.Component class:
Old stateless Person component
const Person = () => {
return (
<JSX code here>
);
}
Chapter 5. Developing with the Universal Access Responsive Web Application
99

Updated stateful Person component
class Person extends Component {
render(){
return (
<JSX code here>
)};
}
b) Create local state to hold the API data.
The local state stores the values returned by the API that drive the render function. Whenever the
state is updated, the component re-renders to reflect the state change. For this scenario, hardcode
the values for the state in your class constructor so that something is displayed on the page. To
differentiate between this temporary default data and the API data, change the firstName to
'Roger'. Later, when you introduce the API, the data for 'James' is returned from the API and
not the default state as shown in the following example:
constructor(props) {
super(props);
this.state= {
user : {
firstName:'Roger',
surname:'Smith',
dob:'April 1st 1996',
gender: 'Male',
address: {
addr1:'1074, Park Terrace',
addr2:'Fairfield',
addr3:'Midway',
addr4:'Utah 12345',
}
}
}
}
c) Convert all hardcoded references to use the values from the state.
Now that you have a state object, replace all hardcoded values with references to the state. Replace
each hardcoded piece of data with a state reference {this.state.user.X}. Examples are as
follows:
...
class Person extends Component {
render(){
return (
...
<Card>
<MediaObject media={avatarMedia} title=
{this.state.user.firstName}>
<List>
<ListItem>Gender: {this.state.user.gender}</ListItem>
<ListItem>{this.state.user.gender}</ListItem>
</List>
</MediaObject>
)};
...
}
...
d) Import the RESTService utility.
To call an API, you must invoke one of the methods of the RESTService utility. First you must import
it from the core package:import { RESTService } from '@spm/core'
e) Create a componentDidMount method to invoke the API call.
When your component is mounted by React, the componentDidMount function is invoked. In
componentDidMount the API call can be made to populate the component state. Update your
constructor to set the user values to blank when initializing, this setting ensure that your data
100
IBM Cúram Social Program Management 8.0.2: IBM Universal Access Responsive Web Application 5.2.0

is being loaded from the API. Then, add the following code to your Person component. The
root location of the API is taken from the values set in your .env.development le when in
development mode. In production mode, it is taken from the .env le.
The .env.development le species the mock server URL as REACT_APP_REST_URL, which has
the value http://localhost:3080/ where the mock server is deployed. You can use this environment
variable to prepend the /user API.
The RESTService API accepts a URL and a callback function as parameters. In the following code,
the callback function is passed as an anonymous function in the second parameter. The 'success' is
checked, before the state is updated with the response.
Note: Error scenarios are not handled in this code. The “Handling failures in the application” on
page 103 scenario contains details about failure responses, 'Error Boundaries', and failure handling.
componentDidMount() {
const url = ${process.env.REACT_APP_REST_URL}/v1/user;
const user = RESTService.get(url, (success, response) => {
if (success) {
this.setState((user: response));
}
});
}
Results
Start your application, log in and select the My Details tab. The tab loads using data that is pulled from
the /user API.
The REACT_APP_REST_URL environment variable that is dened in the .env and .env.development
les determines where the API is served. In development mode, the API calls the mock server. In
production mode, the API calls the SPM server that hosts the application REST APIs. You can seamlessly
switch between development and production, assuming the contract remains the same between your
mock and real APIs. That is, that the JSON structure matches in both.
Related reference
Handling failures in the application
Handle any failures that you nd when you did integration testing in the Developing with IBM Cúram Social
Program Management APIs by using Tomcat scenario.
Testing REST API connections with Tomcat
Build on the scenario in Calling an API from the application. Do your integration testing with the real IBM
Cúram Social Program Management APIs instead of the mock APIs in your Universal Access client.
Before you begin
You must be familiar with the IBM Cúram Social Program Management development environment, the
development of REST APIs, and the IBM Cúram Universal Access development environment.
This scenario uses IP address 192.1.1.1 to represent the development computer for the IBM Cúram
Social Program Management server, and 192.9.9.9 for the computer that hosts the Universal Access
client. However, you can use the same computer with the same IP address. Replace this address with the
IP address of your development computer.
Chapter 5. Developing with the Universal Access Responsive Web Application
101

About this task
The mock server is hosted on the same domain as the application during development http://localhost.
However, when your APIs are served from a different domain, you might encounter Cross Origin Resource
Sharing (CORS) issues. You can use Tomcat to congure your Universal Access client and IBM Cúram
Universal Access server to allow Cross Origin requests. To overcome the CORS issues, the REST toolkit
uses a lter that provides the required HTTP headers to allow browsers to accept responses from a
different domain. In this scenario, the domain is where the REST application is deployed.
Procedure
1. Congure the IBM Cúram Social Program Management server, take the following steps:
a) In your development environment, add the following properties to Bootstrap.properties
and set the hostname/ipaddress of the computer where the Universal Access client is to be
deployed:
• curam.rest.refererDomains = 192.9.9.9
• curam.rest.allowedOrigins = 192.9.9.9
Note: If you develop the server and client on the same computer, you can use "localhost".
The property curam.rest.allowedOrigins is the Origin value in the CORS
headers. Both properties can have comma-delimited domain names, for example,
curam.rest.allowedOrigins = 192.9.9.9, 192.9.9.8, mymachine.mycorp.com to
allow multiple domains to access the IBM Cúram Social Program Management application.
b) Set the CATALINA_HOME environment variable to the location of your Tomcat
installation. For example, on Windows set the following variable: ‘set
CATALINA_HOME=C:\DevEnv\7.0.1\tomcat’
c) Build IBM Cúram Social Program Management by using the appbuild server, database, client, and
other components.
d) Run an extra target appbuild rest to create the REST project in your
EJBServer\build\RestProject\devApp directory.
e) Copy Rest.xml into your Tomcat conf/localhost folder. For more information about building
Cúram APIs, see Developing Cúram REST APIs.
f) Start the server, RMILoginClient, and Tomcat in the normal way for IBM Cúram Social Program
Management.
The REST client starts automatically. When the client is running, the APIs are accessible in the /
Rest base path, for example: http://192.1.1.1:9080/Rest/<myapi>.
2. Congure the Universal Access client by completing the following steps:
a) Modify the following environment variable in the .env.development le in the root of the
application to point to the REST URL on Eclipse/Tomcat as shown in the following example:
REACT_APP_REST_URL=http://192.1.1.1:9080/Rest
Note: If you develop the server and client on the same computer, you can use "localhost".
If you want to connect to an application on WebSphere Application Server, you must change
"http" to "https" and update to the correct port. 9044 is the default port.
b) Build the application, enter the following command: npm run build.
c) Start the application, enter the following command: npm run start.
Results
Your Universal Access client application now communicates with the REST API that is deployed on Eclipse
with Tomcat.
102
IBM Cúram Social Program Management 8.0.2: IBM Universal Access Responsive Web Application 5.2.0

Note: Run the application in debug mode so it stops at breakpoints in the application code.
Related information
Developing Cúram REST APIs
Handling failures in the application
Handle any failures that you nd when you did integration testing in the Developing with IBM Cúram Social
Program Management APIs by using Tomcat scenario.
Before you begin
You should build fault-tolerant web applications because, for example, web services such as a REST API
are never fully reliable. When handling the expected response, the application must also allow for failures,
such as network outages, timed out responses, internal server errors, or software bugs.
Universal Access ErrorBoundary component
According to React, "Error boundaries are React components that catch JavaScript errors anywhere in
their child component tree, log those errors, and display a fallback UI instead of the component tree that
crashed."
An error boundary component is a React component that implements the componentDidCatch lifecycle
method. For more information about error boundaries, see https://reactjs.org/
The @spm/core-ui package exports a reusable ErrorBoundary component. The default behavior of
the component is to handle error scenarios by replacing the failing component with a generic message.
Note: Authentication errors have a specic handler in the ErrorBoundary component. If the error object
that is received by the componentDidCatch method contains a status attribute with a value of '401'
(Unauthorized error), then the client forces a log-out in the client application. Citizens are automatically
redirected to the Log in page, so they can revalidate and return to the page they were previously on. This
situation typically happens if the session times out or is invalidated on the server. The source code for the
ErrorBoundary component is available in the @spm/core-ui package.
This scenario shows API error handling in the My Details page where the API call fails. This scenario also
shows how to use the ErrorBoundary component to provide a better user experience when failures
occur.
Error boundaries in the Universal Access application
The Universal Access starter pack contains the following two error boundaries:
• The rst wraps the entire application to capture errors that might occur when loading the header or
footer.
• The second wraps the main content to capture errors that are raised from components that are loaded
in the main content section.
The error boundaries are shown in the following example:
/**
* App component entry point.
*/
const App = () => (
<BrowserRouter>
<ScrollToTop>
<ErrorBoundary
footer={<ApplicationFooter />}
header={<ApplicationHeaderComponent hasErrorBeenCaught />}
isHeaderBoundary
>
<ApplicationHeader />
<ErrorBoundary>
<Main pushFooter className="wds-u-bg--page">
{routes}
</Main>
Chapter 5. Developing with the Universal Access Responsive Web Application
103

</ErrorBoundary>
<ApplicationFooter />
</ErrorBoundary>
</ScrollToTop>
</BrowserRouter>
);
The error boundary on the main section allows the application context to be retained. That is, the header
and footer continue to be displayed when the error is raised from the main section. This continuity
provides a better user experience.
You can replace these error boundaries with your own error boundaries.
Faking an API error
This API failure scenario uses a 404 response as the error, you trigger this failure by temporarily changing
the API call to a non-existent API.
Take the following steps:
1. Open src/modules/generated/SampleModule/utils.js.
2. Update the fetchOnlineCategoriesUtil function to call a non-existent API v1/ua/
online_categories1 as shown in the following example:
const fetchOnlineCategoriesUtil = callback => {
ReduxUtils.getModelDataFromRestAPI(
callback,
`v1/ua/online_categories1`,
models.UAOnlineCategoryList
);
};
3. Save your code and wait for the application to reload.
The SampleApplicationComponent component cannot call the API and an error page is displayed.
Catching an API failure
Using the Faking an API error failure scenario, you can modify the code to cater for this failure. The
API call is asynchronous, and the callback runs outside the context of the Component tree. This
execution mode means that the error that is thrown in the call-back function is not caught by the
componentDidCatch method of the ErrorBoundary. Therefore, instead of exposing the component
with the withErrorBoundary HOC, which throws an error, you can update the state of the component.
You can then retrieve the error state from the WDA hook and handle it as you need. The failure branch
sets the error value that is returned by the API call as shown in the following example.
export const SampleApplicationComponent = props => {
const { data, isFetching, error } = SampleModuleHooks.useFetchOnlineCategories();
console.log(`state -> ${error}`);
if (isFetching) {
return <AppSpinner />;
}
if (error) {
throw new Error('An error occurred when calling API ');
}
....
export default withRouter(SampleApplicationComponent);
The render method should print the following error in the console:
state -> Error: cannot GET http://localhost:3080/`v1/ua/online_categories1` (404)
104
IBM Cúram Social Program Management 8.0.2: IBM Universal Access Responsive Web Application 5.2.0

Throwing an error
Now that you have control of the failure, throw an error with an appropriate value for the ErrorBoundary
component to catch. You can place the throw in the render function, which executes when the state
updates.
The error object that you throw can be anything that you choose so that the error is useful to the citizen.
In this instance, you can throw the string object that is returned by the response because it describes the
issue.
Implementing a loading mask
Building on the previous scenarios, use a loading mask to indicate that the application is working on
rendering a page.
About this task
Response times vary for REST APIs over a network. In a many cases, the time it takes to receive the
response is longer than the time it takes for React to render for the rst time. This delay leads to a poor
user experience when the page draws the components, but the data is missing.
To avoid poor user experience, use a loading mask to tell users that the application is working on
rendering their page.
This scenario uses the AppSpinner component from the universal-access-ui package to include
a loading mask for the My Details page to demonstrate how your components can handle slow response
times.
API response delay
During development, you must often replicate real world response times for APIs. You can congure the
RestService to set a delay by using the env.development le in your environment. By default this
value is set to 2 seconds. Note this delay in the application when you are in development mode, where
you see spinners while components wait for the data to be returned from the mock server by way of the
RestService module. You can increase or decrease this value to meet your application's needs.
The AppSpinner component
The universal-access-ui package includes the AppSpinner component, which you can reuse in
your project. The AppSpinner component wraps the Spinner component from the govhhs-design-
system-react package and includes a label for accessibility purposes. You can also create your own
loading mask in the same manner. You can view the source code for AppSpinner in the universal-
access-ui package.
Procedure
1. Waiting for the API.
The AppSpinner is displayed while the application waits for the API to respond, so you need a
mechanism to notify you when the data is, and is not loaded. Use the state to indicate when data is
loaded and when it is not. Take the following steps:
a) Open the PersonComponent.js le.
b) In the constructor, add an attribute called loading to the state, with a value of true.
...
constructor(props) {
super(props);
this.state = {
user: {
firstName: "",
surname: "",
dob: "",
gender: "",
address: {
Chapter 5. Developing with the Universal Access Responsive Web Application
105

addr1: "",
addr2: "",
addr3: "",
addr4: ""
}
},
loading: true,
};
}
...
2. Display the loading mask.
Now you have a value that indicates whether the data is loading, take the following steps to display the
loading mask based on the value:
a) Import the AppSpinner loading mask from universal-access-ui:
import {AppSpinner} from '@spm/universal-access-ui';
b) In the render function, add a check that renders the AppSpinner if the loading value is true:
render() {
if (this.state.loading){
return <AppSpinner/>
}
return (
<Grid className="wds-u-p--medium">
<Column width="1/2">
...
)
}
When you save and reload the application, you see the spinner in the main section area. However,
the spinner continues to display after the data is returned.
3. Remove the loading mask.
When the data is returned from the API, remove the mask by updating the state to indicate that
loading is nished. Take the following steps:
a) In the componentDidMount function, update the state to set the loading value to false when a
successful response is returned as shown in the following example:
componentDidMount() {
const url = ${process.env.REACT_APP_REST_URL}/v1/user1;
RESTService.get(url, (success, response) => {
this.setState({loading: false})
if (success) {
this.setState({user: response});
} else {
this.setState({apiCallFailed: response})
}
});
}
b) Save and reload the application. Now, when the API response is received, the loading mask is
removed and the user's data is displayed.
Reusing existing features
The reference application that is available when you install IBM Cúram Universal Access satises a
number of general business scenarios such as creating an account, logging in, and applying for benets.
The scenarios are provided both as working software and as examples of how to construct the product.
You can clone and modify existing features in the application.
106
IBM Cúram Social Program Management 8.0.2: IBM Universal Access Responsive Web Application 5.2.0

Before you begin
The universal-access-ui package is structured by feature. Typically, each feature is mapped to a
single route. For example, when the /profile route is loaded, the Prole feature is displayed. The
feature folder is a collection of les that work together to present that feature. An example from the
Prole feature is shown.
/universal-access-ui
--/src
----/Feature
------/Profile
--------/components
----------/ContactInformationComponent.js
----------/PersonalInformationComponent.js
----------/ProfileComponent.js
----------/ProfileComponentMessages.js
--------/index.js
--------/ProfileContainer.js
The feature uses a commonly used pattern to move the data retrieval and management into a container
component, and the rendering logic into stateless presentation components. This pattern is widely
documented and used extensively when you work with React and Redux. The pattern is not covered
in detail here, but you can see how features are structured.
About this task
You can copy the entire code base for a feature into your custom project and replace the route that served
that feature with your version. You can then modify the code base to create your own custom feature.
Note: After you reuse a feature, you now have full ownership of the custom feature. On upgrade of the
universal-access-ui package, you do not receive any changes to the product version of the feature
and must manually apply any updates that you need.
Note: Most features in the universal-access-ui package depend on the modules in the universal-
access package for their data. On upgrade, you must validate that your feature was not affected by any
changes to modules that the feature depends on. See “Universal Access Redux modules” on page 57
.
Procedure
1. Find the feature that you want to replace in the universal-access-ui package.
a) Inspect the URL end point that you want to change and note the path.
For example, the path to the faqs feature is /myapp/faqs so the path is faqs.
b) Open the /node_modules/@spm/universal-access-ui/src/router/Path.js le. Search
for the path string literal, in this case '/faqs' is assigned to the Paths.FAQS variable.
const Paths = {
HOME: '/',
...
FAQS: '/faqs',
...
SIGNUP: '/signup',
...
};
export default Paths;
c) Open the /node_modules/@spm/universal-access-ui/src/router/Routes.js le.
Search for Paths.FAQS to nd the route that the variable is being used in. Use the component
value of the route to nd the associated feature.
Chapter 5. Developing with the Universal Access Responsive Web Application
107

For example, the FAQ route component is imported from '../features/FAQ'.
...
import FAQ from '../features/FAQ';
...
export default () => (
<Switch>
...
<Route component={FAQ} exact path={PATHS.FAQS} />
...
</Switch>
);
2. Copy the entire feature folder into your custom application.
For example, copy the /node_modules/@spm/universal-access-ui/src/features/FAQ
directory to <myapp>/src/features/FAQ.
3. Replace the route with your custom version.
a) In your project, open the src/routes.js le.
b) Add a route at any point before the UARoutes entry to ensure that your path supersedes the same
path in UARoutes.
import React from 'react';
import { Switch, Route } from 'react-router-dom';
import { Routes as UARoutes } from '@spm/universal-access-ui';
import FAQ from './features/FAQ';
export default (
<Switch>
<Route component={FAQ} exact path='/faqs' />
<UARoutes />
</Switch>
);
4. You can now verify whether your custom version of the feature is being used. Make an obvious change
to the feature and reload the application to see whether the change is picked up and displayed.
5. Change the code to customize the feature.
Implementing page view analytics
You can implement page view analytics in your application to collect citizen page views for analysis.
Using the included page view JavaScript functions, you can start tracking page views by implementing a
callback to send tracking data to a library of your choice for analysis. In this example, the data is sent to
the Google global site tag (gtag.js) JavaScript tagging framework.
Before you begin
The registerPageViewCallback and pageView functions are available for you to implement tracking
in your custom application.
registerPageViewCallback
This function takes a callback, which you must dene, as an argument. You must call the
registerPageViewCallback function before the application is rendered.
pageView
This function calls the registered page view callback where present. If the page view callback is not
registered, it is not called.
For IEG pages, pageView passes an object with the following properties as a parameter to the
callback:
• pageType ('IEG')
• pageID (the current IEG page ID)
• scriptID (the IEG script ID)
108
IBM Cúram Social Program Management 8.0.2: IBM Universal Access Responsive Web Application 5.2.0

For non-IEG pages, pageView passes an object with the following properties as a parameter to the
callback:
• title
• location
• path
About this task
To track page views, you must initialize the tracking library, register the callback, and implement the
callback to send tracking data to a library for analysis.
When you dene your own custom routes, you must use the TitledRoute component so that the pages
can be tracked. If the route corresponds to an IEG script, you must set the isIEG property for the
TitledRoute component.
Procedure
1. The index.html le is a good place to initialize the library. Insert this snippet, which is as provided by
Google except for the tracking call.
<!-- Global site tag (gtag.js) - Google Analytics -->
<script async src="https://www.googletagmanager.com/gtag/js?id=UA-TRACKINGID"></script>
<script>
window.dataLayer = window.dataLayer || [];
function gtag(){dataLayer.push(arguments);}
gtag('js', new Date());
</script>
2. Also in the index.html le, you must update the Content Security Policy to allow the Google script to
run:
<meta http-equiv="Content-Security-Policy" content="script-src 'self' 'unsafe-eval' 'unsafe-
inline' https://www.googletagmanager.com/ http://www.google-analytics.com/" />
3. Implement the callback function.
The callback handles both IEG and non-IEG pages based on the pageType prop.
export default function customCallback(props) {
const gtagProps = {};
if (props.pageType && props.pageType === 'IEG') {
// IEG pages
gtagProps.page_title = `${props.scriptID} ${props.pageID}`;
gtagProps.page_path = `/apply/${props.pageID}`;
} else {
// Non-IEG pages
gtagProps.page_title = props.title;
gtagProps.page_location = props.location;
gtagProps.page_path = props.path;
}
window.gtag('config', 'UA-TRACKINGID', gtagProps);
}
4. In index.js, register the callback before the application renders.
registerPageViewCallback(customCallback);
ReactDOM.render(<App />, document.getElementById('root'));
5. For your own custom routes, you must use the TitledRoute component so that the pages can
be tracked. If the route corresponds to an IEG script, you must set the isIEG property for the
TitledRoute component. For more information, see “Advanced routing” on page 69.
Implementing a test environment
Use the test-framework package to set up your IBM Universal Access Responsive Web Application test
environment for testing with Test Cafe, Jest, and Enzyme. Then, use this guidance and the provided helper
Chapter 5. Developing with the Universal Access Responsive Web Application
109
les to write end-to-end tests, unit tests, or snapshot tests for your project. You can congure the default
test environment to suit your project requirements as needed.
End-to-end test environment
The test-framework package contains reusable les to help you set up a test environment with
TestCafe, and to help you to develop end-to-end test scripts.
End-to-end test helper les
The end-to-end test helper les in test-framework are designed to operate best within a page object
framework structure for your end-to-end automation suite.
Browser.js
The Browser.js module simulates interactions a user can have with their browser during an automated
test, such as:
• Retrieving the current URL for the current page displayed in the remote browser.
• Clicking the browsers back button to navigate to the previous page.
• Clicking the browsers forward button to advance to the next page.
Page.js
The Page.js module simulates common interactions that a user can have with a web page in an
application. A large variety of prebuilt methods are provided in this le, which help you to execute many
user interactions, such as:
• Clearing text and typing new text into an input eld.
• Clicking an element.
• Clicking an element only if it is displayed.
• Retrieving the value of an input eld.
• Retrieving the text content of an element.
• Waiting for an element to be displayed.
• Plus many more as described in the JS documentation for this package.
In addition, the Page module contains two methods to help you with developing and debugging your
end-to-end test scripts:
• The wait method pauses a test for a specied time (in milliseconds).
• The debug method physically stops the currently executing test script. You can then interact with the
page that is displayed in the remote browser in its current state. You can resume the test script again at
any time.
PageObject.js
The PageObject.js le acts as a base class from which you can build your own custom page objects
for use with end-to-end tests for any application. This class provides a lot of built-in functionality to help
you with your page object development tasks. For more information, see the JS documentation for this
package and the PageObject class documentation.
Verify.js
The Verify.js module provides a number of assertion methods for verifying the results from your
automated test scripts. This module allows you to execute verications such as:
• Verifying whether an element is displayed in the UI.
110
IBM Cúram Social Program Management 8.0.2: IBM Universal Access Responsive Web Application 5.2.0

• Verifying whether two values are equal (or not).
• Verifying whether a specied value is true or false.
End-to-end test initial setup and conguration
Create your directory structure and index.js le.
Project directory structure
Using the suggested directory structure for your end-to-end test framework helps you to get the best out
of the test-framework package during test development. It also helps you to keep things clean and
maintainable as your test framework scales in size.
.
├── tests
| └── e2e
| | └── config
| | └── data
| | └── page-objects
| | └── scripts
• The config directory contains a single index.js le that serves as the conguration le for all of the
modules and page objects that are going to be used by your test scripts.
• The data directory contains any additional data that is used by the test scripts such as user data or
routes data for your application.
• The page-objects directory is where you build the page objects that are required to test each
individual page of your application.
• The scripts directory is where you place the test scripts to be ran by testcafe.
Initial config directory setup
The rst step in building your end to end framework is to create an index.js le in the config directory
as shown:
.
├── tests
| └── e2e
| | └── config
| | | └── index.js
This le is where you are import all of the modules from the test-framework package that you want
to reuse in your test scripts. You also congure and export your page objects from this conguration le.
This approach improves your framework's long-term maintainability as everything that is used by your
test scripts is located in and exported from this single le. If something does change, the conguration le
is all that needs to be updated and your scripts automatically inherit all of the changes without the need
to refactor them.
Import the test-framework helper les and export them for use in your test scripts. Initially your
index.js le contains the following code:
import { Browser, Page, Verify } from'@spm/test-framework';
export { Browser, Page, Verify };
If you set up your test directory structure as suggested, then importing each of these modules into your
test scripts follows this pattern:
import { Browser, Page, Verify } from'../config';
Chapter 5. Developing with the Universal Access Responsive Web Application
111
Page object development and best practices
The page object model design pattern for building UI automation frameworks is our recommended
practice. A page object is an object-oriented class that is built to represent the individual pages in the
application under test. These representations offer an interface from which your test scripts can interact
with any UI element that is associated with that page similarly to how a user would interact with them.
For example, the page object for the LoginPage in your application might include a login() method
where you specify the user name and password credentials as parameters. This method then provides the
automated steps that are required for logging a user in to your application. This page object can then be
reused by any test script that requires a logged in user, with each test suite calling that login() method
without needing to copy and paste the individual steps each time.
The benets to the page object model extend far beyond simply reducing code duplication. Further
benets include:
• The API of your chosen automation framework is completely abstracted away from your test scripts.
This makes tests easier to read, write and review.
• Element selectors are isolated in the page object that requires them.
• Since you are referencing page objects in your test scripts, the scenarios executed by the scripts
document themselves as you write them. Managers and new team members alike will nd these test
scripts much clearer and easier to understand. For example: it is much easier to read and instantly
know the meaning of loginPage.goto(); followed by loginPage.login(); as opposed to trying
to make sense of a group of API calls.
• Suppose that an update completely changes the behavior for something that previously exists in one of
your page objects. You need to update only the affected individual page object function to work with the
new behavior and all of your test scripts automatically inherit the changes. You won't need to go back
and change anything in any of your scripts.
Best practices
Best practices for the development of page objects in your automation framework.
Use CSS selectors to locate your UI elements
Use CSS selectors when trying to locate your UI elements. While you can use XPaths for this purpose,
CSS selectors are the highly recommended practice due to their sheer simplicity, not to mention the
overall speed and performance advantages they have over their XPath equivalents. To get the best
out of CSS selectors, assign some attribute to your UI elements to make them unique from all other
elements. For example, set the id, name, or perhaps a custom data-testid attribute with some
unique identier for that element.
Keep assertions out of page objects
One of the golden rules for building end-to-end test scripts is that you should aim to include just one
main assertion or set of assertions per test script. It is therefore equally important that you do not
place assertions in any of the functions provided by your page objects. It can be very tempting to add
assertions to a page object function because it always provides an assertion for you every time that
method is invoked.
For example, suppose that a message is briefly displayed to the user to conrm that they have
successfully logged in. You also have a scenario to automate that veries that this message is
displayed after a user has logged in. You might add the assertions for this as the nal steps of the
login() method in your LoginPage page object so that this verication is always made every time
any page object invokes that login() function.
While it can look like a good idea to do this and also promotes the idea that you are getting something
of a free verication for your login behavior in all of your other scripts, this is not a recommended
practice because:
112
IBM Cúram Social Program Management 8.0.2: IBM Universal Access Responsive Web Application 5.2.0

• First, you are losing a lot of clarity in your test scripts by adding verications to your page object
functions. Seeing loginPage.login() in your script does not clearly imply that this method also
includes a verication therefore the intention of the test script will also be unclear as a result.
• Adding assertions to page objects adds too much ambiguity to your test suites. Your scripts will
automatically inherit multiple assertions, any of which can fail, which may result in the conclusion
of your scripts never being reached and their intended main verication(s) never taking place. Going
back to our login() example, suppose a bug is introduced whereby the login message is not
displayed to the user after successful login. Now all of your test scripts which invoke that login()
method will fail since you added the verications to conrm the presence of the message even
though only one test in your entire suite should realistically be verifying this.
• Developers that may have to debug a failing test will be forced to dig deep into your page object
framework in order to nd what verications have actually taken place during the test execution.
This will be even more complex a task if you are importing and reusing page objects that have been
developed in a separate framework.
• Verications aren't as free as you might think. In fact, they can be very expensive for time. Having
multiple verications taking place throughout your page object functions can slow your test script
execution times down by a signicant amount.
The pageObject class
The PageObject.js le in the test-framework package provides an interface from which you can
easily create page objects for use in your end-to-end framework. When you create page objects, you can
use PageObject constructor parameters to automatically generate methods that are commonly used
by page objects during automation.
Import this class into your page object le directly and extend from it to inherit all of its behavior, for
example:
import { PageObject } from'@spm/test-framework';
export default class MyPageObject extends PageObject {
// ...
}
You can use the PageObject class to set a URL for the web page that is represented by your page object.
It also has a number of parameters to automatically generate methods that are commonly used by page
objects during automation. Alternatively, you can call the super method in the constructor to extend
from this class without setting any of the parameters.
The PageObject constructor parameters
The PageObject class provides a number of constructor parameters that you can use to build your
page objects. The sample code shows how to invoke the PageObject constructor and lists all of the
parameters that are accepted:
export default class MyPageObject extends PageObject {
/* Invokes the PageObject constructor - the following is the complete list of parameters
supported in their correct order */
constructor() {
super(
url,
clickList,
clickIfDisplayedList,
clearAndTypeTextList,
typeTextList,
selectList,
getValueList,
getIsSelectedList,
getDropdownSelectionList,
getTextContentList
getIsReadOnlyList
);
}
}
Chapter 5. Developing with the Universal Access Responsive Web Application
113
@param {JSON} clickList parameter
The clickList parameter species a list of CSS selectors in JSON, all of which correspond to elements
in the UI to be clicked during your test execution. For example, these two CSS selectors correspond to two
different buttons in your UI:
const submitButton ='input[id="submit"]';
const exitButton ='button[id="exit"]';
Instead of declaring them as the individual variables as shown, declare them as the clickList
parameter as follows:
const clickList= {
exitButton: 'button[id="exit"]',
submitButton: 'input[id="submit"]'
};
export default class MyPageObject extends PageObject {
/* For this example we are only setting the URL and clickList parameters - all other
parameters are left undefined */
constructor() {
super('http://www.ibm.com', clickList);
}
}
By specifying your UI elements that are to be clicked in this way, you now have access to click methods
for each of the selectors in the clickList after you create an instance of your page object. These click
methods are automatically generated when your page object is created. So for the previous example,
the following code sample demonstrates exactly what methods become available when you create an
instance of the MyPageObject class:
/* First create an instance of your page object */
const myPageObject = newMyPageObject();
/* After creating the page object instance, you will have access to both of these click methods
*/
await myPageObject.clickExitButton();
await myPageObject.clickSubmitButton();
The click method name is derived from the word click followed by the title of the key that you
assigned to your selector. Therefore, if you declared a myCustomSelector key in the JSON that provided
to the clickList parameter, the click method for that selector is clickMyCustomSelector().
Note: As all of these method names are derived from keys, be careful with your spelling. Any spelling
mistakes in keys are reproduced in the subsequent click method name.
@param {JSON} clickIfDisplayedList parameter
Specifying CSS selectors in the clickIfDisplayedList parameter automatically generates a method
for each selector when the page object instance is created.
Each of the generated methods attempts to click the UI element corresponding to your specied selector
only if that selector is displayed in the UI. If the UI element is not displayed, the method exits cleanly and
allows your test script to continue running.
The naming convention for this method follows the format click_XXX_IfDisplayed where _XXX_ is
the title that you assigned to each of your keys.
The methods that are generated in this instance are as follows:
const clickIfDisplayedList= {
exitButton: 'button[id="exit"]',
submitButton: 'input[id="submit"]'
};
class MyPageObject extends PageObject {
/* For this example we are only setting the URL and clickIfDisplayedList parameters - all
other parameters are left undefined */
constructor() {
114
IBM Cúram Social Program Management 8.0.2: IBM Universal Access Responsive Web Application 5.2.0

super('http://www.ibm.com', undefined, clickIfDisplayed);
}
}
/* Now create an instance of your page object */
const myPageObject = newMyPageObject();
/* After creating the page object instance, you will have access to both of these
clickIfDisplayed methods */
await myPageObject.clickExitButtonIfDisplayed();
await myPageObject.clickSubmitButtonIfDisplayed();
@param {JSON} clearAndTypeTextList parameter and @param {JSON} typeTextList
parameter
Both of these parameters automatically generate type methods. However, the functionality of the
methods that are generated for each of the element selectors that are specied in either list is slightly
different:
• If you add selectors to the clearAndTypeTextList parameter, then the methods clear all previous
text that was entered into the corresponding UI element before you type new text into that element.
• Any selectors added to the typeTextList parameter generate methods that type text into the UI
element. No previous text is cleared, so the text is appended to the existing text.
While the functionality varies depending on which list that you add your selectors to, the actual method
names that are generated follow the very same naming convention. In both cases the method name
follows the format type_XXX, where _XXX is the title that you assigned to each of your keys. This
type_XXX method also accepts a string parameter where you can specify the exact text that you want
to type into that element.
The methods that are generated in this instance are as follows:
const clearAndTypeTextList = {
firstName: 'input[id="first_name"]',
lastName: 'input[id="last_name"]'
};
const typeTextList = {
addressLine1: 'input[id="address_line_1"]',
addressLine2: 'input[id="address_line_2"]'
};
class MyPageObject extends PageObject {
/* For this example we are only setting the URL and both type text parameters - all other
parameters are left undefined */
constructor() {
super(
'http://www.ibm.com',
undefined,
undefined,
clearAndTypeTextList,
typeTextList
);
}
}
/* Now create an instance of your page object */
const myPageObject = newMyPageObject();
/* After creating the page object instance, you will have access to all of these type methods */
await myPageObject.typeFirstName('Michael');
await myPageObject.typeLastName('Myers');
await myPageObject.typeAddressLine1('Haddonfield');
await myPageObject.typeAddressLine2('Illinois');
@param {JSON} selectList parameter
You can use the selectList parameter to specify a list of element selectors that correspond to
<select> elements in your UI. Any element selector that specied in this parameter has a method
automatically generated for it when the page object instance is created. The naming convention for the
generated methods follows the format select_XXX, where _XXX is the title that you assigned to each of
Chapter 5. Developing with the Universal Access Responsive Web Application
115

your keys. This select_XXX method also accepts a string parameter where you can specify the exact
option that is to be chosen from the list of options in that <select> element.
The following example shows the methods that are generated for element selectors that are specied in
the selectList parameter:
const selectList= {
company: 'select[id="company"]',
county: 'select[id="county"]'
};
class MyPageObject extends PageObject {
/* For this example we are only setting the URL and the selectList parameter - all other
parameters are left undefined */
constructor() {
super(
'http://www.ibm.com',
undefined,
undefined,
undefined,
undefined,
selectList
);
}
}
/* Now create an instance of your page object */
const myPageObject = newMyPageObject();
/* After creating the page object instance, you will have access to these select methods */
await myPageObject.selectCompany('IBM');
await myPageObject.selectCounty('Dublin');
@param {JSON} getValueList parameter
For verication purposes in your test scripts, you can retrieve the text value of an <input> eld by adding
element selectors to the getValueList parameter.
The naming convention for the methods follows the format get_XXX_Value, where _XXX_ is the title
that you assigned to each of your keys. When you invoke this method in your test script, it retrieves the
current string value of the <input> element corresponding to the CSS selector you specied.
The following example shows how you might combine a type_XXX method action with a
get_XXX_Value method action to enter text into an <input> eld and then retrieve its value again:
const clearAndTypeTextList = {
firstName: 'input[id="first_name"]',
lastName: 'input[id="last_name"]'
};
/* We can re-use both of the existing selectors for the purpose of this list - there's no need
to declare them again */
const getValueList= {
firstName: clearAndTypeTextList.firstName,
lastName: clearAndTypeTextList.lastName
};
class MyPageObject extends PageObject {
/* For this example we are only setting the URL, the clearAndTypeTextList parameter and the
getValueList parameter - all other parameters are left undefined */
constructor() {
super(
'http://www.ibm.com',
undefined,
undefined,
clearAndTypeTextList,
undefined,
undefined,
getValueList
);
}
}
/* Now create an instance of your page object */
const myPageObject = newMyPageObject();
116
IBM Cúram Social Program Management 8.0.2: IBM Universal Access Responsive Web Application 5.2.0

/* After creating the page object instance, you will have access to all of these methods */
await myPageObject.typeFirstName('Jack');
await myPageObject.typeLastName('Bauer');
const firstName = awaitmyPageObject.getFirstNameValue();
const lastName = awaitmyPageObject.getLastNameValue();
@param {JSON} getIsSelectedList parameter
During test execution, you can verify whether a specic checkbox or set of checkboxes were selected
or cleared with the getIsSelectedList parameter. The naming convention for the generated methods
follows the format is_XXX_Selected, where _XXX_ is the title that you assigned to each of your keys.
When you invoke this method in your test script, it returns a Boolean true or false value that depends
on whether the checkbox element corresponding to the CSS selector that you specied is checked or not.
The following example shows how you might combine a click_XXX method action with an
is_XXX_Selected method action to select a checkbox and then determine whether it was checked:
const clickList= {
agreeTermsAndConditions: 'input[type="checkbox"][id="terms_and_conditions"]'
};
/* We can re-use this existing selector for the purpose of this list - there's no need to
declare it again */
const isSelectedList= {
agreeTermsAndConditions: clickList.agreeTermsAndConditions
};
class MyPageObject extends PageObject {
/* For this example we are only setting the URL, the clickList parameter and the
isSelectedList parameter - all other parameters are left undefined */
constructor() {
super(
'http://www.ibm.com',
clickList,
undefined,
clearAndTypeTextList,
undefined,
undefined,
undefined,
isSelectedList
);
}
}
/* Now create an instance of your page object */
const myPageObject = newMyPageObject();
/* The first check for whether the checkbox is selected or not will return false */
let isChecked = awaitmyPageObject.isAgreeTermsAndConditionsSelected();
/* Now lets click on the checkbox and re-run our previous method - this time it will return
true */
await myPageObject.clickAgreeTermsAndConditions();
isChecked = await myPageObject.isAgreeTermsAndConditionsSelected();
@param {JSON} getDropdownSelectionList parameter
You can retrieve the selected option from a <select> element during test execution by adding selectors
to the getDropdownSelectionList parameter. For example, if your test script already has a value for a
<select> element in your UI and you want to verify whether the value is correct and retained after some
other actions are executed.
The naming convention for the generated methods follows the format get_XXX_Selection, where
_XXX_ is the title that you assigned to each of your keys. When you invoke this method in your test script,
it retrieves the string value of the currently selected option in the <select> element corresponding to
the CSS selector you specied.
Chapter 5. Developing with the Universal Access Responsive Web Application
117

The following example shows how you might combine a select_XXX method action with an
get_XXX_Selection method action to select an option in a <select> element and then retrieve the
currently selected option from that <select> element again:
const selectList= {
company: 'select[id="company"]',
county: 'select[id="county"]'
};
/* We can re-use these existing selectors for the purpose of this list - there's no need to
declare them again */
const getDropdownSelectionList= {
company: selectList.company,
county: selectList.county
};
class MyPageObject extends PageObject {
/* For this example we are only setting the URL, the selectList parameter and the
getDropdownSelectionList parameter - all other parameters are left undefined */
constructor() {
super(
'http://www.ibm.com',
undefined,
undefined,
undefined,
undefined,
selectList,
undefined,
undefined,
getDropdownSelectionList
);
}
}
/* Now create an instance of your page object */
const myPageObject = newMyPageObject();
/* After creating the page object instance, you will have access to these all of these methods
*/
await myPageObject.selectCompany('IBM');
await myPageObject.selectCounty('Dublin');
const companySelection = awaitmyPageObject.getCompanySelection();
const countySelection = awaitmyPageObject.getCountySelection();
@param {JSON} getTextContentList parameter
You can use the getTextContentList parameter to specify a list of selectors from which you want to
retrieve text content.
The naming convention for the generated methods follows the format get_XXX_TextContent where
_XXX_ is the title that you assigned to each of your keys. When you invoke this method in your test script,
it retrieves the string value of the text content for the UI element corresponding to the CSS selector that
you specied.
The following example shows the methods that are generated for element selectors that are specied in
the getTextContentList parameter:
const getTextContentList= {
title: 'h1[id="main_heading"]'
};
class MyPageObject extends PageObject {
/* For this example we are only setting the URL and the getTextContentList parameter - all
other parameters are left undefined */
constructor() {
super(
'http://www.ibm.com',
undefined,
undefined,
undefined,
undefined,
undefined,
undefined,
undefined,
undefined,
getTextContentList
118
IBM Cúram Social Program Management 8.0.2: IBM Universal Access Responsive Web Application 5.2.0

);
}
}
/* Now create an instance of your page object */
const myPageObject = newMyPageObject();
/* After creating the page object instance, you will have access to these methods */
const titleText = await myPageObject.getTitleTextContent();
@param {JSON} getIsReadOnlyList parameter
During test execution, you can verify whether a specic input eld or set of input elements are marked as
read only with the getIsReadOnlyList parameter.
The naming convention for the generated methods follows the format is_XXX_ReadOnly, where _XXX_
is the title that you assigned to each of your keys. When you invoke this method in your test script, it
returns a Boolean true or false value that depends on whether the input element corresponding to the
CSS selector you specied is a read-only input eld or not.
The following example shows the methods that are generated for the element selectors that are specied
in the getIsReadOnlyList parameter:
const getIsReadOnlyList = {
firstName: input[id="first-name"]
};
class MyPageObject extends PageObject {
/* For this example we are only setting the URL and the getIsReadOnlyList parameter - all
other parameters are left undefined */
constructor() {
super(
'http://www.ibm.com',
undefined,
undefined,
undefined,
undefined,
undefined,
undefined,
undefined,
undefined,
undefined,
getIsReadOnlyList
);
}
}
/* Now create an instance of your page object */
const myPageObject = new MyPageObject();
/* After creating the page object instance, you will have access to these methods */
const isReadOnly = await myPageObject.isFirstNameReadOnly();
Adding custom behavior to your page objects
You can add custom behavior to your page objects. For example, a specic click action, or a specic series
of instructions to run for an automated task in your end-to-end test scripts.
As a further example, a web page might render some dynamic content and you need to wait for a specic
element to be visible in the UI before you continue.
The test-framework package provides a PageObject class from which you can take advantage of the
automatically generated methods that are provided. You can add your own custom behavior to your page
objects too.
Chapter 5. Developing with the Universal Access Responsive Web Application
119

Sample page object with custom behavior
In this example, you add a simple waitForPageLoad() method to your page object. It is assumed that
your application is rendering some dynamic content, such as a timeline, and that a See More button is
rendered at the foot of the dynamic content.
import { Page, PageObject } from'@spm/test-framework';
consturl='http://www.ibm.com';
/* Now lets define some other selectors that we are going to use to define our custom behaviour
*/constseeMoreButton='input[type="button"][id="see_more"]';
exportdefaultclassMyPageObjectextendsPageObject {
constructor() {
/* For this example we will only define the URL - we don't need to define the other lists
*/super(url);
}
/* Now lets add our custom behaviour to our page object */asyncwaitForPageLoad() {
awaitPage.waitForElementToBeDisplayed(seeMoreButton);
}
}
/* Now create an instance of your page object */constmyPageObject=newMyPageObject();
/* Lets navigate to the URL defined in our page object and then wait for the page to load
*/awaitmyPageObject.goto();
awaitmyPageObject.waitForPageLoad();
Building, exporting and conguring your page objects
Build, export, and congure your page objects so you can import and use them in your end-to-end test
scripts.
Building your page objects
It is best to build each of your page objects by extending from the PageObject class in the test-
framework package. Then, save each of your page object les in the page-objects folder in your
test framework directory structure. The naming convention for page objects is to use the title of the
application web page that the page object represents, for example HomePage.js or LoginPage.js.
.
├── tests
| └── e2e
| | └── page-objects
| | | └── HomePage.js
| | | └── LoginPage.js
Exporting your page objects from page-objects/index.js
After you create your page objects, you must export them from the page-objects directory to import
them into your test scripts. Create an index.js le in the page-objects folder to enable all of your
page object les to be exported from this single location. As you scale your page object framework, you
can have many page objects to export from this folder.
.
├── tests
| └── e2e
| | └── page-objects
| | | └── HomePage.js
| | | └── LoginPage.js
| | | └── index.js
With the index.js le in place, export your page objects by using this le as shown in the example:
export { defaultasHomePage } from'./HomePage';
export { defaultasLoginPage } from'./LoginPage';
120
IBM Cúram Social Program Management 8.0.2: IBM Universal Access Responsive Web Application 5.2.0

Conguring your page objects
You can now import page objects into your project's config/index.js le for reuse with your end-to-
end test scripts. Before you continue, ensure that your test directory structure looks like this structure:
.
├── tests
| └── e2e
| | └── config
| | | └── index.js
| | └── page-objects
| | | └── HomePage.js
| | | └── LoginPage.js
| | | └── index.js
The following sample code shows your config/index.js le after you add your page object
conguration to the le. In the sample code, you are importing each of your custom page objects from
your page-objects folder, instantiating each page object and then exporting each instantiated page
object from the le:
import { Browser, Page, Verify } from'@spm/test-framework';
import {
HomePage,
LoginPage// ... also import any other page objects that you require ...
} from'../page-objects';
/* Instantiate all of the page objects to be used during the e2e tests */
consthomePage=newHomePage();
constloginPage=newLoginPage();
// ... also instantiate any other page objects that you imported ...export {
Browser,
Page,
Verify,
homePage,
loginPage// ... export all other instantiated page objects ...
};
With your page objects congured, you can now easily import and use your page objects in your end-to-
end test scripts.
Writing end-to-end scripts
Now that your page objects are developed and your end-to-end framework is congured to use the
test-framework package, you are ready to start writing test scripts that bring everything together. The
code samples are developed with testcafe as the leading framework.
The sample code assumes that your framework directory structure is as shown.
.
├── tests
| └── e2e
| | └── config
| | | └── index.js
| | └── page-objects
| | | └── HomePage.js
| | | └── LoginPage.js
| | | └── index.js
| | └── scripts
| | | └── *.e2e.test.js
Scenario 1: Logging in redirects the user to the home page
You can write a test script for the following sample scenario based on the provided directory structure:
1. Open the application and go to the log-in page.
2. Enter the credentials of a valid user into the username and password elds and click Log in.
3. After you log in, verify that you were redirected to the user's account page.
Chapter 5. Developing with the Universal Access Responsive Web Application
121

Now to look at a test script for this scenario that incorporates your page objects and is driven by
testcafe. Comments with each line of code further describe exactly what's happening at each step.
/* Firstly import all relevant page objects and test helper files by importing them from the
config/index.js file */
import { Browser, homePage, loginPage, Verify } from '../config';
fixture('Login e2e').page(loginPage.getUrl()); // Set the initial page to be opened as the
login page
test('Verify that the user is redirected to the home page on successful login', async () => {
/* Log in as a valid user by re-using the page objects login method */
await loginPage.login();
// Re-use the Browser test helper file to get the current URL from the remote browser */
const currentUrl = await Browser.getCurrentUrl();
// Finally verify that the current URL in the remote browser matches the expected URL for the
home page
// It should be noted that every page object has a `getUrl()` method which allows you to
easily retrieve the expected URL for the page it represents
// Also note that this test is re-using the Verify test helper file to do its verifications
await Verify.equal(
currentUrl,
homePage.getUrl(),
'User was not redirected to the home page after successfully logging in'
);
});
Save this test into your scripts directory as LoginPage.e2e.test.js. Ensure that you save all other
test scripts for your end-to-end framework in this directory.
Running end-to-end tests
It is straightforward to run your tests with testcafe by using a single npm script and a number of
custom-set options.
For example, this npm script runs the specied test scripts by using testcafe. The tests run in Google
Chrome with headless mode enabled and in incognito mode:
"testcafe": "testcafe \"chrome:headless -incognito\" tests/e2e/scripts/*.e2e.test.js",
To add this script to your project, copy and paste the npm script into the package.json le of the
project that contains your end-to-end test framework. From the root of the project, run the script from the
command line as follows:
npm run testcafe
You can watch your test suites run in headless mode from your command line.
You can disable headless mode by removing the :headless section of the script:
"testcafe": "testcafe \"chrome -incognito\" tests/e2e/scripts/*.e2e.test.js",
Now, when you run your test suites, you can see a physical remote browser open on the desktop of your
local computer and you can watch the test execution as it happens.
For more information about the full list of supported browsers and all of the command line switches
available for running scripts, see the TestCafe documentation.
122
IBM Cúram Social Program Management 8.0.2: IBM Universal Access Responsive Web Application 5.2.0

Jest and Enzyme test environment
The test-framework package contains reusable les to help you set up a test environment with Jest
and Enzyme, and to help you to develop unit and snapshot test scripts.
Unit and snapshot test initial setup and conguration
Use the provided les to easily congure a default Jest and Enzyme test environment that you can use to
start writing your unit and snapshot tests.
Project directory structure
By default, the Jest les expect a certain folder structure for your unit and snapshot test framework.
Create the following folder structure in your environment.
.
├── tests
| └── config
| | └── setup-tests.js
| | └── snapshot.config.js
| | └── test-mapper.js
| | └── unit.config.js
| └── snapshots
| | └── *.snap.test.js
| └── unit
| | └── *.unit.test.js
Conguring the setup-tests.js le
Add the following code to the setup-tests.js le to congure Jest to work with enzyme-adapter-
react-16 and to congure the snapshot serializer for use with the snapshot tests:
import Enzyme from 'enzyme';
import { createSerializer } from 'enzyme-to-json';
import Adapter from 'enzyme-adapter-react-16';
Enzyme.configure({ adapter: newAdapter() });
/* Setup snapshot serializer */
expect.addSnapshotSerializer(createSerializer({ noKey:true, mode:'deep' }));
Mocking the Redux store
Some Jest tests mount components that access a Redux store by using the getState method.
You can congure a mock store with the relevant Redux methods by adding this code to the setup-
tests.js le.
global.mockStore = {
getState: jest.fn(),
dispatch: jest.fn(),
subscribe: jest.fn()
};
You can then call the mock store from any component in a Jest test script with the following code:
const myComponent = IntlEnzymeTestHelper.mountWithIntlWithStore(
<MyComponent />,
global.mockStore
);
Mocking the Redux store with custom mock state
Some unit tests might need access to a mock Redux store with a specic mock state and with custom
data.
Chapter 5. Developing with the Universal Access Responsive Web Application
123

• Add the mock state to the setup-tests.js le as follows:
const mockState = {
// Add all of your mock data keys and values here
};
• Set the mock getState function to return the mock state when it is called during unit tests:
global.mockStore = {
getState: jest.fn(() => mockState)
};
Conguring the test-mapper.js le
Jest cannot process data from CSS or image les and throws an error to the console if these les are
referenced by any React component. Jest is designed to test the behavior of the component code and
distances itself from any styling or images that are applied to that component.
To cleanly bypass any of these imports, add the following code to the test-mapper.js le.
module.exports= {};
Conguring the unit.config.js and snap.config.js les
These les are designed to congure the unit tests and snapshot tests for a project. You can use the
default Jest conguration by adding the following content to both les:
// unit.config.js
const { getUnitTestConfig } = require('@spm/test-framework');
module.exports = getUnitTestConfig();
// snapshot.config.js
const { getSnapshotTestConfig } = require('@spm/test-framework');
module.exports = getSnapshotTestConfig();
Setting custom jest congurations
You can customize the default Jest conguration.
For example, you can set more project-specic folders to be ignored by the Jest coverage collection
statistics as follows:
const { getUnitTestConfig } = require('@spm/test-framework');
const unitTestConfig = getUnitTestConfig();
unitTestConfig.coveragePathIgnorePatterns.push('<rootDir>/path/to/my/folder1');
unitTestConfig.coveragePathIgnorePatterns.push('<rootDir>/path/to/my/folder2');
module.exports = unitTestConfig;
Unit and snapshot test helper les
The test-framework provides the IntlEnzymeTestHelper.js and TestUtils.js helper les to
help you to write unit and snapshot tests.
IntlEnzymeTestHelper.js
React components that use the react-intl module need access to the intl context,
which is not available when you mount single components with Enzyme. You can use the
IntlEnzymeTestHelper.js class to wrap a valid English-locale intl context around a component
under test.
124
IBM Cúram Social Program Management 8.0.2: IBM Universal Access Responsive Web Application 5.2.0

TestUtils.js
The TestUtils.js class is a utility class for testing React components with Redux modules.
To use the helper les in your Jest tests
Import any of the Jest helper les directly from the test-framework package as follows:
import { IntlEnzymeTestHelper, TestUtils } from '@spm/test-framework';
You can then call any of the class functions from your Jest test scripts as shown in the following
examples:
describe('Test suite', () => {
it('verifies something', () => {
// ...
const wrapper = IntlEnzymeTestHelper.mountWithIntl(
<MyComponentUnderTest />
);
// ...
});
it('verifies something else', () => {
const mockData = {
// mock JSON data
};
const mockUtilFunction = TestUtils.mockActionsCallbackFxn([true, mockData]);
// ...
});
});
Guidelines for writing unit test scripts
The following guidance might be useful when you write Jest tests for both unit and snapshot testing.
To unit test or to snapshot test?
The rst question that you must answer is whether to write a unit test or snapshot test.
Unit tests
Unit tests act as documentation for the project code or React component that you are testing. They
include individual verications for every piece of behavior in the code. Anyone must be able to read
the verications in the unit test suite and fully understand which behavior is being triggered and
under which circumstances. Unit tests must be clear and concise and are a perfect indicator of code
coverage within the overall project. These tests are the primary form of testing for the project code so
you must write unit tests for all code in the project.
Snapshot tests
Snapshot tests can verify only that the DOM output for a React component in the provided state
is correct. Don't use snapshot tests to test React component functionality, but use them as a
complement to your unit tests to verify that the DOM output for a React component is correct. After
unit tests verify the code behavior, snapshot tests can verify that everything is correct from an HTML
markup perspective when the component is output to the DOM.
Snapshot test verications are far too vague to offer any form of clear documentation for a component
that is being tested. Because of the vague nature of their verications, snapshot tests are also a poor
indicator of code coverage so don't use them to collect code coverage statistics. It is much more
benecial for the project to collect code coverage statistics solely for behavioral based verications,
such as unit tests.
Collecting code coverage statistics for snapshot tests can provide a number of false positives. Code
coverage might increase due to the presence of snapshot tests. However, the functionality of the code
is not tested and veried as correct. You might read a high code coverage percentage in the coverage
report and incorrectly assume that all of the component behavior is tested.
Chapter 5. Developing with the Universal Access Responsive Web Application
125

It can be benecial to write both unit test and snapshot test suites for a project. However, unit tests
must always be your priority given that they directly test the functionality of all of the code. A project can
manage without snapshot tests. However, it can never survive without a thorough suite of unit tests.
Decide what must be tested
For each a new function or React component, you must decide what to test. Read through the code for the
function or component and highlight the key behaviors and when they occur.
Create the unit test suite to test all of the identied functionality. After all of the behaviors are captured
and tested in the unit test suite, then you can write snapshot tests to capture the DOM output for any new
React components.
Your goal is to test all of the available functionality and cover 100% of the code. If there is code that is
unreachable for any reason, then that code must be highlighted by the unit tests and refactored.
Ensure that all tests can be ran independently
All tests must be able to run independently of one another. A test that depends on the completion of
another test is difcult to maintain and can be a direct cause of many avoidable consistency and reliability
problems with your test suites.
• If the rst test fails, the dependency can trigger a false negative by causing a dependent test to fail. Jest
tests run concurrently by default so avoid creating tests that depend on each other.
• If a test is nishing work that started in another test, the dependency can signicantly reduce the clarity
of what each test is doing.
• If a test fails, the dependency signicantly hinders debugging. You need to be able to isolate failing
tests so you can rerun the failing test only. Test preconditions must be automatically included when you
run the failed test independently on your local computer. If a failing test depends on another test, you
must nd and run the other test before you can run the failing test. If several tests are chained in a
sequence, you must nd and run all preceding tests.
If you need reusable piece of test code for use in multiple test scripts, put the code inside one of the Jest
test hooks, such as beforeAll, beforeEach, afterAll, or afterEach.
Use clear test descriptions
Each unit test in a project veries some behavior of the code. Therefore, the description of the unit test
must clearly indicate exactly what is being tested and under what circumstances.
There are essentially two ways to declare a unit test description:
• You can use a behavior-driven development (BDD) style description. For example:
it('given MyComponent, when the submit button is clicked, then the dialog is rendered', () =>
{
// ...
});
• You can use a plain English sentence beginning with verifies that... to state exactly what is being
veried. For example:
it('verifies that the dialog is rendered when the submit button is clicked', () => {
// ...
});
Minimize the number of assertions for each test
Ideally each test script has one main assertion or expect statement that veries the behavior that is
being tested. It can be tempting to place multiple expect statements into a single test script, but avoid
this practice. If any of the preceding expect statements in the script fail, then none of the subsequent
expect statements will run.
126
IBM Cúram Social Program Management 8.0.2: IBM Universal Access Responsive Web Application 5.2.0

If multiple expect statements are required, you can create a test suite that triggers the behavior to be
tested in a beforeAll or beforeEach test hook. You can then write multiple test scripts that capture
and verify each expected behavior individually. For example:
describe('MyComponent onClick() method behaviour', () => {
let myComponent;
let onClick;
beforeAll(() => {
onClick = jest.fn();
myComponent =mount(<MyComponent onClick={onClick} />);
/* Click the submit button to fire the onClick behaviour */
myComponent.find('button').prop('onClick')();
});
it('verifies that the wds-u-hidden class of the dialog has been removed', () => {
expect(myComponent.find('Dialog').hasClass('wds-u-hidden')).toBeFalsy();
});
it('verifies that the onClick functionality was invoked', () => {
expect(onClick.mock.calls).toHaveLength(1);
});
});
Running Jest and Enzyme tests
If you are using the default Jest conguration, you can run the Jest and Enzyme tests by adding scripts to
the package.json le.
Procedure
• Add the following scripts to the package.json le.
"test-snapshots": "jest --config ./tests/config/snapshot.config.js",
"test-snapshots-update": "npm run test-snapshots -- -u",
"test-unit": "jest --config ./tests/config/unit.config.js",
"test-unit-coverage": "npm run test-unit -- --collectCoverage",
React environment variable reference
A full list of Universal Access React environment variables categorized by function. You can set
environmental variables in .env les in the root directory of your application. If you omit environment
variables, either they are not set or the default values apply.
The starter pack provides the .env and the .env.development les to get you started. For more
information about using .env les in react-scripts, see Adding Development Environment Variables
In .env in the Create React App documentation.
• “REST API” on page 128
• “User session” on page 129
• “Security” on page 129
• “Locale” on page 130
• “Unauthorized redirect” on page 130
• “Feature toggles” on page 130
• “Connectivity handler” on page 130
• “User account status polling” on page 131
• “Application-specic verication polling” on page 131
• “Document uploads” on page 132
• “Social Program Management Web Development Accelerator” on page 132
• “Application authentication” on page 133
• “Simple authentication for development” on page 133
Chapter 5. Developing with the Universal Access Responsive Web Application
127

• “Single sign-on (SSO) authentication” on page 134
• “Intelligent Evidence Gathering (IEG)” on page 135
REST API
REACT_APP_REST_URL
Species the path to REST services. You must set this variable as it is needed by the Authentication
service. When you specify a path, it can be a URL to a server, or a relative path in the local
deployment server if you are using a proxy. For the Universal Access application, it is http{s}://
<ServerHostName>:<Port>/Rest. For example:
REACT_APP_REST_URL=https://192.0.2.4:9044/Rest
Where <ServerHostName> and <Port> are the hostname and port number of the server where the
REST services are deployed.
This variable is also used by the default Redux modules and modules that are generated by IBM Social
Program Management Web Development Accelerator to call REST APIs. For example:
RestService.get(${REACT_APP_REST_URL}/v1/users)
For development with the mock server, you can use local host without /Rest. For example:
REACT_APP_REST_URL=http://localhost:3080
For more information, see “The mock server API service” on page 71.
MOCK_SERVER_PORT
Species the port to serve mock APIs. For example:
MOCK_SERVER_PORT=3080
For more information, see “The mock server API service” on page 71.
REACT_APP_RESPONSE_TIMEOUT
Species the maximum time in seconds to wait for the rst byte to arrive from the server, by default
10, but does not limit how long the entire download can take. Set the response timeout to be a few
seconds longer than the actual time it takes the server to respond. The lengthened response allows
for time to make DNS lookups, TCP/IP, and TLS connections. For example:
REACT_APP_RESPONSE_TIMEOUT=10
For more information, see “The RESTService utility” on page 73
.
REACT_APP_RESPONSE_DEADLINE
Species the maximum time in seconds for the entire request, including all redirects, to complete.
If the response is not fully downloaded within REACT_APP_RESPONSE_DEADLINE, the request is
canceled. The default value is 60. For example:
REACT_APP_RESPONSE_DEADLINE=60
For more information, see “The RESTService utility” on page 73
.
REACT_APP_DELAY_REST_API
(Development only) Species a time in seconds to simulate a delay in the response from the API. For
example:
REACT_APP_DELAY_REST_API=2
128
IBM Cúram Social Program Management 8.0.2: IBM Universal Access Responsive Web Application 5.2.0

The value can be set to any positive integer to adjust the delay. For more information, see “The
RESTService utility” on page 73.
User session
REACT_APP_LOGOUT_END_POINT
Species the logout endpoint for the application. By default, /logout.
The strategy for user session logout changed to align with using the SPM REST infrastructure APIs.
Now when logging out, the /logout endpoint is called instead of the old logout.jsp endpoint.
REACT_APP_LOGOUT_END_POINT=/logout
If your version of SPM does not support the new /logout endpoint, you must set the old
logout.jsp endpoint. The /logout endpoint is supported in 7.0.10.0 iFix 4 and 7.0.11.0 iFix 1
or later.
REACT_APP_LOGOUT_END_POINT=logout.jsp
REACT_APP_SESSION_INACTIVITY_TIMEOUT
Species the time in seconds before a user session expires. The value must match the session
timeout that is congured on the server, by default, 30 minutes, or 1800 seconds.
REACT_APP_SESSION_INACTIVITY_TIMEOUT=1800
For more information, see “Conguring user session timeout” on page 182
.
REACT_APP_SESSION_PING_INTERVAL
Species the time in seconds between each time that the user’s current session is checked for
security purposes to see whether they are actively using the application or not. By default, the value is
60. For example:
REACT_APP_SESSION_PING_INTERVAL=60
REACT_APP_SESSION_TIMEOUT_REDIRECT_URL
Species the URL that the application redirects to when a user session times out. By default, /login.
For example:
REACT_APP_SESSION_TIMEOUT_REDIRECT_URL=/login
Security
You can specify Cross-Site Request Forgery (CSRF) protection settings and the logout endpoint for
your application. For more information, see “Enabling Cross-Site Request Forgery (CSRF) protection for
Universal Access” on page 140.
REACT_APP_REQUIRE_CSRF_TOKEN
Species whether a CSRF token is needed before the application can make API requests. If enabled,
and if no CSRF token is stored, the application attempts to get a CSRF token before making a request.
It takes a Boolean value, and defaults to false if not present. For example, to enable CSRF protection:
REACT_APP_REQUIRE_CSRF_TOKEN=true
REACT_APP_CSRF_ALLOWLIST
Species a comma-separated list of URL sufxes to allow, typically where enabling CSRF protection
might cause an innite loop. The default value is empty. For example:
REACT_APP_CSRF_ALLOWLIST=/logon.jsp,/logout.jsp,/j_security_check
Chapter 5. Developing with the Universal Access Responsive Web Application
129

Locale
REACT_APP_INTL_LOCALE
Species a locale to set the correct regional format for dates and numbers in the application. The
value must align with the curam.environment.default.locale value that is set in your regional
settings on the server, see The Application.prx le.
The format of the locale is xx-XX, for example. en-US, rather than en_US, which is the format on the
server. For example, to set the US locale:
REACT_APP_INTL_LOCALE=en-US
Unauthorized redirect
REACT_APP_UNAUTHORIZED_REDIRECT_URL
Species the URL that the application redirects to when an unauthorized redirect occurs. By default, /
login.
REACT_APP_UNAUTHORIZED_REDIRECT_URL=/login
Feature toggles
You can enable the display of specic features in the application.
REACT_APP_FEATURE_LIFE_EVENTS_ENABLED
Species whether to display the Life Events feature in the application with a Boolean value. It is
enabled by default. For example, to enable Life Events:
REACT_APP_FEATURE_LIFE_EVENTS_ENABLED=true
For more information, see “Enabling and disabling life events” on page 194.
REACT_APP_FEATURE_APPEALS_ENABLED
Species whether to display the Appeals feature in the application with a Boolean value. It is disabled
by default. For example:
REACT_APP_FEATURE_APPEALS_ENABLED=false
For more information, see “Enabling and disabling appeals” on page 231.
REACT_APP_FEATURE_VERIFICATIONS_ENABLED
Species whether to display the Citizen Verications feature in the application with a Boolean value. It
is disabled by default. For example, to enable Citizen Verications:
REACT_APP_FEATURE_VERIFICATIONS_ENABLED=true
For more information, see “Enabling or disabling verications” on page 211.
Connectivity handler
REACT_APP_CONNECTIVITY_INTERVAL
Species the interval in milliseconds between polling calls to check internet connectivity. By default,
the system_configuration API is pinged every 5 seconds.
REACT_APP_CONNECTIVITY_INTERVAL=5000
130
IBM Cúram Social Program Management 8.0.2: IBM Universal Access Responsive Web Application 5.2.0

REACT_APP_CONNECTIVITY_POLLING_ENABLED
(Development only) Species whether to poll to check internet connectivity. For development
purposes, you can disable polling by setting the value to false.
REACT_APP_CONNECTIVITY_POLLING_ENABLED=true
You can customizing connectivity handling, for more information, see “Implementing a connectivity
handler” on page 64.
User account status polling
To check whether a user has a standard or linked account when they submit an application, you can
poll the user's account type to check for updates to their account status. This feature can be useful
when an application is set up to automatically create linked accounts, such as in test or demonstration
environments.
REACT_APP_USER_ACCOUNT_POLLING
For example:
REACT_APP_USER_ACCOUNT_POLLING={“api”: “/v1/ua/user_account_login”, “timeout”: “0",
“interval”: “1000"}
Where:
• api
Species a URL to call to check the user account type. By default, /v1/ua/user_account_login.
• timeout
Species the timeout in milliseconds for the user account type polling to stop. By default, the
timeout is set to 0, which disables user account type polling. Five seconds is a sensible period to
allow for asynchronous processing to nish while not polling indenitely.
• interval
Species the interval in milliseconds between polling calls to check the user account type. By
default, 1 second.
Application-specic verication polling
When a citizen submits an application, there is a delay while verications are generated for that
application. You can enable verication polling to handle this delay, allowing the page to wait and present
the verications when they become available. You can set the polling on (default) or off, and adjust the
interval and duration. For more information about verication settings, see “Customizing verications” on
page 211.
REACT_APP_VERIFICATION_POLLING
For example:
REACT_APP_VERIFICATION_POLLING={"api": "/v1/ua/submitted_applications", "timeout": "10000",
"interval": "1000"}
Where:
• api
Species a URL to call to check the submitted applications for verications. By default, /v1/ua/
submitted_applications.
• timeout
Species the timeout in milliseconds for the polling calls to stop. By default, 10 second.
• interval
Chapter 5. Developing with the Universal Access Responsive Web Application
131

Species the interval in milliseconds between polling calls. By default, 1 second.
Document uploads
You can specify the allowed le formats and maximum size for the documents that users can upload.
REACT_APP_DOC_UPLOAD_FILE_FORMATS
Species the le name extension, including the dot separator, of the allowed le types for document
uploads in a comma-separated list. By default, if you do not set this environment variable, the allowed
le types are JPG, JPEG, PNG, TIFF, and PDF. To change the default le types, set this environment
variable. For example:
REACT_APP_DOC_UPLOAD_FILE_FORMATS=".png,.jpg,.pdf"
If you specify an invalid le extension string, all le types are denied.
For more information, see “Customizing le formats and size limits for le uploads” on page 212
.
REACT_APP_DOC_UPLOAD_SIZE_LIMIT
Species the maximum size limit for uploaded documents. By default, the maximum le size is 5 MB.
To change the default le size, set this environment variable. For example:
REACT_APP_DOC_UPLOAD_SIZE_LIMIT=6
For more information, see “Customizing le formats and size limits for le uploads” on page 212.
REACT_APP_DOC_UPLOAD_LEAD_DAYS
Species a lead time in days to subtract from due dates to give caseworkers time to process
applications before the actual due dates. This earlier date is then displayed to citizens in the
application.
The default value of REACT_APP_DOC_UPLOAD_LEAD_DAYS is 0 days. The value that you set is
converted to its absolute value and subtracted from the verication due date. For example, -1 and 1
have the same effect.
For example:
REACT_APP_DOC_UPLOAD_LEAD_DAYS=-7
For more information, see “Customizing a le upload lead time for verications” on page 213.
Social Program Management Web Development Accelerator
For more information, see “Generating Universal Access Redux modules” on page 62.
WDA_MODULES_OUTPUT
(Development only) Species the directory to place module les generated by the IBM Social Program
Management Web Development Accelerator, by default src/modules/generated. For example:
WDA_MODULES_OUTPUT=src/modules/generated
WDA_MODULES_CONFIG
(Development only) Species a JSON le in which to save the module conguration that you dene,
by default modules_config.json. This le contains the metadata that is used to generate the code.
For example:
WDA_MODULES_CONFIG=src/modules/modules_config.json
It is recommended that you add only this le to source control.
132
IBM Cúram Social Program Management 8.0.2: IBM Universal Access Responsive Web Application 5.2.0

WDA_SPM_SWAGGER
(Development only) Species the location of a copy of the IBM Cúram Social Program Management
Swagger specication that denes which REST APIs are available to the Social Program Management
Web Development Accelerator. For example:
WDA_SPM_SWAGGER=spm_swagger.json
You can copy this le from a running IBM Cúram Social Program Management instance at http://
hostname:port/Rest/api/definitions/v1.
Application authentication
The default implementation for authentication is a Java Authentication and Authorization Service (JAAS)
authentication method. If the JAAS authentication method does not suit, you can change to another
authentication method, such as Single sign-on (SSO). Ensure that you set any related environmental
variables where needed. For more information, see “Universal Access authentication” on page 140.
The following authentication methods are provided:
REACT_APP_AUTH_METHOD
• JAASAuthentication
(Default) No further environmental variables needed.
• DevAuthentication
(Development only) Species simple authentication during development that bypasses proper
authentication (JAAS or SSO) and accepts the username dev without any password. The login
process can run and allows access to the 'user account' password protected pages. If you specify
simple authentication, you can set the optional user type environmental variable in “Simple
authentication for development” on page 133.
• SSOSPAuthentication or SSOIDPAuthentication
Species service-provider (SP)-initiated or identity provider (IdP)-initiated SAML 2.0 web SSO. If
you set SSO authentication, you must set the related SSO environmental variables in “Single sign-on
(SSO) authentication” on page 134.
For example:
REACT_APP_AUTH_METHOD=SSOIDPAuthentication
Simple authentication for development
(Development only) If you are using simple authentication for development, you can set the following
environmental variable. For more information, see “Customizing the authentication method” on page 142.
REACT_APP_SIMPLE_AUTH_USER_TYPE
(Development only) Species a user type during development so you can test functionality for those
users.
• PUBLIC, a public citizen account user.
• GENERATED, an anonymous generated account user.
• STANDARD, a standard registered account user.
• LINKED, a linked account user.
• null, no user type.
For more information about user types, see “User account types” on page 148.
For example, to test the application for a linked user:
Chapter 5. Developing with the Universal Access Responsive Web Application
133

REACT_APP_SIMPLE_AUTH_USER_TYPE=LINKED
Single sign-on (SSO) authentication
If you use SSO authentication, you must set the following environmental variables. For more information,
see “Customizing the authentication method” on page 142 and Conguring the Universal Access
Responsive Web Application for SSO.
• The <IdP_URL> consists of three parts: the HTTPS protocol, the IdP hostname or IP address, and the
listener port number. For example, https://192.168.0.1:12443.
• The <ACS_URL> consists of three parts: the HTTPS protocol, the Assertion Consumer Service (ACS)
hostname or IP address, and the listener port number. For example, https://192.168.0.2:443.
REACT_APP_SAMLSSO_ENABLED
Species whether SSO authentication is used in the application. By default, the IdP-initiated flow of
the SAML SSO browser prole is used. A Boolean value is accepted. For example, to handle the SAML
SSO browser prole in the application:
REACT_APP_SAMLSSO_ENABLED=true
REACT_APP_SAMLSSO_SP_MODE
(SP-initiated flow only) Species whether to use the SP-initiated flow of the SAML SSO Browser
prole. By default, the default IdP-initiated flow of the SAML SSO Browser prole and this setting
overrides it. A Boolean value is accepted. For example:
REACT_APP_SAMLSSO_SP_MODE=true
REACT_APP_SAMLSSO_USERLOGIN_URL
Species the IdP login page URL, that is, the URL where the application sends the user login
credentials. For example:
REACT_APP_SAMLSSO_USERLOGIN_URL=<IdP_URL>/pkmslogin.form
REACT_APP_SAMLSSO_SP_ACS_URL
Species the ACS application server URL, that is, the service provider URL where the application
sends the SAML response. For example:
REACT_APP_SAMLSSO_SP_ACS_URL=<ACS_URL>/samlsps/acs
REACT_APP_SAMLSSO_USERLOGOUT_URL
Species the IdP logout page URL, that is, the URL where the application sends the user logout
request. For example:
REACT_APP_SAMLSSO_USERLOGOUT_URL=<IdP_URL>/pkmslogout
REACT_APP_SAMLSSO_IDP_LOGININITIAL_URL
(IdP-initiated flow only) Species the initial URL to which the application sends the initial login
request to the identity provider. Refer to the identity provider documentation for the correct URL and
values. For example:
REACT_APP_SAMLSSO_IDP_LOGININITIAL_URL=<IdP_URL>/isam/sps/saml20idp/saml20/logininitial?
RequestBinding=
HTTPPost&PartnerId=<ACS_URL>/samlsps/acs&NameIdFormat=Email
REACT_APP_SAMLSSO_IDP_SSOLOGIN_URL
(SP-initiated flow only) Species the identity provider URL where the application sends the SAML
request. Refer to the identity provider documentation for the URL. For example
134
IBM Cúram Social Program Management 8.0.2: IBM Universal Access Responsive Web Application 5.2.0

REACT_APP_SAMLSSO_IDP_SSOLOGIN_URL=<IdP_URL>/isam/sps/saml20idp/saml20/login
Intelligent Evidence Gathering (IEG)
For more information, see IEG in the Universal Access Responsive Web Application.
REACT_APP_DISPLAY_REQUIRED_LABEL
Species whether to indicate the required form elds or the optional form elds. As most questions
in a typical form are required, indicating the optional questions rather than the required questions
typically results in a less cluttered form. By default, optional elds are highlighted in IEG forms. For
example, to display labels for required elds only:
REACT_APP_DISPLAY_REQUIRED_LABEL=true
REACT_APP_DATE_FORMAT
Species the date format for form elds, by default, MM/DD/YYYY. The valid values are dd-mm-yyyy
and mm-dd-yyyy. If you omit the environment variable or set an invalid value, the default date format
is used. For example, to change the date format to DD/MM/YYYY:
REACT_APP_DATE_FORMAT=dd-mm-yyyy
Note: Specic globalization considerations apply to the date format when it is used in hint text
and messages. Ensure that you have the same date format in the REACT_APP_DATE_FORMAT
environment variable, and in theDateAdapter_DateFormat and Errors_date messages in the
intelligent-evidence-gathering-locales package.
REACT_APP_PHONE_MASK_FORMAT
Species a phone number mask for a form eld in a question. The value must be in ISO 3166-1
alpha-2 code format, for example, US | CA | GB | DE. In your IEG script, you must add the
wds-js-input-mask-phone class name to the question.
REACT_APP_PHONE_MASK_FORMAT=US
Where country is the locale that you want to use.
REACT_APP_PHONE_MASK_DELIMITER
Species a custom delimiter for phone numbers. For example, to convert 1 636 5600 5600 to
1-636-5600-5600:
REACT_APP_PHONE_MASK_DELIMITER=-
REACT_APP_PHONE_MASK_LEFT_ADDON
Species a xed country code for phone number elds. For example, to convert 1-636-5600-5600 to
+1-636-5600-5600:
REACT_APP_PHONE_MASK_LEFT_ADDON=+
REACT_APP_CURRENCY_MASK_ADDON
Species a currency symbol to display before or after the amount, where the alignment of the
currency symbol is based on the locale. For more information, see the developer.mozilla.org
documentation. For example, to specify Canadian Dollars, where in a French locale the dollar is
aligned on the right, and in an English locale the dollar is aligned on the left:
REACT_APP_CURRENCY_MASK_ADDON=$
REACT_APP_CURRENCY_MASK_LEFT_ADDON
Deprecated, see “REACT_APP_CURRENCY_MASK_ADDON” on page 135.
Chapter 5. Developing with the Universal Access Responsive Web Application
135

Species a currency symbol to display before the amount. If you omit this value, US dollars are
displayed by default. For example, to specify Euro:
REACT_APP_CURRENCY_MASK_LEFT_ADDON=$
REACT_APP_CURRENCY_MASK_RIGHT_ADDON
Deprecated, see “REACT_APP_CURRENCY_MASK_ADDON” on page 135.
Species a currency symbol to display after the amount. If both left and right values are set, left takes
precedence. For example, to specify Euro for Luxemburg:
REACT_APP_CURRENCY_MASK_RIGHT_ADDON=€
136IBM Cúram Social Program Management 8.0.2: IBM Universal Access Responsive Web Application 5.2.0

Chapter 6. Security for the Universal Access
Responsive Web Application
IBM Cúram Universal Access gives citizens access to their most sensitive personal data over the internet.
Security must be a primary concern in the development of citizen account customizations. All projects
that are built on the Universal Access Responsive Web Application must focus on delivering security from
beginning to end.
It is recommended that all projects take at least the following steps to ensure the security of the project
delivery:
• Ensure that the project team are familiar with the principles of secure application development, and
common vulnerabilities such as the OWASP Top Ten.
• Develop and apply a threat model.
• Employ security experts to test everything from requirements to the nished deployment.
• Plan for how the application is used in public spaces like libraries and kiosks.
Customers must contact IBM support to discuss any unusual customization that might have specic
security issues.
Build secure web apps with the Social Program Management
Design System
When you develop with the IBM Social Program Management Design System and npm, you must consider
your security attack plane, and take the appropriate steps to prevent or reduce the threat to your runtime
application from malicious actors. npm is an impressive resource of open source software, but you must
understand the threats that exist with this software stack and act responsibly to mitigate risk.
IBM Cúram Universal Access goes through rigorous security threat monitoring during development and
before release. However, after the software is released there is an ongoing threat to your business:
• From your customization of the software.
• From new vulnerabilities that are discovered after release.
npm, which is the backbone of the Social Program Management Design System software development
lifecycle strategy, promotes the reuse of third-party packages. Each of your packages uses other
packages, which in turn use other packages, and so on. This generates a large tree of dependencies on
software packages, many of which you might have little or no knowledge of. It is important to understand
the NPM threat vectors and take the appropriate steps.
Protect yourself during development
You can use a number of strategies to reduce the possibility that you might release vulnerable software.
Review Dependencies
If you introduce new third-party dependencies in your custom code, try to choose packages
that are established, well-maintained, and used widely. This strategy increases the chances that
vulnerabilities are discovered quickly and resolved immediately by the package owners.
Audit Packages
Monitor the results of the npm audit command that is run after each installation. To reduce possible
vulnerabilities, x issues in your direct dependencies as they arise to ensure that your development
environment is using the latest versions of packages in your dependency tree. While not all packages
that are used during development get deployed in production, it is still good practice to minimize
warnings as much as possible.
©
Copyright IBM Corp. 2018, 2022 137

Lint in development
Use linting tools in your development environment to highlight security issues in your custom code
and resolve or mitigate any reported issues before your release the code. For more information about
conguring linting, see “Enforce good code style with ESLint and EditorCong” on page 49.
Lint in the continuous integration pipeline
Introduce linting to your integration pipeline to ensure that failures for security rules block the
integration of new code.
Review code
Include security as a critical aspect of a code review, and educate your developers on how to spot
scenarios where security is a concern, and how to identify coding errors.
Consider your authentication strategy
The reference application provides basic sign-up and log-in pages to demonstrate how the IBM
Universal Access Responsive Web Application can be integrated with a IBM Cúram Social Program
Management deployment. These features are provided as references, but are not intended to be
directly deployed into production.
You must consider your authentication strategy and ensure it meets your organization's requirements.
For example, you might need to integrate with an Identity Provider in your authentication flow, or use
a captcha for your sign-up or log-in pages.
Secure your REST APIs
Ensure that you secure your REST APIs before deployment, see “Securing access to Universal Access
REST APIs” on page 140.
Protect your production environment
You must understand how your production code is created, and use npm audit to identify security
issues.
How is your deployed code created?
npm install
When you run npm install for your development environment, it typically installs packages that:
• Are used at run time and need to be included in the build for deployment.
• Are only required for development purposes or to create the deployment.
By convention, runtime or development-only packages are separated by the dependencies and
devDependencies lists in the package.json le. However, you can have the packages in either list
or mixed any way that you want. After an installation runs successfully you have all the code that is
required to go to the next stage, which is to build your deployment and run your app. Adding packages
to the devDependencies list does not ensure that they are not in your deployed code.
npm run build
When you run npm run build, the dependencies list in the package.json le is ignored as it is
only relevant to the development environment. Instead, the src/index.js le that represents the
root of the App is used to initiate a process of including only the les that are required to create a
working deployment. It is possible that code from packages that are listed in your devDependencies
ends up in your deployment bundle, if code from those packages is called from code in your runtime
application.
Use npm audit to identify security issues
When you run npm audit, all packages that are listed in package-lock.json are analyzed for
vulnerabilities. The audit is not sophisticated enough to know what is part of the deployment. That is,
the contents of the build folder, and the packages from which they were included. For this reason, an npm
138
IBM Cúram Social Program Management 8.0.2: IBM Universal Access Responsive Web Application 5.2.0

audit is an indicative security check that helps to identify potential vulnerabilities with the packages
that you are using. However, it is not an accurate picture of how vulnerable your running application is
because:
• Code from packages with known vulnerabilities might not be included in your deployed code. Either
because it is only used for development, or because the bundling algorithm calculates that the code is
not required and doesn't add it to the deployment bundle.
• Vulnerabilities might not be discovered yet. So the code that you successfully audited yesterday might
not pass an audit check today. No code did not change, but a new vulnerability was discovered and
reported to NPM https://www.npmjs.com/advisories.
Therefore, npm audit is a good smoke test for vulnerabilities, but needs further analysis before action is
taken.
When to run npm audit?
npm audit runs on each installation. In a development environment, it is obvious to the team when
vulnerabilities arise as each time a developer installs the app, they are notied of vulnerabilities.
For a deployed environment, you can run npm audit daily against your deployed code to highlight any
new vulnerabilities that were discovered since you deployed your application. You might be tempted to
run it against your development codebase, but this code is not the same as your deployed code. The
packages that are in a deployment might have been removed from your development repository since you
last deployed and therefore not show up in an audit on your development codebase.
To monitor the code that is running in your deployed environment, you must run npm audit against
the packages that were used to build that deployment. You need the package.json and package-
lock.json from the codebase from which the deployment was built. You can create a simple automated
job to run npm audit against a folder that contains these les and to report any failures. For example,
you can run npm audit --audit-level=high from a folder that contains these les:
/my-current-deployment-packages
+ package.json
+ package-lock.json
Consider penetration testing
Penetration testing is an activity that is carried out on running software to nd security holes. Penetration
testing can be done with automated tools, such as IBM Security AppScan. To add a further strength test
to your development process, you can hire third-party services that specialize in the penetration testing
of apps, which includes both automated and manual testing. Typically, penetration testing is carried out
periodically to provide an external health check on your applications security.
How to address security vulnerabilities
If you nd that you are using a vulnerable package, you must analyze the threat to decide how to mitigate
the risk.
Sometimes, an npm audit scan might report packages that are used in development but are not in your
deployed application bundle and therefore not in your runtime application. The urgency of xing issues
with these packages is reduced.
For vulnerabilities that you discover through npm audit that are High or Critical, you must address
them as soon as possible. For most, the x is already available or to be provided within hours or days
of registration of the vulnerability. You must redeploy your production code from a repository that was
updated to the patched version of the vulnerable package. Typically, npm audit advises you what you
need to do.
In some cases, the x might require upgrading a package to a major version, which requires a manual
upgrade as it might be a breaking change for your code. Where the package was included through your
own custom code, you can do this upgrade yourself. In other cases, the x is outside your control. For
Chapter 6. Security for the Universal Access Responsive Web Application
139

example, where the vulnerable package is a dependency of a package that you depend on, you need the
owner of that package to x their code. If IBM owns the package, you can open a support case for the
issue.
For more information about how deal with security audits, see this npm article.
Securing access to Universal Access REST APIs
You must ensure that you secure access to REST APIs that are used by Universal Access.
If you are enabling verications, you must ensure that you have implemented the appropriate le security
and validations for document uploads, and enabled the Files API so you can upload les to IBM Cúram
Social Program Management, see Securing and enabling the Files API.
IBM Cúram Social Program Management delivers many REST APIs that are not all used by client
applications like IBM Cúram Universal Access. Ensure that you remove Security IDentiers (SIDs) from
the database for any unused REST API functions to greater secure what is available to be accessed by
users, see “User account authorization roles and groups” on page 149.
Enabling Cross-Site Request Forgery (CSRF) protection for Universal Access
You can enable token-based Cross-Site Request Forgery (CSRF) protection in Universal Access to secure
the IBM Cúram Social Program Management REST APIs from CSRF attacks.
About this task
For more information about CSRF protection in Social Program Management, see Cross-Site Request
Forgery (CSRF) Protection.
For more information about how the REST APIs integrate token-based CSRF protection, see Integrating
token-based Cross-Site Request Forgery (CSRF) protection.
Procedure
1. Enable CSRF protection on the SPM server, see Enabling token-based Cross-Site Request Forgery
(CSRF) protection.
2. Ensure that any subdomains are included in the curam.rest.refererDomains SPM system
property.
3. Set the Universal Access security environment variables for CSRF in Universal Access application. See
“React environment variable reference” on page 127.
4. Ensure that any images in the application that are stored in SPM and requested from the SPM server
use the UAImage component from the core-ui package. The UAImage component is a wrapper for
the Image component that adds the CSRF token to image requests from the SPM server.
Note: If you are upgrading, you must ensure that you replace the Image component with the UAImage
component for all images that are stored in SPM. Otherwise, images that are stored in SPM cannot be
retrieved and displayed.
Universal Access authentication
The universal-access package exports the Authentication module, which can be used to log in
and out of the application and to inspect the details of the current user. The login service is passed
a username and password, and optionally a callback function that is called when the authentication
request is completed.
Authentication services
The Authentication API supports the following modes:
• JAAS Authentication (Default)
140
IBM Cúram Social Program Management 8.0.2: IBM Universal Access Responsive Web Application 5.2.0

• Simple Authentication (Development mode)
• Single Sign-on (SSO) Authentication
• Custom authentication
JAAS authentication
By default, the login process uses the standard JAAS login module.
The JAAS login module is exposed through the Social Program Management Universal Access API at
the /j_security_check end point, and authenticates the user against the SPM database of users. For
more information about JAAS login in SPM, see Authentication Architecture
.
Simple authentication (Development Mode)
During development, you can use a simple authentication that does not require an SPM server. This
simple authentication bypasses proper authentication (JAAS or SSO) and instead accepts the username
dev without any password. The login process runs and allows access to the 'user account' password
protected pages.
This simple authentication is sufcient to do most client development work and avoids the need to
congure your client application to communicate with an SPM server.
SSO authentication
The application supports single sign-on (SSO), which is a typical use case for many enterprises that serve
multiple applications with a single username and password for their clients.
For more information about conguring your application to use SSO, see Conguring SAML SSO on
WebSphere Application Server.
Automatically logging in to your SSO
The default SSOVerifier component wraps the whole application and checks for SSO status when
the application is loaded for the rst time. The SSOVerifier component veries whether the user
is already logged in with SSO and can be logged directly into the application. If the user is not yet
authenticated, then they must authenticate as a public citizen so that they can access the system
conguration.
The SSOVerifier does the entire precheck within the component, by making all the required calls to
determine with the IdP whether the current user is authenticated. SSOVerifier is helped to make
these calls by using functions exposed by SSOAuthentication.
If you need custom verication, you must create your own verier component to replace the current
SSOVerifier component. Then, add your custom verier component to the call stack in your entry
JavaScript le, for example App.js.
Custom authentication
You can implement your own custom authentication to suit your specic environment.
User account types
The Universal Access client supports three different user account types, Public, Generated, and Citizen.
For more on user accounts and security, see “User account types” on page 148
. If you want to
customize the log in and sign up process that is provided with the Universal Access starter pack, the
Authentication module provides log-in functions to support each of these three user account types.
Authentication.loginAsPublicCitizen
Authentication.loginWithGeneratedUser
Chapter 6. Security for the Universal Access Responsive Web Application
141

Authentication.login
Tracking the logged in user
The Universal Access Responsive Web Application uses 'session storage' in the browser to store some
basic details of the currently logged-in user after they are authenticated with the server. This session
storage is typically used to inform the client application what views to present. For example, if no user is
logged in, then the login and sign-up page buttons are displayed on the home page.
The Authentication module provides functions that query the current logged-in user and their account
details, according to the session storage in the browser.
Authentication.getLoggedInUser
Authentication.getUserAccount
Logged in on the client or the server
Citizens can seem to be logged in on the client when they are not logged in on the server. This situation
does not compromise the security of the application. The SPM server APIs use session tokens that are
stored in cookies to determine whether the current user is authenticated. The cookies are transmitted
with each API call, and only a valid token results in a successful response.
For example, if a user's session times out on the server, the next API request to the server results in a
401 unauthorized response, even if the user seems to be logged in to the client application. This behavior
ensures that no matter what the client application says about the currently logged-in user, the server
responds only to valid session tokens.
For more information, see “Conguring user session timeout” on page 182.
Related concepts
The RESTService utility
The @spm/core package provides the RESTService utility, which you can use to connect your
application to a REST API. The RESTService utility provides important functions for securing and
connecting to IBM Cúram Social Program Management REST APIs, such as CSRF protection and SSO
support. You can fetch resources with alternatives such as Fetch API, SuperAgent, or Axis, but you must
consider implementing functionality that is handled by the RESTService utility, like CSRF protection and
SSO support.
Customizing the authentication method
The default implementation for authentication is a Java Authentication and Authorization Service (JAAS)
authentication method. If the JAAS authentication method does not suit, you can change to one of the
other provided authentication methods, or implement your own custom authentication method.
About this task
The following authentication methods are available in the application. For more information, see
“Universal Access authentication” on page 140. To use any of the provided authentication methods,
set the REACT_APP_AUTH_METHOD environmental variable in the appropriate .env le to one of the
following options and set any related environmental variables. For example:
REACT_APP_AUTH_METHOD=SSOIDPAuthentication
• JAASAuthentication
(Default for production environments. That is, npm start with .env.development.)
No further environmental variables needed.
• DevAuthentication
142
IBM Cúram Social Program Management 8.0.2: IBM Universal Access Responsive Web Application 5.2.0

(Default for development environments.)
Set the “Simple authentication for development” on page 133 environmental variables.
• SSOSPAuthentication
Service-provider (SP)-initiated SAML 2.0 web SSO.
• SSOIDPAuthentication
Identity provider (IdP)-initiated SAML 2.0 web SSO.
If you set SSO authentication, you must set the “Single sign-on (SSO) authentication” on page 134
environmental variables.
For more information about environmental variables, see the “React environment variable reference” on
page 127.
If you want to use custom authentication, you must create a custom authentication method and register
the new authentication method as follows:
Procedure
1. Create a custom authentication method, which consists of a normal class le that contains two static
methods as follows:
• static login = input => {}
Where input is an object that contains one or more of these authentication properties: username,
password, callback, ssoPreCheck, ssoLogin.
Implement the logic to authenticate the user in this method.
• static logout = (callback, reportLogoutError) => {}
Where:
– callback is a function that is called when logout completes.
– reportLogoutError can be used to dene whether a message is shown.
Implement the logic to log out the user in this method.
2. Register your new authentication method in an entry point le such as App.js by using the
AuthenticationRegistry component as shown in the following example:
a) Import the AuthenticationRegistry component and the authentication class:
import { AuthenticationRegistry } from '@spm/core';
import CustomAuthentication from '<path_to_custom_method>';
b) Use AuthenticationRegistry.registerAuthenticationType to register the functions
from the authentication class:
AuthenticationRegistry.registerAuthenticationType(CustomAuthentication);
Authenticating with external security systems
By default, IBM Cúram Universal Access uses its own authentication system that is backed up by a
database of registered users. However, Universal Access can also be congured to authenticate with
external security systems.
Conguring SAML SSO for Universal Access
You can congure SAML Single Sign-On (SSO) for Universal Access. For more information, see Conguring
SAML SSO on WebSphere Application Server.
Chapter 6. Security for the Universal Access Responsive Web Application
143

Identity Only authentication
You can deploy Universal Access in Identity Only mode for registered users so that creating accounts
occurs externally and user accounts are authenticated externally. For more information, see Identity-only
authentication.
Integrating with IdPs for multifactor authentication
To integrate multifactor authentication into your application, use single sign-on through SAML with an
identity provider (IdP) that supports multifactor authentication.
In the associated single sign-on flow, the entire authentication process, including the login screen, is
delegated to the IdP. You can customize the application to support the flow.
For more information, see the example in the Github open source repository.
External security authentication example for Universal Access
You can ensure that citizens can be authenticated for any of your services by using a single
set of credentials. This approach provides the benets of a streamlined authorization process for
both governments and citizens. The example outlines the implementation of a set of customization
requirements for a team that is deploying Universal Access.
Any analysis of requirements for external security integration must consider the following questions:
• Does your deployment support anonymous screening, anonymous intake, or both?
• Is account management supported in IBM Cúram Universal Access or in the external security system?
• Is single sign-on (SSO) needed?
Example customization requirements
The external security authentication example describes the conguration and development tasks to
implement the following set of customization requirements, and refers to these requirements where
appropriate.
1. Users can access Universal Access and do anonymous screening or intake.
2. Users who want to access their saved screening or intake information must rst create an account on a
system called CentralID.
3. Users who log in to Universal Access can use their CentralID username and password to authenticate.
4. Users do all of their account management with an external system called Central ID. For example,
resetting a password, creating a new account, or changing account details.
5. CentralID stores all user records in a secure LDAP server.
6. Because all account management is now done in CentralID, the account creation screens and
password reset screens are to be removed from Universal Access.
7. Users can log in as soon as they register with CentralID, and experience no delay while an ID
propagates to Universal Access.
Conguring an alternative login ID
By default, you cannot change user names after they are created. However, you can congure an
alternative login ID that can be updated.
For information about conguring alternative login IDs, see Alternate login IDs. If you congure an
alternative login ID for a user name that is case-sensitive, then the alternative login ID is also case-
sensitive.
Related information
Alternate Login IDs
144
IBM Cúram Social Program Management 8.0.2: IBM Universal Access Responsive Web Application 5.2.0

Deploying in identity-only mode for registered users
You must congure the application server to use LDAP for authentication if a user is in Identity–Only
mode. Also, congure the necessary properties to deploy in identity-only mode for registered users.
Conguring the application server to use LDAP for authentication in Identity–
Only mode
If a user is in Identity–Only mode, it is necessary to match the login IDs that are stored in LDAP with
the login IDs that are stored in the ExtendedUsersInfo table.
For information about how to congure your application server to use LDAP for authentication, see the
relevant application server documentation.
Conguring properties to deploy in identity-only mode for registered users
Add the following properties to the AppServer.properties le:
curam.security.check.identity.only=true
curam.security.user.registry.disabled.types=EXT_AUTO,EXT_GEN
curam.citizenworkspace.enable.usertypes.for.temporary.users=true
public.user.type=EXT_AUTO
To recongure the application server, run the following command:
appbuild configure
The curam.security.check.identity.only property ensures that application security is set to
work in Identity Only mode. For more information about Identity Only authentication mode, see either
Deployment Guide for WebSphere or Deployment Guide for WLS. In Identity Only mode, authentication
uses only the internal user table to check for the existence of the user. The validation of the password
is left to a subsequent module, either a JAAS module (Oracle WebLogic) or the User Registry (IBM
WebSphere).
Take the example of a user, "johnsmith", who has been registered with the CentralID LDAP server. For
John Smith to be able to use Universal Access, there must also be a "johnsmith" entry in the ExternalUser
table. When John Smith logs in, his authentication request is passed to the Cúram JAAS Login Module.
The Cúram JAAS Login Module checks that the user johnsmith exists in the Cúram ExternalUser table
but does not check the password. The authentication then proceeds to the User Registry (WebSphere)
or LDAP JAAS Module (WebLogic) where the user name and password are checked against the contents
of the CentralID LDAP server. For the authentication to work correctly, it is necessary to congure the
application server with the connection details for the secure LDAP server.
The Identity Only conguration allows the application to defer to an external security system such as an
LDAP-based directory service for the authentication of user credentials. However, when an anonymous
user accesses the organization Home page for the rst time, the user is automatically logged in as a
publiccitizen user. Subsequently, if the user chooses to screen themselves or to perform an intake,
Universal Access creates a new "generated" anonymous user. Each generated user is unique, which
ensures that the data that belongs to that user is kept condential. Public citizen users and generated
users are not inserted into the LDAP directory, so they cannot be authenticated by using the Identity Only
mechanism. The following line ensures that users with the user type EXT_AUTO (public citizen users) and
EXT_GEN (generated users) are authenticated against the External User table:
curam.security.user.registry.disabled.types=EXT_AUTO,EXT_GEN
After the previous conguration has been applied to the server and the server has been started, perform
the following conguration steps:
1. Log in as sysadmin.
2. Select Application Data > Property Administration.
Chapter 6. Security for the Universal Access Responsive Web Application
145
3. Select category Citizen Account - Conguration.
4. Set the property curam.citizenaccount.public.included.user to EXT_AUTO.
5. Set the property curam.citizenaccount.anonymous.included.user to EXT_GEN.
6. Set the property curam.citizenworkspace.enable.usertypes.for.temporary.users to TRUE.
7. Publish the property changes.
You need another conguration entry so that Universal Access operates correctly with respect to
authentication as shown in the following steps:
8. Select Select Application Data > Property Administration.
9. Select category Infrastructure – Security parameters.
10. Set curam.custom.externalaccess.implementation to
curam.citizenworkspace.security.impl.CitizenWorkspacePublicAccessSecurity.
11. Publish the property changes.
12. Log out and restart the server.
Disabling the Create Account screens
Congure the necessary properties to disable the screens for creating an account that Universal Access
provides by default. Requirement 4 in the example requirements indicates that all account management
functions are handled by the external system, CentralID, including the creation of a new account and
performing a password reset.
Congure Universal Access to disable the screens that are related to account management:
1. Log in as sysadmin.
2. Select Application Data > Property Administration.
3. Select Category Citizen Portal - Conguration.
4. Set the property curam.citizenworkspace.enable.account.creation to NO.
5. Publish the property changes.
The previous steps remove references to Account Creation pages from Universal Access. The Login
screen still contains a link to a page for changing passwords. In this example, the implementation team
can use the following steps to retain the link but change it to open a new browser window on the
CentralID password reset page:
1. Log in as sysadmin.
2. Select Application Data > Property Administration.
3. Select Category Citizen Portal - Conguration.
4. Set the property curam.citizenworkspace.forgot.password.url to , for example http://
www.centralid.gov/resetpassword
5. Publish the property changes.
To completely remove the reset password link, use the following steps:
1. Log in as sysadmin.
2. Select Application Data > Property Administration.
3. Select Category Citizen Portal - Conguration.
4. Set the property curam.citizenworkspace.display.forgot.password.link to NO.
5. Publish the property changes.
146
IBM Cúram Social Program Management 8.0.2: IBM Universal Access Responsive Web Application 5.2.0

Redirecting users to register with an external system
Replace the message that is displayed in the log in page so that non-registered users are directed to the
CentralID page for registration.
Universal Access invites users to log in with a log in message. You can replace the message so that the log
in page displays a message that is similar to the following example:
"<p>If you are registered with CentralID enter your user name
and password to log in. To register, go to
<a href="http://www.centralid.gov/register"> The CentralID
registration page.</a></p>"
The properties for controlling the login page message are in the <CURAM_DIR>/EJBServer/
components/Data_Manager/Initial_Data/blob/prop/Logon.properties le.
Enabling users to log on immediately after registration with CentralID
Users should be able to log in as soon as they have registered with CentralID. Some conguration is
required to prevent a delay in the propagation of a user's ID to other systems.
To function correctly, each user must have an entry in the ExternalUser table. The customer could build a
batch process to import users from the LDAP directory into the ExternalUser table. However, requirement
7 in the example requirements would not be satised, which states that users must be able to register
with CentralID, and then immediately use Universal Access. Another option would be to build a web
service or similar mechanism that would be launched when a new user registers with CentralID. The
implementation of the web service would create the appropriate entry in the ExternalUser table.
A simpler option is to override the default log-in behavior to create new accounts as
needed, after the completion of checks to ensure that the relevant entry exists in the
LDAP server. You can override the default log-in behavior in Universal Access by extending
the curam.citizenworkspace.security.impl.AuthenticateWithPasswordStrategy class
and overriding the authenticate() method. The following code outlines how to use the
AuthenticateWithPasswordStrategy and other security APIs to meet the previous requirements:
public class CustomSecurityStrategy extends AuthenticateWithPasswordStrategy {
@Inject
private CitizenWorkspaceAccountManager cwAccountManager;
...
@Override
public String authenticate(final String username,
final String password)
throws AppException, InformationalException {
final String retval = null;
if (username.equals(PUBLIC_CITIZEN)) {
return super.authenticate(username, password);
}
// Authenticate generated accounts as normal
if (cwAccountManager.isGeneratedAccount(username)) {
return super.authenticate(username, password);
}
// Check that the user exists in LDAP
// This prevents hackers from registering many bogus
// accounts that exist in Curam but not in LDAP
if (!isUserInLDAP(username)) {
return SECURITYSTATUS.BADUSER;
}
// If there's no account for this user
if (!cwAccountManager.hasAccount(username)) {
createUserAccount(username);
}
return SECURITYSTATUS.LOGIN;
}
private void createUserAccount(final String username)
throws AppException, InformationalException {
final CreateAccountDetails newAcctDetails;
...
cwAccountManager.createStandardAccount(newAcctDetails);
}
}
Chapter 6. Security for the Universal Access Responsive Web Application
147

This code checks to see whether the user is logging in is a public citizen user or a generated account.
In both cases, authentication logic is delegated to the default AuthenticateWithPasswordStrategy
API. In the case of a registered user, the Strategy checks the LDAP directory to ensure that the user exists
in the LDAP directory. If the user exists in the LDAP directory and does not exist yet in Universal Access,
then a new user account is created. Note, the custom code does not need to authenticate the user against
LDAP since the authentication is handled by the User Registry in WebSphere or the LDAP JAAS Module
in WebSphere. It is important to note that the password parameter of the authenticate() method is
passed in clear text.
To install the CustomSecurityStrategy class, it must be bound in place of the Default Security
Strategy class. Use a Guice Module to bind the implementation:
public class CustomModule extends AbstractModule {
@Override
protected void configure() {
binder().bind(SecurityStrategy.class).to(
CustomSecurityStrategy.class);
}
}
You must congure the CustomModule at startup by adding a DMX le to the custom component as
shown in the following example:
<CURAM_DIR>/EJBServer/custom/data/initial/MODULECLASSNAME.dmx
<?xml version="1.0" encoding="UTF-8"?>
<table name="MODULECLASSNAME">
<column name="moduleClassName" type="text" />
<row>
<attribute name="moduleClassName">
<value>gov.myorg.CustomModule</value>
</attribute>
</row>
</table>
User account types
IBM Cúram Universal Access has different account types to support both anonymous and registered
citizens. As citizens use Universal Access, their account type can change.
IBM Cúram Universal Access has the following user types:
Public citizen account
When citizens view the organization Home page, they are automatically logged in under the publiccitizen
account. This account has access only to the home page and the pages that allow citizens to enter or reset
passwords.
Anonymous account
When the user clicks a link to start screening or applying for benets, they are logged out as publiccitizen
and logged back as an anonymous account with a random username. A principle of Universal Access is
that users cannot access the data of other users. If all intakes and screenings used the same publiccitizen
user account, a citizen might see data that was entered by another citizen.
Registered accounts
Registered accounts are standard accounts that are created by citizens. Citizens can create accounts
when they rst use the application, or during processes like applying for benets. These accounts are
different from anonymous accounts in that they allow citizens to continue previously saved applications,
restart applications that were previously unnished, and review or withdraw previously submitted
applications.
148
IBM Cúram Social Program Management 8.0.2: IBM Universal Access Responsive Web Application 5.2.0

Linked accounts
Linked accounts are accounts that are linked to a Concern Role ID for a Person entity. Organizations must
implement their own linking functions. Universal Access APIs that allow a username to be linked to a
Concern Role ID are available to support linking.
Citizens with linked accounts have access to detailed information about their benets and cases by using
their citizen account. Citizens with a linked account can submit life events such as getting married or
losing their job. They also have access to information about benet payments. Because of the sensitivity
of this information, customers must ensure that they have a robust process for creating linked user
accounts.
The following scenarios are examples. The actual processes for linking are unique to each organization.
• A citizen creates a user account in Universal Access and submits an intake application:
– An organization can implement an online mechanism to link a registered account. Citizens can be
asked in the online application if they want to upgrade their account for access to more services. If
they consent, their registered account is automatically linked.
– Citizens are contacted by their caseworker who asks them if they want access to more services. The
citizen agrees and presents themselves at their local ofce with personal identication, such as a
passport. The caseworker can then link the registered account that they used to submit their intake
application.
• A citizen requests a citizen account and is asked to present themselves at their local Social Welfare
ofce with personal identication, such as drivers license. After they verify the citizen’s identity, the
caseworker uses custom functions to enter details for the new linked account.
In none of these scenarios does a caseworker have access to a citizen's password. The linking process
can automatically upgrade their account, or can trigger a batch job that sends the password by letter to
the citizen's home address.
User account authorization roles and groups
User account types are assigned different authorization roles, which limit the methods that can be
called. Do not grant extra permissions to authorization roles, except for Linked Accounts, which use the
LINKEDCITIZENROLE. If you add custom methods to the citizen account, extra permissions are required.
For more information about adding custom methods to the citizen account, see “Customizing the citizen
account” on page 231.
If you use only a subset of IBM Cúram Universal Access functions, remove permission to call any unused
methods from the database. For example, if the citizen account is not used, remove the unneeded
LINKEDCITIZENROLE and other related authorization artifacts. Projects that don't use the citizen account
must also consider the deployment implications.
Proper use of authorization roles and groups ensures that no user can access functions for which they
have no permission. However, it does not prevent users from using these functions to access data that
belongs to other users, which is done with Data-based Security. Universal Access provides a Data-based
Security framework for all customizations to use.
Congure authorization roles only for functions that are being used. IBM Cúram Social Program
Management delivers many REST APIs that are not all used by client applications like IBM Cúram
Universal Access. It is important to remove Security IDentiers (SIDs) from the database for any unused
REST API functions to greater secure what is available to be accessed by users.
Related concepts
Customizing the citizen account
Chapter 6. Security for the Universal Access Responsive Web Application
149

Users can use the citizen account to log in to a secure area where users can screen and apply for
programs.
Authorization for the citizen account
Permission to call the server facade methods that serve data to citizen account pages is managed by
the standard Social Program Management authorization model. In addition to the standard authorization
checks, each facade method that is called by a citizen account page must complete some security checks
to ensure the user who is associated with the transaction (the currently logged in user) has permission to
access the data they are requesting.
Ensure that the currently logged-in user is the correct type
The currently logged in user must be an external user with an applicationCode of CITWSAPP, and have
an account of type Linked.
The curam.citizenaccount.security.impl.CitizenAccountSecurity API offers a
performDefaultSecurityChecks method that ensures that the user is the correct type. The method
checks the user type and, if it is not acceptable, writes a message to the logs and fails the transaction.
Note: You must call this API in the rst line of every custom facade method before any processing or
further validation takes place:
public CitizenPaymentInstDetailsList listCitizenPayments()
throws AppException, InformationalException {
// perform security checks
citizenAccountSecurity.performDefaultSecurityChecks();
// validate any page parameters (none in this case)
// invoke business logic
return citizenPayments.listPayments();
}
Ensure that the logged-in user has permission to access the requested records
Ensure that the currently logged in user has permission to access the specic records that they are
reading. For instance, validate any page parameters that are passed in to ensure that the records
requested are related to the currently logged in user in some way.
A malicious user who is logged in to a valid linked account might send requests to the system to request
other users' data. To prevent this intrusion, all page parameters must be validated to ensure that they are
somehow traceable back to the currently logged in user. How this conclusion is determined is different for
each type of record.
For example, a Payment can be traced back to the Participant by way of the Case on which it was
entered.
The curam.citizenaccount.security.impl.CitizenAccountSecurity application
programming interface (API) offers methods to complete these checks for the types of records that are
served to citizens by the initially congured pages. For specic information, review the Javadoc of this
API. For custom pages that serve different types of data, extra checks must be implemented to validate
the page parameters.
This process needs to be added to a custom security API and called by the facade methods in question.
The methods must check whether the record requested can be traced back to the currently logged in user.
If not, the method must log the username, method name, and other data. If these conditions are not met,
the transaction needs to be failed immediately (as opposed to adding the issue to the validation helper
and allowing the transaction to proceed):
if (paymentInstrument.getConcernRole().getID()
!= citizenWorkspaceAccountManager
.getLoggedInUserConcernRoleID().getID()) {
150
IBM Cúram Social Program Management 8.0.2: IBM Universal Access Responsive Web Application 5.2.0

/**
* the payment instrument passed in is not related
* to the logged in user log the user name of the
* current user, the method invoked and any other
* pertinent data
*/
// throw a generic message
throw PUBLICUSERSECURITYExceptionCreator
.ERR_CITIZEN_WORKSPACE_UNAUTHORISED_METHOD_INVOKATION();
}
While as much information as possible regarding the infraction needs to be logged, it is important
to ensure that you do not display information that might be useful to malicious users. A generic
exception must be thrown that does not contain any information that relates to what went wrong.
The curam.citizenaccount.security.impl.CitizenAccountSecurity API displays a generic
message that states You are not privileged to access this page.
Customizing account creation and management
You can customize account creation and management.
Account management congurations
Use the following conguration properties to dene the behavior of password validations for citizen
accounts. For the Universal Access Responsive Web Application, you must implement these validations in
the application before you enable them.
Table 3. Account congurations
Property Description
curam.citizenworkspace.username.min.length Minimum number of characters in the username.
curam.citizenworkspace.username.max.length Maximum number of characters in the username.
curam.citizenworkspace.password.min.length Minimum number of characters in the password.
curam.citizenworkspace.password.max.length Maximum number of characters in the password.
curam.citizenworkspace.password.min.special.chars Minimum number of special characters and/or numbers in the password.
To update these properties, log in as a System Administrator (sysadmin), select Application Data >
Property Administration, and search for the property.
Account management events
Events are raised at key points during account processing. You can use these events to add custom
validations to the account management process.
For more information about adding custom validations to the account management process, see Cúram
Server Developer.
The table shows the events in the
curam.citizenworkspace.security.impl.CitizenWorkspaceAccountEvents class. For more
information about the events, see the related Javadoc information in the WorkspaceServices component.
Table 4. Account events
Event Interface Description
CitizenWorkspaceCreateAccountEvents Events raised around account creation.
CitizenWorkspacePasswordChangedEvent Event raised when a user is changing their password.
CitizenWorkspaceAccountAssociations Events raised when a user is linked or unlinked from an associated
Person Participant.
Related information
Cúram Server Developer
Chapter 6. Security for the Universal Access Responsive Web Application
151

CitizenWorkspaceAccountManager API
Use the curam.citizenworkspace.security.impl.CitizenWorkspaceAccountManager API to
create and link citizen accounts. You can use the API to build custom functionality to support caseworkers
who want to create and link accounts on behalf of citizens.
The API offers the following methods:
• Creating standard accounts.
• Creating linked accounts.
• Removing links between participants and accounts.
• Retrieving account information.
For more information, see the API Javadoc.
Data caching
Minimize the risk of citizens accessing each others' data from browser and server data caches. Cached
data can be accessed when citizens use the browser back button or browser history to retrieve data
entered by other users, or when PDF les are cached locally on the computer that was used to make the
application.
Server caching
HTTP servers like Apache can set cache-control response headers to not store a cache. Use this approach
to prevent access to data using the browser back button or history.
Browser caching
Browsers can be congured not to cache content. If citizens can access the web portal in a "kiosk", then
the browser should be congured never to cache content.
Advise citizens to clear their cache and close all browser windows they have used when they are nished
using the web portal. Also tell citizens to remove PDF documents that they download from the browser's
temporary internet les.
152
IBM Cúram Social Program Management 8.0.2: IBM Universal Access Responsive Web Application 5.2.0

Chapter 7. Conguring the Universal Access
Responsive Web Application
System administrators can use the following conguration options to congure and maintain Universal
Access with the Universal Access Responsive Web Application features such as screening, applications,
updates with life events, appeals, and verications.
Related information
IEG in the Universal Access Responsive Web Application
Conguring the browser
Users are notied when cookies or JavaScript are disabled in their browser. To use the application,
they must enable both cookies and JavaScript in their browser by conguring the appropriate browser
preferences.
Cookies and JavaScript
The following information messages are displayed if cookies or JavaScript are disabled:
Cookies are disabled in your browser
To use this service, you must enable cookies in your browser settings and try again. For instructions to
enable cookies, check your browser support website.
JavaScript is disabled in your browser
To use this service, you must enable cookies in your browser settings and try again. For instructions to
enable JavaScript, check your browser support website.
Because JavaScript is not available, the JavaScript messages are implemented in a static le, instead of
the standard message implementation. Updating the text or styling of these messages is different than
the standard process.
• For more information about translating these messages, see “Translating the multilingual messages for
when JavaScript is disabled ” on page 86.
• For more information about styling these messages, see “Customizing the color scheme or typography”
on page 89.
Conguring service areas
You can dene a service area by conguring the counties or ZIP codes that are associated with the service
area.
Conguring service areas
You dene service areas in the Service Areas section of the administration application. You must specify
a name for a service area. You can associate counties and ZIP codes of the areas that are covered with the
service area. Service areas can be associated with a local ofce, which identies where citizens can apply
in person for a program or where they can send an application. For more information about associating
service areas with local ofces, see “Dening local ofces for a program” on page 160.
Enabling citizens to search for a local ofce
A search page allows citizens to search for a local ofce. Citizens can either search by county or by ZIP
code. The curam.citizenworkspace.page.location.search.type system property determines
how the search works.
• If you set the property to Zip, citizens can search for a local ofce using a ZIP code.
©
Copyright IBM Corp. 2018, 2022 153

• If you set the property to County, citizens can select from a list of counties to get a list of local ofces.
Conguring PDFs
PDF format is supported for three use cases in the IBM Universal Access Responsive Web Application.
Citizens can download PDF application forms for offline applications, a PDF summary of information that a
citizen enters is automatically generated when citizens submit an application, and a PDF can be created to
capture an appeal request.
PDF forms for offline applications
Citizens can download PDF application forms to view or apply offline. You can congure a PDF application
form to be available from specic program applications. You can also congure application forms to
be available from the screening results page when citizens are found to be eligible for a program. To
congure a PDF application form, you must:
• Dene a PDF application form, see “Dening PDF forms” on page 155.
• To specify a PDF application form for program application, see “Specifying a PDF application form for
program applications” on page 155.
• To specify a PDF application form to be available for programs from screening results, see “Specifying a
PDF application form for screening results” on page 155.
PDF summary
By default, a generic PDF summary is generated for all IBM Cúram Social Program Management intake
applications. Citizens can download the PDF to see a summary of the information that they entered in
their application. The PDF summary is generated from a generic XSL template by using the Social Program
Management XML infrastructure.
Customizing the generic XSL template for the PDF summary
You can congure your system to use an improved XSL template that is based on the summary page in
IEG scripts. If needed, you can customize the XSL template for the PDF summary. For more information
about customizing the generic PDF summary form, see “Customizing the generic PDF summary form for
processed applications” on page 189.
Conguring a PDF application form template for the PDF summary
You can congure a PDF application form to be used as a template for the summary PDF form instead
of the generic XSL template. The application form is populated with information that is entered by
the citizen. That is, the citizen's information is copied from the data store to the PDF application form
according to the data mapping. To congure the PDF application form as a template, you must:
• Dene a PDF application form, see “Dening PDF forms” on page 155
.
• Specify a PDF application form for an application, see “Specifying a PDF application form for program
applications” on page 155.
• Dene PDF summary mappings for a program, “Dening PDF summary mappings for a program” on
page 155.
PDF forms for appeal requests
Typically, the details that citizens provide in an appeal request are added to a PDF, both the citizen and
the caseworker receive a copy. For more information about conguring a PDF for appeal requests, see
“Conguring appeal requests” on page 183.
Related concepts
Dening local ofces for a program
154
IBM Cúram Social Program Management 8.0.2: IBM Universal Access Responsive Web Application 5.2.0

Citizens might be able to apply for a program in person at a local ofce. You can congure local ofces
where an application for a program can be sent.
Dening PDF forms
You can dene PDF application forms that you can then associate with applications or programs.
Dene a PDF form by selecting Administration Workspace > Shortcuts > Universal Access > PDF
Forms.
You must specify a name and language for each PDF form. You can also add a version of the form for each
language that is congured in your application.
You can associate a local ofce with a PDF form, which enables administrators to dene the local ofce
and associated service areas where citizens can send their completed application.
Specifying a PDF application form for program applications
You can specify a PDF application form that citizens can download to view or apply for a program offline.
You must dene PDF application forms before you can associate them with a program application, see
“Dening PDF forms” on page 155.
Specify a PDF form for an online application by selecting the PDF form from the list at Administration
Workspace > Shortcuts > Universal Access > Applications > Online Application > Edit > PDF
Application Form
Citizens can then see a Download application link for the application, see “Start an application” on page
8.
Specifying a PDF application form for screening results
You can congure PDF application forms to be available for citizens to download from their screening
results to view or apply offline. They can post it to the agency or bring it to a local ofce.
You must dene PDF forms before you can associate them with a program, see “Dening PDF forms” on
page 155.
When PDF Application Form is specied for a program, a Download application link is displayed for
eligible programs on the Here's what you might get page when citizens complete a screening, see “The
Here's what you might get screening results page” on page 6.
Dening PDF summary mappings for a program
Information that citizens enter during all online intake applications is mapped to a PDF summary form
that citizens can print. By default, this PDF summary is based on an XSL template, but you can congure a
PDF application form to be used as a template for the PDF summary instead.
To generate the PDF summary based on the PDF application form, you must congure a mapping
conguration of type PDF Form Creation for that program. The data is mapped to the application form
that is specied for the online application that the program is associated with.
If a PDF mapping conguration is not associated with a program, the default generic XSL template is used.
Complete the following steps as an administrator:
1. Select Administration Workspace > Shortcuts > Universal Access > Programs.
2. Select a program then select Mappings > New Mapping.
3. Add the conguration XML and a mapping conguration of type PDF Form Creation.
4. Dene a PDF form, see “Dening PDF forms” on page 155.
5. Specify a PDF form for an online application, see “Specifying a PDF application form for program
applications” on page 155.
Chapter 7.
Conguring the Universal Access Responsive Web Application155

Conguring programs
You can congure different types of programs, with settings for display and system processing
information, local ofces, mappings to PDFs, and evidence types. You can associate programs with
screenings and benet applications.
Conguring a program
You can congure program details and associated display and system processing information on the New
Program page in the administration application.
Dening a name and reference
The name that you dene is displayed in the administration application.
Dene a name and reference when creating a new program. The name that is dened is displayed both to
the citizen and in the internal application. The reference is used to reference the program in code.
Dening an intake processing system
Dene an intake processing system for each program.
Two options are available:
• Cúram
• Select from the list of precongured remote systems.
If intake is managed by IBM Cúram Social Program Management, select Cúram. If intake is
managed by an external system, the program application is sent to the remote system by using the
ProcessApplicationService web service, select a remote system.
If Cúram is specied as the intake system, an application case type must be selected. An application case
of the specied type is created in response to a submission of an application for the program. An indicator
is provided which dictates whether a Reopen action is enabled on the programs list on an application
case for denied and withdrawn programs of a particular type. A workflow can be specied that is initiated
when the program is reopened. For more information on conguring application cases, see Cúram Intake
overview.
When an application case type is selected, the program can be added manually to that type of application
case by a worker in the internal application as part of intake processing. A conguration setting species
whether the program is a coverage type. Coverage types are automatically evaluated by program group
rules in the context of healthcare reform applications, such as insurance affordability. Coverage types
cannot be applied for directly by a citizen or manually added to an application case by a worker and
authorized. If the program is a coverage type, select Yes. The program is ltered out of the list of
programs available to be added to online and internal applications in administration and the list of
programs available to be manually added to an application case by a worker. If the program is not a
coverage type, select No. The program will be available to be manually added to online and internal
applications in administration and to an application case by a worker.
A remote system must be congured in the administration application before it can be selected as the
case processing system. For more information about remote systems, see Conguring Remote Systems.
Related information
Cúram Intake overview
Dening case processing details
Dene a case processing system for each program.
Two options are available:
• Cúram
• Select from remote systems.
156
IBM Cúram Social Program Management 8.0.2: IBM Universal Access Responsive Web Application 5.2.0
If the program eligibility is determined and managed by using a Cúram-based system, select Cúram. If
eligibility is determined and managed by an external system, select a remote system.
If you select Cúram as the case processing system, more options are available to allow you to congure
program level authorization. Program level authorization means that if an application case contains
multiple programs, each program can be authorized individually, and a separate case is used to manage
the citizens on an ongoing basis.
Dening the integrated case strategy
Dene the integrated case strategy so that the system can identify whether a new or existing integrated
case is used when program authorization is successful.
The integrated case strategy identies whether a new or existing integrated case is used when program
authorization is successful. The integrated case hosts any product deliveries created as a result of the
authorization. If a new integrated case is created, all of the application case clients are added as case
participants to the integrated case. If an existing integrated case is used, any additional clients on the
application case are added as case participants to the integrated case. Any evidence captured on the
application case that is also required on the integrated case is copied to the integrated case upon
successful authorization. The conguration options for the integrated case strategy are as follows:
New
A new integrated case of the specied type is always created when authorization of the program is
successful.
Existing (Exact Client Match)
If an integrated case of the specied type exists with the same citizens as those cases present on the
application case, the existing case is used automatically. If multiple integrated cases that meet these
criteria exist, the caseworker is presented with a list of the cases and must select one to proceed with
the authorization. If no existing cases match the criteria, a new integrated case is created.
Existing (Exact Client Match) or New
If one or more integrated cases of the specied type exist with the same citizens as those cases
present on the application case, the caseworker is presented with the option to select an existing case
to use as the ongoing case, or to create a new integrated case. If no existing cases match the criteria,
a new integrated case is created.
Existing (Any Client Match) or New
If one or more integrated cases of the specied type exist, where any of the clients of the application
case are case participants, the caseworker is presented with the option to select one of the existing
cases to use as the ongoing case, or to create a new integrated case. If no existing cases match the
criteria, a new integrated case is created.
Specifying the Integrated Case Type
The administrator must specify the type of integrated case to be created or used upon successful
program authorization as dened by the Integrated Case strategy listed.
Specifying a client selection strategy
Specify a client selection strategy to dene how clients are added from the application case to the
product delivery.
The client selection strategy denes how clients are added from the application case to the product
delivery created as a result of authorization of a program. If a product delivery type is specied, a client
selection strategy must be selected. The conguration options are as follows:
All Clients
All of the application clients are added to the product delivery case. The application case primary
client is set as the product delivery primary client. All other clients are added to the product delivery
as members of the case members group.
Rules
A rule set determines the clients to be added to the product delivery if a product delivery is
congured. At least one client must be determined by the rules for authorization to proceed.
Chapter 7.
Conguring the Universal Access Responsive Web Application157
User Selection
The user selects the clients who are added to the product delivery. The caseworker must select
both the primary client and any other clients to be added to the case member group on the product
delivery.
Specifying a Client Selection Ruleset
A Client Selection Ruleset must be selected when the Client Selection Strategy is Rules.
Specifying a product delivery type
Specify a product delivery type.
The Product Delivery Type drop-down species the product delivery that is used to make a payment to
citizens in respect of a program. Product Delivery Type displays all active products congured on the
system.
Note: This eld applies to both program and application authorization processing. That is, program and
application authorization can result in the creation of the product delivery type that is specied.
Submitting a product delivery automatically
The Submit Product Delivery indicator species if the product delivery created as a result of program
authorization should be submitted automatically for approval. If selected, the product delivery created as
a result of authorization of this program is submitted automatically to a supervisor for approval.
Note: This eld applies to both program and application authorization processing. That is, program and
application authorization can result in the automatic submission of a product delivery.
Conguring timers
Agencies can impose time limits within which an application for a program must be processed. You can
congure application timers for each of these programs.
For example, an agency might want to specify that food assistance applications are authorized within 30
business days of the date of application.
The following conguration options are available, including the duration of the timer, whether the timer is
based on business or calendar days, a warning period, and timer extension and approval.
Duration
The length of the timer in days. This value, along with the elds Start Date and Use Business Days
(and the congured business hours for the organization) calculate the expiry date for the timer. This
value is used as a number of business days if Use Business Days is set. If Use Business Days is not
set, this value is used as calendar days.
Start Date
Species whether the timer starts on the application date or the program addition date. The options
available are Application Date and Program Addition Date.
Note: In most cases, these dates are the same. That is, the programs are added at the same time
as the application is made. However, when a program is added later to the application, after initial
submission, the dates differ.
Warning Days
Species a number of warning days to warn citizens that the timer deadline is approaching. If
congured, the Warning Reached workflow is enabled when the warning date is reached and the
timer is still running (for example, the program is not completed).
End Date Extension Allowed
Species whether citizens can extend the timer by a number of days.
Extension Approval Required
Species whether a timer extension requires approval from a supervisor. If approval is required, the
supervisor either approves or rejects the extension. After the extension is approved, or if approval is
not required, the timer expiry date is updated to reflect the extension.
158
IBM Cúram Social Program Management 8.0.2: IBM Universal Access Responsive Web Application 5.2.0
Use Business Days
Species if the timer should not decrement on non-working days. If this indicator is set, the system
uses the Working Pattern Hours for the organization to determine the non-working days when it is
calculating the expiry date for the timer.
Resume Timer
Species whether the program timer must be resumed when the program is reopened.
Resume From
If a timer is resumed, the Resume From eld species the dates from which a program can be
resumed. The values include the date that the program was completed, denied, or withdrawn, and the
date that the program was reopened.
Timer Start
Species a workflow that is started when the timer starts.
Warning Reached
Species a workflow that is started when the warning period is reached.
Deadline Not Achieved
Species a workflow that is enacted if the timer deadline is not achieved; that is, the program is not
being withdrawn, denied, or approved by the timer expiry date.
Conguring multiple applications
Congure multiple applications so that citizens can apply for a program while they have a previous
application pending.
The Multiple Applications indicator dictates if citizens can apply for a program while they have a previous
application pending. If set to true, citizens can have multiple pending applications for the given program.
That is, citizens can submit an application for this program while they already have a pending application
in the system. If it is set to false, this program is not offered if logged in citizens have pending applications
for this program.
This conguration is not applicable to Health Care Reform Applications.
Dening a URL
If a URL is dened, a More Info link is displayed with the program name so that citizens can nd out more
information about the selected program.
Dening description and summary information
When a program is displayed on the Select Programs page, a description can be displayed which gives a
description of the program. The Online Program Description eld denes this description.
A description summary of the program can also be dened using the Online Program Summary eld. The
eld is a high-level description of the program displayed on the Here's what you might get page that is
displayed when citizens complete a screening.
Dening local ofce application details
Citizens can apply for programs at a local ofce. If this is the case, the Citizen Can Apply At Local Ofce
indicator indicates that local ofce information is displayed for a program.
Additional information can also be dened, for example, citizens might need to bring proof of identity if
they want to apply at the local ofce. An administrator can dene this information in the Local Ofce
Application Information eld.
Chapter 7.
Conguring the Universal Access Responsive Web Application159

Dening local ofces for a program
Citizens might be able to apply for a program in person at a local ofce. You can congure local ofces
where an application for a program can be sent.
Associating a local ofce with a program allows an administrator to dene the local ofces and their
associated service areas where a particular program can be applied for in person. This information is
displayed on the Here's what you might get page that is displayed to citizens when they complete a
screening.
A local ofce must be rst be dened in the LocalOfce code table in system administration. Service areas
must be dened before they can be associated with a local ofce.
Dening program evidence types
You can congure selected evidence types to allow the expedited authorization of programs before other
programs in a multi-program application. You can then associate these evidence types with a program.
Evidence types can support applications for multiple programs. You might need a program to be
authorized more quickly than other programs for which a citizen applied. You can specify that the
evidence that is needed for a specic program to be authorized only is used and copied to the ongoing
cases. Benets for the authorized program can be delivered to citizens, while the caseworker continues to
gather the evidence that is needed for the other programs.
Conguring screenings
Dene the different types of screenings that citizens can complete to identify programs that they might be
eligible to receive.
For each screening, you can congure the available programs and eligibility requirements. You can then
congure the script, rules, and data schema to collect and process citizen information, and dene what
information is displayed to citizens.
Once dened, citizens can self screen to identify programs that they may be eligible to receive. There are
four main aspects to conguring a screening:
• Conguring the information about a screening to be displayed to citizens.
• Conguring the script, rules and schema used to collect and process the information specied by
citizens to identify their eligibility.
• Conguring the programs for which citizens can screen themselves for eligibility.
• Conguring additional screening system properties.
Related concepts
Screen
Citizens can self-check their eligibility for benets and services before they submit an application.
Checking for eligibility is implemented by using the Screening feature.
Customizing screenings
Use the supported classes and APIs to customize the events that are started for screenings and the
screening results page.
Conguring a new screening
Screenings are congured on the New Screening page.
The screening congurations are as follows.
Dening a name
You must dene a name must be dened when creating a screening. The name dened is the name of the
screening displayed to citizens in the IBM Cúram Universal Access portal.
160
IBM Cúram Social Program Management 8.0.2: IBM Universal Access Responsive Web Application 5.2.0

Dening program selection
The Program Selection indicator denes whether citizens can select specic programs that they want to
screen for, or whether they are brought directly into a screening script. If citizens are brought to a script,
they are screened for all programs associated with the screening.
Dening a More Info URL
If a More Info URL is dened, a More Info link is displayed.
Allowing re-screening
The Allow Rescreening indicator denes whether citizens can re-screen when they have completed a
screening.
Dening an icon for a screening
If you want an icon displayed with a screening, select an icon from the Icon selection box.
Note: Alternatively, you could modify the img src attribute of the icon directly on the screening HTML
page, for example
<img src="camera.gif" alt="Camera">
Conguring eligibility and screening details
Congure details for eligibility screening or ltered screening
Two types of screening are supported - ltered screening and eligibility screening. Eligibility screening
collects answers to a set of questions, stores this information and processes it to identify eligibility.
Filtered screening reduces the number of programs that a citizen might screen for by asking a short set of
questions and using the answers to lter out the programs that they would not be eligible for.
Conguring eligibility screening details
Specify an IEG script for the screening to collect the answers to a set of questions. You must also specify
a data store schema to store the data entered in the script. On saving the screening, the system creates
an empty template for both the script and schema based on the Question Script and schema that you
specied. You can update these templates from the Screening tab by selecting hyperlinks provided on
the page. Clicking the Question Script link starts the IEG editor that allows you to edit the question script.
Click the schema link to start the Datastore Editor, you can then edit the schema.
You must specify a CER rule set to process the data in the data store and to produce an eligibility result.
When specied on creation of the screening, the system creates an empty rules template. You can then
update the ruleset from the Screenings tab by selecting the hyperlink provided on the page. Clicking
the link starts the CER Editor, which allows you to edit the ruleset. For more information about writing
screening rule sets, see “Writing Rule Sets For Screening” on page 163
Conguring ltered screening details
Specify ltered screening details for a screening so that ltered screening is available before citizens
perform eligibility screening. As with eligibility screening, you must dene a Filter Script (IEG) and
associated data store schema to collect and store the answers to questions. You must also specify a
Filter Rules (CER rule set) to process the data and produce a ltered screening result. When specied on
the New Online Screening page, the system automatically creates an empty template for the scripts and
ruleset that can be subsequently updated by selecting the associated hyperlinks on the Screening page.
Reusing rule sets across screenings
Use the system property curam.citizenworkspace.screening.ruleset.reuse.enabled to specify:
Chapter 7.
Conguring the Universal Access Responsive Web Application161

• Whether CER rule sets can be reused across different screenings.
• Whether the same rule set can be used for eligibility and ltered screening.
If curam.citizenworkspace.screening.ruleset.reuse.enabled is enabled, you cannot reuse rule sets, if it is
disabled you can reuse rule sets. You cannot use the ScreeningRulesLinkDAO.readActiveByRuleSet method
when curam.citizenworkspace.screening.ruleset.reuse.enabled property is enabled.
Conguring screening display information
You can congure the screening information display elds for each screening.
Summary information
Dene a high-level description of the screening.
Here's what you might get text
Dene the text to be displayed on the Here's what you might get page, which is displayed to show
citizens the results of a completed screening.
Description
Dene a description of the screening to be displayed.
How to apply text
Allows an administrator to dene the text displayed on the Here's what you might get page.
Dening programs for a screening
You must associate programs with a screening so that citizens can screen for those programs.
You can associate any program that is described in Conguring Programs with a screening. When
associating programs with a screening, you can assign an order that sets the display order of the selected
program relative to other programs associated with the screening.
Related concepts
Conguring programs
You can congure different types of programs, with settings for display and system processing
information, local ofces, mappings to PDFs, and evidence types. You can associate programs with
screenings and benet applications.
The screening auto-save property
Use the screening curam.citizenworkspace.auto.save.screening property to set whether
screenings are automatically saved for authenticated citizens.
By default, curam.citizenworkspace.auto.save.screening is set to true. All screenings,
irrespective of type, are automatically saved for authenticated citizens. Each screening
is automatically saved when citizens click Next to progress through an IEG script. If
curam.citizenworkspace.auto.save.screening is set to false, screenings are not automatically
saved.
162
IBM Cúram Social Program Management 8.0.2: IBM Universal Access Responsive Web Application 5.2.0

Conguring rescreening
Congure whether citizens can change and resubmit their screenings.
About this task
In the administration application, you can congure whether to allow citizens to change and re-submit
their screening. If so, citizens can rescreen from the Check what you might get page or from the Here's
what you might get page. If not, citizens who want to rescreen must delete their screenings and start
again.
Procedure
1. Log in to IBM Cúram Social Program Management as an administrator.
2. Select Administration Workspace > Shortcuts.
3. Select Universal Access > Screenings.
4. Select the screening that you want to change.
5. Select ... > Edit.
6. Select the Allow Rescreening checkbox to enable rescreening and click Save.
Prepopulating the screening script
When citizens screen from a citizen account, you can prepopulate information that is already known about
the citizen who is screening.
You must congure prepopulation for screening. For more information, see how this conguration is done
for life events, “Pre-populating a life event” on page 197
and “Driving updates from life events” on page
201.
Use the system property curam.citizenaccount.prepopulate.screening to set whether the
IEG script is prepopulated. The default value of this property is true, which means that the script is
prepopulated with information that is already known about the citizen.
Related concepts
Authenticated screening
Citizens who are logged in to Universal Access can complete an authenticated screening.
Resetting data captured from a previous screening
Determine whether starting an intake application resets data captured by a previously completed
screening.
Determines whether starting an intake application resets datastore data captured by a previously
completed screening
Use the system property curam.citizenworkspace.intake.resets.screening.results to
determine whether starting an intake application resets datastore data that was captured by a previously
completed screening.
Setting curam.citizenworkspace.intake.resets.screening.results to true means that
starting an intake application resets datastore data captured by a previously completed screening.
Setting curam.citizenworkspace.intake.resets.screening.results to false means that
starting an intake application does not reset datastore data captured by a previously completed
screening.
Writing Rule Sets For Screening
Develop screening rule sets.
Chapter 7.
Conguring the Universal Access Responsive Web Application163
Addin a data store schema
Create a new data store schema for use with screening and intake intelligent evidence gathering (IEG)
scripts. However, some constraints exist on the format of these schemas. In some cases, requirements
dictate that citizens can screen for a program and then follow that screening by applying for benets.
In many cases, applications are processed by IBM Cúram Social Program Management and are mapped
to Cúram cases and evidence by using the Cúram Data Mapping Engine (CDME). In these circumstances,
use CitizenPortal.xsd as a basis for the schema for screening. This process is used because the
same data store schema also needs to be used for intake. In particular, the CDME features do not work
correctly if a schema is used that removes or changes the data type of any of the attributes or entities in
the CitizenPortal.xsd schema.
All schema that follows the pattern of the CitizenPortal.xsd schema are safe for later releases.
This assurance means that upgrades do not add any new mandatory attributes or entities. Upgrades do
not change any existing attributes or entities that currently are required to support existing Cúram data
mapping engine functions.
The screening rules interface
All screening rule sets must use the screening rules interface so that they can be executed within IBM
Cúram Universal Access.
The ruleset interface is detailed in the following XML example:
<?xml version="1.0" encoding="UTF-8"?>
<RuleSet xmlns:xsi="http://www.w3.org/2001/XMLSchema-instance"
xsi:noNamespaceSchemaLocation="http://www.curamsoftware.com/
CreoleRulesSchema.xsd"
name="ScreeningInterfaceRuleSet">
<!-- This class must be extended by all rule sets invoked by
the Citizen Portal screening results processing. -->
<Class name="AbstractScreeningResult" abstract="true">
<Initialization>
<Attribute name="calculationDate">
<type>
<javaclass name="curam.util.type.Date"/>
</type>
</Attribute>
</Initialization>
<!-- The programs supported by this Screening Ruleset. -->
<Attribute name="programs">
<type>
<javaclass name="List">
<ruleclass name="AbstractProgram"/>
</javaclass>
</type>
<derivation>
<!-- Subclasses of AbstractScreeningResult must override
this attribute to create a list of the Programs
supported by the rule set. -->
<abstract/>
</derivation>
</Attribute>
</Class>
<!-- This class must be extended by all programs supported
in the rule set. -->
<Class name="AbstractProgram" abstract="true">
<!-- Identifies the program as configured in the Citizen
Portal administration application. -->
<Attribute name="programTypeReference">
<type>
<javaclass name="String"/>
</type>
<derivation>
<abstract/>
</derivation>
164
IBM Cúram Social Program Management 8.0.2: IBM Universal Access Responsive Web Application 5.2.0

</Attribute>
<!-- Whether the claimant is eligible for this program. -->
<Attribute name="eligible">
<type>
<javaclass name="Boolean"/>
</type>
<derivation>
<abstract/>
</derivation>
</Attribute>
<!-- The localizable explanation as to why the claimant is
or is not eligible for this program. May contain HTML
formatting/hyperlinks/etc. -->
<Attribute name="explanation">
<type>
<javaclass name="curam.creole.value.Message"/>
</type>
<derivation>
<abstract/>
</derivation>
</Attribute>
</Class>
</RuleSet>
Screening rule sets must include a class that extends the AbstractScreeningResult rule class
outlined .
Using the AbstractScreeningResult rule class guarantees that the required attributes are available
when the rules are executed.
Conguring applications
Use IBM Cúram Social Program Management administration and system administration applications to
dene the applications that are available for citizens. For each application, you can congure the available
programs and an application script and data schema. You must also congure the remaining applications
details, such as application withdrawal reasons.
Related concepts
Apply
Citizens can apply for benets online by submitting an application form that includes personal details
like income, expenses, employment, and education. This information becomes evidence on the citizen's
case that agencies can use to determine their eligibility for benets. Citizens can also apply offline by
downloading the application form to send to the agency or to bring to their local agency ofce.
Customizing applications
You can customize the application flow to link directly to an application script, or to provide separate
overview pages or submission conrmation pages for each application type. You can also use
customization points, for example, customizing the generic PDF for processed applications, to customize
the application intake process when an intake application is submitted.
Conguring applications in the administration application
Use the IBM Cúram Social Program Management administration application to congure an online
application.
Procedure
1. Log in to Social Program Management as an administrator.
2. Select Administration Workspace > Shortcuts > Universal Access > Applications.
3. Click New. The New Online Application page opens.
4. Enter the required information. For more information, see Conguring application information and
display information, Conguring scripts, and Dening a PDF form.
Chapter 7.
Conguring the Universal Access Responsive Web Application165

Conguring application information and display information
Congure the following information on the New Online Application page.
Name
The name of the application that is displayed in the online portal.
Program selection
Indicates whether citizens can select specic programs to apply for or whether they are brought
directly into an application script. That is, citizens can apply for all programs associated with the
application.
More Info URL
If a URL is dened, a More Info link is displayed with the application name so that citizens can nd out
more information about the selected application.
Client registration
Determines whether citizens are registered as prospect persons or persons.
To determine whether to register citizens as prospect persons or persons, the system checks the
client registration conguration in the following two scenarios:
• If Person Search and Match is congured, and no match can be found for the citizen.
• If Person Search and Match is not congured, that is, citizens on an application are always
registered without the system automatically searching and matching them.
If Client Registration is not set, the system checks the system property
curam.intake.registerAsProspect to identify whether citizens are registered as a prospect
person or a person.
Submit on Completion Only
Determines whether citizens can submit the application to the agency before completing the intake
script.
Dening an icon for an application
If you want an icon displayed with an application, select an icon from the Icon selection box.
Note: Alternatively, you could modify the img src attribute of the icon directly on the application
HTML page, for example
<img src="camera.gif" alt="Camera">
Summary
A high-level description of the application.
Description
An overview description of the application.
Submission Conrmation Page Details
A more detailed description of the application. Use the Title and Text elds to dene a title and text to
be displayed on the Submission Conrmation page.
Conguring scripts
Congure an IEG application script to collect the answers to the application questions and congure a
submission script for an application so that citizens can submit applications.
Application scripts
Specify a script name in the Question Script eld. Specify a data store schema in the Schema eld to
store the data entered in the script. On saving the application, an empty template for both the script
and schema is created by the system based on the question script and schema specied. You can
update these templates from the Application tab by selecting the hyperlinks provided on the page.
Click the Question Script link to start the IEG editor so you can edit the question script. Click the
Schema link to start the Datastore Editor and edit the schema.
166
IBM Cúram Social Program Management 8.0.2: IBM Universal Access Responsive Web Application 5.2.0

Submission scripts
Congure an IEG submission script in the Submission Script. The script denes additional
information that does not form part of the application script to be captured, for example, a TANF
typically requires information regarding the citizen's ability to attend an interview.
On saving the application, an empty template for the submission script is created by the system based
on the Submission Script that you specify. You can update this from the Application tab by selecting
the hyperlink on the page. Clicking the link starts the IEG editor that you use to edit the question
script.
Conguring application properties
Use the system administration application to congure IBM Cúram Social Program Management
application properties for online applications.
About this task
You can congure the following properties for your organization.
• Mandate citizen authentication before they can apply.
If you set the curam.citizenworkspace.authenticated.intake property to YES, citizens must
create an account or log in before they start an application. Citizens are brought to the following
components:
– The Apply for benets page.
– The login page when citizens select Apply.
If set to NO, citizens go directly to the application selection page.
• Set optional authenticated application.
If you set the curam.citizenworkspace.intake.allow.login property, citizens can choose to
log in before they submit an application. If not, citizens go directly to the application submission script.
• Display a conrmation page to citizens when they quit the application.
If you set the curam.citizenworkspace.display.confirm.quit.intake property to YES, a
conrmation page is displayed when citizens quit during the application process. If set to NO, a
conrmation page is not displayed.
Use this property only when the curam.citizenworkspace.intake.allow.login property is set
to NO.
• Allow citizens to start an application from the organization Home page.
If you set the curam.citizenworkspace.intake.enabled property to YES, the Apply For Benets
link is displayed on the organization Home page. If set to NO, the link is not displayed.
• Preepopulate scripts with known information about authenticated citizens. You must congure
prepopulation for intake. For more information, see how this conguration is done for life events,
“Pre-populating a life event” on page 197 and “Driving updates from life events” on page 201.
If you set the curam.citizenaccount.prepopulate.intake property property to TRUE, the
application is prepopulated with information that is already known about authenticated citizens. By
default, this property is set to true so scripts are prepopulated. If not, the script is not prepopulated.
• Automatically save applications in the citizen account.
If you set the Auto-save intake property to true, applications are automatically saved in the citizen
account. Each application is auto-saved when citizens click Next as they progress through the IEG
script. By default, this property is set to true. If set to false, applications are not automatically saved.
Procedure
1. Log in to Social Program Management as a system administrator.
Chapter 7.
Conguring the Universal Access Responsive Web Application167

2. Select System Congurations > Shortcuts > Application Data.
3. Enter the name of the application property that you want to congure in the Name eld and select
Search.
4. Select ... > Edit Value.
5. Change the property setting, for example change YES to NO and Save your changes.
Conguring other application settings
You can associate programs with an application, dene mappings for an application, and congure
withdrawal reasons.
Associating programs with applications
Programs can be associated with an application. You can set the display order of the selected
program relative to other programs that are associated with the application. For more information,
see “Conguring programs” on page 156.
Dening evidence mappings for an application
Applications can be processed by IBM Cúram Social Program Management or a remote system.
If the application is processed by IBM Cúram Social Program Management, the entered information
is mapped to the evidence tables that are associated with the application case that is dened for the
programs that are associated with the application. The mappings are congured for an application by
creating a mapping with the Data Mapping Editor. A mapping conguration must be specied in order
for the appropriate evidence entities to be created and populated in response to an online application
submission.
For more information about the Data Mapping Editor, see Conguring with the Data Mapping Editor.
Conguring withdrawal reasons
Citizens can withdraw the application for all or any one of the programs for which they applied.
When they withdraw an application, citizens must specify a withdrawal reason. You can dene
withdrawal reasons for an application in the Intake Application section of the administration
application. Before you associate a withdrawal reason with an application, you must dene
withdrawal reasons in the WithdrawalRequestReason code table. For more information, see Intake
Application.
Related concepts
Conguring programs
You can congure different types of programs, with settings for display and system processing
information, local ofces, mappings to PDFs, and evidence types. You can associate programs with
screenings and benet applications.
Related information
Intake Application
Conguring with the Data Mapping Editor
Conguring online categories
Online categories group different types of applications or screenings together to make it easier for citizens
to nd the ones that they need. You must dene online categories for screenings and applications to be
displayed. After you dene online categories, you must associate each screening and application to a
category.
Dening online categories
When dening an online category a name and URL must be dened. If a URL is dened a More Info link
is displayed with the name of the online category allowing citizens to nd out more information about the
selected category. An order can be assigned to a category which dictates the display order of the selected
category relative to other categories.
168
IBM Cúram Social Program Management 8.0.2: IBM Universal Access Responsive Web Application 5.2.0

Associating screenings and applications
Applications and screenings must be associated with an online category so they can be displayed in the
application. When associating a screening with an online category, an order can be applied which dictates
the display order of the screening relative to other screenings within the same category. When associating
an application with an online category an order can be applied which dictates the display order of the
application relative to other applications within the same category.
Conguring life events
For each life event, you must dene how information is collected, stored, and displayed. You can congure
life event information categories, mappings to dynamic evidence, and information sharing with internal
and external sources.
Life events are displayed in the citizen account to allow citizens to submit information to the agency.
Life events can also provide citizens with useful information and resources. Life events can be made
available in other channels. For example, they can be submitted online by an agency worker in the internal
application. Conguration settings allow different information to be displayed depending on where the
life event is initiated from. For example, the Having a Baby life event question script that is displayed to
citizens can be different from the Having a Baby life event question script that is displayed to an agency
worker.
Related concepts
Update
Citizens can update their details by submitting a change in their circumstances to the agency, which is
implemented by using the Life Events feature. Examples of changes in circumstances include a change
of address, a birth, or marriage. These signicant events in citizens' lives might affect the benets or
services that they are receiving or are due to receive.
Customizing life events
A description of the high-level architecture of life events and how to perform the analysis and
development tasks in building a life event.
Conguring a life event
You can congure a life event in the administration application on the New Life Event page.
Dening a name
Specify a name that uniquely identies the life event. This name is only displayed in the administration
application. You must specify a schema if the life event enables citizens to submit information to the
agency. The schema denes where the information submitted by a citizen or user in the life event script
is stored. For more information about dening data store schemas, see Working With Intelligent Evidence
Gathering.
Dening a channel type
The channel type denes the channel in which a life event is used, for example, 'Online' or 'Internal'.
Dening a display name
The display name represents the name of the life event that appears citizens or agency workers. For
example, a change of job life event might be displayed as Lost My Job to citizens but Client Loses Job to
caseworkers.
Displaying question and answer scripts
Question script is the name of the life event script. Answer script gathers answers to life event questions.
Chapter 7.
Conguring the Universal Access Responsive Web Application169

Dening a schema
The name of the data store schema used by the life event script to capture data. Select a schema from the
Schema menu.
Dening the display ruleset
Dene the ruleset that determines which recommendations are displayed to citizens when a life event is
submitted.
Enabling citizen consent
For certain life events, a citizen's consent might be needed before information is sent to a remote system
or agency. The Citizen Consent Enabled selection box allows an administrator to specify whether a
citizen's consent is needed. This provision means that citizens can select the agencies that they would
like to send their life event information to.
If this indicator is specied, a list of remote systems is displayed on completion of the life event script.
If this indicator is not specied, the citizen is not presented with the list. If only one remote system is
associated with the life event, the Citizen Consent If One Choice Only eld is provided to determine
whether the citizen is presented with the remote systems list. The citizen must specify their consent to
send information to this remote system by selecting it on completion of the question script.
Dening the channel
The channel that this life event applies to, either online or internal.
Dening a display description
A description of the life event. This description is displayed on the cards on the citizen's prole page. Rich
text is supported.
Dening additional information
Additional information related to the life event can be specied. For example, you can display links to
useful websites or information that the agency deems relevant to a particular life event.
Dening the submission text
Congure the text to be displayed to a citizen after they submit a life event. If a rule set was dened, the
following default text is displayed:
Your information has been submitted. Based on the information you have given us, we have
identied services and programs that may be of use to you. View your results.
Dening an icon
You cannot dene an icon when rst conguring a life event. Instead, you must save the life event and
then take the following steps:
1. Select the ellipsis ... icon for the new life event and then select New Image.
2. Select Browse, and select an image le from your local drive.
Note: Only .png or .gif images are supported. Image les must not be animated.
3. Specify an image name and alt text and select Save.
Related information
Working with Intelligent Evidence Gathering
170
IBM Cúram Social Program Management 8.0.2: IBM Universal Access Responsive Web Application 5.2.0

Mapping life event information to evidence entities
Information that is gathered in the life event script is stored in the data store schema that is dened for
the life event.
To pass information gathered in the life event script into IBM Cúram Social Program Management, it must
be mapped to dynamic evidence entities. Dynamic evidence entities must rst be dened in the Rules
and Evidence section of the administration application. When dened, you must specify these entities as
Social Record Evidence Types in the administration application. An indicator is also provided to set if a
particular evidence type is visible to citizens. When the social record evidence entities are dened, use
the Data Mapping Editor to map the data from the data store to the appropriate evidence entities. You can
access the Data Mapping Editor from the Mappings tab on the life event.
When citizens submit a life event, the information that is gathered is mapped to evidence entities that are
associated with a new case type called a social record case. The evidence broker can then be used to pass
the information from this case to the appropriate ongoing cases.
For more information about data mapping, see the Conguring with the data mapping editor related link.
For more information about sharing evidence, see the Sharing evidence with the evidence broker related
link.
Related information
Conguring with the Data Mapping Editor
Sharing evidence with the evidence broker
Dening a question script, answer script, and schema
You must dene an IEG script for the life event if the life event allows citizens or users to submit
information to the agency.
The IEG script that you dene collects the answers to a set of questions related to the life event. Specify
a script name in the Question Script eld. You must also specify a schema if the life event allows citizens
or users to submit information to the agency. The schema denes where the information submitted in
the life event script is stored. Specify a schema in the Schema eld. You must specify an answer script
to allow citizens to review the answers they have provided to the questions during submission of the life
event. Specify an answer script in the Answer Script eld.
When you save the life event, empty template scripts and a schema are created by the system based on
the Question Script, Answer Script and Schema specied. You can then update these from the Life Event
tab by selecting the hyperlinks provided on the page. Clicking on the Question Script and Answer Script
links launch the IEG Editor. Clicking on the Schema link starts the Datastore Editor. Existing schema,
question scripts and answer scripts can be used by selecting them on the Edit Life Event page.
Note: If a life event has been congured to send information to remote systems, set the Finish Page eld
in the script properties (accessed by selecting Edit > Congure Script Properties in the IEG Editor) to
cw/DisplayRemoteSystems.jspx.
For more information on dening IEG scripts and schema, see Working with Intelligent Evidence Gathering.
Related information
Working with Intelligent Evidence Gathering
Categorizing life events
Life event administration allows you to categorize or group together similar life events, for example,
changing jobs, changing address and changing income life events could be categorized within an
employment category.
Categorizing life events makes it easier for citizens or users to nd the life event they need. You dene
categories in life event administration and then associate them with a life event. When dening a
category, you must specify a name and description . Life events can then be associated with that category.
Chapter 7.
Conguring the Universal Access Responsive Web Application171

Dening Remote Systems
Life event information can be submitted to remote or external systems. You must associate a remote
system with a life event so that life event information can be sent to that system.
The remote system must have the Life Event Service web service associated with it. This is used to
transmit life event information to the remote system. Remote Systems can be congured in the Remote
Systems section of the administration application.
Conguring the citizen account
Although customization is required to modify some citizen account information, you can congure
information on the citizen account and the Contact Information tab.
Messages can originate as a result of transactions in IBM Cúram Social Program Management or a remote
system. Most of the conguration options apply to all messages but there are a some conguration
options that do not apply to messages originating from a remote system.
Related concepts
Track
When citizens create a secure citizen account, they can access a range of relevant information. Citizens
can also use the citizen account to track and manage their interactions with the agency.
Conguring messages
The Messages pane on the organization Home page displays messages to logged-in citizens. For example,
a message that informs citizens when their next benet payment is due or the amount of the last
payment. You can congure a number of items in the Messages plane.
Messages can be displayed which relate to meetings, activities, and application acknowledgments.
Messages can be displayed as a result of transactions in IBM Cúram Social Program Management or
they can originate from remote systems through a web service.
Account messages
Adding an account message or changing a dynamic element of an account message requires
customization. You can update the text in the default account messages by using a set of properties
for each type of message.
The following properties are available:
• CitizenMessageMyPayments - messages about payments.
• CitizenMessageApplicationAcknowledgement - messages about application acknowledgments.
• CitizenMessageVerificationMessages - messages about verication messages.
• CitizenMessageMeetingMessages - messages about meetings.
• CitizenMessagesReferral.properties - messages about referrals.
• CitizenMessagesServiceDelivery - messages about service deliveries.
• OnlineAppealRequestMessage - messages about appeal requests.
The properties are in the Application Resources section of the administration application. To update the
message, each le needs to be downloaded, updated, and uploaded again. The icons that are displayed in
the citizen account for each type of message can be congured in the Account Messages section of the
administration application.
Adding a message that originates from a remote system requires that a code table entry is added to
the ParticipantMessageType code table and an associated entry in the Account Messages listing in
the administration application. Messages can then be sent by the ExternalCitizenMessageWS web
service.
172
IBM Cúram Social Program Management 8.0.2: IBM Universal Access Responsive Web Application 5.2.0

Creating appeal request acknowledgment or appeal rejection messages
Create messages to acknowledge an appeal request or to reject an appeal request.
Table 5. Appeal request acknowledgment
Message Area Description
Title Appeal Request Acknowledgment
Message We have received your [Appeal Request
- hyperlink to the appeal request
on the My Appeals page] and it
is currently under review. We will
contact you shortly to confirm the
next steps.
Effective Date Current Date.
Duration This value is dened in the
Num.Days.To.Expiry=7 property in the
OnlineAppealRequestMessage properties le
and used in the implementation to set the attribute
expiry date time. The default value is 7.
Notes None.
Table 6. Appeal rejection
Message Area Description
Title Appeal Request Disallowed
Message We have reviewed your appeal request
and determined it to be an invalid
appeal. We will send you written
notice of this, including further
details.
Effective Date Current Date.
Duration This value is dened in the
Num.Days.To.Expiry=7 property in the
OnlineAppealRequestMessage properties le
and used in the implementation to set the attribute
expiry date time. The default value is 7.
Notes None.
Creating application acknowledgments
Create messages to acknowledge an application.
Table 7. Application acknowledgment
Message Area Description
Title <Icon> TANF Application Acknowledgment
Message We have received your TANF Application
form. The status of this application
is pending. We will contact you when
the application has been processed.
Effective Date Current
®
date
Chapter 7. Conguring the Universal Access Responsive Web Application173

Table 7. Application acknowledgment (continued)
Message Area Description
Duration An administrator can use a conguration setting to
dene the number of days (from the effective date)
that the message is displayed.
Notes None.
Creating meeting messages
Create messages for a meeting invitation, a meeting cancellation, and a meeting update. An administrator
can use a conguration setting to set the number of days (from the effective date) that the meeting
messages are displayed.
Table 8. Meeting invite
Message Area Description
Title <Icon> Meeting Invitation - Meeting with Case
Worker
Message 1 (Not an all day meeting and the
meeting start and end date are on the same day)
You are invited to attend a meeting
from 9.00AM until 5.00PM on 12/04/2010
in Meeting Room 1, Block C. Please
contact Joe Bloggs at 014567832 or
[email protected] if you need more
information or cannot attend.
Message 2 (All day meeting for one day only) You are invited to attend an all day
meeting on 12/04/2010 in Meeting Room
1, Block C. Please contact Joe Bloggs
at 014567832 or [email protected] if
you need more information or cannot
attend.
Message 3 (All day meeting for multiple days) You are invited to attend an all day
meeting each day from 12/04/2010 until
15/04/2010 in Meeting Room 1, Block C.
Please contact Joe Bloggs at 014567832
or [email protected] if you need more
information or cannot attend.
Message 4 (Non-all day meeting for multiple days) You are invited to attend a
meeting from 9.00AM until 5.00PM
from 12/04/2010 to the 13/04/2010
in Meeting Room 1, Block C. Please
contact Joe Bloggs at 014567832 or
[email protected] if you need more
information or cannot attend.
174IBM Cúram Social Program Management 8.0.2: IBM Universal Access Responsive Web Application 5.2.0

Table 8. Meeting invite (continued)
Message Area Description
Notes When the case worker is setting
up a meeting, the location is an
optional field. Therefore, if a
meeting location is not specified,
the preceding messages are displayed
without a location. Also, the meeting
organizer's contact details are
optional. Therefore, if no contact
details are found, the preceding
message is displayed without the
organizer's contact details.
Table 9. Meeting cancellation
Message Area Description
Title <Icon> Cancellation - Meeting with Case Worker
Message 1 (Not an all day meeting and the
meeting start and end date are on the same day)
The meeting that you were scheduled
to attend from 2.00PM until 6.00
PM on 12/04/2010 is canceled. Please
contact Joe Bloggs at 014567832 or
[email protected] if you need more
information.
Message 2 (All day meeting for one day only) The all day meeting that you were
scheduled to attend on 12/04/2010 is
canceled. Please contact Joe Bloggs at
014567832 or [email protected] if you
need more information.
Message 3 (All day meeting for multiple days) The all day meeting that you were
scheduled to attend from 12/04/2010
until 15/04/2010 is canceled. Please
contact Joe Bloggs at 014567832 or
[email protected] if you need more
information.
Effective Date Current Date.
Notes The meeting organizer's contact details link opens
a page that shows the organizer's contact details.
Table 10. Meeting update
Message Area Description
Title <Icon> Cancellation - Meeting with Case Worker
Message 1 (Date and Time change of a non-all-day
meeting)
The meeting that you were scheduled
to attend from 2.00PM until 6.00
PM on 12/04/2010 is rescheduled to
3.00PM until 7.00 PM on 13/04/2010
in Meeting Room 1, Block C. Please
contact Joe Bloggs at 014567832 or
[email protected] if you need more
information or cannot attend.
Chapter 7. Conguring the Universal Access Responsive Web Application175

Table 10. Meeting update (continued)
Message Area Description
Message 2 (Location change of a non-all-day
meeting)
The location of the meeting you are
scheduled to attend from 2.00PM until
6.00 PM on 12/04/2010 is changed.
This meeting is now scheduled for
Meeting Room 1, Block D. Please
contact Joe Bloggs at 014567832 or
[email protected] if you need more
information or cannot attend.
Message 3 (Date, time, and location change of
non-all-day meeting)
The meeting that you were scheduled
to attend from 2.00PM until 6.00
PM on 12/04/2010 is rescheduled to
3.00PM until 7.00 PM on 13/04/2010.
It is rescheduled for Meeting Room
2, Block C. Please contact Joe Bloggs
at 014567832 or [email protected] if
you need more information or cannot
attend.
Message 4 (Date change of all day meetings for
multiple days)
The all day meeting that you are
scheduled to attend from 12/04/2010
until 15/04/2010 is rescheduled. This
meeting will now take place from
13/04/2010 until 16/04/2010. Please
contact Joe Bloggs at 014567832 or
[email protected] if you need more
information or cannot attend.
Message 5 (Location change for all day meeting for
multiple days)
The location of the all day
meeting you are scheduled to attend
from 12/04/2010 until 15/04/2010 is
changed. This meeting is rescheduled
for Meeting Room 1, Block D. Please
contact Joe Bloggs at 014567832 or
[email protected] if you need more
information or cannot attend.
Message 6 (Date and location change for all-day
meeting for multiple days)
The all day meeting that you are
scheduled to attend from 12/04/2010
until 15/04/2010 is rescheduled.
This meeting will now take place
from 13/04/2010 until 16/04/2010 in
Meeting Room 1, Block D. Please
contact Joe Bloggs at 014567832 or
[email protected] if you need more
information or cannot attend.
Message 7 (Date change for an all-day meeting) The all day meeting that you are
scheduled to attend on 12/04/2010
is rescheduled. This meeting will
now take place on 13/04/2010. Please
contact Joe Bloggs at 014567832 or
[email protected] if you need more
information or cannot attend.
176IBM Cúram Social Program Management 8.0.2: IBM Universal Access Responsive Web Application 5.2.0

Table 10. Meeting update (continued)
Message Area Description
Message 8 (Location change for an all-day
meeting)
The location of the all day meeting
you are scheduled to attend on
12/04/2010 is changed. This meeting
is rescheduled for Meeting Room 1,
Block D. Please contact Joe Bloggs
at 014567832 or [email protected] if
you need more information or cannot
attend.
Message 9 (Date and location change for an all-day
meeting)
The all day meeting that you are
scheduled to attend on 12/04/2010
is rescheduled. This meeting is
rescheduled for 13/04/2010 in
Meeting Room 1, Block D. Please
contact Joe Bloggs at 014567832 or
[email protected] if you need more
information or cannot attend.
Message 10 (Date and time change of a non-all-
day meeting for multiple days)
The meeting that you are scheduled
to attend from 2.00PM until 6.00
PM on 12/04/2010 until 15/04/2010
is rescheduled. This meeting is
rescheduled for 2.00PM until 6.00 PM
on 13/04/2010 until 16/04/2010. Please
contact Joe Bloggs at 014567832 or
[email protected] if you need more
information or cannot attend.
Message 11 (Location change of a non-all-day
meeting for multiple days)
The location of the meeting you
are scheduled to attend from 2.00PM
until 6.00 PM on 12/04/2010 until
15/04/2010 is changed. This meeting
is rescheduled for Meeting Room 1,
Block D. Please contact Joe Bloggs
at 014567832 or [email protected] if
you need more information or cannot
attend.
Message 12 (Date, time, and, location change of
non-all-day meeting for multiple days)
The meeting that you are scheduled
to attend from 2.00PM until 6.00
PM on 12/04/2010 until 15/04/2010
is rescheduled. This meeting is
rescheduled for 2.00PM until 6.00
PM on 13/04/2010 until 16/04/2010
in Meeting Room 1, Block D. Please
contact Joe Bloggs at 014567832 or
[email protected] if you need more
information or cannot attend.
Chapter 7. Conguring the Universal Access Responsive Web Application177

Table 10. Meeting update (continued)
Message Area Description
Notes When the case worker is setting up a meeting, the
location is an optional eld. Therefore, if a meeting
location is not specied, the preceding messages
are displayed without a location. Also, the meeting
organizer's contact details are optional. Therefore,
if no contact details are found, the preceding
message is displayed without the organizer's
contact details.
Creating payment messages
Create messages for an issued payment, a canceled payment, a due payment, a stopped payment, an
unsuspended payment, an issued overpayment, and an issued underpayment. An administrator can use a
conguration setting to set the number of days (from the effective date) that the payment messages are
displayed.
Table 11. Payment issued
Message Area Description
Title <Icon> Latest Payment
Message 1 Your latest payment of $22.00 was due
on 22/07/2009. Click here to view the
payment details. Your next payment is
due on 29/07/2009. Click My Payments
to view your payment history.
Message 2 (Payment previously canceled) Your latest payment of $22.00 was
due on 22/07/2009. Click here to
view the payment details. This payment
was originally canceled on 23/07/2009.
Click here to view details of the
canceled payment. Your next payment is
due on 29/07/2009. Click My Payments
to view your payment history.
Effective Date Current Date.
Notes A payment can be issued, then canceled, and
then reissued. The here hyper link opens a page
that shows payment details. The My Payments
link opens the My Payments page in the Citizen
Account.
Note: If no more payments are due, the Your
next payment is due on 29/07/2009 part
of the messages is not displayed.
Table 12. Payment canceled
Message Area Description
Title <Icon> Payment Canceled
178IBM Cúram Social Program Management 8.0.2: IBM Universal Access Responsive Web Application 5.2.0

Table 12. Payment canceled (continued)
Message Area Description
Message Your payment of $22.00, due on
22/07/2009, has been canceled. Click
here to view the details. Click
Contact Information to contact
your caseworker if you need more
information. Your next payment is due
on 29/07/2009. Click My Payments to
view your payment history.
Effective Date Current Date.
Notes If no more payments are due, the Your next
payment is due on 29/07/2009 part of
the message is not displayed. The Contact
Information link opens the Contact Information
tab in the citizen account. The My Payments
link opens the My Payments page in the Citizen
Account.
Table 13. Payment due
Message Area Description
Title <Icon> Next Payment Due
Message Your next Cash Assistance payment is
due on 29/07/2011.
Effective Date Current Date.
Notes This message is appropriate when it is the rst
payment that a citizen receives.
Table 14. Case suspended
Message Area Description
Title <Icon> Payments Stopped
Message Your Cash Assistance payments have
been stopped from 29/07/2009. Click
Contact Information to contact
your caseworker if you need more
information.
Effective Date Current Date.
Notes The Contact Information link opens the Contact
Information tab in the Citizen Account.
Table 15. Case unsuspended
Message Area Description
Title <Icon> Payments Unsuspended
Chapter 7. Conguring the Universal Access Responsive Web Application179

Table 15. Case unsuspended (continued)
Message Area Description
Message Your Cash Assistance payment
suspension has been lifted from
29/07/2009. Your next payment is due
on 31/07/2009.
Effective Date Current Date.
Notes None.
System messages
Agencies use system messages to send messages to either all public citizens, or specically to clients
who have a citizen account. For example, an agency might want to provide information and helpline
numbers to citizens who are affected by a natural disaster. You can congure system messages in the
administration application on the New System Message page.
Use the Title and Message elds to dene the title of the message and the message body that is
displayed in the citizen application.
The Visibility eld denes the user group that a message is visible to, for example, either
Logged-in users, Public users, or Public and logged-in users.
Use the Effective Date and Time to dene an effective date for the message, such as when the message
is displayed in the citizen account. Use the Expiry Date and Time eld to dene an expiry date for the
message, for example, when to remove the message from the Citizen Account.
The message is saved with a status of In-Edit. Before the message is displayed in the Citizen Account, it
must be published. After it is published, the message is active and is displayed either to public citizens or
in the Citizen Account, based on the visibility, effective date and expiry dates that you have dened.
Conguring message duration
System properties set the length of time a type of message is displayed in the citizen account. For
example, a payment message can be congured to be displayed for 10 days. These conguration
options apply only to messages that originate as a result of transactions on IBM Cúram Social Program
Management.
The following system properties are provided:
• curam.citizenaccount.payment.message.expiry.days - sets the number of days from the
effective date that a payment message is displayed in the citizen account. A payment message is
displayed for this duration unless another payment message is created which replaces it. The default
value is 10.
• curam.citizenaccount.intake.application.acknowledgement.message.expiry.days -
sets the number of days from the effective date that an application acknowledgment message is
displayed in the citizen account. An acknowledgment message is displayed for this duration unless
another acknowledgment message is created which replaces it. The default value is 10.
• curam.citizenaccount.meeting.message.effective.days -sets the number of days from the
effective date that a meeting message is displayed. A meeting message is displayed for this duration
unless another meeting message is created which replaces it. The default value is 10.
Switching off messages
An agency might not want to display messages in the Citizen Account. To cater for this choice, the system
property curam.citizenaccount.generate.messages enables an agency to switch all messages on
or off. The default value is true, which means that messages are generated and displayed in the Citizen
Account.
180
IBM Cúram Social Program Management 8.0.2: IBM Universal Access Responsive Web Application 5.2.0
Conguring last logged in information
The text displayed in the welcome message and last logged on information can be updated using
the properties that are stored in the CitizenAccountHome properties le stored in the Application
Resource section of the Administration Application.
The following properties are provided:
• citizenaccount.welcome.caption - updates the welcome message.
• citizenaccount.lastloggedon.caption - updates the last logged on message.
• citizenaccount.lastloggedon.date.time.text - updates the date and time message.
Conguring contact information
Congure contact information for citizens and caseworkers.
Contact information displayed in the citizen account displays contact details (phone numbers, addresses
and email addresses) stored for the logged in citizen and also caseworker contact details (business phone
number, mobile phone number, pager, fax and email) of the case owners of cases associated with the
logged in citizen in IBM Cúram Social Program Management and on remote systems.
Citizen contact information
The following system property is provided that sets whether contact information is displayed to a citizen.
curam.citizenaccount.contactinformation.show.client.details
If the property is set to true, citizens' address, phone number, and email address are displayed. If
this property is set to false, contact information is not displayed. The default value for this property
is true.
Caseworker
The following system properties are provided to set whether agency worker contact information is
displayed to a citizen, and if displayed, additional system properties are provided to dictate the type
of contact information displayed:
curam.citizenaccount.contactinformation.show.caseworker.details
Sets whether worker contact details are displayed in the citizen account. If this property is set to true,
worker contact details of cases associated with the logged in citizen are displayed. If this property is
set to false, worker contact information is not displayed. The default value for this property is true.
curam.citizenaccount.contactinformation.show.businessphone
Sets whether the worker's business phone number is displayed. The default value of this property is
true.
curam.citizenaccount.contactinformation.show.mobilephone
Sets whether the worker's mobile number is displayed. The default value of this property is true.
curam.citizenaccount.contactinformation.show.emailaddress
Sets whether the worker's email address is displayed. The default value of this property is true.
curam.citizenaccount.contactinformation.show.faxnumber
Sets whether the worker's fax number is displayed. The default value of this property is true.
curam.citizenaccount.contactinformation.show.pagernumber
Sets whether the worker's pager is displayed. The default value of this property is true.
curam.citizenaccount.contactinformation.show.casemember.cases
Sets whether the worker's contact information is displayed for cases where the citizen is a case
member. If this property is set to true, cases where the citizen is a case member are displayed. If this
property is set to false, then only cases where the citizen is the primary client are displayed. Note: this
property only applies to cases originating from IBM Cúram Social Program Management. The types of
product deliveries and integrated cases to be displayed can be congured in the Product section of
Chapter 7.
Conguring the Universal Access Responsive Web Application181

the Administration Application. For more information on administering this see the Cúram Integrated
Case Management Conguration Guide.
Conguring user session timeout
Congure the user session timeout modal in the System Administration application and the Universal
Access Responsive Web Application so that citizens know when their session is about to expire.
If a user session is inactive for a while, citizens can continue their current session by clicking Stay logged
in so that they don't lose information that they entered on the current page. Citizens can also continue the
current session by navigating away from the Stay logged in button.
If citizens do not continue their session, they are logged out automatically after a congurable period of
time to secure their personal information.
Use the following properties to congure the session timeout:
curam.environment.enable.timeout.warning.modal
You can enable or disable the session timeout feature. For more information, see Customizing the
session timeout warning in Universal Access.
curam.environment.timeout.warning.modal.time
You can congure the maximum time that the Stay logged in dialog is displayed to citizens. For more
information, see Customizing the session timeout warning in Universal Access.
REACT_APP_SESSION_INACTIVITY_TIMEOUT
In the Universal Access Responsive Web Application, use the
REACT_APP_SESSION_INACTIVITY_TIMEOUT environment variable to congure the time in
seconds before a user session expires. You can set the environment variable in the .env
or .env.development les in the root of your application. The value must match the session
timeout that is congured on the server, by default, 30 minutes or 1800 seconds.
Conguring the dialog box text
To congure the dialog box title, informational text, or button text for the Universal Access Responsive
Web Application, use the SessionTimeoutDialogComponentMessages.js le that accompanies
the source les. For more information, see Customizing the IBM Cúram Universal Access server.
Conguring the login page to notify citizens when their session times out
Use the sessionCountdownTimerEnd property on the router location state to update a customized
login page with a message to notify citizens when their session times out. For more information about
routing, see “Developing with routes” on page 67
.
An example of the sessionCountdownTimerEnd is shown:
if (location.state.sessionCountdownTimerEnd) {
<Alert .../>
}
This notication message is congured by default when a citizen's session times out.
Related concepts
Developing with routes
Routes dene the valid endpoints for navigation in your application. Your application consists of a network
of routes that can be traversed by your users to access the application's pages.
Related tasks
Customizing the Universal Access Responsive Web Application
Use this information to customize Universal Access for your organization.
Related information
Customizing the session timeout warning in Universal Access
182
IBM Cúram Social Program Management 8.0.2: IBM Universal Access Responsive Web Application 5.2.0

Conguring appeal requests
Complete the following steps to enable a citizen to request an appeal from their citizen account.
Procedure
1. Create a custom IEG script and data store schema to capture the appeal information.
2. Set the values of the curam.citizenworkspace.appeals.datastore.schema and the
curam.citizenworkspace.appeals.datastore.script.id properties to the values of the
script and data store schema that you created.
3. Create an XSL template to generate a PDF of the appeal information.
Related tasks
Customizing appeals
You can customize appeals to suit your organization. You can integrate with an appeals system of your
choice. If you are licensed for the IBM Cúram Appeals application module, the IBM Cúram Social Program
Management appeals functionality is available on installation.
Related information
IEG in the Universal Access Responsive Web Application
Conguring communications on the Notices page
You can congure the maximum number of communications that are displayed on the Notices page. By
default, up to 20 communications are displayed.
Procedure
Edit the curam.citizenaccount.max.communication system property and specify the maximum
number of communications to display.
What to do next
You can further customize the underlying communications implementation if needed. For more
information, see “Customizing the Notices page” on page 237
.
Related concepts
The Notices page
When a citizen is logged in, they can see all communications that are relevant to them on the Notices
page, with sent, received, or normal status indicated. Notices are typically formal written communications
that are issued to meet legal, regulatory, or state requirements, which are created by using letterhead
templates.
Conguring payments
Congure the REACT_APP_ENTITLEMENT_CARD_ENABLED environment variable to enable the display of
additional benet payment related information in the application user interface. The additional payment
information is reflected everywhere that payment information is displayed, for example, in the dashboard
and all payments pages.
Before you begin
To avail of the additional payments information display feature, ensure that your version of Social Program
Management provides the ua/payments_summaries REST API.
About this task
By default, REACT_APP_ENTITLEMENT_CARD_ENABLED is set to false, so that additional payment
information is not displayed.
Chapter 7.
Conguring the Universal Access Responsive Web Application183
If REACT_APP_ENTITLEMENT_CARD_ENABLED is set to true, the additional benet payment
information is displayed. Expected and previous payments, a detailed payment breakdown, and
information relating to any adjustments that have been made since the last payment are all available
in their accounts. The information is displayed in the dashboard, the benets page, the all payments page
and the payment detail page.
Procedure
To enable the display of additional payment related information, set the value of the
REACT_APP_ENTITLEMENT_CARD_ENABLED environment variable to true.
184IBM Cúram Social Program Management 8.0.2: IBM Universal Access Responsive Web Application 5.2.0

Chapter 8. Customizing the Universal Access
Responsive Web Application
Use this information to customize Universal Access for your organization.
Related information
IEG in the Universal Access Responsive Web Application
Customizing screenings
Use the supported classes and APIs to customize the events that are started for screenings and the
screening results page.
Related concepts
Conguring screenings
Dene the different types of screenings that citizens can complete to identify programs that they might be
eligible to receive.
Track the volume, quality, and results of screenings
Use the curam.citizenworkspace.impl.CWScreeningEvents class to access the events that are started for
screening events.
You can use curam.citizenworkspace.impl.CWScreeningEvents to track the volume or results of screening
for reporting purposes. For more information, see to the API Javadoc for CWScreeningEvents in
<CURAM_DIR>/EJBServer/components/CitizenWorkspace/doc
Populating a custom screening results page
Use the performScreening that is contained in the
curam.citizenworkspace.security.impl.UserSession API to populate a custom Screening
Results page.
The Screening Results page is displayed when an IEG screening script is run. The operation runs the
congured rule set for the selected screening type. The results of the screening, that is, the list of eligible
and undecided programs, are stored against the user's session.
The screeningResultsForDisplay return type of the operation allows access to three objects. These objects
contain the information that is required to populate either the default or custom Screening Results page:
ScreeningType
The screening type that the user selected.
List<Program>
A list of the programs that the user was screened for. The ScreeningResultsOrderingStrategy sets the
order of the programs listed.
Map<String, ProgramType>
A join.util.map that contains a mapping of strings to ProgramTypes where the string contains the
unique reference for that ProgramType.
The following is a sample usage:
UserSession userSession = userSessionDAO.get(sessionID);
ScreeningResultsForDisplay screeningResultsForDisplay =
userSession.performScreening();
The following is a sample interface denition:
/**
* Executes the Screening rule set associated with the current screening IEG
©
Copyright IBM Corp. 2018, 2022 185
* script data. The return object, {@link ScreeningResultsForDisplay},
* contains all of the information required to be displayed on the
* Screening Results page.
*
* @return object containing the ordered screening results, the selected
* {@link ScreeningType} and a map of {@link ProgramType} records.
*
* @throws InformationalException
* Generic exception signature.
* @throws AppException
* Generic exception signature.
*/
ScreeningResultsForDisplay performScreening() throws InformationalException,
AppException;
For more information, see the API Javadoc for the
curam.citizenworkspace.security.impl.UserSession in <CURAM_DIR>/EJBServer/
components/CitizenWorkspace/doc.
Customizing applications
You can customize the application flow to link directly to an application script, or to provide separate
overview pages or submission conrmation pages for each application type. You can also use
customization points, for example, customizing the generic PDF for processed applications, to customize
the application intake process when an intake application is submitted.
Related concepts
Conguring applications
Use IBM Cúram Social Program Management administration and system administration applications to
dene the applications that are available for citizens. For each application, you can congure the available
programs and an application script and data schema. You must also congure the remaining applications
details, such as application withdrawal reasons.
Linking directly to an application
You can link directly to the overview page of an application from a custom URL. For example, you can
customize the application flow to skip the Apply For Benets page and the Benet Selection page if you
prefer.
You can do this by using the IDs from the INTAKEAPPLICATIONTYPE and PROGRAMTYPE database
tables.
Creating a direct link by using a custom URL
For example, you might want to create a URL, such as /food-stamps, that links directly to your food
stamps application.
1. Create a wrapper component to pass in the data about the application. For example, create a
FoodStampsComponent as shown.
const FoodStampsComponent = () => (
<ApplicationOverviewContainer
intakeApplicationTypeId=“91001”
programIds=“1010,1015”
>
<FoodStampsDescriptionComponent />
</ApplicationOverviewContainer>
);
2. Add a new /food-stamps route that loads the FoodStampsComponent component.
Creating a direct link by using a generic URL
Rather than hardcoded values, you can pass in the data for an application by using a
generic URL of the form /application-overview/:intakeApplicationTypeId/:programIds,
186
IBM Cúram Social Program Management 8.0.2: IBM Universal Access Responsive Web Application 5.2.0

where :intakeApplicationTypeId is the intake application type ID and :programIds is a comma-
separated list of program IDs. For example:
/application-overview/91001/1010,1015
Customizing application overview pages
You can create separate application overview pages for each application type so you can display specic
information about the type of benet that a citizen is applying for.
These examples use the ApplicationOverviewContainer and the StartApplicationButton
components, and demonstrate how to customize the page while using the existing application
functionality.
Customizing an application overview page accessed by a custom URL
When you access an application by using a custom URL, such as /food-stamps, you can use a
wrapper component to pass in a child component, in which you can display information about a specic
application type.
For example, for a food stamps application, you can create a FoodStampsDescriptionComponent
component as a child of your FoodStampsComponent.
const FoodStampsComponent = () => (
<ApplicationOverviewContainer
intakeApplicationTypeId=“91001”
programIds=“2010,2015”
>
<FoodStampsDescriptionComponent />
</ApplicationOverviewContainer>
);
Customizing an application overview page accessed by a generic URL
When accessing an application by using generic URLs, such as /application-overview/
91001/1010,1015, complete the following steps to customize the overview page for an application.
1. Write a component that checks the IDs, for example, NewOverviewComponent.
constNewOverviewComponent=props=>{
letchild=null;
const id = props.match.params.intakeApplicationTypeId;
if(id === '91001') {
child=<FoodStampsDetailsComponent/>;
} else if (id === '50000') {
child=<ChildWelfareDetailsComponent />;
} else {
// throw error
}
return(
<ApplicationOverviewContainer
intakeApplicationTypeId={props.match.params.intakeApplicationTypeId}
programIds={props.match.params.programIds}
>
{child}
</ApplicationOverviewContainer>
);
};
2. Overwrite the existing route. For example:
<TitledRoute
component={NewOverviewComponent}
exact
path={`${PATHS.APPLICATION_OVERVIEW}/:intakeApplicationTypeId/:programIds`}
title={applicationOverviewTranslations.overviewTitle}
/>
Chapter 8. Customizing the Universal Access Responsive Web Application
187

Customizing the intake application workflow
Review a summary of the intake application workflow in a flowchart.
Figure 5. Intake application workflow
Create intake PDF
This automatic activity creates a PDF document based on the content of the application. For more
information, see “Customizing the generic PDF summary form for processed applications” on page
189.
InvokeLegacySystemProcessing
This automatic activity sends applications to legacy systems by using web services. This path is
taken only if there are legacy systems that are associated with at least one of the programs on the
application.
CreateParticipantsAndCasesDeferAES
This automatic activity creates participants for the submitted application and then creates one or
more cases for the programs that are associated with the application. In most cases, application
cases are created.
This path is taken only if the conguration property curam.intake.use.resilience is set to
true. For compatibility with previous versions, this property is false by default. However, it is
recommended that all production systems set this value to true. For more information about the
implications of setting this value to true, see “Using events to extend intake application processing”
on page 192.
This activity also defers the evidence sharing that occurs when case members are added to an
application case to a later point in the workflow.
188
IBM Cúram Social Program Management 8.0.2: IBM Universal Access Responsive Web Application 5.2.0

Note: For customizations to this workflow or for custom intake
workflows, evidence sharing can be deferred by using the
curam.aes.sl.observe.impl.AESShareSetPullManualEnactment.process() API. For
more information, see the associated Javadoc.
Mapping
This automatic activity uses the Cúram Data Mapping Engine (CDME) to map data collected in the
application script into Case Evidence. If a validation issue occurs with the mapped evidence, this
activity is automatically retried. During the retry, if there is a single Application Case, the validations
are disabled and a WDO flag IntakeCaseDetails.mappingValidInd set to false.
EvidenceCorrections
This manual task is called if the Mapping activity fails due to a validation error. That is, the
IntakeCaseDetails.mappingValidInd set to false. The assignment of this task is congurable.
For more information, see Evidence Issues Ownership Strategy. The caseworker or operator must
resolve the evidence validation issues and resubmit the application.
Subflow: Evidence Sharing Pull Workflow
If there is evidence to share, the evidence sharing pull workflow is enacted to trigger any sharing
activities that were deferred in CreateParticipantsAndCasesDeferAES.
If there is no evidence to share, the workflow bypasses this step.
PostMapping
This automatic activity starts the next stage of application processing by calling the
IntakeApplication.IntakeApplicationEvents.postMapDataToCuram() event.
CreateParticipantsCasesAndMapEvidence
This path is followed when the conguration property curam.intake.use.resilience is set to
false. This automatic activity behaves identically to the older non-resilient workflow. It creates cases
and participants and completes all evidence mapping in a single transaction, which results in a less
resilient process if a failure occurs.
Customers can customize the workflow compliantly as described in the Developing Compliantly with IBM
Cúram Social Program Management and Cúram Workflow Reference. Customers must not change the
enactment structs that are used by these workflows.
Related concepts
Customizing the generic PDF summary form for processed applications
By default, the PDF summary is automatically generated from an XSL template for all intake applications.
Using events to extend intake application processing
The interface IntakeApplication.IntakeApplicationEvents contains events that are invoked
when citizens submit an intake application for processing.
Related information
Evidence Issues Ownership Strategy
Customizing the generic PDF summary form for processed applications
By default, the PDF summary is automatically generated from an XSL template for all intake applications.
The PDFs are rendered by the XML server. For more information about XSL templates, see XSL Templates.
Chapter 8. Customizing the Universal Access Responsive Web Application
189
Conguring the generic PDF summary template
Complete the following steps to change or update the generic PDF summary template for intake
applications. If needed you can upload your own custom template. Customers can choose between an
improved template or the default earlier template.
About this task
WSXSLTEMPLATEINST001.xsl
The /EJBServer/components/WorkspaceServices/data/initial/blob/
WSXSLTEMPLATEINST001.xsl template is congured by default and provides compatibility for
existing scripts.
IntakeApplicationPDFTemplate.xsl
Customers can use the more recent /EJBServer/components/WorkspaceServices/data/
initial/blob/IntakeApplicationPDFTemplate.xsl template to generate an improved
summary that is based on the nal summary page of the IEG application script.
The PDF summary template does not support some IEG scripts. To dene a list of scripts to be
excluded from summary PDF template generation, if a summary PDF template is congured, use
the curam.intake.pdftemplate.iegsummarypagelayout.scriptexcludelist environment
variable. For the excluded IEG scripts, the default data store PDF template is used instead to generate
PDF documents.
The PDF summary template does not support the following IEG scripts:
• Scripts with no summary pages.
• Scripts with one or more summary pages, but where a summary page isn't at the end of the script.
• Scripts with a summary page that is nested in a condition.
• Scripts where the last summary page contains no cluster.
For a summary PDF to be generated from an IEG script by using the
IntakeApplicationPDFTemplate.xsl template, a summary page must be at the end of the
script. If your IEG scripts don't have a summary page, you must either add a summary page or use
the default WSXSLTEMPLATEINST001.xsl template, which doesn't need a summary page in the IEG
script.
You can congure the text and logo in the header, and further customize the template to dene the
information that you want to include in the PDF summary form.
Procedure
1. Log in as a system administrator, go to Communications > XSL Templates.
2. Search for the Intake Application template with the following details:
• Description: Intake Application
• Relates To: Intake Application
• Category: Intake Application
• Subcategory: Intake Application
• Template Type: Letter
• Template ID: Intake Application
3. Select the template and check it out.
The existing template version is saved in case you need it later.
4. Locate the template that you want to upload.
This can be your own custom template, or the improved template. For example, to use the improved
IntakeApplicationPDFTemplate.xsl template, download it from /EJBServer/components/
190
IBM Cúram Social Program Management 8.0.2: IBM Universal Access Responsive Web Application 5.2.0

WorkspaceServices/data/initial/blob/IntakeApplicationPDFTemplate.xsl so you can
upload it here.
5. Click Check in template, and upload the new or updated template.
Customizing generic PDF summary forms based on the IntakeApplicationPDFTemplate.xsl
template
You can customize the generic PDF summary form of an online application that is based on the most
recent IntakeApplicationPDFTemplate.xsl template. You can customize the text and logo in the
header, and customize the XSL template to dene the information that you want to include in the generic
PDF summary form.
Before you begin
The IntakeApplicationPDFTemplate.xsl template uses information from
the summary page in IEG scripts to generate the PDF summary
form, see https://www.ibm.com/support/knowledgecenter/en/SS8S5A_7.0.11/com.ibm.curam.ieg.doc/
CitizenEngagement/t_CECUST_ieg_elements_pdf_summary.html.
Where an IEG script contains multiple conditional summary pages, the last visible summary page is used
to generate the PDF. If your IEG scripts don't have a summary page, you must either add a summary page,
or use the earlier WSXSLTEMPLATEINST001.xsl template, which doesn't need a summary page.
Procedure
1. To customize the PDF header, edit the intake-application-pdf-props app resource, which
is located in the EJBServer/components/WorkspaceServices/data/initial/blob/prop/
IntakeApplicationPDFProps.properties le.
You can customize the following information:
# START NON-TRANSLATABLE
pdf.logo=logo-pdf
# END NON-TRANSLATABLE
pdf.logo.altText=logo
pdf.application.reference=Application number:
pdf.submitted.date=Submitted on
a) Update the text as needed.
b) To customize the PDF logo, add an image resource that matches the name on the pdf.logo
property and locale. The default name of the image resource is logo-pdf.
2. To update the template, search for an XSL resource that is called Intake Application, which is
located at:
EJBServer/components/WorkspaceServices/data/initial/blob/IntakeApplicationPDFTemplate.xsl
This XSL uses XSL-FO 1.0 technology to generate the PDF. For more information about XSL, see
https://www.w3.org/TR/xsl11.
3. Update the system to use your custom template, see “Conguring the generic PDF summary template”
on page 190.
Customizing generic PDF summary forms based on the WSXSLTEMPLATEINST001.xsl template
Complete the following step to customize a PDF summary form that is based on the default
WSXSLTEMPLATEINST001.xsl template. You can customize the XSL template to dene the information
that you want to include in the generic PDF summary form.
About this task
The data passed to the XSL template reads from the data store. For more information, see XSL
TemplatesXSL Templates.
Chapter 8. Customizing the Universal Access Responsive Web Application
191

Procedure
1. Instead of displaying the data store labels in the PDF, you can dene a property le to specify
alternative names for entities and attributes and to hide entities and attributes that you do not want to
display in the PDF.
Dene a property le with the naming convention <application schema name>PDFProps, and
edit the contents of the property le as follows:
Name an entity
<Entity Name=<Name To Be Displayed in the PDF>, for example, Application=Intake
Application
Hide an entity
<Entity Name.hidden=true, for example, ScreeningType.hidden=true
Hide an attribute
<Entity Name.Attribute Name.hidden=true, for example, Application.user
Name.hidden=true
Specify a label for an attribute
<Entity Name.Attribute Name=PDF Label, for example, Submission.dig FirstName=First
Name
Upload the property le to Application Resources in the Intelligent Evidence
Gathering section of the administration application. For more information about
IEG, see https://www.ibm.com/support/knowledgecenter/SS8S5A_7.0.11/com.ibm.curam.ieg.doc/
WorkingWithIntelligentEvidenceGathering/ctr_WorkingWithCuramIntelligentEvidenceGathering.html.
2. To update the template, search for an XSL resource that is called Intake Application, which is
located at:
/EJBServer/components/WorkspaceServices/data/initial/blob/WSXSLTEMPLATEINST001.xsl
Update the template as needed. This XSL uses XSL-FO 1.0 technology to generate the PDF. For more
information about XSL, see https://www.w3.org/TR/xsl11.
Using events to extend intake application processing
The interface IntakeApplication.IntakeApplicationEvents contains events that are invoked
when citizens submit an intake application for processing.
Use these events to change the way that intake applications are handled, for example supplement
or replace the standard CDME mapping or perform an action after an application has been sent
to a remote system using web services. For more information, see the API Javadoc information
for IntakeApplication.IntakeApplicationEvents in <CURAM_DIR>/EJBServer/components/
WorkspaceServices/doc.
The interface IntakeProgramApplication.IntakeProgramApplicationEvents contains
events that are invoked at key stages during the processing of an application
for a particular program. For information, see the API Javadoc information
for IntakeProgramApplication.IntakeProgramApplicationEvents in <CURAM_DIR>/
EJBServer/components/WorkspaceServices/doc.
Customizing the concern role mapping process
The curam.workspaceservices.applicationprocessing.impl package contains a
ConcernRoleMappingStrategy API that provides a customization point into the online application process.
Use the ConcernRoleMappingStrategy API to implement custom behavior following the creation of each
new concern role that is added to an application. For example, customers who have customized the
prospect person entity might want to store information on that entity that cannot be mapped using the
default CDME processing.
192
IBM Cúram Social Program Management 8.0.2: IBM Universal Access Responsive Web Application 5.2.0

Enable the ConcernRoleMappingStrategy API
In the IBM Cúram Social Program Management system administration application, enable the
ConcernRoleMappingStrategy API by setting the Enable Custom Concern Role Mapping property to true.
Procedure
1. Log in to the Social Program Management application as system administrator.
2. Click System Congurations > Application Data > Property Administration.
3. In the Application - Intake Settings category, search for the property
curam.intake.enableCustomConcernRoleMapping.
4. Edit the property to set its value to true.
5. Save the property.
6. Select Publish.
Use the ConcernRoleMappingStrategy API
Use the enabled ConcernRoleMappingStrategy API to implement a strategy for mapping information to a
custom concern role.
About this task
The curam.workspaceservices.applicationprocessing.impl package contains the
ConcernRoleMappingStrategy API.
Procedure
1. Provide an implementation of the customization point.
2. Bind your custom implementation by creating or extending your custom mapping module as follows:
package com.myorg.custom;
class MyModule extends AbstractModule {
@Override
protected void configure() {
bind(ConcernRoleMappingStrategy.class).to(
MyCustomConcernRoleMapping.class);
3. If you did not already add your MyModule class to the ModuleClassName table by using an appropriate
DMX le, add your MyModule class.
How to send applications to remote systems for processing
Use the Citizen Workspace to send applications to remote systems that use web services for processing.
An event ReceiveApplicationEvents.receiveApplication is raised before the application is
sent to the remote system. The event can be used to edit the contents of the data store that
is used to gather application data before transmission. For more information, refer to the API
Javadoc for ReceiveApplicationEvents, which is in <CURAM_DIR>/EJBServer/components/
WorkspaceServices/doc.
Customizing life events
A description of the high-level architecture of life events and how to perform the analysis and
development tasks in building a life event.
Many types of life events can be built by analysts, some require input from developers. This information
will help analysts to understand how to perform the analysis for a new life event and how to determine
whether input is needed from developers.
Chapter 8. Customizing the Universal Access Responsive Web Application
193

Related concepts
Conguring life events
For each life event, you must dene how information is collected, stored, and displayed. You can congure
life event information categories, mappings to dynamic evidence, and information sharing with internal
and external sources.
Enabling and disabling life events
The life events feature is enabled by default. When it is enabled, the life event feature is available for
linked users only. You can use the REACT_APP_FEATURE_LIFE_EVENTS_ENABLED environment variable
to enable or disable life events.
About this task
For more information about linked users, see “User account types” on page 148.
The following life events functionality can be enabled or disabled:
• The View your account card on the Home page is updated to say See your next payment, tell us of
any changes in your circumstances, and more.
• Review your prole card on the Dashboard page.
• Tell us if any anything has changed pane on the Prole page.
• Live event-related URLs, for example /life-events/history.
Procedure
1. Edit the .env le in the root of your application.
2. Set REACT_APP_FEATURE_LIFE_EVENTS_ENABLED to true or false. If you don't dene the
environment variable, the life event feature defaults to enabled.
How to build a life event
To design a life event for IBM Cúram Universal Access, you must undertake an analysis.
You can build life events for caseworkers, or use the life event infrastructure to drive other processes like
certication, but that is outside the scope of this information. Java coding skills are not a prerequisite
for developing all life events. Depending on requirements, many and in some cases all of the artifacts
required can be developed by a Business Analyst. Business Analysts can use this information to
determine whether Java developers are needed to complete the implementation of a life event.
Generally, there are two types of life events for citizens:
• Standard life events
• Round tripping life events
Standard life events allow citizens to enter new life event information and submit it to the agency. For
example, a citizen logs in and submits a "Having a Baby" life event, which is new information on the
system. If they submit incorrect information, such as the name of the obstetrician, they can start a new
life event, reenter the information, and submit.
Round-tripping life events are more complex. The distinction between round-tripping or standard life
events is whether the data that is pre-populated in the life event can be changed by the user. If a citizen
is expected to update pre-populated information in addition to adding new information, the life event is
considered a round-tripping life event. It’s considerably harder to design scripts for this type of life event.
The primary artifacts that constitute a simple life event are:
• An IEG script and its associated data store schema
• An IEG script to review answers in a previously submitted life event (optional)
194
IBM Cúram Social Program Management 8.0.2: IBM Universal Access Responsive Web Application 5.2.0

• A Cúram Data Mapping Engine specication that describes how to map data from the IEG script into
evidence on the citizen's cases
All of these artifacts can be congured in the administrator application. For more information about
conguring Simple life events, see “Conguring life events” on page 169.
Information that is entered is processed by the life events system as follows:
1. If the user is linked to the local IBM Cúram Social Program Management case processing system, then
the life events system can update related evidence in their cases.
2. If the user is linked to remote systems, then the life events system can send updates to the remote
system by using web services.
If the life event is a round-tripping life event, or it is required to update the person's evidence in IBM
Cúram Social Program Management, then some development work is needed. See the life events APIs
needed to meet these requirements or indeed to supplement the standard life event behavior with more
custom functionality.
Customizing advanced life events
To develop advanced life events, you must understand the difference between a simple life event and
advanced life event.
When to use advanced life events
Advanced life events enable fully automated round-tripping of data. This means that evidence is read
into the datastore for an IEG script. It is then updated by the citizen. When the life event is submitted,
the original evidence that was read into the IEG script is updated. Advanced life events are only required
when this level of automated round tripping of data is required. Under all other circumstances Simple
life events are the recommended approach. Project Architects should consider carefully whether round
tripping is required or whether the data entered can be treated as new evidence to be integrated into the
citizen's cases.
Advanced life events cannot be congured through the administration user interface, they must be
created by developers.
How to build a life event
Analysis
The distinction between standard life events and round-tripping life events is whether citizens can change
the data that is prepopulated in the life event. If citizens can update prepopulated information, rather
than just adding new information, then use a round-tripping life event. It's more difcult to develop this
type of life event. The advanced life events subsystem is designed to cater for round-tripping life events.
The following information describes how to develop an advanced life event that supports round-tripping.
The following primary artifacts constitute an advanced life event:
• An IEG script and its associated data store schema.
• An IEG script to review answers in a previously submitted life event (optional).
• A Recommendations Ruleset that produces the set of recommendations based on the information that
is entered in the IEG script (optional).
The life events system can take information that is entered by the user and update related evidence in any
cases they have.
The life events system can do one of the following processes:
1. If the user is linked to the local IBM Cúram Social Program Management case processing system, then
the life events system can update related evidence in any of their cases.
Chapter 8. Customizing the Universal Access Responsive Web Application
195
2. If the user is linked to remote systems, then the life events system can send updates to related remote
systems through web services.
You can congure the life events system to ask a citizen's permission before life event information is sent
to remote systems. A standard life event that just sends information to remote systems can be congured
through the administration application. For more information, see Dening Remote Systems.
If the life event is a round-tripping life event or is needed to update evidence in the local case processing
system, then some development work is needed to congure the life event. Round-tripping life events
must be pre-populated. Pre-population of life events is only supported for users that are linked to the
local IBM Cúram Social Program Management case processing system by using a concern role. To read
information from cases and update those cases, the life events system relies on the Citizen Data Hub
subsystem. The following work is needed to congure the Citizen Data Hub.
The life event broker uses the Data Hub to get the data it needs to populate the life event, so you must
congure the Data Hub to extract this data. The life event broker also sends the updated data back
through the Data Hub. The Data Hub must be congured to tell it what to do with this updated data.
You can use some of these artifacts to congure the Citizen Data Hub for reading information:
• Transform - converts data from the Holding Case into data store XML.
• Filter Evidence Links - When you read Citizen Data, these links lter out only the evidence entities of
interest that are read from the Holding Case.
• View processors - Java classes for extracting non-evidence data into the data store XML.
You can use these artifacts, among others, to congure the Citizen Data Hub for updating information:
• Transforms - Convert a data store XML Difference Description back into Holding Case Evidence.
• Update processors - Do other update tasks or update non-evidence data that relates to citizens.
Considerations for life events analysis
The considerations that affect the complexity of developing a particular life event that must read from, or
write to, an evidence or participant-related data store in IBM Cúram Social Program Management. These
considerations inform any analysis of life events development and any resulting estimates.
1. Is the life event a standard life event or a round tripping life event
2. What information needs to be pre-populated into the IEG script?
3. What evidence data is read by the life event?
4. What evidence data is updated by the life event?
5. What non-evidence data is read/updated by the life event
6. How many programs or case types are affected by the life event
7. If a life event shares to multiple cases, will those case types also share evidence with each other using
Evidence Broker?
8. Does a life event have associated recommendations? If so, do they relate to Community Services,
Government Programs or both?
Of these items that deal with Non-Evidence Entities presents the greatest challenge. Any life event that
updates non-evidence entities require developers with Java skills.
196
IBM Cúram Social Program Management 8.0.2: IBM Universal Access Responsive Web Application 5.2.0

Building the components of a life event
How you build the component parts of a life event that uses the Citizen Data Hub. This information does
not require any knowledge of Java.
Writing life event IEG Scripts
Writing a life event IEG script is similar to writing any other IEG script, but with some special
considerations. These considerations depend on whether the life event is a round-tripping life event or a
standard life event.
For a round-tripping life event, citizen data is read into the data store that is used by the IEG script. This
data can be modied by citizens as they progress from page to page in the life event script. For example,
a citizen can modify income data that is read into the life event script before submission. The life event
broker ensures that when the citizen changes the income data the changes are detected and propagated
correctly back to the income entity from which the data was read. The life event broker needs a way to
track data from its origin in the income entity, through the life event script, and back to the same income
entity. To facilitate this process, the IEG script designer needs to place a marker into the data store
schema.
The following code block is an example of the denition of an income data store:
1 <xsd:element name="Income">
<xsd:complexType>
<xsd:attribute name="incomeType" type="INCOME_TYPE"
default=""/>
5 <xsd:attribute name="cgissIncomeType"
type="CGISS_INCOME_TYPE"/>
<xsd:attribute name="incomeFrequency"
type="INCOME_FREQUENCY" default=""/>
<xsd:attribute name="incomeAmount" type="IEG_MONEY"
10 default="0"/>
<xsd:attribute name="localID" type="IEG_STRING"/>
<xsd:complexType>
</xsd:element>
The life event broker uses the localID attribute to track the unique identity of the entity from which the
income data was drawn. When this entity is changed and submitted, the life event broker can use the
value of localID to locate the correct entity to update with the changes in the life event. Other special
markers exist that can be placed in the schema to aid with providing automatic updates to evidence
entities.
When you design a script for a round-tripping life event, you must account for the effects that pre-
population of data can have on the flow of the script. One example of this situation is conditional clusters.
Life event scripts need to avoid conditional clusters that are associated with pre-populated data. These
clusters are common in intake scripts but don’t work well when the data store was pre-populated. For
example, for a life event that involves a job loss, a Boolean flag on the Person entity, hasJob is used
to indicate that person has a job. The IEG script presents the user with a question: Does anyone in
your household have a job?. This question is used to drive the display of a conditional cluster that
identies which household members who have jobs.
However, if the data in the data store is repopulated, it’s likely one or more Person entities with hasJob
already be set to true. In the current implementation of IEG, it isn’t possible to get the Does anyone
in your household have a job? control question to default to true even when hasJob is true
for one or more household members. For this reason, the rule needs to be to avoid control questions for
conditional clusters such as when the elds they control are pre-populated.
Pre-populating a life event
A description of the artifacts that you must develop to pre-populate a life event script:
How the Data Hub works for reading
You can use the Data Hub to collect data about Citizens from different locations and return the data as an
XML document in a datastore. You can use the Data Hub to hide the complexities of where data comes
from and how it is represented in its original locations. For example, to drive a "Lost my Job" life event,
Chapter 8. Customizing the Universal Access Responsive Web Application
197

you might need to gather information about a person's Income, Address, and Employment. These three
pieces of information might be represented differently on the underlying system, they might be on one or
more different systems. The caller doesn't need to know this detail. The Citizen Data Hub can get these
pieces of information in one single operation. Operations of this type are named uniquely, each is called
a "Data Hub Context". To animate the "Lost my Job" example, dene a Data Hub Read Context called
"CitizenLostJob" that enables the collection of Income, Address and Employment information in a single
query.
One of the sources that the Data Hub can draw on is Evidence on Cases. In particular, Evidence on the
Citizen's Holding Case. The Holding Case can use the Evidence Broker to gather data from many disparate
Integrated Cases or even from other systems through web services. The Holding Case is a little different
from other Cases. There is only one Holding Case per Citizen on a given IBM Cúram Social Program
Management system. The Holding Case has an interface that allows all of the Evidence it contains to
be extracted in XML format. This XML format is optimized for the description of Evidence in particular.
Because it is optimized for the description of Evidence, it isn't necessarily in a format that is suitable for
insertion into a data store. Fortunately it is relatively easy to translate data in one XML format into another
format with XSLT. For more information about XSLT, see http://www.w3.org/TR/xslt.
Authoring Read Transforms
You can write XSLT Transforms for use in the Data Hub. To write Citizen Data Hub Transforms, you must
understand the structure of the Holding Evidence XML that is the source data and the Data Store schema
that is the target.
For example, a simple life event for Citizens who have bought a new car is associated with the Data
Hub Context "CitizenBoughtCar". Look at the following fragment of Holding Evidence XML that is used to
describe a Vehicle:
<?xml version="1.0" encoding="UTF-8"?>
<client-data
xmlns="http://www.curamsoftware.com/schemas/ClientEvidence">
<client localID="101" isPrimaryParticipant="true">
<evidence>
<entity localID="-416020015578349568" type="ET10081">
<attribute name="vehicleMake">VM2</attribute>
<attribute name="versionNo">2</attribute>
<attribute name="startDate">20110301</attribute>
<attribute name="usageCode">VU1</attribute>
<attribute name="amountOwed">3,200.00</attribute>
<attribute name="numberOfDoors">0</attribute>
<attribute name="evidenceID">
-5315936410157449216
</attribute>
<attribute name="monthlyPayment">0.00</attribute>
<attribute name="vehicleModel">159</attribute>
<attribute name="year">2008</attribute>
<attribute name="equityValue">0.00</attribute>
<attribute name="endDate">10101</attribute>
<attribute name="fairMarketValue">17,000.00</attribute>
<attribute name="curamEffectiveDate">20110301
</attribute>
</entity>
</evidence>
</client>
</client-data>
The client element represents data that belongs to the participant with concern role id 101. In Social
Program Management demo data this is James Smith. The client contains a single evidence entity of
type ET10081. In the Social Program Management Common Evidence layer, ET10081 is the Evidence
Type identier for Vehicle Evidence. The localID attribute plus the evidence type uniquely identies the
underlying evidence object for the Vehicle. This data must be mapped to data store XML so that it can be
used to populate an IEG Script. Consider how the previous data is represented in data store XML:
<?xml version="1.0" encoding="UTF-8"?>
<Application>
<Person localID="101" isPrimaryParticipant="true"
hasVehicle="true">
<Resource resourcePageCategory="RPC4001"
198
IBM Cúram Social Program Management 8.0.2: IBM Universal Access Responsive Web Application 5.2.0

localID="-416020015578349568" vehicleMake="VM2"
versionNo="2" amountOwed="3,200.00" vehicleModel="159"
year="2008" fairMarketValue="17,000.00"
curamEffectiveDate="20110301">
<Descriptor/>
</Resource>
</Person>
</Application>
This XML data must conform to the schema that is used to build the IEG script. Notice that the data
store XML conforms to a schema that is a superset of the CitizenPortal.xsd schema. You can use the
CitizenPortal.xsd schema as a starting point for the schemas used in Customer life events and add
"marker" attributes that are needed for life events. These marker attributes include the use of localID.
Datastore schemata for entities can also include the following special markers that are specialized for
representing Evidence in the Holding Case:
• curamEffectiveDate - This maps to the effective date of a piece of Social Program Management
Evidence
The following XSLT fragment shows how to transform Vehicle Holding Evidence into a corresponding Data
Store Entity:
<?xml version="1.0" encoding="UTF-8"?>
<xsl:stylesheet xmlns:xsl="http://www.w3.org/1999/XSL/Transform"
xmlns:x="http://www.curamsoftware.com/
schemas/DifferenceCommand"
xmlns:fn="http://www.w3.org/2006/xpath-functions"
version="2.0">
<xsl:output indent="yes"/>
<xsl:strip-space elements="*"/>
<xsl:template match="update">
<xsl:for-each select="./diff[@entityType='Application']">
<xsl:element name="client-data">
<xsl:apply-templates/>
</xsl:element>
</xsl:for-each>
</xsl:template>
<xsl:template match="diff[@entityType='Person']">
<xsl:element name="client">
<xsl:attribute name="localID">
<xsl:value-of select="./@identifier"/>
</xsl:attribute>
<xsl:element name="evidence">
<xsl:apply-templates/>
</xsl:element>
</xsl:element>
</xsl:template>
<xsl:template match="diff[@entityType='Resource']">
<xsl:element name="entity">
<xsl:attribute name="type">ET10081</xsl:attribute>
<xsl:attribute name="action">
<xsl:value-of select="./@diffType"/>
</xsl:attribute>
<xsl:attribute name="localID">
<xsl:value-of select="./@identifier"/>
</xsl:attribute>
<xsl:for-each select="./attribute">
<xsl:copy-of select="."/>
</xsl:for-each>
</xsl:element>
</xsl:template>
<xsl:template match="*">
<!-- do nothing -->
</xsl:template>
</xsl:stylesheet>
Chapter 8. Customizing the Universal Access Responsive Web Application
199

Adding this transform to your life event can turn Vehicle Evidence recorded on any Integrated Case into a
Data Store format that can be displayed in an IEG script with all the information pre-populated from the
Evidence Record.
Dening Filters for Evidence
When the Holding Case is called to return an XML representation of its evidence, by default it returns
all evidence for the citizen concerned. This can be a very large query that returns more information than
is required. For each Data Hub Context, use a Filter Evidence Link to dene, which Evidence Types you
need. Dene a Filter Evidence Link by adding entries to a Filter Evidence Link dmx le. The following
example shows a Filter Evidence Link dmx le that denes the information that to be returned for the
"CitizenBoughtCar" life event:
<?xml version="1.0" encoding="UTF-8"?>
<table name="FILTEREVIDENCELINK">
<column name="FILTEREVLINKID" type="id" />
<column name="FILTERNAME" type="text" />
<column name="EVIDENCETYPECODE" type="text" />
<row>
<attribute name="FILTEREVLINKID">
<value>175</value>
</attribute>
<attribute name="FILTERNAME">
<value>CitizenBoughtCar</value>
</attribute>
<attribute name="EVIDENCETYPECODE">
<value>ET10081</value>
</attribute>
</row>
</table>
Using Pre-Packaged View Processors
You now know how Transforms can be used to turn Evidence data into Data store XML for use in a life
event Script. However, other important pieces of information are not represented as Evidence. In general,
you must develop custom Java code to populate any information that is not represented as evidence. With
Java, you can develop View Processors that can be used to extract non-evidence data and translate this
data into data store XML. By associating these View Processors with the right Data Hub Context, they
can add their information into the data store in addition to the data put there by the transforms. The
Life Events Broker ships with some pre-packaged View Processors that are capable of inserting certain
frequently used non-evidence Data.
• Household View Processor
• The Person Address View Processor
The Household View Processor nds all Persons that are related to the currently logged-in user
and pulls them into the data store with information on how they are related to the logged-
in Citizen. This information is based on the IBM Cúram Social Program Management Platform
ConcernRoleRelationship entity.
The Person Address View Processor populates the most important details of the logged-in Citizen, such as
name and Social Security Number. It also pulls in the Residential and Mailing addresses of the logged-in
Citizen. Both the Household View processor and the Person Address View Processor can be used together
in the same life event Context but the Person Address View Processor must be run after the Household
View Processor. The following example shows how to congure these two View Processors to execute for
the "CitizenBoughtCar" life event.
<?xml version="1.0" encoding="UTF-8"?>
<table name="VIEWPROCESSOR">
<column name="VIEWPROCESSORID" type="id"/>
<column name="LOGICALNAME" type="text" />
<column name="CONTEXT" type="text" />
<column name="VIEWPROCESSORFACTORY" type="text" />
<column name="RECORDSTATUS" type="text"/>
<column name="VERSIONNO" type="number"/>
<row>
200
IBM Cúram Social Program Management 8.0.2: IBM Universal Access Responsive Web Application 5.2.0

<attribute name="VIEWPROCESSORID">
<value>4</value>
</attribute>
<attribute name="LOGICALNAME">
<value>CitizenLostJob0</value>
</attribute>
<attribute name="CONTEXT">
<value>CitizenBoughtCar</value>
</attribute>
<attribute name="VIEWPROCESSORFACTORY">
<value>
curam.citizen.datahub.internal.impl.
+HouseholdCustomViewProcessorFactory
</value>
</attribute>
<attribute name="RECORDSTATUS">
<value>RST1</value>
</attribute>
<attribute name="VERSIONNO">
<value>1</value>
</attribute>
</row>
<row>
<attribute name="VIEWPROCESSORID">
<value>5</value>
</attribute>
<attribute name="LOGICALNAME">
<value>CitizenLostJob1</value>
</attribute>
<attribute name="CONTEXT">
<value>CitizenBoughtCar</value>
</attribute>
<attribute name="VIEWPROCESSORFACTORY">
<value>
curam.citizen.datahub.internal.impl.
+CustomPersonAddressViewProcessorFactory
</value>
</attribute>
<attribute name="RECORDSTATUS">
<value>RST1</value>
</attribute>
<attribute name="VERSIONNO">
<value>1</value>
</attribute>
</row>
</table>
The CONTEXT eld links the ViewProcessor to the "CitizenBoughtCar" life event Context. This ensures
that this ViewProcessor is called whenever the "CitizenBoughtCar" Data Hub Context is called. The use
of a logicalName uniquely distinguishes each View Processor. View Processors for a Data Hub Context
are executed in lexical order. A View Processor name with a logicalName of "AAA" for the Data Hub
Context "CitizenBoughtCar" is executed before one with a logicalName of "AAB".
Driving updates from life events
A description of the artifacts that you must develop to process data that is submitted from a life event
script.
How the Data Hub works for updating
The citizen Data Hub also has Data Hub contexts for updating. Life events typically use the same Data
Hub context name for the read and updates that are associated with the same life event. The example
CitizenBoughtCar context describes a set of artifacts for prepopulating a CitizenBoughtCar
life event script and also a set of artifacts for handling updates to the Citizen's data when the
CitizenBoughtCar life event script is complete.
An update operation for a Citizen Data Hub context can update multiple individual entities in a single
transaction. The following artifacts are provided to a Data Hub following a script submission:
• A Data Store root entity, which is the root of the data store that was updated by the life events IEG
script.
• A Difference command, which is an entity that describes how this data store is different from the one
that was passed to the IEG script before it was started. In other words, it describes how the user
Chapter 8. Customizing the Universal Access Responsive Web Application
201

changed the data by running the life event script. These differences are broken down into three basic
types:
– Creations - The user creates a data store entity as a result of running the IEG script.
– Updates - The user updates an entity as a result of running the IEG script.
– Removals - The user removes an entity as a result of running the IEG script.
Creations and Updates are the most common. Allowing users to remove items in life events scripts
is generally considered bad practice. Standard life events tend to be characterized by a number of
Creations whereas Round Tripping life events tend to be a mixture of Creations and Updates. The
Difference Command is generated automatically by the life event broker after a life event is submitted.
• A Data Hub Context Name.
To turn a Data Hub Update Operation into automatic updates to evidence entities on the Holding Case,
specify a Data Hub Update Transform. For requirements to update non-evidence entities, you must
develop an Update Processor. These Update Processors involve Java code development.
Writing transforms for updating
Update Transforms, like Read Transforms are specied by using a simple XSLT syntax. To write Update
Transforms, the author must understand both the input XML, and the output Evidence XML format. The
following examples are built around a CitizenHavingABaby life event. This life event allows the user
to report that they are due to have a baby. They can enter a number of unborn children to indicate, for
example, that they are expecting twins. The user can also enter a due date and they can nominate a
father for the unborn child. The father can be an existing case participant or someone else entirely. In
the latter case, they must enter information like their name, address, or Social Security Number. This life
event is not a round-tripping life event, as it creates evidence rather than updates evidence. The input
to an Update Transform is an XML-based description of the Data Store Difference Command. An example
difference command XML for the CitizenHavingABaby is shown:
<update>
<diff diffType="NONE" entityType="Application">
<diff diffType="NONE" entityType="Person" identifier="102">
<diff diffType="CREATE" entityType="Pregnancy">
<attribute name="numChildren">1</attribute>
<attribute name="dueDate">20110528</attribute>
<attribute name="curamDataStoreUniqueID">385</attribute>
</diff>
</diff>
<diff diffType="UPDATE" entityType="Person" identifier="101">
<attribute name="isFatherToUnbornChild">true</attribute>
<attribute name="curamDataStoreUniqueID">399</attribute>
</diff>
</diff>
</update>
The difference command XML corresponds node-for-node with the data store XML. Each diff node
describes how the corresponding data store entity was modied by running the IEG script. The
curamDataStoreUniqueID attribute identies the changed data store entity. The diffType attribute
identies the nature of the change, for example CREATE, UPDATE, NONE, or REMOVE. Attributes that
changed or were added to each data store entity are listed. In the previous example, the user registered a
pregnancy for Linda Smith (concern role ID 102) with one unborn child, due on 28 May 2011. The father
is listed as being James Smith (concern role ID 101). For more information about the difference command
XML, see the schema in the Difference Command XML schema. You can use some other attributes and
elements when you update the XML, as shown:
<?xml version="1.0" encoding="UTF-8"?>
<client-data>
<client localID="102">
<evidence>
<entity type="ET10074" action="CREATE" localID="">
<attribute name="numChildren">1</attribute>
<attribute name="dueDate">20110528</attribute>
<entity-data entity-data-type="role">
<attribute type="LG"/>
202
IBM Cúram Social Program Management 8.0.2: IBM Universal Access Responsive Web Application 5.2.0

<attribute roleParticipantID="102"/>
<attribute
entityRoleIDFieldName="caseParticipantRoleID"/>
</entity-data>
<entity-data entity-data-type="role">
<attribute type="FAT"/>
<attribute roleParticipantID="101"/>
<attribute participantType="RL7"/>
<attribute
entityRoleIDFieldName="fahCaseParticipantRoleID"/>
</entity-data>
<entity type="ET10125" action="CREATE">
<attribute name="comments"> Unborn child 1</attribute>
<entity-data entity-data-type="role">
<attribute type="UNB"/>
<attribute roleParticipantID="102"/>
<attribute
entityRoleIDFieldName="caseParticipantRoleID"/>
</entity-data>
</entity>
</entity>
</evidence>
</client>
</client-data>
Note the use of the action attribute, which describes the action to be taken on the underlying evidence.
For example, to create the evidence or to update existing evidence.
The next section discusses the meaning of the <entity-data> element. The following example shows
the XSLT used to transform the previous difference XML into the previous evidence XML:
<?xml version="1.0" encoding="UTF-8"?>
<!-- This script plucks out and copies all resource-related -->
<!-- entities from output built by the XMLApplicationBuilder -->
<xsl:stylesheet xmlns:xsl="http://www.w3.org/1999/XSL/Transform"
xmlns:x="http://www.curamsoftware.com/
schemas/DifferenceCommand"
xmlns:fn="http://www.w3.org/2006/xpath-functions"
version="2.0">
<xsl:output indent="yes"/>
<xsl:strip-space elements="*"/>
<xsl:template match="update">
<xsl:for-each select="./diff[@entityType='Application']">
<xsl:element name="client-data">
<xsl:apply-templates/>
</xsl:element>
</xsl:for-each>
</xsl:template>
<xsl:template match="diff[@entityType='Person']">
<xsl:element name="client">
<xsl:attribute name="localID">
<xsl:value-of select="./@identifier"/>
</xsl:attribute>
<xsl:element name="evidence">
<xsl:apply-templates/>
</xsl:element>
</xsl:element>
</xsl:template>
<xsl:template match="diff[@entityType='Pregnancy']">
<xsl:element name="entity">
<xsl:attribute name="type">ET10074</xsl:attribute>
<xsl:attribute name="action">
<xsl:value-of select="./@diffType"/>
</xsl:attribute>
<xsl:attribute name="localID">
<xsl:value-of select="./@identifier"/>
</xsl:attribute>
<xsl:for-each select="./attribute">
<xsl:copy-of select="."/>
</xsl:for-each>
<xsl:element name="entity-data">
<xsl:attribute name="entity-data-type">
role
</xsl:attribute>
<xsl:element name="attribute">
<xsl:attribute name="type">LG</xsl:attribute>
</xsl:element>
<xsl:element name="attribute">
<xsl:attribute name="roleParticipantID">
Chapter 8. Customizing the Universal Access Responsive Web Application
203

<xsl:value-of select="../@identifier"/>
</xsl:attribute>
</xsl:element>
<xsl:element name="attribute">
<xsl:attribute name="entityRoleIDFieldName">
caseParticipantRoleID
</xsl:attribute>
</xsl:element>
</xsl:element>
<xsl:element name="entity-data">
<xsl:attribute name="entity-data-type">
role
</xsl:attribute>
<xsl:element name="attribute">
<xsl:attribute name="type">FAT</xsl:attribute>
</xsl:element>
<xsl:for-each select=
"../../diff[@entityType='Person']/attribute[
@name='isFatherToUnbornChild'
and ./text()='true']">
<!-- Copy the participant id if a family -->
<!-- member is the father -->
<xsl:element name="attribute">
<xsl:attribute name="roleParticipantID">
<xsl:value-of select="
../@identifier"/>
</xsl:attribute>
</xsl:element>
</xsl:for-each>
<!-- Copy details of absent parent -->
<xsl:call-template name="absentFather"/>
<xsl:element name="attribute">
<xsl:attribute name="entityRoleIDFieldName">
fahCaseParticipantRoleID
</xsl:attribute>
</xsl:element>
</xsl:element>
<xsl:variable name="numBabies">
<xsl:value-of select="attribute[
@name='numChildren'
]/text()"/>
</xsl:variable>
<xsl:call-template name="unbornChildren">
<xsl:with-param name="count" select="$numBabies"/>
</xsl:call-template>
</xsl:element>
</xsl:template>
<xsl:template name="unbornChildren">
<xsl:param name="count" select="1"/>
<xsl:if test="$count > 0">
<xsl:element name="entity">
<xsl:attribute name="type">ET10125</xsl:attribute>
<xsl:attribute name="action">
<xsl:value-of select="./@diffType"/>
</xsl:attribute>
<xsl:element name="attribute">
<xsl:attribute name="name">
comments
</xsl:attribute>
Unborn child <xsl:value-of select="$count"/>
</xsl:element>
<xsl:element name="entity-data">
<xsl:attribute name="entity-data-type">
role
</xsl:attribute>
<xsl:element name="attribute">
<xsl:attribute name="type">
UNB
</xsl:attribute>
</xsl:element>
<xsl:element name="attribute">
<xsl:attribute name=
"roleParticipantID">
<xsl:value-of select="
../@identifier"/>
</xsl:attribute>
</xsl:element>
<xsl:element name="attribute">
<xsl:attribute name=
"entityRoleIDFieldName">
caseParticipantRoleID
204
IBM Cúram Social Program Management 8.0.2: IBM Universal Access Responsive Web Application 5.2.0

</xsl:attribute>
</xsl:element>
</xsl:element>
</xsl:element>
<xsl:call-template name="unbornChildren">
<xsl:with-param name="count" select="$count - 1"/>
</xsl:call-template>
</xsl:if>
</xsl:template>
<xsl:template name="absentFather">
<xsl:element name="attribute">
<xsl:attribute name="participantType">
<xsl:text>RL7</xsl:text>
</xsl:attribute>
</xsl:element>
<xsl:if test="attribute[@name='fahFirstName']">
<xsl:element name="attribute">
<xsl:attribute name="firstName">
<xsl:value-of select="attribute[
@name='fahFirstName'
]/text()"/>
</xsl:attribute>
</xsl:element>
</xsl:if>
<!-- etc. map other personal details such as -->
<!-- SSN, date of birth -->
<xsl:if test="diff[@entityType='ResidentialAddress']">
<xsl:if test="diff[
@entityType='ResidentialAddress']/attribute[
@name='street1']">
<xsl:element name="attribute">
<xsl:attribute name="street1">
<xsl:value-of select=
"diff[
@entityType='ResidentialAddress']
/attribute[
@name='street1']/text()"/>
</xsl:attribute>
</xsl:element>
</xsl:if>
<!-- etc. map other parts of residential address -->
</xsl:if>
</xsl:template>
<xsl:template match="*">
<!-- do nothing -->
</xsl:template>
</xsl:stylesheet>
Writing transforms that create new case participants
Evidence Entities frequently refer to third parties. For example, Pregnancy evidence refers to the father
through a Case Participant Role. The associated father can be a Person or a Prospect Person. Other
evidence types, such as Student, can refer to a School that is entered as a Representative Case
Participant Role.
The Evidence XML schema provides a generic element that is called <entity-data>, which can be
used to provide special handling instructions to the Citizen Data Hub. The type of handling depends
on the <entity-data-type> specied. IBM Cúram Social Program Management provides a special
processor for the entity-data-type role. This role entity data processor can be used to create new
Case Participant Roles or to reference existing Case Participant Roles for existing Case Participants. In
the Evidence XML output listed previously, the attribute that is denoted by type is used to denote the
Case Participant Role Type. For example, FAT for Father or UNB for Unborn Child. This value must be a
code-table value from the CaseParticipantRoleType code table. The roleParticipantID denotes
the ConcernRoleID of an existing participant on the system. If the roleParticipantID is supplied,
the system does not attempt to create a new Case Participant, but reuses a case participant with this ID.
The entityRoleIDFieldName is the eld name in the corresponding Evidence Entity. For example, for
the Pregnancy evidence entity, it is fahCaseParticipantRoleID. Where a new participant needs to
be created, the following elds are supported by the Role Entity Data Processor.
Chapter 8. Customizing the Universal Access Responsive Web Application
205

• participantType - A code table entry from the ConcernRoleType code table. For example, use RL7
to create a new Prospect Person.
• firstName
• middleInitial
• lastName
• SSN
• dateOfBirth
• lastName
• lastName
• street1
• city
• state
• zipCode
Updating Non-Evidence entities
You can congure life events to automatically map updates through to Evidence Entities on multiple
integrated cases. Sometimes life events must update non-Evidence entities such as a Residential
Address, Employment, or other customer-specic non-evidence entities. Typically, these entities are
shared across multiple cases. It is also typical that these entities do not follow the same controlled Life
Cycle as evidence entities. Evidence has many advantages:
• It is temporal.
• It is case-specic, with sharing of updates between cases controlled through the Evidence Broker.
• Caseworkers can veto acceptance of updates that come from external sources like IBM Cúram Universal
Access.
• It has an in-edit and approval cycle.
• It has support for verications.
Non-evidence entities have none of these advantages and safeguards. A decision to update non-evidence
entities based on life events must be made with due care, especially if the changes can be applied
simultaneously across multiple cases. You can update non-evidence entities but this approach always
involves custom code. These approaches must include safeguards to ensure that at least one agency
worker manually approves changes before they are applied to the system.
Conguring the evidence broker for use with the holding case
The Holding Case is only a holding area for Evidence before it is sent somewhere else. Typically, after
data is updated on the Holding Case, the goal is to broker these updates to Integrated Cases so that
caseworkers can evaluate the changes and apply them to the relevant cases.
For example, after the data is accepted on Integrated Cases, a user can see the positive impact of
submitting a life event because the updated data has an impact on the user's benets. The bridge
between the Holding Case and the Integrated Cases is crossed only if the appropriate Evidence Broker
conguration is dened. For more information about the Evidence Broker, see the Evidence Broker
Developers Guide.
Conguring sharing from the Holding Case
An evidence conguration for sharing of Pregnancy evidence from the Holding Case to an Integrated Case
is shown in the following example:
<?xml version="1.0" encoding="UTF-8"?>
<table name="EVIDENCEBROKERCONFIG">
<column name="EVIDENCEBROKERCONFIGID" type="id"/>
<column name="SOURCETYPE" type="text" />
<column name="SOURCEID" type="id" />
206
IBM Cúram Social Program Management 8.0.2: IBM Universal Access Responsive Web Application 5.2.0

<column name="TARGETTYPE" type="text" />
<column name="TARGETID" type="id"/>
<column name="SOURCEEVIDENCETYPE" type="text"/>
<column name="TARGETEVIDENCETYPE" type="text"/>
<column name="AUTOACCEPTIND" type="bool"/>
<column name="WEBSERVICESIND" type="bool"/>
<column name="SHAREDTYPE" type="text"/>
<column name="RECORDSTATUS" type="text"/>
<column name="VERSIONNO" type="number"/>
<row>
<attribute name="EVIDENCEBROKERCONFIGID">
<value>10003</value>
</attribute>
<attribute name="SOURCETYPE">
<value>CT10301</value>
</attribute>
<attribute name="SOURCEID">
<value>10330</value>
</attribute>
<attribute name="TARGETTYPE">
<value>CT5</value>
</attribute>
<attribute name="TARGETID">
<value>4</value>
</attribute>
<attribute name="SOURCEEVIDENCETYPE">
<value>ET10000</value>
</attribute>
<attribute name="TARGETEVIDENCETYPE">
<value>ET10074</value>
</attribute>
<attribute name="AUTOACCEPTIND">
<value>0</value>
</attribute>
<attribute name="WEBSERVICESIND">
<value>0</value>
</attribute>
<attribute name="SHAREDTYPE">
<value>SET2002</value>
</attribute>
<attribute name="RECORDSTATUS">
<value>RST1</value>
</attribute>
<attribute name="VERSIONNO">
<value>1</value>
</attribute>
</row>
</table>
When evidence is shared from the Holding Case to another Integrated Case, the source type needs to
be CT10301 and the source ID needs to be set to 10330. The source evidence type needs to be set to
ET10000, which is the code for all Evidence that is stored in Holding Cases. Evidence of this type is known
as Holding Evidence. The target evidence type in this case is ET10074. In Cúram Common Evidence,
this particular designation identies Pregnancy Evidence. The evidence sharing type needs to be set to
SET2002, which is the code for Non-Identical Sharing.
Note: The AUTOACCEPTIND is set to 0. Always set this value to 0 when it is shared from a Holding Case
to an Integrated Case. This setting means that a caseworker always sees any changes that come from the
citizen's Holding Case.
If the caseworker agrees with the changes, the Incoming Evidence link of the Integrated Case Evidence
page can be used to synchronize the data from the Holding Case in the normal way.
To establish an Evidence Broker Conguration for a custom component, a DMX le must be created
that contains the conguration that follows the previous example, for example, %SERVER_DIR%
\components\Custom\data\initial\EBROKER_CONFIG.dmx
In sharing Holding Evidence to a Standard Evidence Entity like a Pregnancy, the Evidence Broker copies
the Holding Evidence that contains the Pregnancy data into a new Pregnancy Evidence Record in the
target Integrated Case. Holding Evidence is not standard Evidence. Holding Evidence is stored in an XML
representation, so while the Holding Evidence is copied to the Target Evidence type, the Evidence Broker
Chapter 8. Customizing the Universal Access Responsive Web Application
207

converts the XML data into standard Evidence data. To assist with this conversion process, it is necessary
to supply metadata. See the following example of this metadata:
<?xml version="1.0" encoding="UTF-8"?>
<data-hub-config>
<evidence-config package="curam.holdingcase.evidence">
<entity name="HoldingEvidence" ev-type-code="ET10000">
<attribute name="entityStruct">
curam.citizen.datahub.holdingcase.holdingevidence.struct.
+HoldingEvidenceDtls
</attribute>
</entity>
<entity name="Pregnancy" ev-type-code="ET10074">
<attribute name="entityStruct">
curam.evidence.entity.struct.PregnancyDtls
</attribute>
<related-entity>
<case-participant-role>
<attribute name="linkAttribute">
fahCaseParticipantRoleID
</attribute>
</case-participant-role>
<case-participant-role>
<attribute name="linkAttribute">
caseParticipantRoleID
</attribute>
</case-participant-role>
</related-entity>
</entity>
</evidence-config>
</data-hub-config>
The metadata describes each of the entities that can be copied to and from the Holding Case and an
Integrated Case. The metadata describes the dtls structs that are used to build the target evidence. It
also describes which of the attributes in Case Evidence refer to case participant roles. This information
ensures that when the Holding Evidence is copied, it does not blindly copy case participant role identiers
from Holding Evidence. Instead, it looks for the equivalent case participant role ID on the target case and,
if it does not exist, creates one.
This metadata is stored in an AppResource resource store key. The resource store key is identied by the
Environment Property curam.workspaceservices.datahub.metadata. The initially congured value
for this variable defaults to the value curam.workspaceservices.datahub.metadata. This variable
points to default Holding Evidence Data Hub metadata. You can use the following steps to replace the
default Holding Evidence Data Hub metadata with a custom version to support all Evidence Types that
need to be brokered from the Holding Case to all Integrated Cases:
• Copy the contents of %SERVER_DIR%
\components\WorkspaceServices\data\initial\clob\DataHubMetaData.xml to
%SERVER_DIR%\components\Custom\data\initial\clob\CustomDataHubMetaData.xml
• Edit the contents of CustomDataHubMetaData.xml to describe all the Evidence Entities that need to
be updated by the Data Hub.
• Create a le %SERVER_DIR%\components\Custom\data\initial\APP_RESOURCES.dmx. Add an
entry to this le as shown:
<?xml version="1.0" encoding="UTF-8"?>
<table name="APPRESOURCE">
<column name="resourceid" type="id" />
<column name="localeIdentifier" type="text"/>
<column name="name" type="text"/>
<column name="contentType" type="text"/>
<column name="contentDisposition" type="text"/>
<column name="content" type="blob"/>
<column name="internal" type="bool"/>
<column name="lastWritten" type="timestamp"/>
<column name="versionNo" type="number"/>
<row>
<attribute name="resourceID">
<value>10700</value>
</attribute>
<attribute name="localeIdentifier"> <value/>
</attribute>
208
IBM Cúram Social Program Management 8.0.2: IBM Universal Access Responsive Web Application 5.2.0

<attribute name="name">
<value>custom.datahub.metadata</value>
</attribute>
<attribute name="contentType">
<value>text/plain</value>
</attribute>
<attribute name="contentDisposition"> <value>inline</value>
</attribute> <
attribute name="content"> <value> ./Custom/data/initial/clob/CustomDataHubMetaData.xml </
value>
</attribute> <attribute name="internal"> <value>0</value> </attribute>
<attribute name="lastWritten"> <value>SYSTIME</value>
</attribute> <attribute name="versionNo"> <value>1</value>
</attribute>
</row>
</table>
• Create or append to the le %SERVER_DIR%
\components\Custom\properties\Environment.xml adding an entry along the following lines:
<environment>
<type name="dynamic_properties">
<section code="WSSVCS"
name="Workspace Services - Configuration">
<variable name="curam.workspaceservices.datahub.metadata"
value="custom.datahub.metadata" onlyin="all"
type="STRING">
<comment>
Identifies an AppResource used to configure DataHub
meta-data.
</comment>
</variable>
</section>
</type>
</environment>
Round-tripping and conguring sharing to the Holding Case
Analysts also might want to consider whether evidence needs to be transferred in the opposite direction.
That is, from the Integrated Cases to the Holding Case. When sharing is congured from the Integrated
Case to the Holding Case, changes made by the caseworker to selected evidence can be propagated
back to the Holding Case. This process is essential for life events that need to prepopulate data from
Evidence Entities in existing Integrated Cases. This example shows how to congure Pregnancy Evidence
for Sharing to the Holding Case.
<?xml version="1.0" encoding="UTF-8"?>
<table name="EVIDENCEBROKERCONFIG">
<column name="EVIDENCEBROKERCONFIGID" type="id"/>
<column name="SOURCETYPE" type="text" />
<column name="SOURCEID" type="id" />
<column name="TARGETTYPE" type="text" />
<column name="TARGETID" type="id"/>
<column name="SOURCEEVIDENCETYPE" type="text"/>
<column name="TARGETEVIDENCETYPE" type="text"/>
<column name="AUTOACCEPTIND" type="bool"/>
<column name="WEBSERVICESIND" type="bool"/>
<column name="SHAREDTYPE" type="text"/>
<column name="RECORDSTATUS" type="text"/>
<column name="VERSIONNO" type="number"/>
<row>
<attribute name="EVIDENCEBROKERCONFIGID">
<value>2</value>
</attribute>
<attribute name="SOURCETYPE">
<value>CT5</value>
</attribute>
<attribute name="SOURCEID">
<value>4</value>
</attribute>
<attribute name="TARGETTYPE">
<value>CT10301</value>
</attribute>
<attribute name="TARGETID">
<value>10330</value>
</attribute>
<attribute name="SOURCEEVIDENCETYPE">
Chapter 8. Customizing the Universal Access Responsive Web Application
209

<value>ET10074</value>
</attribute>
<attribute name="TARGETEVIDENCETYPE">
<value>ET10000</value>
</attribute>
<attribute name="AUTOACCEPTIND">
<value>1</value>
</attribute>
<attribute name="WEBSERVICESIND">
<value>0</value>
</attribute>
<attribute name="SHAREDTYPE">
<value>SET2002</value>
</attribute>
<attribute name="RECORDSTATUS">
<value>RST1</value>
</attribute>
<attribute name="VERSIONNO">
<value>1</value>
</attribute>
</row>
</table>
Note: Unlike Sharing from Holding Case to Integrated Case, the AUTOACCEPTIND is set to 1. This
designation is because the target case is a Holding Case and Holding Cases are designed to operate
unattended. It is not expected that caseworkers need to review items that are being shared onto the
Holding Case as they come from an authoritative source, for instance, the Integrated Case.
Issues for consideration
With suitable conguration, you can share data from the Holding Case to multiple Integrated Cases. For
example, Integrated Cases A and B are congured to share information with a citizen's Holding Case. A
and B both separately recorded an Income Evidence record for the citizen. In the citizen's Holding Case,
this evidence record shows up as two separate Income Records. For cases A and B, the income records
are two separate records that hold a view of the citizen's income. However, to the citizen, this breakdown
might not make much sense. The citizen has only one Income and is using one portal to communicate
with the agency or agencies concerned. Why does the citizen see two records for the same Income? In
cases where there is sharing to multiple Integrated Cases from a single Holding Case, consider creating
another set of sharing relationships to be established from A to B and B to A. This issue requires proper
consideration early on in the project lifecycle.
Putting it all together
You saw how to create the parts of a life event, now join all these pieces together to make a complete life
event.
New life events can be congured in the administration application. You can create new life event
types and life event channels, add rich text descriptions, and associate life events with IEG scripts and
recommendation rule sets. When all of the needed entities are created, the data can be extracted into a
set of DMX les that can be used as a basis for ongoing development. Use the following set of commands
to extract the relevant DMX les:
build extractdata -Dtablename=LifeEventType
build extractdata -Dtablename=LifeEventContext
build extractdata -Dtablename=LifeEventCategory
build extractdata -Dtablename=LifeEventCategoryLink
build extractdata -Dtablename=LocalizableText
build extractdata -Dtablename=TextTranslation
The LocalizableText and TextTranslation tables contain all of the life event descriptions, but they
also contain text translations that don't relate to life events. Developers must audit these DMX les and
remove any entries that don't correspond to the relevant life event descriptions before they copy the DMX
les to %SERVER_DIR%\components\Custom\data\initial\.
210
IBM Cúram Social Program Management 8.0.2: IBM Universal Access Responsive Web Application 5.2.0

Event APIs for life events
The life event broker is instrumented with guice events. Developers can write listeners that can be bound
to these events. The available events are:
• PreCreateLifeEvent - Invoked before launching a life event
• PostCreateLifeEvent - Invoked after the life event has been initialized. That is after the Data Hub
Transform and View Processors have been executed.
• PreSubmitLifeEvent - Invoked after the life event has been submitted but before the Update
Processors have been run.
• PostSubmitLifeEvent - Invoked after the life event has been submitted.
Note that both the Pre and Post SubmitLifeEvent events are executed from within a Deferred Process so
the current user is expected to be SYSTEM. Life events should never attempt to change the contents of the
life event. The code extract below shows how a Listener class, MyPreCreateListener can be bound to
one of these life events:
Multibinder<LifeEventEvents.PreCreateLifeEvent>
preCreateBinder =
Multibinder.newSetBinder(binder(),
new TypeLiteral<LifeEventEvents.PreCreateLifeEvent>() { /**/
});
preCreateBinder.addBinding().to(MyPreCreateListener.class);
Customizing verications
If your organization includes the online submission of documents in their business process, citizens can
upload and submit documents from the IBM Universal Access Responsive Web Application to prove
information that they provided in their benet applications. You can customize a number of aspects of the
verications functionality in the application.
Your organization can integrate a verications system of your choice. If you use the IBM Cúram
Verication Engine application module, the verications functionality is available in the Universal Access
Responsive Web Application after you set up your IBM Cúram Social Program Management verications.
Related concepts
Verify
If your organization includes the online submission of documents in their business process, citizens are
notied in the Universal Access Responsive Web Application when some of their information needs to
be veried with supporting documentation. They can then provide that supporting documentation online.
Both citizens and caseworkers receive notications, alerting them to any steps to take. Case workers
control the verication of evidence, ensuring adherence to agency standards.
Related information
Verication Engine
Enabling or disabling verications
The verications feature is disabled by default. Set the
REACT_APP_FEATURE_VERIFICATIONS_ENABLED environment variable to enable or
disable the Your documents page and options in your application. Set the
curam.rest.docservice.fileupload.enabled property to enable the les API so you can upload
les to your system. Verications are available only to linked users.
About this task
For more information about linked users, see “User account types” on page 148
.
The following verications functions are enabled or disabled:
• The verications-related URLs, the Your documents page at /verifications and the verication
details page at /verifications/details.
Chapter 8. Customizing the Universal Access Responsive Web Application
211

• The verication Alert on the Dashboard page.
• Verications messages in the To-dos pane on the dashboard.
For more information about environment variables, see the “React environment variable reference” on
page 127.
Procedure
1. Note: Before you enable the les API, ensure that you implement the appropriate le security and
validations for document uploads.
Set the curam.rest.docservice.fileupload.enabled property to enable the les API so you
can upload les to your system, see Securing and enabling the Files API
.
2. Edit the .env le in the root of your application and set
REACT_APP_FEATURE_VERIFICATIONS_ENABLED to true. If you don't dene the environment
variable, the verications feature defaults to disabled.
Enabling the submitted document review feature for citizen verications
If you use the IBM Cúram Verication Engine application module and you want to enable caseworkers
to see submitted documents in IBM Cúram Social Program Management, you must enable the submitted
document review feature for citizen verications.
About this task
For more information about the submitted document review feature,
see https://www.ibm.com/support/knowledgecenter/en/SS8S5A_7.0.11/com.ibm.curam.content.doc/
Verication/c_VER_CaseworkersReviewing.html.
Procedure
To enable caseworker to see the submitted documents, set the
curam.verification.submittedDocuments.display.enabled property to display documents
that are submitted to verify evidence with the associated verication.
Customizing le formats and size limits for le uploads
You can specify which le formats to allow users to upload and a size limit for uploaded les by setting
environment variables. By default, the allowed le formats are JPG, JPEG, PNG, TIFF, and PDF and the le
size limit is 5 MB.
Before you begin
You must ensure that you have implemented the appropriate le security and validations for document
uploads and enabled the le upload API.
If you do not set the REACT_APP_DOC_UPLOAD_FILE_FORMATS environment variable, the default le
formats are allowed. If you specify an invalid le extension string, all le types are denied.
If you do not set the REACT_APP_DOC_UPLOAD_SIZE_LIMIT, the default value applies.
Procedure
1. To change the allowed le formats for le uploads, set the REACT_APP_DOC_UPLOAD_FILE_FORMATS
environment variable in your .env le. Specify the le name extension, including the dot separator, for
each allowed le type in a comma-separated list.
For example:
REACT_APP_DOC_UPLOAD_FILE_FORMATS=".png,.jpg,.pdf"
212
IBM Cúram Social Program Management 8.0.2: IBM Universal Access Responsive Web Application 5.2.0

2. To change the allowed le sizes for le uploads, set the REACT_APP_DOC_UPLOAD_SIZE_LIMIT
environment variable in your .env le. Enter the maximum size in megabytes (MB).
For example:
REACT_APP_DOC_UPLOAD_SIZE_LIMIT=6
Customizing a le upload lead time for verications
If needed, your organization can congure a lead time to the due date so that document
are submitted earlier to give caseworkers enough time to verify the evidence. Use the
REACT_APP_DOC_UPLOAD_LEAD_DAYS environment variable to set how many days you want to subtract
from the actual date. This earlier date is then displayed to citizens in the application.
About this task
By default, the due date is the date when the information needs to be veried by the caseworker. The
default value of REACT_APP_DOC_UPLOAD_LEAD_DAYS is 0 days. The value you set is converted to its
absolute value and subtracted from the verication due date. For example, -1 and 1 have the same affect.
Procedure
To set a lead time, set the REACT_APP_DOC_UPLOAD_LEAD_DAYS environment variable in your .env le.
For example:
REACT_APP_DOC_UPLOAD_LEAD_DAYS=-7
If the actual due date is 31 August, then 24 August is displayed in the application.
Customizing how verication information is presented
The information for the majority of verications that are presented to the citizen is processed and grouped
by evidence records to present meaningful and consumable information in the UI. However, you might
have a number of evidence types that contain disparate information that would be more meaningfully
displayed in separate verications. You can customize how information from evidence records is grouped
and displayed in the application.
To understand how information is grouped by default, take an evidence record called Medical Expenses,
which is an instance of a Medical expenses evidence type. An evidence record can consist of one or more
veriable data items. For example, the amount entered for a medical expense and it's frequency. If a
citizen had multiple expenses, it might look like this:
Medical Expense:
• For Diabetes
– Amount: $100
– Frequency: Weekly
• For Asthma
– Amount: $125
– Frequency: Monthly
To show related expenses that need documentation, veriable data items are grouped into bigger
verications. By default, information is grouped by the following ve criteria in order of importance:
• Evidence type
• Evidence record
• Case
• Person
Chapter 8. Customizing the Universal Access Responsive Web Application
213

• Due date
Anything different in the list results in a separate verication.
The text that is displayed on the verication is taken from the evidence descriptor of the evidence record
for which the verication was raised, for example Paid $100 for Diabetes.
Customizing veriable data item grouping
You can customize how veriable data items on an evidence record are grouped for display in
verications. For example, to separate out disparate items that are on the same evidence record but
that are not suitable to show on the same verication.
About this task
To customize the grouping, you must override the method with your own custom implementation and
import your custom implementation. You can use the following example as a reference.
Procedure
1. Create a custom module that implements your custom grouping.
For example:
src/features/Verification/CustomVerificationsConfig.js
2. Create a config function that adds a custom mapping verication.
import { CustomVerificationsSelectors } from '@spm/universal-access';
function config() {
// Custom function to group by evidence type and due date
const customGroupFunction = verification => {
return `${verification.relatedEvidence.value}-${dueDate}`;
};
CustomVerificationsSelectors.addCustomGroupId(customGroupFunction);
}
export default { config };
3. Update your App.js le or equivalent as follows:
import CustomVerificationsConfig from './features/Verification/CustomVerificationsConfig';
CustomVerificationsConfig.config();
Customizing verication names
You can customize the name of a verication if the name from the evidence type is not suitable.
Procedure
1. Create a custom module that implements your custom naming.
For example:
src/features/Verification/CustomVerificationsConfig.js
2. Create a config function that adds a custom mapping verication.
import { CustomVerificationsSelectors } from '@spm/universal-access';
function config() {
// Custom function to change the description to "Health Custom"
const customNameCallback = (group) => {
const { relatedEvidenceType } = group;
// if the code of the name is "DET106" change the description to "Health expenses"
if (relatedEvidenceType && relatedEvidenceType.value === 'DET106') {
214
IBM Cúram Social Program Management 8.0.2: IBM Universal Access Responsive Web Application 5.2.0

// add description to "Health expenses"
const newRelatedEvidenceType = { ...relatedEvidenceType, description: 'Health
Custom' };
// return a group with the name modified
return { ...group, relatedEvidenceType: newRelatedEvidenceType };
}
return group;
})
CustomVerificationsSelectors.addMapVerificationGroup(groupByVerificationId);
}
export default { config };
3. Update your App.js le or equivalent as follows:
import CustomVerificationsConfig from './features/Verification/CustomVerificationsConfig';
CustomVerificationsConfig.config();
Customizing caseworker tasks
When a citizen submits a document for a verication, a task is generated for the caseworker. Tasks are
displayed to the caseworker that is assigned to the citizen's case when they log in to the caseworker
application. System administrators can congure the system to display a task each time a citizen provides
all documents for an individual evidence record on a case, or to display the task only when a citizen has
provided all documents for every evidence record on a case.
About this task
By default, the task is displayed only when all documents are uploaded for all evidence records on the
case.
Procedure
1. Log on to the IBM Cúram Social Program Management application as a system administrator, and click
System Congurations.
2. In the Shortcuts pane, click Application Data > Property Administration.
3. Congure the curam.citizenworkspace.task.notifications.on.all.evidence.uploads
property.
Related concepts
Caseworker tasks
When documents are submitted for verication by a citizen, a task is generated for the caseworker that is
assigned to the citizen’s case.
Customizing application-specic verication polling
When a citizen submits an application, there is a delay while verications are generated for that
application. You can enable verication polling to handle this delay, allowing the page to wait and present
the verications when they become available. You can set the polling on (default) or off, and adjust the
interval and duration.
About this task
For more information about environment variables, see the “React environment variable reference” on
page 127.
Procedure
Edit the .env le in the root of your application and update values for
REACT_APP_VERIFICATION_POLLING.
For example:
Chapter 8. Customizing the Universal Access Responsive Web Application
215

REACT_APP_VERIFICATION_POLLING={"api": "/v1/ua/submitted_applications", "timeout": "10000",
"interval": "1000"}
Where:
• api
Species a URL to call to check the submitted applications for verications. By default, /v1/ua/
submitted_applications.
• timeout
Species the timeout in milliseconds before the polling stops. By default, 10 second.
• interval
Species the interval in milliseconds between polling calls. By default, 1 second.
Related concepts
Submit application-specic documents
Citizens with linked accounts can upload the required supporting documents for their application. After a
citizen signs and submits their application, they are shown the information that they need to verify and
the documents that they can upload to prove that information.
Customizing with web services
In some scenarios, agencies handle interactions with citizens over the internet, but use an existing
legacy system for case processing. To cater for these scenarios, Universal Access can be congured to
communicate with various remote systems using web services.
Inbound and outbound web services
Universal Access supports specic outbound and inbound web services.
The following outbound web services are supported:
• Submit an application for benets.
• Withdraw an application for benets.
• Send a life event.
The following inbound web services are supported:
• Create a citizen account on Universal Access.
• Link a user to a remote system (gives them the right to send information to those systems and receive
information from them in turn).
• Unlink a user from a remote system.
• Receive an update to the status of a submitted application.
• Receive an update to the status of a request to withdraw an application.
• Receive a citizen message (for display on a citizen account).
• Receive payment information.
• Receive case contact information.
Web services security
Connections to remote systems can be congured through the remote systems conguration page in the
administrator application.
Remote systems can invoke web services on Universal Access and must supply user name and password
credentials as part of the SOAP header, details of how to do this are described using sample web service
requests. It is strongly recommended that a different username and password be assigned to each
remote system. The username associated with a remote system is set in the Source User Name eld
216
IBM Cúram Social Program Management 8.0.2: IBM Universal Access Responsive Web Application 5.2.0

of the remote system conguration page. Having a different user name for each remote system allows
Universal Access to perform proper data-based security checks on the incoming service requests. This
prevents one remote system sending requests to update data that is properly the concern of a different
remote system.
Process application service
The process application web services consists of receive application and receive withdrawal request.
Receive application
When the Receive application outbound web service is started on remote systems, it communicates an
application for benets for one or more social programs. The Web Service Description Language (WSDL)
describing this service can be found in
<CURAM_DIR>\EJBServer\components\WorkspaceServices\axis\ProcessApplicationServi
ce\ProcessApplicationService.wsdl.
A web service request of this type contains the following information:
• intakeApplicationType - An ID that uniquely identies an Intake Application Type.
• applicationReference – A unique reference for a particular application. This reference is a human-
readable ID that is displayed to citizens after they complete an application; for example, 512 or 756.
The application reference is used as an argument to other web services and needs to be stored by the
receiver.
• applicationLocale – Denotes the preferred locale of the user who entered the application, for
example en_US. This information needs to be stored by the receiver. Remote systems can send various
information back to the citizen's account. Some of this information must be localized by the sender to
the preferred locale of the citizen.
• submittedDateTime – The date and time at which the application was submitted. This information is
in XML schema dateTime format, for example, 2012-05-29T15:34:49.000+01:00.
• programsAppliedFor – This eld contains a list of the programs that were applied for as part of this
application. Each program is referred to by a unique reference. This information corresponds to the
value of the Reference eld congured in the Programs section of Universal Access conguration. For
example:
<ns1:programsAppliedFor>
<ns1:programTypeReference>CashAssistance</ns1:programTypeReference>
<ns1:programTypeReference>SNAP</ns1:programTypeReference>
</ns1:programsAppliedFor>
• applicationData – Contains a base64 encoded representation of the intake data. This intake data is
the XML representation of the XML data store associated with an application.
• applicationSchemaName – The name of the schema that is used to create the data store for the
application.
• senderIdentification – Identies the sender of the request. The sender identication contains
two parts, 1) the identier of the system from which the request originates, 2) The Citizen Workspace
Account ID of the user that created the request. The second part is optional, applications submitted
anonymously do not contain part two but applications that are submitted by a logged in user do.
• supplementaryInformation – optional, reserved for future use.
The receiver of this information is expected to record the details of the application keyed against sender
identication and intake application reference.
On success, the implementation of this web service must return the Boolean value true to indicate that
the request was processed successfully. In the case that a problem occurs in processing the request, a
fault must be returned containing a string to indicate the nature of the problem. The String needs to be
localized to the locale of Universal Access server since it appears in the server log les.
Chapter 8. Customizing the Universal Access Responsive Web Application
217
Note: The receiver can receive multiple applications with the same Intake Application reference but the
intake application reference is always unique for a particular sender. For example, Systems A and B send
a receiveApplication() request to system X. Both requests have the applicationReference 256.
Note: The receiver never should receive two applications from A with an application reference of 256.
Receive withdrawal request
IBM Cúram Universal Access invokes this outbound web service on remote systems. It is used by citizens
to withdraw an application that they have previously submitted using the Receive Application Service.
WSDL describing this service can be found in
<CURAM_DIR>\EJBServer\components\WorkspaceServices\axis\ProcessApplicationServi
ce\ProcessApplicationService.wsdl.
A web service request of this type contains the following information:
• applicationReference – A unique reference for the application to be withdrawn. This refers to the id
transmitted with the Receive Application service request.
• programTypeReference – A reference that identies the program being withdrawn. Each program type is
referred to by a unique reference. This corresponds to the value of the Reference eld congured in the
Programs section of IBM Cúram Universal Access conguration. For example "CashAssistance".
• requestSubmittedDateTime – A timestamp indicating when the request was submitted in XML Schema
dateTime format. For example, 2012-05-29T15:34:49.000+01:00
• withdrawalRequestReason – The value is taken from the code table WithdrawalRequestReason. Values
for this code table are
– WRES1001 – Attained employment
– WRES1002 – Change of circumstances
– WRES1003 – Filed in error
• withdrawalRequestID – An id that uniquely identies this withdrawal request from the sending instance
of Universal Access.
• senderIdentication – Identies the sender of the request. The sender identication contains two parts,
1) the identier of the system from which the request originates, 2) The Citizen Workspace Account ID
of the user that created the request.
• supplementaryInformation – optional, reserved for future use.
The expected result following successful processing is a receiveWithdrawalRequestResponse as follows:
<receiveWithdrawalRequestResponse>
<result>true</result>
</receiveWithdrawalRequestResponse>
The service implementation should return a fault if there is an error processing the request. The fault
string should be globalized to the locale of the IBM Cúram Universal Access server since it will appear in
the server log les. Some problems that may arise include:
• A withdrawal request with the given ID has already been sent by the given instance of Universal Access.
• The application reference referred to is not recognized as an application previously transmitted in a
Receive Application service invocation from the same Universal Access instance.
The withdrawal request application is processed by the receiving agency after which a response should be
sent in the form of a withdrawal request update. See the sample SOAP request for this web service.
218
IBM Cúram Social Program Management 8.0.2: IBM Universal Access Responsive Web Application 5.2.0
Update Application Service
The Update Application web services consists of the Intake Program Application Update and the
Withdrawal Request Update.
Intake Program Application Update
The Intake Program Application Update is an inbound web service invoked by remote systems on IBM
Cúram Universal Access.
The Intake Program Application Update is used to inform Universal Access of changes
to the status of an application for benets that was previously received via the Receive
Application web service. The status of an application can transition to Approved, Denied or
Withdrawn. Where an application is denied a reason can be included in the web service
message. The schema for the payload of web service requests of this type can be found
in <CURAM_DIR>\EJBServer\components\WorkspaceServices\webservices\UpdateApplication.xsd. See
the sample SOAP request for this web service.
A web service request of this type contains the following information:
• curamReferenceID – This must match the applicationReference element for the corresponding Receive
Application request.
• programApplicationStatus – This can take the following values:
– IPAS1002 – Withdrawn
– IPAS1003 – Approved
– IPAS1004 – Denied
• programApplicationDisposedDateTime – This is a formatted date time string in the standard IBM Cúram
ISO8601 format – "YYYYMMDD HH:MM:SS".
• programApplicationDenialReason – Optional, if the status sent is IPAS1004, this contains free text
describing the reason for denial. The denial reason should be taken from the code table IBM Cúram
IntakeProgApplDenyReason.
The web service request needs to be sent with a Cúram security credential (see a sample SOAP message
for details). The user name placed within the credential must match the Source User Name entered into
the Remote System entry corresponding to the peer system sending the request.
Withdrawal Request Update
The Withdrawal Request Update is an inbound web service invoked by remote systems on IBM Cúram
Universal Access.
The Withdrawal Request Update is used to inform Universal Access of changes to the status of a
Withdrawal Request that was previously submitted using the Receive Withdrawal Request web service.
You can nd the schema for the payload of web service requests of this type in
<CURAM_DIR>\EJBServer\components\WorkspaceServices\webservices\UpdateApplicatio
n.xsd. See the sample SOAP request for this web service.
A web service request of this type contains the following information:
• curamReferenceID – This must match the withdrawalRequestID in the corresponding Receive
Withdrawal Request message.
• withdrawalRequestStatus – This an enumeration taking the following values:
– WREQ1002 – Approved
– WREQ1003 – Denied
• resolvedDateTime – A time stamp in the standard IBM Cúram ISO8601 format – "YYYYMMDD
HH:MM:SS".
Chapter 8. Customizing the Universal Access Responsive Web Application
219
• withdrawalRequestDenialReason – Optional. In the case there the withdrawal request was denied,
a textual explanation for the denial. The sender must localize this to the locale of the citizen who
originally submitted the application.
See the sample SOAP request for the Withdrawal Request Update operation.
On success this operation returns a document indicating that the request has succeeded. On failure, a
fault is raised. Reasons for failure include:
• The withdrawal request id does not match a known withdrawal request id.
• The withdrawal request state transition is invalid.
life event service
The life event service is an outbound web service is invoked by IBM Cúram
Universal Access on remote systems. WSDL describing this service can be found in
<CURAM_DIR>\EJBServer\components\WorkspaceServices\axis\LifeEventService\LifeEvent.wsdl.
A request for this web service contains the following elds:
• lifeEventReference – Describes the type of the life event, for example "Change of Address"
• senderIdentication – Identies the sender of the request. The sender identication contains two parts,
1) the identier of the system from which the request originates, 2) The Citizen Workspace Account ID
of the user that created the request.
• lifeEventData - Contains a base64 encoded representation of the life event data. This life event data is
the XML representation of the XML datastore associated with an life event.
• lifeEventSchemaName – The name of the schema used to create the data store for the life event.
• submittedDateTime – The date and time when the life event was submitted. An XML Schema dateTime.
For example, 2012-05-29T15:34:49.000+01:00
• supplementaryInformation – optional, reserved for future use.
The implementation should return a response of type lifeEventResponse with the content "true" when the
life event is successfully processed. If there is an error processing the life event then the system should
return a fault in accordance with the WSDL specication.
Create account service
The create account service is an inbound web service invoked by remote systems on IBM Cúram Universal
Access. The service creates a Citizen Workspace Account for users who previously submitted an Intake
Application anonymously.
The create account service performs two functions:
• Create an account for a previously anonymous user.
• Link that account to the remote system that is invoking the Create Account Web Service.
If a Citizen Workspace user is "linked" to a remote system, it means that user is registered on the remote
system and the remote system will recognize requests from that Citizen Workspace user as relating to a
particular case, cases or an individual on the remote system. This has serious security implications on the
remote system – The remote system sending a request to link a user or create an account for a user must
be convinced of the identity of the individual who owns the account. The schema for the payload of web
service requests of this type can be found in
<CURAM_DIR>\EJBServer\components\WorkspaceServices\webservices\ExternalAccountC
reate.xsd. See the sample SOAP request for this web service.
A create account request contains the following information:
• rstName – The rst name.
• middleName – The middle name. Optional.
• surname – The last name.
220
IBM Cúram Social Program Management 8.0.2: IBM Universal Access Responsive Web Application 5.2.0
• username – The username for the newly created account.
• password – The password for the newly created account.
• conrmPassword – Conrmation of the password. Must match password.
• secretQuestionType – The type of secret question selected to unlock the user's account. Values should
correspond to entries from the SecretQuestionType code table. For example, SQT1 – Mother's maiden
name.
• answer – An answer to the secret question. Non empty.
• termsAndConditionsAccepted – Boolean indication that the citizen has accepted the terms and
conditions on which the account is created.
• intakeApplicationReference – Refers to the unique applicationReference passed in as part of the receive
application request. If this is specied, a link will be created between the application and the newly
created account.
• clientIDOnRemoteSystem – This is a unique identier that can be used to identify the user of this
account on the remote system. There is no prescribed form for this id, it could be a Social Security
Number for example. It must be capable of uniquely identifying the citizen on the remote system.
• sourceSystem – Identies the remote system that sent this request. This must match the name of a
remote system congured in the administration application. For more information about conguring
remote systems, see Conguring remote systems.
If successful this returns the id of the created citizen workspace account. Problems that occur during the
processing of the request are flagged by a fault response. Possible issues include:
• An account has already been associated with the intake application reference.
• The username already exists.
• The user name or password do not meet minimum mandatory criteria such as password strength, user
name length.
Link service
The link service is an inbound web service invoked by remote systems on IBM Cúram Universal Access.
The link service is used to link a Citizen Workspace account to a remote system.
See the section on Create Account Service for a general discussion of the implications of linking a user.
The schema for the payload of web service requests of this type can be found in
<CURAM_DIR>\EJBServer\components\WorkspaceServices\webservices\ExternalAccountL
ink.xsd. See the sample SOAP request for this web service.
This web service request contains the following information:
• sourceSystem – The name of the remote system sending the request. Must match the name of a remote
system congured in the system.
• citizenWorkspaceAccountID – The unique citizen workspace account id.
• clientIDOnRemoteSystem - This is a unique identier that can be used to identify the user of this
account on the remote system. There is no prescribed form for this id, it could be a Social Security
Number for example. It must be capable of uniquely identifying the client on the remote system.
• createdByUsername – The username on the remote system responsible for this request.
On success this operation returns a document indicating that the request has succeeded. On failure, a
fault is raised. Reasons for failure include:
• The citizen workspace account id is invalid, does not exist or is associated with a de-activated account.
• The citizen workspace account in question is already linked to this remote system.
Chapter 8. Customizing the Universal Access Responsive Web Application
221
Unlink service
The unlink service is an inbound web service invoked by remote systems on IBM Cúram Universal Access.
The unlink service is used to unlink a Citizen Workspace Account from a remote system.
After executing this service it will not be possible for the user of the unlinked account to submit life events
to this remote system, for example. The schema for the payload of web service requests of this type can
be found in
<CURAM_DIR>\EJBServer\components\WorkspaceServices\webservices\ExternalAccountU
nlink.xsd. See the sample SOAP request for this web service.
This web service request contains the following information:
• sourceSystem – The name of the remote system sending the request.
• citizenWorkspaceAccountID – The unique ID of the Citizen Workspace Account being unlinked.
On success this operation returns a document indicating that the request has succeeded. On failure, a
fault is raised. Reasons for failure include:
• The indicated account does not exist or is not active.
• The indicated account is not linked to the remote system sending the request.
Citizen message
The citizen message is an inbound web service invoked by remote systems on IBM Cúram Universal
Access. The citizen message is used to send Citizen Messages that are displayed on a user's Home Page
when they log in to the Citizen Account.
The schema for the payload of web service requests of this type can be found in
<CURAM_DIR>\EJBServer\components\WorkspaceServices\webservices\ExternalCitizenM
essage.xsd. See the sample SOAP request for this web service.
This web service request contains the following information:
• sourceSystem – The name of the remote system sending the request.
• citizenWorkspaceAccountID – The unique citizen workspace account id.
• cityIndustryType – Denotes the type of industry associated with the message. The values for this
element must match codes from the CityIndustry code table.
• relatedID – Refers to the id of an underlying entity in the remote system to which the message refers.
For example, if the message concerns a payment then the related ID identies the ID of the payment
within the remote system.
• externalCitizenMessageType – The external citizen message type, taken from the
ExternalCitizenMessageType codetable.
• messageTitle – The title of the message. It is the responsibility of the remote system to localize this to
the locale of the end user.
• messageBody – The body of the message. It is the responsibility of the remote system to localize this to
the locale of the end user.
• effectiveDate – Optional. The date from which the message is effective. It will only be displayed from
this date onwards. The date must be in the format – "YYYY-MM-DD". If an effective date is not provided
then the current date is taken as the effective date.
• expiryDate – The date that the message is set to expire. Following this date, the message will not be
displayed to the user. The date must be in the format – "YYYY-MM-DD".
• priority – A boolean value to indicate whether this message is a high priority.
Some messages are designed such that a newer message can replace an older one. For example, a
message is sent concerning a meeting. The time of the meeting changes and a new message is sent with
the updated time for the meeting. The citizen does not see both messages, rather the second message
replaces the rst and only the second message is seen. One external message will automatically replace
222
IBM Cúram Social Program Management 8.0.2: IBM Universal Access Responsive Web Application 5.2.0
another external message if the following elds match those of an existing message: sourceSystem,
externalCitizenMessageType and relatedID.
Payment service
The payment service is an inbound web service invoked by remote systems on IBM Cúram Universal
Access. The payment service is used to transmit information about one or more payments.
The schema for the payload of web service requests of this type can be found in
<CURAM_DIR>\EJBServer\components\WorkspaceServices\webservices\ExternalPayment.
xsd. See the sample SOAP request for this web service.
This web service request can contain one or more Payments. This allows the remote system to batch
up payments and send them as a single request for performance reasons. Each payment can relate to
an entirely separate citizen account. A single payment may contain a payment breakdown. A payment
breakdown may contain one or more payment line items.
A single payment contains the following information:
• paymentID – Together with the source system, this uniquely identies a payment.
• sourceSystem – The name of the remote system sending the request. Must match the name of a remote
system congured in the system.
• citizenWorkspaceAccountID – The unique citizen workspace account id.
• cityIndustryType – Denotes the type of industry associated with the payment. The values for this
element must match codes from the CityIndustry code table. Optional.
• paymentAmount – The headline value for the payment as a whole. This payment may optionally be
further broken into a number of line items.
• currency – The currency in which the payment was made, contains values from the Currency code table.
Optional.
• paymentMethod – The method by which the payment was made, contains values from the
MethodOfDelivery code table.
• paymentStatus – The status of the payment, for example cancelled, processed, suspended etc.
Contains values from PmtReconciliationStatus code table.
• effectiveDate – The effective date of the payment in the format "YYYY-MM-DD".
• coverPeriodFrom – The start date of the period covered by this payment. In the format "YYYY-MM-DD".
• coverPeriodTo – The end date of the period covered by this payment. In the format "YYYY-MM-DD".
• dueDate – The date that the payment was due to be paid. In the format "YYYY-MM-DD".
• payeeName – The name of the payee for this payment.
• payeeAddress – The address that the payment was sent to (in the case of a cheque). Optional.
• paymentReferenceNo – Uniquely identies a payment within a given remote system.
• bankSortCode - The sort code of the bank account to which this payment is delivered.
• bankAccountNo – The bank account number to which payment is made.
• A payment may contain a Payment Breakdown (optional).
A Payment Breakdown contains one or more Payment Line Items. A Payment Line Item contains the
following information:
• caseName – The human readable name of the case on the remote system with which this payment is
associated.
• The case name must be localised to the locale of the citizen. This case name must match the case name
displayed on the Contact Information page.
• caseReference – This uniquely identies the case on a given remote system.
• componentType – This contains a code from the FinComponentType code table.
• debitAmount – The amount debited if this payment was a debit.
Chapter 8. Customizing the Universal Access Responsive Web Application
223
• creditAmount – The amount credited if this payment was a credit.
• coverPeriodFrom - The start date of the period covered by this payment. In the format "YYYY-MM-DD".
• coverPeriodTo – The end date of the period covered by this payment. In the format "YYYY-MM-DD".
It is important to note that payments can supersede previously submitted payments. For example, a
payment is submitted from TestSystem with paymentID 1234. Subsequently another payment arrives
from TestSystem with the same paymentID, 1234. This payment replaces the previous payment. The
previous payment is physically removed along with all its related payment line items. A typical example of
where this might occur is when a previously issued payment is cancelled.
Contact service
The contact service is an inbound web service invoked by remote systems on IBM Cúram Universal
Access. The contact service is used to update a register of caseworker contact details relating to a remote
system.
The schema for the payload of web service requests of this type can be found in
<CURAM_DIR>\EJBServer\components\WorkspaceServices\webservices\ExternalContact.
xsd. See the sample SOAP request for this web service.
A contact web service request contains the following information:
• sourceSystem – The name of the remote system sending the request. Must match the name of a remote
system congured in the system.
• contactReference – A reference for the contact, unique within the source remote system.
• fullName – The full name of the caseworker.
• phoneNumber – The phone number of the caseworker. Optional.
• mobilePhoneNumber – The mobile/cell phone number of the caseworker. Optional.
• faxNumber – The fax number for the caseworker. Optional.
• email – The email address of the caseworker. Optional.
If a request is received with the same source system and contact reference as a preexisting entry then the
information in the newer request supersedes the preexisting information.
Case service
The case service is an inbound web service invoked by remote systems on IBM Cúram Universal Access.
The case service is used to update details of cases associated with a particular Citizen Account.
The schema for the payload of web service requests of this type can be found in
<CURAM_DIR>\EJBServer\components\WorkspaceServices\webservices\ExternalCase.xsd
. See the sample SOAP request for this web service.
A web service request of this type contains the following information:
• sourceSystem – The name of the remote system sending the request. Must match the name of a remote
system congured in the system.
• contactReference – A reference for the contact, unique within the source remote system, this must
match a contact reference previously transmitted via a Contact Service request.
• caseReference – This is a case reference and must be unique within the remote system that is the
source of this request.
• caseName - The human readable name of the case on the remote system. The case name must be
localized to the locale of the client. Case names used in the Payment web service should match case
names provided in this request.
• citizenWorkspaceAccountID – The unique citizen workspace account id.
If a request is received with the same source system and case reference as a preexisting entry then the
information in the newer request supersedes the preexisting information.
224
IBM Cúram Social Program Management 8.0.2: IBM Universal Access Responsive Web Application 5.2.0
Sample SOAP requests
Use the sample SOAP requests to help you develop real SOAP requests.
Intake program application update
Sample intake program application update SOAP request.
<soapenv:Envelope xmlns:soapenv="http://schemas.xmlsoap.org/soap/
envelope/" xmlns:rem="http://remote.externalservices.workspaceservices
.curam" xmlns:xsd="http://dom.w3c.org/xsd">
<soapenv:Header>
<curam:Credentials xmlns:curam="http://www.curamsoftware.com">
<Username>userforpeersystem</Username>
<Password>password</Password>
</curam:Credentials>
</soapenv:Header>
<soapenv:Body>
<rem:updateIntakeProgramApplication>
<rem:xmlMessage>
<intakeProgramApplicationUpdate>
<applicationReference>256</applicationReference>
<applicationProgramReference>joannesprogram
</applicationProgramReference>
<programApplicationStatus>IPAS1004</programApplicationStatus>
<programApplicationDisposedDateTime>
20120528 17:19:47
</programApplicationDisposedDateTime>
<programApplicationDenialReason>IPADR1001
</programApplicationDenialReason>
</intakeProgramApplicationUpdate>
</rem:xmlMessage>
</rem:updateIntakeProgramApplication>
</soapenv:Body>
</soapenv:Envelope>
Withdrawal request update
Sample withdrawal request update SOAP request.
<?xml version="1.0" encoding="UTF-8"?>
<table name="SEARCHSERVICEFIELD">
<column name="
searchServiceFieldId
" type="text" />
<column name="
searchServiceId
" type="text" />
<column name="
name
" type="text" />
<column name="
indexed
" type="bool" />
<column name="
type
" type="text" />
<column name="
stored
" type="bool" />
<column name="
entityName
" type="text" />
<column name="
analyzerName
" type="text" />
<column name="
untokenized
" type="bool" />
<row>
<attribute name="searchServiceFieldId">
<value>
field0
</value>
</attribute>
Chapter 8. Customizing the Universal Access Responsive Web Application
225
<attribute name="searchServiceId">
<value>
PersonSearch
</value>
</attribute><attribute name="name">
<value>
primaryAlternateID
</value>
</attribute><attribute name="indexed"> <soapenv:Envelope
xmlns:soapenv="http://schemas.xmlsoap.org/soap/envelope/"
xmlns:rem="http://remote.externalservices.workspaceservices.curam"
xmlns:xsd="http://dom.w3c.org/xsd">
<soapenv:Header>
<curam:Credentials xmlns:curam="http://www.curamsoftware.com">
<Username>userforpeersystem</Username>
<Password>password</Password>
</curam:Credentials>
</soapenv:Header>
<soapenv:Body>
<rem:updateWithdrawalRequest>
<rem:xmlMessage>
<withdrawalRequestUpdate>
<curamReferenceID>-6897262829317914624</curamReferenceID>
<withdrawalRequestStatus>WREQ1002</withdrawalRequestStatus>
<resolvedDateTime>20120525 11:30:50</resolvedDateTime>
</withdrawalRequestUpdate>
</rem:xmlMessage>
</rem:updateWithdrawalRequest>
</soapenv:Body>
</soapenv:Envelope>
Create account
Sample create account SOAP request.
<soapenv:Envelope xmlns:soapenv="http://schemas.xmlsoap.org/soap/
envelope/" xmlns:rem="http://remote.externalservices.workspaceservices.
curam" xmlns:xsd="http://dom.w3c.org/xsd">
<soapenv:Header>
<curam:Credentials xmlns:curam="http://www.curamsoftware.com">
<Username>admin</Username>
<Password>password</Password>
</curam:Credentials>
</soapenv:Header>
<soapenv:Body>
<rem:createAccount>
<!--Optional:-->
<rem:xmlMessage>
<!--Optional:-->
<cre:AccountCreate xmlns:cre="http://www.curamsoftware.com/
WorkspaceServices/ExternalAccountCreate">
<firstName>John</firstName>
<middleName>M</middleName>
<surname>Doe</surname>
<username>johnmdoe</username>
<password>password1</password>
<confirmPassword>password1</confirmPassword>
<secretQuestionType>SQT1</secretQuestionType>
<answer>mypassword1</answer>
<termsAndConditionsAccepted>true</termsAndConditionsAccepted>
<intakeApplicationReference>256</intakeApplicationReference>
<clientIDOnRemoteSystem>112233445566</clientIDOnRemoteSystem>
<sourceSystem>TestSystem</sourceSystem>
</cre:AccountCreate>
</rem:xmlMessage>
</rem:createAccount>
</soapenv:Body>
</soapenv:Envelope>
Account link
Sample account link SOAP request.
<soapenv:Envelope xmlns:soapenv="http://schemas.xmlsoap.org/soap/
envelope/" xmlns:rem="http://remote.externalservices.workspaceservices.
curam" xmlns:xsd="http://dom.w3c.org/xsd">
<soapenv:Header>
<curam:Credentials xmlns:curam="http://www.curamsoftware.com">
<Username>admin</Username>
<Password>password</Password>
226
IBM Cúram Social Program Management 8.0.2: IBM Universal Access Responsive Web Application 5.2.0
</curam:Credentials>
</soapenv:Header>
<soapenv:Body>
<rem:linkTargetSystemToAccount>
<rem:xmlMessage>
<lnk:AccountLink xmlns:lnk="http://www.curamsoftware.com/
WorkspaceServices/ExternalAccountLink">
<sourceSystem>TestSystem</sourceSystem>
<citizenWorkspaceAccountID>7081910414040104960
</citizenWorkspaceAccountID>
<clientIDOnRemoteSystem>112233445566</clientIDOnRemoteSystem>
<createdByUsername>testuser</createdByUsername>
</lnk:AccountLink>
</rem:xmlMessage>
</rem:linkTargetSystemToAccount>
</soapenv:Body>
</soapenv:Envelope>
Account unlink
Sample account unlink SOAP request.
<soapenv:Envelope xmlns:soapenv="http://schemas.xmlsoap.org/soap/
envelope/" xmlns:rem="http://remote.externalservices.workspaceservices.
curam" xmlns:xsd="http://dom.w3c.org/xsd">
<soapenv:Header>
<curam:Credentials xmlns:curam="http://www.curamsoftware.com">
<Username>admin</Username>
<Password>password</Password>
</curam:Credentials>
</soapenv:Header>
<soapenv:Body>
<rem:unlinkTargetSystemFromAccount>
<!--Optional:-->
<rem:xmlMessage>
<unl:AccountUnlink xmlns:unl="http://www.curamsoftware.com/
WorkspaceServices/ExternalAccountUnlink">
<sourceSystem>TestSystem</sourceSystem>
<citizenWorkspaceAccountID>7081910414040104960
</citizenWorkspaceAccountID>
</unl:AccountUnlink>
</rem:xmlMessage>
</rem:unlinkTargetSystemFromAccount>
</soapenv:Body>
</soapenv:Envelope>
Citizen message
Sample citizen message SOAP request.
<soapenv:Envelope xmlns:soapenv="http://schemas.xmlsoap.org/soap/
envelope/" xmlns:rem="http://remote.externalservices.workspaceservices.
curam" xmlns:xsd="http://dom.w3c.org/xsd">
<soapenv:Header>
<curam:Credentials xmlns:curam="http://www.curamsoftware.com">
<Username>admin</Username>
<Password>password</Password>
</curam:Credentials>
</soapenv:Header>
<soapenv:Body>
<rem:createMessage>
<rem:xmlMessage>
<cm:CitizenMessage xmlns:cm="http://www.curamsoftware.com/
WorkspaceServices/ExternalCitizenMessage">
<sourceSystem>TestSystem</sourceSystem>
<cityIndustryType>CMI9001</cityIndustryType>
<citizenWorkspaceAccountID>7081910414040104960
</citizenWorkspaceAccountID>
<relatedID>6060</relatedID>
<externalCitizenMessageType>PMT2004</externalCitizenMessageType>
<messageTitle>Hello, World!</messageTitle>
<messageBody>This is the body of the message.</messageBody>
<effectiveDate>2000-01-01</effectiveDate>
<expiryDate>2020-01-01</expiryDate>
<priority>false</priority>
</cm:CitizenMessage>
</rem:xmlMessage>
</rem:createMessage>
Chapter 8. Customizing the Universal Access Responsive Web Application
227
</soapenv:Body>
</soapenv:Envelope>
Payment (simple)
Sample payment (simple) SOAP request.
<soapenv:Envelope xmlns:soapenv="http://schemas.xmlsoap.org/soap/
envelope/" xmlns:rem="http://remote.externalservices.workspaceservices.
curam" xmlns:xsd="http://dom.w3c.org/xsd">
<soapenv:Header>
<curam:Credentials xmlns:curam="http://www.curamsoftware.com">
<Username>admin</Username>
<Password>password</Password>
</curam:Credentials>
</soapenv:Header>
<soapenv:Body>
<rem:create>
<rem:xmlMessage>
<tns:Payment xmlns:tns="http://www.curamsoftware.com/
WorkspaceServices/ExternalPayment">
<paymentID>1554</paymentID>
<sourceSystem>TestSystem</sourceSystem>
<cityIndustryType>CMI9001</cityIndustryType>
<citizenWorkspaceAccountID>7081910414040104960
</citizenWorkspaceAccountID>
<paymentAmount>50.00</paymentAmount>
<currency>EUR</currency>
<paymentMethod>CHQ</paymentMethod>
<paymentStatus>PRO</paymentStatus>
<effectiveDate>2012-01-01</effectiveDate>
<coverPeriodFrom>2012-01-01</coverPeriodFrom>
<coverPeriodTo>2012-01-01</coverPeriodTo>
<dueDate>2012-01-01</dueDate>
<payeeName>Dorothy</payeeName>
<payeeAddress>12 Gloster St., WA 6008</payeeAddress>
<paymentReferenceNo>F</paymentReferenceNo>
<bankSortCode>933384</bankSortCode>
<bankAccountNo>88776655</bankAccountNo>
<PaymentBreakdown>
<PaymentLineItem>
<caseName>I</caseName>
<caseReferenceNo>J</caseReferenceNo>
<componentType>C10</componentType>
<debitAmount>22.45</debitAmount>
<creditAmount>50.76</creditAmount>
<coverPeriodFrom>2012-01-01</coverPeriodFrom>
<coverPeriodTo>2012-01-01</coverPeriodTo>
</PaymentLineItem>
</PaymentBreakdown>
</tns:Payment>
</rem:xmlMessage>
</rem:create>
</soapenv:Body>
</soapenv:Envelope>
Payment (batched)
Sample payment (batched) SOAP request.
<soapenv:Envelope xmlns:soapenv="http://schemas.xmlsoap.org/soap/
envelope/" xmlns:rem="http://remote.externalservices.workspaceservices.
curam" xmlns:xsd="http://dom.w3c.org/xsd">
<soapenv:Header>
<curam:Credentials xmlns:curam="http://www.curamsoftware.com">
<Username>admin</Username>
<Password>password</Password>
</curam:Credentials>
</soapenv:Header>
<soapenv:Body>
<rem:create>
<rem:xmlMessage>
<tns:Payments xmlns:tns="http://www.curamsoftware.com/
WorkspaceServices/ExternalPayment">
<Payment>
<paymentID>2346</paymentID>
<sourceSystem>TestSystem</sourceSystem>
<cityIndustryType>CMI9001</cityIndustryType>
<citizenWorkspaceAccountID>8306889512684879872
</citizenWorkspaceAccountID>
228
IBM Cúram Social Program Management 8.0.2: IBM Universal Access Responsive Web Application 5.2.0
<paymentAmount>48.00</paymentAmount>
<currency>EUR</currency>
<paymentMethod>CHQ</paymentMethod>
<paymentStatus>PRO</paymentStatus>
<effectiveDate>2012-01-01</effectiveDate>
<coverPeriodFrom>2012-01-01</coverPeriodFrom>
<coverPeriodTo>2012-01-01</coverPeriodTo>
<dueDate>2012-01-01</dueDate>
<payeeName>D</payeeName>
<payeeAddress>E</payeeAddress>
<paymentReferenceNo>F</paymentReferenceNo>
<bankSortCode>G</bankSortCode>
<bankAccountNo>H</bankAccountNo>
<PaymentBreakdown>
<PaymentLineItem>
<caseName>I</caseName>
<caseReferenceNo>J</caseReferenceNo>
<componentType>C24000</componentType>
<debitAmount>22.45</debitAmount>
<creditAmount>49.76</creditAmount>
<coverPeriodFrom>2012-01-01</coverPeriodFrom>
<coverPeriodTo>2012-01-01</coverPeriodTo>
</PaymentLineItem>
<PaymentLineItem>
<caseName>I</caseName>
<caseReferenceNo>J</caseReferenceNo>
<componentType>C24000</componentType>
<debitAmount>22.45</debitAmount>
<creditAmount>49.76</creditAmount>
<coverPeriodFrom>2012-01-01</coverPeriodFrom>
<coverPeriodTo>2012-01-01</coverPeriodTo>
</PaymentLineItem>
</PaymentBreakdown>
</Payment>
</tns:Payments>
</rem:xmlMessage>
</rem:create>
</soapenv:Body>
</soapenv:Envelope>
Contact
Sample contact SOAP request.
<soapenv:Envelope xmlns:soapenv="http://schemas.xmlsoap.org/soap/
envelope/" xmlns:rem="http://remote.externalservices.workspaceservices.
curam" xmlns:xsd="http://dom.w3c.org/xsd">
<soapenv:Header>
<curam:Credentials xmlns:curam="http://www.curamsoftware.com">
<Username>admin</Username>
<Password>password</Password>
</curam:Credentials>
</soapenv:Header>
<soapenv:Body>
<rem:updateExternalContact>
<rem:xmlMessage>
<con:ContactInfo xmlns:con="http://www.curamsoftware.com/
WorkspaceServices/ExternalContact">
<sourceSystem>TestSystem</sourceSystem>
<contactReference>CON_100</contactReference>
<fullName>Harry Neilan</fullName>
<phoneNumber>1-800-CALL-ME</phoneNumber>
<mobilePhoneNumber>1-800-CALL-MOB</mobilePhoneNumber>
<faxNumber>1-800-CALL-FAX</faxNumber>
<email>[email protected]</email>
</con:ContactInfo>
</rem:xmlMessage>
</rem:updateExternalContact>
</soapenv:Body>
</soapenv:Envelope>
Cases
Sample cases SOAP request.
<soapenv:Envelope xmlns:soapenv="http://schemas.xmlsoap.org/soap/
envelope/" xmlns:rem="http://remote.externalservices.workspaceservices.
curam" xmlns:xsd="http://dom.w3c.org/xsd">
<soapenv:Header>
<curam:Credentials xmlns:curam="http://www.curamsoftware.com">
Chapter 8. Customizing the Universal Access Responsive Web Application
229

<Username>admin</Username>
<Password>password</Password>
</curam:Credentials>
</soapenv:Header>
<soapenv:Body>
<rem:updateExternalCase>
<rem:xmlMessage>
<cas:CaseInfo xmlns:cas="http://www.curamsoftware.com/
WorkspaceServices/ExternalCase">
<sourceSystem>TestSystem</sourceSystem>
<contactReference>CON_100</contactReference>
<caseReference>CAS_109</caseReference>
<caseName>My Benefit Case - 103</caseName>
<citizenWorkspaceAccountID>8306889512684879872
</citizenWorkspaceAccountID>
</cas:CaseInfo>
</rem:xmlMessage>
</rem:updateExternalCase>
</soapenv:Body>
</soapenv:Envelope>
Customizing appeals
You can customize appeals to suit your organization. You can integrate with an appeals system of your
choice. If you are licensed for the IBM Cúram Appeals application module, the IBM Cúram Social Program
Management appeals functionality is available on installation.
About this task
You can customize the following aspect of appeals:
• The Your rights to appeal content text on the dashboard.
• The Your appeals page. The Appeals page is shown only when a citizen has a case to appeal, otherwise
it is not displayed.
• The Request an Appeal Overview page, from which you can start the Request an Appeal form.
• The Request an Appeal IEG script, in which you specify the contents of the form.
• The Conrmation and next steps page.
• The Appeal cards on the Appeals home page, which contain information about each appeal request
that a user creates. Each card shows the status of the appeal request in a colored badge, with text
such as Appeal Request Submitted or Appeal Request Pending. The color depends on the status. For
example, Appeal Request Submitted is blue. You can customize the label text.
Procedure
1. The Appeals feature is unavailable by default. Enable Appeals in the application, see “Enabling and
disabling appeals” on page 231.
2. Review the text on application pages. For more information about modifying text on pages, see
“Changing text in the application” on page 87
.
3. Review the Request an Appeal form. For more information, see “Conguring appeal requests” on page
183.
4. Review the Appeal Request cards on the Your appeals page, which show the appeals status. For more
information about customizing the appeals statuses, see “Customizing appeal request statuses” on
page 239.
Related concepts
Appeal
If your organization includes appeals in their business process, citizens can appeal decisions on their
benets online from their citizen accounts on their own devices. If your organization uses the IBM Cúram
230
IBM Cúram Social Program Management 8.0.2: IBM Universal Access Responsive Web Application 5.2.0

Appeals application module, your organization can process appeals through the full appeals life cycle that
is provided by that solution.
Enabling and disabling appeals
The Appeals feature is disabled by default. Use the REACT_APP_FEATURE_APPEALS_ENABLED
environment variable to enable or disable the Appeals pages and options in your application. When you
enable Appeals, it is available only to linked users with an existing case that they can appeal.
About this task
For more information about linked users, see “User account types” on page 148
.
The following Appeals functionality can be enabled or disabled:
• The Appeals tab on the home page.
• The Appeals Request page.
• Your rights of appeal message on the home page.
• Appeals-related URLs, for example /appeals.
Procedure
1. Edit the .env le in the root of your application.
2. Set REACT_APP_FEATURE_APPEALS_ENABLED to true or false. If you don't dene the environment
variable, the appeals feature defaults to enabled.
Customizing the citizen account
Users can use the citizen account to log in to a secure area where users can screen and apply for
programs.
Users also use the citizen account to view information relevant to them, including individually tailored
messages, system-wide announcements, updates on their payments, contact information for agency staff
and outreach campaigns that might be relevant to them. The citizen account also provides a framework
for customers to build their own pages or override the existing pages.
Related concepts
Track
When citizens create a secure citizen account, they can access a range of relevant information. Citizens
can also use the citizen account to track and manage their interactions with the agency.
Messages
When a linked citizen logs in, messages are gathered from the system and from remote systems for
display.
The curam.citizenmessages.impl.CitizenMessageController API gathers and displays
messages. The API reads persisted messages by participant from the ParticipantMessage database
table. The API also raises the CitizenMessagesEvent.userRequestsMessages event, inviting
listeners to add messages to a list that is passed as part of the event parameter. The messages that
are gathered from each source are sorted, turned into XML, and returned to the citizen for display.
Conguring citizen messages
Global congurations are included that can be specied for Citizen Messages, such as enabling certain
types and conguring their display order. The different types of messages also include their own
Chapter 8. Customizing the Universal Access Responsive Web Application
231

conguration points. Specic information about how to customize the various message types is provided
later.
The textual content of a message type also can be congured. Each message type has a related properties
le that includes the localizable text entries for the various messages displayed for that type. These
properties also include placeholders that are substituted for real values related to the citizen at run time.
The wording of this text can be customized, by inserting a different version of the properties le into the
resource store. The following table denes which properties le need to be changed for each type of
message:
Table 16. Message properties les
Message type Property le name
Payments CitizenMessageMyPayments.properties
Application Acknowledgment CitizenMessageApplicationAcknowledgement.properties
Verications CitizenMessageVerificationMessages.properties
Meetings CitizenMessageMeetingMessages.properties
Referral CitizenMessagesReferral.properties
Service Delivery CitizenMessagesServiceDelivery.properties
You can also remove placeholders (which are populated with live data at run time) from the properties.
However, there is currently no means to add further placeholders to existing messages. A custom type of
message must be implemented in this situation.
Adding a new type of citizen message
Messages are gathered by the controller in two ways: the controller
reads messages that were persisted to the database by using the
curam.citizenmessages.persistence.impl.ParticipantMessage API, and also gathers them
by raising the curam.participantmessages.events.impl.CitizenMessagesEvent
A decision needs to be made regarding whether to 'push' the messages to the database, or else have
them generated dynamically by a listener that listens for the event that is raised when the citizen logs
in. The specic requirements of the message type need to be considered, along with the benets and
drawbacks of each option.
Persisted messages
In this scenario, when something takes place in the system that might be of interest to the citizen, a
message is persisted to the database. For example, when a meeting invitation is created, an event is
red. The initially congured meeting messages function listens for this event. If the meeting invitee is a
participant with a linked account, a message is written to the ParticipantMessage table that informs
the citizen that they are invited to the meeting.
One benet of this approach is that little processing is done when the citizen logs in to see this message:
the message is read from the database and displayed, as opposed to calculation that takes place that
would determine whether the message was required. However, the implementation also needs to handle
any changes to the underlying data that might invalidate or change the message, and take appropriate
action.
For example, the meeting message function also listens for changes to meetings to ensure the meeting
time, location, and similar, are up to date, and to send a new message to the citizen to inform the citizen
that the location or time was changed.
232
IBM Cúram Social Program Management 8.0.2: IBM Universal Access Responsive Web Application 5.2.0
Dynamic messages
These messages are generated when the citizen logs in, by
event listeners that listen for the curam.participantmessages.events.impl.
CitizenMessagesEvent.userRequestsMessages event.
Because the message is generated at runtime, code is not required to manage change over time. The
message is generated based on the data within the system each time the citizen logs in. If some
underlying data changes, the next time the citizen logs in, they will get the correct message.
A drawback to this approach is that signicant processing might be required at run time to generate the
message. Care must be taken to ensure that this processing does not adversely affect the load time of the
Citizen Account dashboard.
Performance considerations must be evaluated against the requirements of the specic message type
and the effort that is required to manage change to the data that the message is related to over time.
For example, the initially congured verication message is dynamic. When a citizen logs in, it checks
to see whether any outstanding verications exist for that citizen. This process is a relatively simple
database read, whereas it would be complicated to listen for various events in the Verication Engine and
ensure that an up-to-date message was stored in the database related to the participants' outstanding
verications. Alternatively, the meeting messages need to inform the citizen of changes to their meetings,
so functionality had to be written to manage changes to the meeting record and its related message over
time.
Implementing a new message type
Organizations can implement a dynamic message or a persisted message.
To implement a new message type, regardless of whether the message is persisted or is generated
dynamically, complete the following steps.
Common tasks
• In the administration system, add an entry to the CT_ParticipantMessageType code table to
represent the new message type.
• Add a DMX entry for the ParticipantMessageCong database table. This entry stores the type and sort
order of the new message type and is used for administration. For example:
<row>
<attribute name="PARTICIPANTMESSAGECONFIGID">
<value>2110</value>
</attribute>
<attribute name="PARTICIPANTMESSAGETYPE">
<value>PMT2001</value>
</attribute>
<attribute name="ENABLEDIND">
<value>1</value>
</attribute>
<attribute name="SORTORDER">
<value>5</value>
</attribute>
<attribute name="VERSIONNO">
<value>1</value>
</attribute>
</row>
• Add a properties le to the App Resource store that contains the text properties and image reference for
the message.
• Add an image for this message type to the resource store.
Implementing a dynamic message
To implement a dynamic style message, an event listener must be implemented to
listen for the CitzenMessagesEvent.userRequestsMessages event. This event argument
contains a reference to the Participant and a list, to which the listener adds
curam.participantmessages.impl.ParticipantMessage Java objects.
Chapter 8. Customizing the Universal Access Responsive Web Application
233

For more information, see the Javadoc API for CitzenMessagesEvent in the
<CURAM_DIR>/EJBServer/components/core/doc directory. For a full explanation, see
the Javadoc API for curam.participantmessages.impl.ParticipantMessage and
curam.participantmessages.impl.ParticipantMessages.
The message text is stored in a properties le in the resource store. A dynamic listener retrieves the
relevant properties from the resource store, and creates the ParticipantMessage object. The message text
for a message can include placeholders. Values for placeholders are added to ParticipantMessage objects
as parameters. The CitizenMessagesController resolves these placeholders, replacing them with the real
values for the participant.
For example, look at this entry from the CitizenMessageMyPayment.properties le:
Message.First.Payment=
Your next payment is due on {Payment.Due.Date}
The actual payment due date of the payment is added to the ParticipantMessage object as a
parameter. The CitizenMessagesController then resolves the placeholders, populating the text with
real values, and then turns the message into XML that is rendered on the citizen account. A public
CitizenMessageController method also exists, which returns all messages for a citizen as a list, see the
Javadoc.
From the curam.participantmessages.impl.ParticipantMessage API:
/**
* Adds a parameter to the map. The paramReference
* should be present in the message title or body so
* it can be replaced by the paramValue before the message
* is displayed.
*
* @param paramReference
* a string place holder that is present in either the
* message title or body. Used to indicate where the value
* parameter should be positioned in a message.
* @param paramValue
* the value to be substituted in place of the place holder
*/
public void addParameter(final String paramReference,
final String paramValue) {
parameters.put(paramReference, paramValue);
}
The call to the method would look like this:
participantMessage.addParameter("Payment.Due.Date", "1/1/2011");
Messages can also include links, which are also resolved at run time. Links can use placeholder values for
the link text. A link is dened in a properties le as shown.
Click {link:here:paymentDetails} to view the payment details.
In this example, here is the text to display, and paymentDetails is the name of the
link to be inserted at that point in the text. For more information, see the Advisor
Developer's Guide. For a dynamic listener to populate this link with a target, it creates a
curam.participantmessages.impl.ParticipantMessageLink object, specifying a target and a
name for the link. The code would look like this example:
ParicipantMessageLink participantMessageLink =
new ParticipantMessageLink(false,
"CitizenAccount_listPayments", "paymentDetails");
participantMessage.addLink(participantMessageLink);
Before the dynamic listener composes the message, it must check to ensure that the
message type in question is enabled. The curam.participantmessages.configuration.
impl.ParticipantMessageConfiguration record for that message type is read, and the
isEnabled method is used to determine whether this message type is enabled. If not, processing stops.
234
IBM Cúram Social Program Management 8.0.2: IBM Universal Access Responsive Web Application 5.2.0
Note: You can separate the code that listens for the event and the code that composes a specic message
to adhere to the philosophy of "doing one thing and doing it well".
Implementing a persisted message
To display a persisted message to the citizen, it must be written to the database with the
curam.citizenmessages.persistence.impl.ParticipantMessage API. Message arguments
are handled by persisting a curam.advisor.impl.Parameter record and associating it
with the ParticipantMessage record. Links are handled by the curam.advisor.impl.Link
API. Parameter names map to placeholders in the message text. Link names relate
to the names of links that are specied in the message text. For more information,
see the Javadoc for curam.citizenmessages.persistence.impl.ParticipantMessage,
curam.advisor.impl.Parameter, and curam.advisor.impl.Link.
An expiry date time must be specied for each ParticipantMessage. After this date time, the message is
no longer be displayed.
Messages can be removed from the database. If a message needs to be replaced with a
modied version, or removed for another reason, use the curam.citizenmessages.persistence.
impl.ParticipantMessage API.
Each message has a related ID and type that is used to track the record that the message is related to.
For example, meeting messages store the Activity ID and a type of Meeting. Messages can be read by
participant, related ID, and type by the ParticipantMessageDAO.
Before it persists the message, the dynamic listener checks to ensure that the
message type in question is enabled. The curam.participantmessages.configuration.
impl.ParticipantMessageConfiguration record for that message type is read, and the
isEnabled method is used to determine whether this message type is enabled. If not, no further
processing occurs.
Customizing specic message types
Organizations can customize the default message to create a referral message or a service delivery
message.
Referral message
This message type creates messages related to referrals. This is a dynamic message. When the citizen
logs in, a message will be created for each referral that exists for the citizen in the system, provided that
referral has a referral date of today or in the future, and provided that a related Service Offering has been
specied for this referral. The properties le
EJBServer\components\CitizenWorkspace\data\initial\blob\prop\CitizenMessageRefe
rral.properties contains the properties for the referral message text, message parameters, links and
images. This properties le is stored in the resource store. This resource is registered under the resource
name CitizenMessageReferral. To change the message text of the message, or to remove
placeholders or change links, a new version of this le must be uploaded into the resource store.
Service delivery message
This message type creates messages related to service deliveries. This is a dynamic message. When the
citizen logs in, a message will be created for each service delivery that exists for the citizen in the system,
provided that service delivery has a status of 'In Progress' or 'Not Started'. The properties le
EJBServer\components\CitizenWorkspace\data\initial\blob\prop\CitizenMessageServ
iceDelivery.properties contains the properties for the service delivery message text, message
parameters, links and images. This properties le is stored in the resource store. This resource is
registered under the resource name CitizenMessageServiceDelivery. To change the message text
of the message, or to remove placeholders or change links, a new version of this le must be uploaded
into the resource store.
Chapter 8. Customizing the Universal Access Responsive Web Application
235
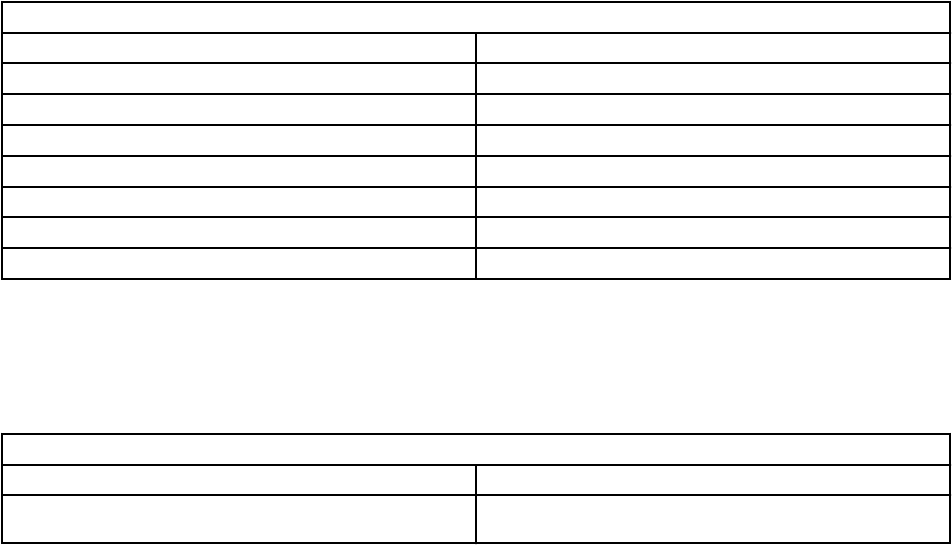
Payment messages
The payment message type creates messages based on the payments that are issued or canceled for a
citizen.
The payment messages are persisted to the database. They replace each other, for example, if a payment
is issued and then canceled, the payment issued message is replaced with a payment canceled message.
The properties le
EJBServer\components\CitizenWorkspace\data\initial\blob\prop\CitizenMessageMyPa
yments.properties contains the properties for nancial message text, message parameters, links, and
images. This properties le is stored in the resource store. This resource is registered in the resource
name CitizenMessageMyPayments. To change the message text of nancial messages, or to remove
placeholders or change links, upload a new version of this le to the resource store. The following table
lists the messages that are created when events that are related to payments occur in the system, and the
related property in CitizenMessageMyPayments.properties.
Table 17. Payment messages and related properties
Payment event Message Property
First payment issued on a case Message.First.Payment
Latest payment issued Message.Payment.Latest
Last payment issued Message.Last.Payment
Payment canceled Message.Cancelled.Payment
Payment reissued Message.Reissue.Payment
Payment stopped (case suspended) Message.Stopped.Payment
Payment / Case unsuspended Message.Unsuspended.Payment
Customization of the payment messages expiry date
You can set the number of days that the payment message is displayed to the citizen with a system
property. By default the property value is set to 10 days, but you can override this default from property
administration.
Table 18. Payment message expiry property
Name Description
curam.citizenaccount.payment.message.expiry.days The number of days that the payment message is displayed to the
participant.
Meeting messages
The meeting message type creates messages based on meetings that citizens are invited to, provided that
they are created by using the curam.meetings.sl.impl.Meeting API.
The API raises events that the meeting messages functionality consumes. There are other ways of
creating Activity records without this API, but meetings created in these ways do not have related
messages created as the events are not raised. These messages are persisted to the database. They
replace each other, for example, if a meeting is scheduled and then the location is changed, the initial
invitation message is replaced with one informing the citizen of the location change. The properties le
EJBServer\components\CitizenWorkspace\data\initial\blob\prop\CitizenMessageMeet
ingMessages.properties contains the properties for the meeting messages text, message
parameters, links and images. This properties le is stored in the resource store. This resource is
registered in the resource name CitizenMessageMeetingMessages. To change the message text of
meeting messages, or to remove placeholders or change links, a new version of this le must be uploaded
into the resource store. Table 1 describes the messages created when various events related to meetings
occur in the system, and the properties in CitizenMessageMeetingMessages.properties that
relates to each message created. Different versions of the message text are displayed depending on
whether the meeting is an all day meeting, whether a location has been specied, and whether the
meeting organizer has contact details registered in the system. Accordingly, the property values in this
236
IBM Cúram Social Program Management 8.0.2: IBM Universal Access Responsive Web Application 5.2.0

table are approximations that relate to a range of properties within the properties le. Refer to the
properties le for a full list of the message properties.
Table 19. Meeting messages
Meeting event Message Properties
Meeting invitation Non.Allday.Meeting.Invitation.*, Allday.Meeting.Invitation.*
Meeting update Non.Allday.Meeting.Update.*, Allday.Meeting.Update.*
Meeting canceled Allday.Meeting.Update.*, Allday.Meeting.Cancellation.*
Customization of the meeting messages display date
The number of days before the meeting start date that the message should be displayed to the citizen can
be congured using a system property. By default the property value is set to 10 days, however, this can
be overridden from property administration.
The meeting message expires ( it is no longer displayed to the citizen) at the end of the meeting, that is,
the date time at which the meeting is scheduled to end.
Table 20. Meeting message display date property
Name Description
curam.citizenaccount.meeting.message.effective.days The number of days before the meeting start date that the message
should be displayed to the citizen.
Application acknowledgment message
The application acknowledgment message type creates a message when an application is submitted by a
citizen.
The message is persisted to the database. The properties le
EJBServer\components\CitizenWorkspace\data\initial\blob\prop\CitizenMessageAppl
icationAcknowledgment.properties contains the properties for the messages text, message
parameters, links and images. This properties le is stored in the resource store. This resource is
registered under the resource name CitizenMessageApplicationAcknowledgment. To change the
message text of the message, or to remove placeholders or change links, a new version of this le must be
uploaded into the resource store.
Customization of application acknowledgment message expiry date
The number of days the Application Acknowledgment message will be displayed to the citizen can be
congured using a system property. By default the property value is set to 10 days, however, this can be
overridden from property administration.
Table 21. Application acknowledgment message expiry property
Name Description
curam.citizenaccount. intake.application.acknowledgement.message.expiry.days The number of days the application acknowledgment
message will be displayed to the participant.
Customizing the Notices page
By default, the notices relevant to the linked user are listed on the Notices page. You can replace the
default CitizenCommunicationsStrategy implementation with your own custom implementation.
For example, you can create a custom implementation to retrieve the communications of all of the
household members of the logged-in citizen, instead of just the citizen.
Create an alternative implementation of the
curam.citizenaccount.impl.CitizenCommunicationsStrategy.listCitizenCommunicatio
ns(ConcernRoleKey) method for listing the citizen communication records.
Chapter 8. Customizing the Universal Access Responsive Web Application
237

In addition, a number of default hooks are available for custom implementations to customize the
behavior of the communication processing module.
Related concepts
The Notices page
When a citizen is logged in, they can see all communications that are relevant to them on the Notices
page, with sent, received, or normal status indicated. Notices are typically formal written communications
that are issued to meet legal, regulatory, or state requirements, which are created by using letterhead
templates.
Communication processing hooks and events
How electronic notices are managed and supported in the Citizen Portal affects the communication
processing module.
While the default implementation doesn’t address or implement any of the impacts, the following default
hooks are available for the custom implementation to customize the communication processing module.
curam.core.hook.impl.PreCreateCommunicationHook - can be used in customized scenarios for any
kind of pre creation processing for communication records.
curam.core.hook.impl.PreModifyCommunicationHook - can be used in customized scenarios for any
kind of pre modify processing for communication records.
For e.g.; in situations where create or modify operation is not applicable, this hook points can be used
to redirect the user with customized messages before the creation or modication of communication
records using custom exception handling.
curam.core.hook.impl.CommunicationInvocationStrategyHook - can be used as a toggle the above
hooks i.e., PreModifyCommunicationHook and PreCreateCommunicationHook should be invoked or not.
The following communication processing methods have been updated by the pre creation and pre
modication hooks that are mentioned above to enable further customization.
• curam.core.facade.impl.Communication.modifyWordDocument(ModifyWordDocumentDetails)
• curam.core.facade.impl.Communication.modifyEmail(ModifyEmailCommDetails,
ModifyEmailCommKey)
• curam.core.facade.impl.Communication.modifyRecordedCommunication1(ModifyRecordedCommKey,
ModifyRecordedCommDetails1)
• curam.core.facade.impl.Communication.modifyProForma1(ModifyProFormaCommDetails1)
• curam.core.facade.impl.Communication.createEmailCommunication(CreateEmailCommDetails)
• curam.core.facade.impl.Communication.createEmail(CreateEmailCommDetails)
• curam.core.facade.impl.Communication.createMSWordCommunication1(CreateMSWordCommunicatio
nDetails1)
• curam.core.facade.impl.Communication.createCaseMSWordCommunication1(CreateMSWordCommunic
ationDetails1)
• curam.core.facade.impl.Communication.createRecordedCommunication1(RecordedCommDetails1)
• curam.core.facade.impl.Communication.createProForma1(CreateProFormaCommDetails1)
• curam.core.facade.impl.Communication.createProFormaCommunication1(CreateProFormaCommDetail
s1)
Communication events
curam.core.events.CONCERNROLEACOMMUNICATION.INSERT_CONCERN_ROLE_COMMUNICATION
curam.core.events.CONCERNROLEACOMMUNICATION.MODIFY_CONCERN_ROLE_COMMUNICATION
These are the events that are raised post-creation or post-modication of a communication record.
Custom implementations can listen to these events for any kind of post processing requirements.
238
IBM Cúram Social Program Management 8.0.2: IBM Universal Access Responsive Web Application 5.2.0

Customizing appeal request statuses
You can create an implementation to enable the display of appeal request status from an external appeals
system in the citizen account by using the provided API.
About this task
The curam.core.onlineappealrequest.impl.OnlineAppealRequestStatus interface takes an appeal request
as an input and passes back a code-table value. You can modify code-table entries as required.
• The appeal status text that you see in the application is hardcoded as <description> tags in two
CT_CitizenAppealRequestStatus.ctx les.
– The EJBServer\components\core\codetable\CT_CitizenAppealRequestStatus.ctx le
contains the code table value for the Appeal Request Submitted status. This is so you can submit an
appeal even if IBM Cúram Appeals is not installed and the Appeals.jar le is not present. You can
modify the description for the Appeal Request Submitted status in this le.
– When IBM Cúram Appeals is installed and the Appeals.jar is present, more appeal status
values are available. You can modify the descriptions for the other code table status values in the
EJBServer\components\Appeal\codetable\CT_CitizenAppealRequestStatus.ctx le.
For information about editing code tables, see Customizing a code table le
.
• The color of each appeal status is set by the Badge component in the Social Program
Management Watson Design System. The AppealRequestsComponent.js le contains a
getBadgeDataByCodetable function. The getBadgeDataByCodetable function is a map of code
tables to badge type. For example, the CARS1001 code table is mapped to the warning badge type
so it is displayed in red. In your Web app development environment, you can see the badge colors
by opening the Web Design System Storybook documentation at @govhhs/govhhs-design-system-
react/doc/index.html and expanding to Components > Badge.
Procedure
1. Identify the appeal request ID from the caseworker application.
2. Use the appeal request ID to associate the appeal request status from the external system with the
appeal request status in IBM Cúram Universal Access.
3. Implement the curam.core.onlineappealrequest.impl.OnlineAppealRequestStatus interface to return
the appropriate code table value based on the OnlineAppealRequest.
For example, a custom implementation of this class might call a remote system and map the return
value to an appropriate code table value.
4. Customize an appeal status message to display in the Citizen Account.
5. If you create a new status, you must map it to a badge type to specify a color to display.
Related tasks
Customizing appeals
You can customize appeals to suit your organization. You can integrate with an appeals system of your
choice. If you are licensed for the IBM Cúram Appeals application module, the IBM Cúram Social Program
Management appeals functionality is available on installation.
Error logging in the citizen account
When a citizen submits an application, when a citizen clicks Submit a deferred process starts. If a
mapping failure occurs, an error is logged.
Application property
The application property curam.workspaceservices.application.processing.logging.on increases the level
of detail of error messages.
Chapter 8. Customizing the Universal Access Responsive Web Application
239

When curam.workspaceservices.application.processing.logging.on is set to true, detailed error messages
are written to the application log les if the submission process fails.
Error codes
Each error message is prepended with an error code. These error codes help to automatically scan
application logs so that unexpected failures can be identied. The error codes that are returned by the
application is dened in the code table le CT_ApplicationProcessingError.ctx.
The range of codes that are reserved for internal processing is APROCER001 – APROCER500. Customers
can use the range APROCER501 – APROCER999 to log errors in custom processing, for example error
codes for extension-mapping handler class.
The list of error codes that are returned by the application, and a brief description of the problem, is listed
in Table 1.
Table 22. Application error codes
Code Description
APROCER001 An error occurred creating a person.
APROCER002 An error occurred creating a prospect person.
APROCER003 A relationship error occurred creating a person.
APROCER004 An error occurred creating a case.
APROCER005 An error occurred while performing a "map-attribute" mapping.
APROCER006 An error occurred while performing a "set-attribute" mapping.
APROCER007 An error occurred while performing a "map-address" mapping.
APROCER008 General mapping failure.
APROCER009 Error creating evidence.
APROCER010 More than one PDF form is registered against the program type.
APROCER011 Error setting the alternate id type for a Prospect Person.
APROCER012 Invalid alternate ID value.
APROCER013 Error the Evidence Application Builder has not been correctly congured.
APROCER014 Evidence type not listed in the Mapping Conguration.
APROCER015 No parent evidence entity found.
APROCER016 An error occurred when trying to unmarshal the application XML.
APROCER017 An error occurred when trying to set a eld value.
APROCER018 An error occurred when trying to create the PDF document.
APROCER019 An error occurred when trying to create the PDF document. A form code
could not be mapped to a codetable description.
APROCER020 An error occurred when trying a WorkspaceServices mapping extension
handler.
APROCER021 Missing source attribute in datastore entity.
APROCER022 An attribute in an expression is not valid.
APROCER023 Application builder conguration error.
APROCER024 Failed creating DataStoreMappingCong, no name specied.
240IBM Cúram Social Program Management 8.0.2: IBM Universal Access Responsive Web Application 5.2.0

Table 22. Application error codes (continued)
Code Description
APROCER025 Failed creating DataStoreMappingCong, the name is not unique.
APROCER026 The mapping to datastore had to be abandoned because the schema is not
registered.
APROCER027 There was a problem parsing the Mapping Specication.
APROCER028 General mapping error. Mapping XML included.
APROCER029 Cannot have multiple primary participants.
APROCER030 No programs have been applied for.
APROCER031 An error occurred while attempting to map to Person data.
APROCER032 An error occurred while attempting to map to Relationship data.
APROCER033 An error occurred while creating Cases.
APROCER034 An error occurred while creating evidence.
APROCER035 No programs have been applied for.
APROCER036 An error occurred reading data from the datastore.
APROCER037 Specied integrated case type does not exist.
APROCER038 Specied case type does not exist
APROCER039 Duplicate SSN entered for prospect person.
APROCER040 Duplicate SSN entered.
APROCER041 There was a problem with the workflow process.
APROCER042 No primary participant has been identied as part of the intake process.
Artifacts with limited customization scope
A description of IBM Cúram Universal Access artifacts that have restrictions on their use. Customers
that want to change these artifacts should consider alternatives or request an enhancement to Universal
Access.
Model
Customers are not supported in making changes to any part of the Universal Access model. Changes in
the model such as changing the data types of domains can cause failure of the Universal Access system
and upgrade issues. This applies to the model les in the following packages:
• WorkspaceServices
• CitizenWorkspace
• CitizenWorkspaceAdmin
Code tables
See Extending code tables for a list of restricted code tables.
Related information
Extending code tables
Chapter 8. Customizing the Universal Access Responsive Web Application
241

Chapter 9. IEG in the Universal Access Responsive
Web Application
Universal Access uses forms to gather information about citizens, such as when they apply for benets.
IBM Universal Access Responsive Web Application forms that gather data as evidence are implemented
in IEG, as in the classic Universal Access citizen application. However, forms are now rendered in the
browser by the IEG React Player, rather than the IEG Java player, and in some cases, the IEG behavior is
different.
Due to the technology and user interface changes, your existing IEG scripts must be tested before use,
and in most cases, at least some minor changes are needed for existing scripts to work in the new
application.
The default connectivity handling in the Universal Access Responsive Web Application helps to prevent
citizens losing data in IEG forms by preventing them from leaving pages with unsaved changes. For more
information about data loss prevention in IEG, see Connectivity handling.
IEG elements and attributes specic to the design system and
Universal Access Responsive Web Application
The following IEG elements and attributes apply to the design system and Universal Access Responsive
Web Application only.
Display elements and attributes
• The combo-box element, which is a child element of the question element.
• The explainer element, which is a child element of the cluster, question-page, and
relationship-page elements.
• The hint-text element, which is a child element of the container, list-question, and
question elements.
• The next-button-label element, which is a child element of the question-page,
relationship-page, and summary-page elements.
• The relationship-detail-header element, which is a child element of the relationship-
summary-list element.
Display element attributes
• The grouping-id attribute of the cluster element.
Meta-display elements
• The class-names element, which is a child element of the layout element.
• The date-picker value for the type child element of the layout element.
For more information about IEG elements, see the IEG script element reference.
IEG conguration not currently supported for the Universal Access
Responsive Web Application
The following IEG conguration is not currently supported by the IBM Social Program Management Design
System or the Universal Access Universal Access Responsive Web Application.
Question matrices
Question matrices display a list of questions that are based on a code table and, for each of the code
table values and each entity, a check box is displayed for you to select the values that apply to a
particular entity.
242
IBM Cúram Social Program Management 8.0.2: IBM Universal Access Responsive Web Application 5.2.0

Three-eld date picker
The three-eld date picker is no longer supported. Dates either default to a single-eld date input
eld or can be congured with a date picker component by using the layout element.
Grouping individual question help at cluster level
Cluster-level help is supported, however, the compile.cluster.help property, which groups the
help text for each of the questions in a cluster into the cluster help panel is not supported.
Display elements and attributes
• The custom-output element, which renders custom HTML on summary pages only.
• The show-page-elements attribute on the edit-link element for editing specic clusters.
• The footer-field element, which displays values that are calculated from expressions in the
footer-row element of a list.
• The footer-row element, which adds an extra row at the end of a list to display total or summary
information.
• The help-text element, which displays help text, is not supported for pages.
• The icon element, which is used to add images to either the title area of a page or the sections
panel.
• The label-alignment element, which is used in the layout element for a cluster to control the
text alignment of the labels in the cluster.
• The label-width element, which is used in the layout element for a cluster to control the width
of the labels in the cluster.
• The num-cols element, which is used in the layout element for a cluster to control the number of
columns in the cluster.
• The type element, which is used in the layout element for a cluster to control the layout of labels
in relation to input controls.
• The width element, which is used in the layout element for a cluster to control the width of the
cluster on the page.
• The legislation element, which creates legislation links at page and question level to point to
relevant legislative information.
• The policy element, which creates policy links at page and question level to point to relevant
policy information
• The skip-field element, which enables a more flexible layout of elements within clusters or
footer rows in lists where no visible display element is needed.
• The row-help element, which species help for rows in a list.
• The set-focus attribute of the question-page element, which sets focus for a page.
Meta-display elements
• The codetable-hierarchy-layout element, which is used in questions with a code table
hierarchy type to control different aspects of the layout.
Structural, administrative, and other elements and attributes
• The hide-for-control-question attribute on the ieg-script element, which hides the label
and value of control questions for loops when the loop is entered.
• The highlight-validation attribute on the ieg-script element. Validations are now always
displayed with the failing input eld.
• The show-progress-bar attribute on the ieg-script element. Progress through sections is now
indicated by text and the section title. For example, STEP 2 OF 4 · HOUSEHOLD.
For more information about IEG elements, see the IEG script element reference
.
Chapter 9. IEG in the Universal Access Responsive Web Application
243

Customizing the Back button in IEG forms
You can customize the behavior of the Back button in IEG forms to suit your applications.
For the best user experience, set the behavior of the Back button in IEG according to whether you have
a single form or multiple forms in your application. Where you have multiple forms, you typically want to
navigate back to the previous form.
• Where you have a single form, always disable the Back button on the rst page
of the IEG form. The Back button goes back one page in the form, not in the
application, so you don't need one on the rst page. For more information about the show-
back-button element, see https://www.ibm.com/support/knowledgecenter/en/SS8S5A_7.0.11/
com.ibm.curam.ieg.doc/AuthoringScriptsUsingIEG/r_AUTHIEG_Elements1Questionpage1.html.
• Typically, an application has multiple forms. By default, a feature with two forms, Apply and Submit
is provided in the universal-access-ui package. The default feature has two instances of
BaseFormContainer, ApplicationFormContainer and SubmissionFormContainer.
By default, the Apply form has the Back button disabled on its rst page.
In Universal Access Responsive Web Application 3.0.4 or later, the Back button of the Submit form goes
to the Apply form in the SubmissionFormContainer component by default.
If you are customizing or overriding SubmissionFormContainer component, or using an earlier
version, you must add some code to the SubmissionFormContainer component to ensure that the
Back button goes to a previous form.
– Add a function to the component logic, for example:
handleBackForFirstPage = () => {
const { history, submissionFormDetails } = this.props;
const { applicationFormId } = submissionFormDetails;
history.push({
pathname: `${PATHS.APPLY}/${applicationFormId}`,
});
};
– Then, inside the render function, pass the function to the BaseFormContainer component by using
the onBackForFirstPage prop, for example:
render() {
const { submissionFormDetails, match } = this.props;
RESTService.handleAPIFailure(this.props.createApplicationUsingFormDetailsError);
RESTService.handleAPIFailure(this.props.createSubmissionFormError);
RESTService.handleAPIFailure(this.props.deleteApplicationFormError);
RESTService.handleAPIFailure(this.props.getSubmissionFormDetailsError);
if (match.params.submissionFormId && submissionFormDetails) {
return (
<BaseFormContainer
iegFormId={match.params.submissionFormId}
iegHookBindingKey={HookBindings.SUBMISSION}
onBackForFirstPage={this.handleBackForFirstPage}
onExit={this.handleExit}
onFinish={this.handleFinishScript}
onSaveAndExit={this.handleSaveAndExit}
title={(submissionFormDetails && submissionFormDetails.applicationTitle) || ''}
/>
);
}
return <AppSpinner />;
}
}
For more information about the onBackForFirstPage property, see “Customizing script behavior with
BaseFormContainer” on page 258.
244
IBM Cúram Social Program Management 8.0.2: IBM Universal Access Responsive Web Application 5.2.0

Conguring section navigation for forms
If you are developing scripts in IEG, you can enable section navigation to guide people through forms.
About this task
You can use section navigation on any forms, but it is particularly useful for longer forms. If you enable
section navigation, it is a good idea to use section summary pages so that users can review their changes
regularly.
Procedure
In your IEG script, add the show-section element to the ieg-script element.
Related information
Controlling the Flow using Sections (Universal Access Responsive Web Application)
Conguring progress information for forms
If you are developing pages in IEG, you can show progress text and the section title so citizens can see
where they are in the script, for example, STEP 2 OF 4 · HOUSEHOLD.
Add the following IEG conguration property to the ieg-config.properties le to congure the text.
The section title is added automatically.
# Text progress bar indicator
progress.bar.indicator.text=Step %1s of %2s
Where %1s is the current step number and the %2s is the total number of steps on the script. The
message is calculated based on the total number of sections and the current section.
The IEGPageMetadata(JSON); component contains all of the metadata for each IEG form. The text
progress indicator is displayed if IEGPageMetadata nds the metadata['ieg-config']['progress-
indicator'] element in the JSON.
Conguring dynamic titles on forms
If you are developing pages in IEG, you can congure the relationship pages with more relevant titles that
are based on the user's responses.
The relationship page title accepts an International Components for Unicode (ICU) message template.
Page titles and subtitles accept a specic formatting syntax based on ICU. It should be used in loops and
will give more context to the users.
These six keywords are dened:
• index
• innerIndex
• outerIndex
• ordinal
• innerOrdinal
• outerOrdinal
You can use index and ordinal in simple non-nested loops. If they are used in a nested loop, it is
synonymous to outerIndex and outerOrdinal.
Refer to these examples.
"Add {ordinal} member" displays Add rst member, Add second member, ...
"Add the {innerOrdinal} income for the {outerOrdinal} member" displays Add the rst
income for the rst member ...
Chapter 9. IEG in the Universal Access Responsive Web Application
245

"{index, select, 0 {Add your {innerOrdinal} income} other {Add %1s's
{innerOrdinal} income}}" displays Add your rst income or Add Jane's rst income depending on
the value of index (this is equal to ordinal - 1).
"Ajouter la {ordinal}#feminine# personne" displays Ajouter la première personne.
"Ajouter la {innerOrdinal}#feminine# recette du {outerOrdinal}#%spellout-
ordinal-masculine# membre" displays Ajouter la première recette du premier membre.
You can dene the title as follows:
{index, select, 0 {Your relationships} other {{personName}'s relationships}}
The outcome of this message template on the rst relationship question page is Your relationships. On
the following relationship question pages, it shows [personName]’s relationships. The reserved word
personName displays the person's rst name on the title of the page.
Conguring rich text on forms
You can congure rich text to display with a number of IEG display elements in IEG forms. You can also
congure external links in rich text to open in a new tab or window.
About this task
Rich text is supported in the following IEG display elements that support text:
• cluster title, help, and description
• container title, help, and description
• display-text
• divider
• list title, help, and description
• question label and help
• subtitle
For more information about IEG elements, see Display elements.
Conguring external links to open in a new tab or window
You can congure external links to open in a new tab or window in IEG forms. By default, links open in the
current tab.
About this task
For security reasons, HTML in rich text is sanitized to remove certain attributes before display, including
the HTML target attribute. You must congure the rich text to leave the target attribute in the sanitized
content so that the link opens in a new tab or window.
For example, the <a href="myurl">my link</a> link in rich text opens in the current tab as
intended. The <a href="myurl" target="_blank">my link</a> link is intended to open in a
separate tab or window. However, because the rich text is sanitized with DOMPurify before display, the
target attribute is removed and the link opens in the current tab by default.
To congure DOMPurify to leave specic attributes, you must add dompurify to the dependencies and
specify a DOMPurify persistent conguration in any JavaScript or JSX code that runs when the app
is loaded. For example, App.js. For more information about DOMPurify, see https://github.com/cure53/
DOMPurify#persistent-conguration.
Only one active conguration at a time is allowed. After you set the conguration, any extra conguration
parameters that are passed to DOMPurify.sanitize are ignored. The DOMPurify conguration persists
until the next call to DOMPurify.setConfig, or until DOMPurify.clearConfig is called to reset it.
246
IBM Cúram Social Program Management 8.0.2: IBM Universal Access Responsive Web Application 5.2.0

Procedure
1. Add dompurify to the dependencies in the package.json le.
npm install dompurify
2. To congure DOMPurify to leave the target attribute, specify the following DOMPurify persistent
conguration in any JavaScript or JSX code that runs when the app is loaded.
import DOMPurify from 'dompurify';
DOMPurify.setConfig({ ADD_ATTR: ['target'] });
Conguring hint text for forms
You can use short sentences of hint text to explain the expected input format or content in IEG forms. For
example, you can explain the expected format for a telephone number.
About this task
Hint text is suitable for short sentences and does not support HTML tags. If you want to add more text or
format text with HTML tags, use the help-text or explainer elements instead. For more information,
see explainer, hint-text, and help-text.
Note: Specic globalization considerations apply to the date format when it is used in hint text and
messages. Ensure that you have the same date format in the REACT_APP_DATE_FORMAT environment
variable, and in theDateAdapter_DateFormat and Errors_date messages in the intelligent-
evidence-gathering-locales package.
Procedure
In your IEG script, you can add the hint-text element to any container, question or list-
question element.
For example:
• Container
<container show-container-help="true">
<title id="primaryPhoneNumber">primaryPhoneNumber</title>
<hint-text id="PhoneNumber.Hint">PhoneNumber.Hint</hint-text>
<help-text id="PhoneNumber.Help">Telephone number must only contain numbers, parentheses,
or dashes and be 10 digits. For example, (212) 555-0010 or 2125550010.</help-text>
<question id="primaryPhoneType" mandatory="true">
<help-text id="PhoneNumber.Help">Telephone number must only contain numbers,
parentheses, or dashes and be 10 digits. For example, (212) 555-0010 or 2125550010.</help-
text>
<label id="PrimaryPhoneType.Label">Primary Phone Type</label>
</question>
</container>
• Question
<question id="firstName" mandatory="true">
<hint-text id="FirstName.Hint">FirstName.Hint</hint-text>
<label id="FirstName.Label">First Name</label>
</question>
• List question
<list-question entity="Person" id="currentlyWorking" mandatory="false">
<label id="CurrentlyWorking.Label">Please select the people that have a job:</label>
<hint-text id="CurrentlyWorking.Hint">CurrentlyWorking.Hint</hint-text>
<item-label>
<label-element attribute-id="firstName" />
</item-label>
</list-question>
Chapter 9. IEG in the Universal Access Responsive Web Application
247

Conguring explainer text for forms
You can use the explainer element to provide extra text in IEG forms that is initially hidden and that
can be expanded to show further explanation. For example, you can provide background information that
a user can choose to expand only if needed.
About this task
You can use the explainer element to provide a large amount of text without cluttering up the form. For
more information, see explainer, hint-text, and help-text.
Procedure
In your IEG script, add the explainer element to any cluster, question-page, or relationship-
page element.
For example:
• cluster
<cluster>
<explainer>
<title id="ExplainerCluster.Title">Why do we ask for your Social Security Number?</
title>
<description id="Explainer.Description">Your Social Security Number ensures that
your application is unique to you and reduces processing time.</description>
</explainer>
<question control-question="false" id="isSSN" mandatory="true" multi-select="false"
show-field-help="false">
<label id="IsSSN.Label">What is your Social Security Number?</label>
</question>
</cluster>
• question-page
<question-page>
<explainer>
<title id="ExplainerSSN.Title">Why do we ask for your Social Security Number?</title>
<description id="ExplainerSSN.Description">Your Social Security Number ensures that your
application is unique to you and reduces processing time.</description>
</explainer>
</question-page>
• relationship-page
<relationship-page>
<explainer>
<title id="ExplainerSSN.Title">Why do we ask for your Social Security Number?</title>
<description id="ExplainerSSN.Description">Your Social Security Number ensures that your
application is unique to you and reduces processing time.</description>
</explainer>
</relationship-page>
Conguring the 'Help' label for forms
You can change or remove the 'Help' label from the help icon for input controls in the application by
overriding the default text. To remove the label, override the default text with a single space character in a
custom messages le.
Procedure
1. Create a src/locale/messages_en.json messages le with a single space character as the value
for the help label message ID, WidgetHelp_helpToggleText.
248
IBM Cúram Social Program Management 8.0.2: IBM Universal Access Responsive Web Application 5.2.0

{
"WidgetHelp_helpToggleText": " "
}
2. Update the src/config/intl.config.js le in the English locale to point to the custom messages
le.
// [...] {
locale: 'en',
displayName: 'English',
localeData: () => {
require('@formatjs/intl-pluralrules/locale-data/en');
require('@formatjs/intl-relativetimeformat/locale-data/en');
},
messages: require('../locale/messages_en'),
},// [...]
3. Rebuild and deploy the application to see your changes.
Related tasks
Changing text in the application
You can change the default text, images, colors, or typography in the application. In this scenario, an
English language message is changed. Text is changed by providing custom text that overrides the default
text for any language.
Conguring required or optional labels for form elds
You can choose whether to indicate the required elds or the optional elds in IEG forms. As the majority
of questions in a typical form should be required, indicating the optional questions rather than the
required questions typically results in a less cluttered form. By default, optional elds are highlighted in
IEG forms.
About this task
By default, elds that are not congured as required in the IEG script are labeled as Optional and
required elds are not labeled. If you choose to indicate required elds instead, elds that are congured
as required in the script are labeled Required and optional elds are not labeled.
Procedure
Show labels for required questions only by adding the REACT_APP_DISPLAY_REQUIRED_LABEL
environment variable to your .env le with a value of true.
For example:
REACT_APP_DISPLAY_REQUIRED_LABEL=true
Conguring input formats and constraints for form elds
You can customize eld inputs and constraints on IEG forms, such as phone numbers, social security
numbers (SSN), dates, currencies, and percentages. You can adjust the width of form elds to match the
length of the expected input, and choose to use a date picker for dates where appropriate.
About this task
Where users need to type condential information, you can obscure the input values to ensure privacy.
This conguration is done in the data store schema by setting a new data type and cannot be used with
masks. Instead of using a mask, you can also implement any extra constraints, such as the number of
characters, in the data store schema by creating a custom domain, see “Conguring inputs to be obscured
for privacy” on page 253.
Masked input elds increase input eld readability by formatting or constraining typed data. You can
apply input masks with the IEG class-names element, which is a child element of the layout
Chapter 9. IEG in the Universal Access Responsive Web Application
249

element. The class-names element adds the content of the element to the HTML that is generated
for the component, this element accepts multiple values that are separated by a space. For more
information about the IEG layout element, see https://www.ibm.com/support/knowledgecenter/en/
SS8S5A_7.0.11/com.ibm.curam.ieg.doc/AuthoringScriptsUsingIEG/r_AUTHIEG_Elements1Layout1.html.
You might need a custom mask that is not supported by the class-names element, such as variants
of the Social Security Number (SSN) or Social Insurance Number (SIN). To create a custom mask, use
the mask-format element, which is a child element of the layout element, to set custom masks with
Cleave.js format.
Input eld masks
If the class name matches any of the reserved input mask class names, that class name is applied
to the HTML control input. If the class name does not match a reserved input mask class name, the
class name is applied to the <div> element that contains the HTML element (cluster, question,
or list-question). You can use the following design system CSS classes as input masks to format
and constrain input values for questions:
• wds-js-input-mask-currency
Masks input for currencies. The character limit is 21 characters. You can also set optional
environmental variables for currency symbols, see “Conguring currency symbols” on page 252.
• wds-js-input-mask-numeral
Masks input for numerical input.
• wds-js-input-mask-yyyy-mm-dd
Masks input for the YYYY-MM-DD date format.
• wds-js-input-mask-percentage
Masks input for percentage characters.
• wds-js-input-mask-phone
Masks input for phone number elds according to the dened locale for the application. Conguring
the phone number input mask requires some additional steps and you can also set optional
environmental variables for delimiters and country codes, see “Conguring phone numbers” on
page 251.
• wds-js-input-mask-postal-code
Masks input for 2 groups of 3 characters that are separated by a space, XXX XXX, such as a
Canadian postal code. Alphabetic characters are converted to uppercase.
• wds-js-input-mask-sin
Masks input for 3 groups of 3 characters that are separated by spaces, XXX XXX XXX, such as a
Canadian Social Insurance Number (SIN).
• wds-js-input-mask-ssn
Masks input for digits that are separated by dashes and grouped as follows, XXX-XX-XXXX, such as a
US social security number (SSN).
• wds-js-input-layout-size--field_size
Adjusts the width of form elds to match the length of the expected input. Where field_size is
one of the following sizes:
x-small
Use for 2 - 3 characters, such as DD, MM, or title.
small
Use for 4 - 6 characters, such as ZIP code, postal code, or CVV number.
medium
Use for around 8 characters, such as SSN or DD/MM/YYYY.
250
IBM Cúram Social Program Management 8.0.2: IBM Universal Access Responsive Web Application 5.2.0

large
Use for around 16 characters, such as credit card numbers.
x-large
Use for around 24 characters, such as email addresses.
Form eld width
To avoid confusion about expected inputs, always match the width of form elds to the expected
input. For example, use a form eld that matches the length of the SSN.
Date picker
For date questions, in addition to the masked input, you can choose to add a date picker for dates
by setting the value of the type child element of the layout element to date-picker. For those
questions, you can then use the calendar or type the date. By default, date questions are displayed
with the masked input eld if no layout type is specied.
Procedure
1. In your IEG script, add the appropriate CSS classes to the layout element for the question. For
example:
<question id="ssn" mandatory="true">
<label id="SSN.Label">SSN</label>
<layout>
<class-names>custom-css-class1 wds-js-input-mask-ssn wds-js-input-layout-size--medium
</class-names>
</layout>
</question>
2. If you want to add a custom mask, use a mask-format element in the layout element. Dene the
mask-format text value by using an XML CDATA section with a JSON object with reference to the
Cleave.js
documentation,
For example,
<layout><mask-format><![CDATA[{ "delimiter": " ", "blocks": [2, 2, 2],
"numericOnly": true }]]></mask-format><layout>
Conguring phone numbers
You can congure an input mask class name to format phone number elds in IEG forms according to the
dened locale for the application. You can also congure a phone number delimiter or a country prex if
needed.
Procedure
1. Add cleave.js as a dependency in your package.json le.
"cleave.js": "<version>"
Where version is the version that you want to use.
2. Import the region-specic .js le in your initializing .js le.
For example:
import 'cleave.js/dist/addons/cleave-phone.[country]';
Where country is the locale that you want to use.
3. Add a REACT_APP_PHONE_MASK_FORMAT environment variable to your .env le.
REACT_APP_PHONE_MASK_FORMAT=[country]
Where country is the locale that you want to use.
4. In your IEG script, add the wds-js-input-mask-phone class name to the question. For example:
Chapter 9. IEG in the Universal Access Responsive Web Application
251

<question id="primaryPhoneNumber" mandatory="true" show-field-help="true">
<layout>
<class-names>wds-js-input-mask-phone</class-names>
</layout> <label id="PrimaryPhoneNumber.Label">Primary Phone Number</label>
</question>
5. Optional: You can set a custom delimiter for phone numbers by adding the
REACT_APP_PHONE_MASK_DELIMITER environment variable to your .env le.
For example, to convert 1 636 5600 5600 to 1-636-5600-5600, set the environment variable as
follows:
REACT_APP_PHONE_MASK_DELIMITER=-
6. Optional: You can set a xed country code for phone numbers by adding the
REACT_APP_PHONE_MASK_LEFT_ADDON environment variable to your .env le.
For example, to convert 1-636-5600-5600 to +1-636-5600-5600, set the environment variable as
follows:
REACT_APP_PHONE_MASK_LEFT_ADDON=+
Conguring date formats
You can congure the date format in IEG forms by setting the REACT_APP_DATE_FORMAT environment
variable.
About this task
By default, the date format is MM/DD/YYYY if you do not set a value for the REACT_APP_DATE_FORMAT
environment variable. If you set an invalid value, the default date format is used.
The valid values are:
dd-mm-yyyy
mm-dd-yyyy
yyyy-mm-dd
Note: Specic globalization considerations apply to the date format when it is used in hint text and
messages. Ensure that you have the same date format in the REACT_APP_DATE_FORMAT environment
variable, and in the DateAdapter_DateFormat and Errors_date messages in the intelligent-
evidence-gathering-locales package.
Procedure
Change the date format by adding the REACT_APP_DATE_FORMAT environment variable to your .env le.
For example, to change the date format to DD/MM/YYYY, set the environment variable as follows:
REACT_APP_DATE_FORMAT=dd-mm-yyyy
Conguring currency symbols
You can congure the currency symbol that is displayed for currency elds in IEG forms. Congure
the REACT_APP_CURRENCY_MASK_ADDON environment variable to specify a currency symbol to display
either before or after the currency amount. The alignment of the currency symbol is based on the locale.
About this task
For more information about how the currency symbol is aligned based on locale, see the
developer.mozilla.org documentation.
The value of the REACT_APP_CURRENCY_MASK_ADDON environment variable takes
precedence over the deprecated REACT_APP_CURRENCY_MASK_LEFT_ADDON and
REACT_APP_CURRENCY_MASK_RIGHT_ADDON environment variables.
252
IBM Cúram Social Program Management 8.0.2: IBM Universal Access Responsive Web Application 5.2.0

Procedure
Use the following option to congure and align the currency symbol based on the locale by conguring the
REACT_APP_CURRENCY_MASK_ADDON environment variable.
• Add the REACT_APP_CURRENCY_MASK_ADDON environment variable to your .env le.
For example, to set the currency symbol to US dollars, enter the following command:
REACT_APP_CURRENCY_MASK_ADDON=$
Use the following deprecated option to explicitly align the currency symbol on either the left side or the
right side.
•
Add a currency symbol for currency elds by adding the REACT_APP_CURRENCY_MASK_LEFT_ADDON
or REACT_APP_CURRENCY_MASK_RIGHT_ADDON environment variables to your .env le.
For example, to set the currency symbol for US dollars, enter the following command to set the
environment variable:
REACT_APP_CURRENCY_MASK_LEFT_ADDON=$
If both environment variables are set, REACT_APP_CURRENCY_MASK_LEFT_ADDON takes precedence.
Conguring inputs to be obscured for privacy
Where users need to type condential information, you can obscure the input values to ensure privacy.
Users can show or hide the text as they type. The user input is obscured when they type the condential
information, such as their Social Security Number (SSN). By default no constraints are applied, but you
can create a custom domain to apply custom constraints where needed. For example, you can restrict the
number of characters.
About this task
You can obscure inputs by setting the data type for a specied attribute of an entity to IEG_OBSCURED
in the data store schema. This conguration cannot be used with masks. Instead of using a mask, you
can also implement any extra constraints, such as the number of characters, in the data store schema by
creating a custom domain.
For more information about data types and IEG
domains, see https://www.ibm.com/support/knowledgecenter/SS8S5A_7.0.11/com.ibm.curam.ieg.doc/
AuthoringScriptsUsingIEG/c_AUTHIEG_Expressions1DataTypesSupportedOperations1.html.
For more information about data store schemas,
see https://www.ibm.com/support/knowledgecenter/en/SS8S5A_7.0.11/com.ibm.curam.ieg.doc/
WorkingWithIntelligentEvidenceGathering/c_WORKIEG_Getting2CreateSchema1.html.
Procedure
1. In the entity, identify the attributes for which you want to obscure the input.
For example, the ssn attribute for the social security number.
2. Edit the data store schema .xsd le for the IEG script and in the entity, change the type of the
attribute to IEG_OBSCURED.
For example,
<xsd:attribute name="ssn" type="IEG_OBSCURED"/>
3. Optional: To apply further input constraints to the eld, create a custom domain.
For example, to constrain the user from typing more than 9 characters in the input eld for an SSN, you
can create a custom domain called SSN_OBSCURED.
a) Create a custom domain like the following domain.
Chapter 9. IEG in the Universal Access Responsive Web Application
253

....
<xsd:include schemaLocation="IEGDomains"/>
<!-- NEW TYPE BEGIN-->
<xsd:simpleType name="SSN_OBSCURED">
<xsd:restriction base="IEG_OBSCURED">
<xsd:minLength value="8"/>
<xsd:maxLength value="9"/>
</xsd:restriction>
</xsd:simpleType>
<!-- NEW TYPE END-->
<xsd:element name="Application">
.....
b) Edit the data store schema .xsd le for the IEG script and change the type of the ssn attribute to
SSN_OBSCURED.
For example,
<xsd:attribute name="ssn" type="SSN_OBSCURED"/>
Conguring code-table hierarchies for form elds
You can use code-table hierarchies to add two related questions in IEG forms. When you answer the rst
question, the second question is enabled.
About this task
Any question where the data type is dened as a code table hierarchy is displayed as two separate
questions in vertically aligned drop-down menus. The rst question menu corresponds to the root code
table in the hierarchy, and displays the label that is specied for the question. The second question menu
corresponds to the second-level code table in the hierarchy, and displays a label that corresponds to
the code table display name. The second menu is disabled until a selection is made in the rst menu.
Summary pages display both questions.
Displaying a code-table hierarchy value in a list, or the codetable-hierarchy-layout options, are not
supported.
Procedure
To ensure that the label is displayed correctly for the second question, you must ensure that, for each
code table name element, there is a corresponding locale element within the displaynames element
in your code-table denition.
For example, see the following code-table denition.
<codetables package="curam.codetable" hierarchy_name="CountyCityHierarchy">
<!-- Parent codetable - County -->
<codetable java_identifier="COUNTYCODE" name="CountyCode">
<displaynames>
<name language="en">County</name>
<locale language="en">County</name>
</displaynames>
<!-- code items... -->
</codetable>
<!-- Child codetable - City -->
<codetable java_identifier="CITYCODE" name="CityCode" parent_codetable="CountyCode">
<displaynames>
<name language="en">City</name>
<locale language="en">City</name>
</displaynames>
<!-- code items... -->
</codetable>
</codetables>
254
IBM Cúram Social Program Management 8.0.2: IBM Universal Access Responsive Web Application 5.2.0

Implementing a combo box for form elds
You can implement a combo box question with an auto-complete search function to help you to complete
form elds in IEG forms as you type. For example, known address elds can be automatically selected
when you enter an address. You can implement the option to add new items if they are not found, for
example, add an address.
About this task
You must implement a search function in the Universal Access Responsive Web Application and register
the search function with IEGRegistry. The search function can point to an internal or external search
service to provide the information. Then, update the datastore schema denition and your IEG script.
Click here for a video presentation that gives an overview of the combo box.
Implementing search functions for ComboBox components
You can implement the ComboBox component to search external data sources as you type in a form eld,
with a built-in lter function. Implement a search function and associated error handling, and make that
search function available to the IEG form. If needed, you can implement an Add New option so that users
can add an item if it is not found.
Procedure
1. Implement the search function. A search function is a JavaScript function that receives one parameter
that contains the value of the ComboBox, and returns an array of items to be displayed by the
ComboBox.
The response of search-function is an array of items, {items}. Each item is an object with the
following structure:
{
id:"key"
value:"value"
item: { "attribute1": "value1", "attribute2": "value2" },
}
Where:
• id is a mandatory attribute to store the ID in the data store.
• value is the value of the question to store in the data store and to render in the list of options of the
ComboBox.
• item is an optional complex object with the structure of the formData to be populated if that
element is selected in the ComboBox component.
The structure of the item object must match the formData of the target entity. The following simple
example populates the ResidentialAddress entity:
{
'street1': 'street1',
'street2': 'street2',
'city': 'city',
'zipCode':' zipCode',
'state': 'state',
}
2. Register the search function with the IEGRegistry object. IEGForm has access to IEGRegistry
and all registered functions. IEGForm reads the custom functions from IEGRegistry and stores
them on its formContext so IEGForm can call custom functions.
a. Implement the JavaScript function in any .js le.
Chapter 9. IEG in the Universal Access Responsive Web Application
255

b. Import IEGRegistry in a JavaScript initial le, such as App.js, and add the custom function to
the registry. For example:
import { IEGRegistry } from '@spm/core';
import { searchCity, customFunction } from './examples/playground/customFunctions';
...
const App = () => {
IEGRegistry.registerComboBoxSearchFunctions({ searchCity, customFunction });
....
};
Add New option
If you want to render an Add New option in the menu that is displayed by the ComboBox, the response of
the JavaScript function must follow the structure:
{
newItem: { id: '-1', label: 'Add New', value: ' ', position: 'top' },
items,
}
Where:
• newItem is a complex object with the denition of the Add New option.
• id is the ID of the new option.
• label is the label of the new option.
• value is the value of the new option.
• position is the position where the new option renders. The possible values are bottom and top.
Error messages
The search function must implement its own logic to handle errors if an error needs to be displayed on the
UI, the response of the search function must be:
{errorMessage: 'Controlled Error Message'}
The error message is displayed underneath the ComboBox.
Conguring combo box scripts and schemas
Add the combo-box element to a question in your IEG script and congure the combo-box element
attributes. Add a cluster after the question to display the information to the user when they select a menu
item. Update the schema denition with the appropriate elements.
About this task
The question schema type must be a string. You cannot use a question with a combo-box child
element as a control question.
You can review the design system usage guidance for the ComboBox component. In your development
environment, open the Social Program Management Design System Storybook documentation at
<path>@govhhs/govhhs-design-system-react/doc/index.html and search for ComboBox.
For more information about the IEG combo-box element, see combo-box.
Procedure
1. Add the combo-box child element to the question element. For example:
<question-page id="AboutTheApplicant_GB" read-only="false" set-focus="false" show-back-
button="false" show-exit-button="true" show-next-button="true" show-person-tabs="false" show-
save-exit-button="true" entity="Person" >
256
IBM Cúram Social Program Management 8.0.2: IBM Universal Access Responsive Web Application 5.2.0

<!-- ComboBox -->
<cluster entity="SearchAddress">
<title id="SearchAddress.Title">Your address</title>
<question id="fullAddress" mandatory="true" show-field-help="false">
<label id="FullAddress.Label">Search for your address</label>
<combo-box key="id" search-function="searchAddress" target-entity="ResidentialAddress"
filter-items="true" />
</question>
</cluster>
</question-page>
Where:
• key is the id to be stored in the data store and renders as a hidden widget on the front end. It is
mandatory and the entity must dene this property in the schema denition. The key schema type
must be a string.
• search-function is the name of the JavaScript search function to be called on each keydown
event.
• target-entity is an optional attribute to show information to the user when they select a combo
box menu item. In target-entity, specify the cluster entity to be populated with the value of the
search-function result item attribute. Update the script to display the cluster entity on the page,
the target entity must be shown on the same page as the combo box. If more than one cluster on the
page is related to the same entity name, the rst cluster that matches the entity attribute value with
the target-entity value is populated.
• filter-items is an optional attribute that, if true, lters the items as you type with the built-in
lter. By default, it is false.
2. Add a cluster to display the target-entity information when a user selects a menu item.
<question-page id="AboutTheApplicant_GB" read-only="false" set-focus="false" show-back-
button="false" show-exit-button="true" show-next-button="true" show-person-tabs="false" show-
save-exit-button="true" entity="Person" >
<!-- ComboBox -->
<cluster entity="SearchAddress">
<title id="SearchAddress.Title">Your address</title>
<question id="fullAddress" mandatory="true" show-field-help="false">
<label id="FullAddress.Label">Search for your address</label>
<combo-box key="id" search-function="searchAddress" target-entity="ResidentialAddress"
filter-items="true" />
</question>
</cluster>
<!-- ComboBox -->
<cluster entity="ResidentialAddress">
<title id="Address.Title">Enter address</title>
<help-text id="ADHelp">You must enter the address in which you physically reside
(residential address).</help-text>
<question control-question="false" id="street1" mandatory="true" multi-
select="false" show-field-help="false">
<label id="Street1.Label">Street 1</label>
</question>
<question control-question="false" id="street2" mandatory="false" multi-
select="false" show-field-help="false">
<label id="Street2.Label">Street 2</label>
</question>
<question control-question="false" id="city" mandatory="false" multi-select="false"
show-field-help="false">
<label id="City.Label">City</label>
</question>
<question control-question="false" id="zipCode" mandatory="false" multi-
select="false" show-field-help="false">
<label id="Zipcode.Label">ZIP code</label>
</question>
</cluster>
</question-page>
3. Edit the schema denition and add an element for the combo box and the target entity, for example:
<!-- ComboBox -->
<xs:element name="SearchAddress">
<xs:complexType>
Chapter 9. IEG in the Universal Access Responsive Web Application
257

<xs:attribute name="id" type="IEG_STRING" />
<xs:attribute name="fullAddress" type="IEG_STRING"/>
</xs:complexType>
</xs:element>
<!-- Target Entity -->
<xs:element name="ResidentialAddress">
<xs:complexType>
<xs:attribute name="street1" type="IEG_STRING"/>
<xs:attribute name="street2" type="IEG_STRING"/>
<xs:attribute name="city" type="IEG_STRING"/>
<xs:attribute name="zipCode" type="IEG_STRING"/>
</xs:complexType>
</xs:element>
2. Associate that new element to a Person entity.
<xs:element name="Person">
<xs:complexType>
<xs:sequence minOccurs="0">
<xs:element ref="SearchAddress" minOccurs="0" maxOccurs="1"/>
<xs:element ref="ResidentialAddress" minOccurs="0" maxOccurs="unbounded"/>
....
</xs:element>
</xs:complexType>
Customizing script behavior with BaseFormContainer
The behavior of scripts in the application is controlled by the BaseFormContainer.js container
component. Each form calls this container component, which controls script behavior such as whether
partial submission is allowed, or where to go on exiting the script. You can customize the behavior for
individual scripts by modifying BaseFormContainer properties.
About this task
The following BaseFormContainer properties are available:
• iegFormId. (Mandatory) This property corresponds to the IEG execution ID that is obtained from one
of the following options:
– An API that starts the script, by creating the execution with the necessary script ID and data store
schema.
– Existing executions that can be resumed.
Note: Later, the ID is used on the server to ensure that the current user matches the user who
is associated with the execution in the CitizenScriptInfo table. The ID also ensures that the
execution is not completed.
• title. (Mandatory) The title to be displayed in the header. You can convert the property by using the
formatMessage for react-intl.
• isLoginOrSignupAllowed. If the property is true when Save and exit is clicked and the user is not
logged in, the log-in screen is displayed. The default value is True.
• isPartialSubmissionAllowed. Species that partially completed scripts can be submitted. The
corresponding option must be added to the header. The default value is False.
• onExit. Species what happens when a user exits the script without saving. By default, it goes to the
home page.
• onFinish. Species what happens when the last page of the script is submitted. By default, it goes to
the home page.
• onPartialSubmission. Species what happens when a partial script is submitted. By default, it
saves the current page and then starts the OnFinish handler.
• onSaveAndExit. Species what happens when a user saves and exits the script. By default, it saves
the current page and determines what page to go to. If the user is not logged in, the log-in page is
displayed. If the user is logged in, the dashboard is displayed.
• onRef. A function that receives the instance of the current BaseFormContainer to provide
access to its dened functions and props. You can use this function to customize the default
258
IBM Cúram Social Program Management 8.0.2: IBM Universal Access Responsive Web Application 5.2.0

BaseFormContainer functions. For an example of using the onRef function to customize the behavior
of Save and exit, see the SampleApplicationFormComponent in the sampleApplication.
• onBackForFirstPage. A function that is called on the back-button click event of the rst page of a
form to redirect back to another form. The function contains the code responsible for the redirection.
For example, you might want to go back to an application script from a submission script to change
something before you submit an application.
Procedure
To modify the behavior for an existing form feature, follow the standard steps in Reusing existing features
.
For example, to customize the form that is loaded from the /eligiblity/form URL, do the following
steps:
1. Find the path variable in the node_modules/@spm/universal-access-ui/routes/Paths.js
le.
For example, search for /eligibilty/form to locate PATHS.ELIGIBILITY.FORM.
2. Search the Routes le for the path variable to nd the location of the feature that it loads.
For example, in the node_modules/@spm/universal-access-ui/src/routes/Routes.js le
search for the PATHS.ELIGIBILITY.FORM path variable that you located in the previous step. The
path variable maps to the feature/Forms/Eligibility location.
3. Copy the source code from the feature folder that you identied in the previous step to your custom
folder.
For example, copy node_modules/@spm/universal-access-ui/src/features/Forms/
Eligibility to the your-custom-app/src/features/Forms/Eligibility folder.
4. Add a route in the your-custom-app/src/routes.js le with the same path as the original
PATHS.ELIGIBILITY.FORM feature.
a) Map the new route to your custom version of the form feature.
5. Update the properties of the form container according to your requirements.
For example, use custom functions to change the behavior of the on-exit and on-nish flows, as shown
in the following code sample:
<BaseFormContainer
iegFormId={formId}
iegHookBindingKey={HookBindings.SCREENING}
onExit={this.myCustomHandleExitForm}
onFinish={this.myCustomHandleFinishForm}
title={myCustomTitle || ''}
/>
Merging clusters with the cluster element grouping-id
attribute
If you are developing pages in IEG, you can merge several clusters on summary pages by using the
cluster element grouping-id attribute. The grouping-id attribute is not supported for standard
IBM Cúram Social Program Management web applications.
Related data elds can be dened within different clusters under the following conditions. You can use
the grouping-id attribute to merge these related data elds into a single cluster on IEG pages.
• Data is dened within different schema entities but a single cluster can be dened for a single entity
only.
• Data is dened within a conditional cluster but it must be included in a non-conditional cluster when the
condition is met.
All clusters with a specic grouping-id attribute are merged into the rst cluster with that grouping-
id attribute. Aside from the questions, the cluster elements are shown as dened by the rst cluster.
Ensure that the other cluster elements in the rst cluster, such as the title or buttons, are suitable for the
merged cluster.
Chapter 9. IEG in the Universal Access Responsive Web Application
259

Where possible, do not have a conditional cluster as the rst cluster if you are merging conditional and
non-conditional clusters. If the rst cluster is conditional and the condition is not met, then the merged
cluster is not displayed. If a conditional cluster must be positioned before non-conditional clusters in
a merged cluster, then add a non-conditional cluster with no questions as the rst cluster with the
grouping-id.
This sample XML snippet merges three clusters into a single cluster with the grouping-id attribute. The
three clusters have data elds from three different entities and the last cluster is conditional.
<cluster entity="ResidentialAddress" grouping-id="100">
<title id="Address.Title">Address</title>
<edit-link
skip-to-summary="false"
start-page="AboutTheApplicant_GB"
/>
<layout>
<type>flow</type>
<num-cols>2</num-cols>
<label-alignment>left</label-alignment>
</layout>
<question
id="street1"
>
<label id="Street1.Label">Street 1:</label>
</question>
...
</cluster>
<cluster entity="Person" grouping-id="100">
<question
id="applyToMailingAddress"
>
<label id="ApplyToMailingAddress.Label">Mail to Same Address?</label>
</question>
</cluster>
<condition expression="Person.applyToMailingAddress=="N2OITYN2"">
<cluster entity="MailingAddress" grouping-id="100">
<question
id="street1"
>
<label id="Street1.Label">Street 1:</label>
</question>
...
</cluster>
Conguring relationship pages questions
If you are developing pages in IEG, you can congure the text of the relationship questions on relationship
pages.
By default, the question label is dynamic, in the rst relationship question page, it renders as “What is
[Name and Age of the Person related] to you?”. On the following relationship question pages, it renders
“What is [Name and Age of the Person related] to [Name and Age of the Person]?
The attribute name for the start date must be startDate.
To show age in the relationship question label, you must populate the date of birth, which is dened as
the dateOfBirth attribute of the Person entity.
You can use the following IEG conguration property to congure the default text.
# relationship question label on relationship page
relationship.question.label={index, select, 0 {What is %2s to you?} other {What is %2s to %1s?}}
The example ICU template does the following:
In the rst iteration:
What is %2s to you?
Where %2s is the related person in the rst iteration.
260
IBM Cúram Social Program Management 8.0.2: IBM Universal Access Responsive Web Application 5.2.0

From the second iteration until the end:
What is %2s to %1s?
Where %1s is the new main person in the iteration and %2s is the related person in the iteration.
Conguring relationship starting dates on relationship summary
pages
If you are developing pages in IEG, you can congure the start date of relationships for relationship
summary pages. For example, Married since Jun 12, 2014.
You can use the following IEG conguration property to congure the default text.
# relationship type and start date label.
relationship.type.date.label=%1s since %2s
Where %1s is the relationship type and %2s is the relationship start date.
Chapter 9. IEG in the Universal Access Responsive Web Application261

Chapter 10. Troubleshooting and support
Use this information to help you to troubleshoot issues with the IBM Cúram Universal Access Responsive
Web Application or IBM Social Program Management Design System.
The IBM Cúram Social Program Management supported assets can be installed, customized, and
deployed separately from IBM Cúram Social Program Management, before being integrated into the
system.
When troubleshooting web applications that are integrated with IBM Cúram Social Program Management,
use this troubleshooting information in conjunction with the troubleshooting information for IBM Cúram
Social Program Management. For more information, see the Troubleshooting and support related link.
Related information
Troubleshooting and support
Examining log les
Log les are a useful resource for troubleshooting problems.
Examining the browser console logs
For JavaScript applications, you can examine the browser console logs for errors that might be relevant to
investigating problems. For the exact details about how to locate the console logs within the browser, see
your browser documentation.
Note: When you are developing applications with the IBM Social Program Management Design System,
console logging information might also be displayed in the console that runs the start process for the
application.
Examining the HTTP Server log les
When you deploy a built application on an HTTP Server, the built application introduces a new point with
which logging is captured in your system topology. The IBM HTTP Server, Oracle HTTP Server, and the
Apache HTTP Server include comprehensive logging system and related information.
For more information about troubleshooting the IBM HTTP Server, see Troubleshooting IBM HTTP Server
.
For more information about troubleshooting the Oracle HTTP Server, see Managing Oracle HTTP Server
Logs.
For more information about troubleshooting the Apache HTTP Server, see Log Files.
Examining the IEG log les
System administrators can enable improved logging by setting the curam.trace system administration
property to trace_on or higher, and you can then check the server logs after you call the datastore
prepopulation feature. You can view detailed logs that are generated during the population of data
during screening, application intake, and life events to better explain what interactions have taken place.
Information is output to the server logs during datastore prepopulation to describe which code path was
taken and why.
The following information is written to the server logs during datastore prepopulation:
• Information about which code path was taken and why.
• The values of the relevant system administration properties.
• The schema names of the relevant IEG scripts.
• The number of records in the ViewProcessor table.
262
IBM Cúram Social Program Management 8.0.2: IBM Universal Access Responsive Web Application 5.2.0

Connect a React development environment to an SPM server
A common troubleshooting technique is to connect your React development environment on
localhost:3000 to an Social Program Management (SPM) deployment, typically a test system
deployment. In this environment, you must complete some extra conguration steps to handle browser
CORS security features.
With this environment, you can debug issues in the React application without having to rebuild an SPM
development environment, which can save time in many scenarios. For example, where replicating the
problem scenario in the development environment is onerous, but you can troubleshoot it on the test
server.
Due to CORS security features built into browsers, you must change the Cross-Site Request Forgery
(CSRF) and session cookies that the React application uses, from the default Samesite=Lax
to Samesite=None. Otherwise, browsers report CORS errors and the React application cannot
communicate with the SPM server.
You can deploy a gateway web server in front of SPM to modify the cookie by using this directive:
Header edit Set-Cookie ^(.*)$ $1;SameSite=None;Secure
For SPM clusters, place this directive in the web servers where SPM applications are mapped.
Citizen Engagement components and licensing
You can use and customize the IBM Universal Access Responsive Web Application for your organization,
or develop your own custom web applications in addition to the standard IBM Cúram Social Program
Management application. Use this information to understand the IBM Cúram Social Program Management
components, supported assets, and licenses that you need.
Installable components
IBM Social Program Management Design System supported asset
The design system provides foundational packages for building accessible and responsive web
applications. It consists of a React UI component library, React development resources, and a style
guide for creating web applications.
IBM Universal Access Responsive Web Application supported asset
The IBM Universal Access Responsive Web Application provides a reference web application, which
you can use and customize for your organization. The IBM Universal Access Responsive Web
Application requires the IBM Social Program Management Design System and the Universal Access
application module.
Universal Access application module
The Universal Access (UA) application module provides the Universal Access administrator application
and the Universal Access REST APIs that expose interfaces to Universal Access functions for
consumption by the IBM Universal Access Responsive Web Application. Universal Access requires
the IBM Cúram Social Program Management Platform.
Licensing Universal Access
You can buy the Universal Access application module, which entitles the IBM Universal Access
Responsive Web Application asset, and IBM Cúram Social Program Management Platform, which entitles
the IBM Social Program Management Design System asset.
Alternatively, you can buy Citizen Engagement, which includes the Universal Access application module,
the IBM Cúram Social Program Management Platform, and both assets.
Chapter 10. Troubleshooting and support
263

Licensing the IBM Social Program Management Design System
To develop custom web applications to complement the IBM Cúram Social Program Management
Platform, you can buy the IBM Cúram Social Program Management Platform, which entitles the IBM
Social Program Management Design System asset.
Citizen Engagement support strategy
The Citizen Engagement assets are typically released monthly, and they can be upgraded independently
of IBM Cúram Social Program Management (SPM) . Each release is a full release and not a delta release.
The assets are supported for the lifetime of the latest supported SPM version available at the time of the
asset release.
• The main asset line is released monthly and contains new features, enhancements, security updates,
defects, and support for the latest SPM version.
• IBM Universal Access Responsive Web Application 2.6 continues to be supported with security updates
and critical defect xes for older compatible SPM versions.
Although new features can be delivered in any asset release, they are typically delivered at the same time
as the Universal Access application module release that contains the new APIs for those features. Where
possible, Universal Access REST API changes are delivered in refresh pack or other impact-free releases
that impose no forced upgrade impact.
Semantic versioning
The assets use semantic versioning
. As a general guideline, this means:
• MAJOR version for incompatible API changes
• MINOR version for adding functionality in a backwards-compatible manner
• PATCH version for backwards-compatible bug xes
Known limitations
Review the known limitations for the Universal Access Responsive Web Application, and, where available,
workaround information.
Landing page error caused by the public messages environment variable not being
correctly disabled
Universal Access Responsive Web Application 5.0.0 fails to load the application landing page when it
is used with either Social Program Management 7.0.10 or 7.0.11. Social Program Management 8.0.0
provides a /ua/public_messages API that displays public messages on the landing page.
The /ua/public_messages API is not available in Social Program Management 7.0.10 or 7.0.11. If you
are using the Universal Access Responsive Web Application 5.0.0 with either Social Program Management
7.0.10 or 7.0.11, you can resolve the issue by disabling the public messages feature. To disable the public
messages feature, congure the following environment variable in your .env le:
REACT_APP_DISABLE_PUBLIC_MESSAGES =true
264
IBM Cúram Social Program Management 8.0.2: IBM Universal Access Responsive Web Application 5.2.0

Notices
This information was developed for products and services offered in the United States.
IBM may not offer the products, services, or features discussed in this document in other countries.
Consult your local IBM representative for information on the products and services currently available in
your area. Any reference to an IBM product, program, or service is not intended to state or imply that
only that IBM product, program, or service may be used. Any functionally equivalent product, program, or
service that does not infringe any IBM intellectual property right may be used instead. However, it is the
user's responsibility to evaluate and verify the operation of any non-IBM product, program, or service.
IBM may have patents or pending patent applications covering subject matter described in this
document. The furnishing of this document does not grant you any license to these patents. You can
send license inquiries, in writing, to:
IBM Director of Licensing IBM Corporation North Castle Drive, MD-NC119 Armonk, NY 10504-1785 US
For license inquiries regarding double-byte character set (DBCS) information, contact the IBM Intellectual
Property Department in your country or send inquiries, in writing, to:
Intellectual Property Licensing Legal and Intellectual Property Law IBM Japan Ltd. 19-21, Nihonbashi-
Hakozakicho, Chuo-ku Tokyo 103-8510, Japan
INTERNATIONAL BUSINESS MACHINES CORPORATION PROVIDES THIS PUBLICATION "AS IS"
WITHOUT WARRANTY OF ANY KIND, EITHER EXPRESS OR IMPLIED, INCLUDING, BUT NOT LIMITED
TO, THE IMPLIED WARRANTIES OF NON-INFRINGEMENT, MERCHANTABILITY OR FITNESS FOR A
PARTICULAR PURPOSE. Some jurisdictions do not allow disclaimer of express or implied warranties in
certain transactions, therefore, this statement may not apply to you.
This information could include technical inaccuracies or typographical errors. Changes are periodically
made to the information herein; these changes will be incorporated in new editions of the publication.
IBM may make improvements and/or changes in the product(s) and/or the program(s) described in this
publication at any time without notice.
Any references in this information to non-IBM websites are provided for convenience only and do not in
any manner serve as an endorsement of those websites. The materials at those websites are not part of
the materials for this IBM product and use of those websites is at your own risk.
IBM may use or distribute any of the information you provide in any way it believes appropriate without
incurring any obligation to you.
Licensees of this program who wish to have information about it for the purpose of enabling: (i) the
exchange of information between independently created programs and other programs (including this
one) and (ii) the mutual use of the information which has been exchanged, should contact:
IBM Director of Licensing IBM Corporation North Castle Drive, MD-NC119 Armonk, NY 10504-1785 US
Such information may be available, subject to appropriate terms and conditions, including in some cases,
payment of a fee.
The licensed program described in this document and all licensed material available for it are provided by
IBM under terms of the IBM Customer Agreement, IBM International Program License Agreement or any
equivalent agreement between us.
The performance data and client examples cited are presented for illustrative purposes only. Actual
performance results may vary depending on specic congurations and operating conditions.
Information concerning non-IBM products was obtained from the suppliers of those products, their
published announcements or other publicly available sources. IBM has not tested those products
and cannot conrm the accuracy of performance, compatibility or any other claims related to non-
IBMproducts. Questions on the capabilities of non-IBM products should be addressed to the suppliers of
those products.
©
Copyright IBM Corp. 2018, 2022 265

Statements regarding IBM's future direction or intent are subject to change or withdrawal without notice,
and represent goals and objectives only.
All IBM prices shown are IBM's suggested retail prices, are current and are subject to change without
notice. Dealer prices may vary.
This information is for planning purposes only. The information herein is subject to change before the
products described become available.
This information contains examples of data and reports used in daily business operations. To illustrate
them as completely as possible, the examples include the names of individuals, companies, brands, and
products. All of these names are ctitious and any similarity to actual people or business enterprises is
entirely coincidental.
COPYRIGHT LICENSE:
This information contains sample application programs in source language, which illustrate programming
techniques on various operating platforms. You may copy, modify, and distribute these sample programs
in any form without payment to IBM, for the purposes of developing, using, marketing or distributing
application programs conforming to the application programming interface for the operating platform
for which the sample programs are written. These examples have not been thoroughly tested under
all conditions. IBM, therefore, cannot guarantee or imply reliability, serviceability, or function of these
programs. The sample programs are provided "AS IS", without warranty of any kind. IBM shall not be
liable for any damages arising out of your use of the sample programs.
Privacy Policy considerations
IBM Software products, including software as a service solutions, (“Software Offerings”) may use cookies
or other technologies to collect product usage information, to help improve the end user experience,
to tailor interactions with the end user or for other purposes. In many cases no personally identiable
information is collected by the Software Offerings. Some of our Software Offerings can help enable you
to collect personally identiable information. If this Software Offering uses cookies to collect personally
identiable information, specic information about this offering’s use of cookies is set forth below.
Depending upon the congurations deployed, this Software Offering may use session cookies or other
similar technologies that collect each user’s name, user name, password, and/or other personally
identiable information for purposes of session management, authentication, enhanced user usability,
single sign-on conguration and/or other usage tracking and/or functional purposes. These cookies or
other similar technologies cannot be disabled.
If the congurations deployed for this Software Offering provide you as customer the ability to collect
personally identiable information from end users via cookies and other technologies, you should seek
your own legal advice about any laws applicable to such data collection, including any requirements for
notice and consent.
For more information about the use of various technologies, including cookies, for these purposes,
see IBM’s Privacy Policy at http://www.ibm.com/privacy and IBM’s Online Privacy Statement at http://
www.ibm.com/privacy/details the section entitled “Cookies, Web Beacons and Other Technologies”
and the “IBM Software Products and Software-as-a-Service Privacy Statement” at http://www.ibm.com/
software/info/product-privacy.
Trademarks
IBM, the IBM logo, and ibm.com are trademarks or registered trademarks of International Business
Machines Corp., registered in many jurisdictions worldwide. Other product and service names might be
trademarks of IBM or other companies. A current list of IBM trademarks is available on the Web at
“ Copyright and trademark information ” at http://www.ibm.com/legal/copytrade.shtml.
Adobe, the Adobe logo, PostScript, and the PostScript logo are either registered trademarks or
trademarks of Adobe Systems Incorporated in the United States, and/or other countries.
266
Notices
Java and all Java-based trademarks and logos are trademarks or registered trademarks of Oracle and/or
its afliates.
The registered trademark Linux is used pursuant to a sublicense from the Linux Foundation, the exclusive
licensee of Linus Torvalds, owner of the mark on a worldwide basis.
Microsoft, Windows, Windows NT, and the Windows logo are trademarks of Microsoft Corporation in the
United States, other countries, or both.
UNIX is a registered trademark of The Open Group in the United States and other countries.
Other names may be trademarks of their respective owners. Other company, product, and service names
may be trademarks or service marks of others.
Notices267
IBM®
Part Number:
(1P) P/N:
