Microsoft Excel 2010 - Level 2
© Watsonia Publishing Page 57 Applying Borders
CHAPTER 7 APPLYING BORDERS
Border in a spreadsheet is a term that refers to lines placed around
the edges of cells or ranges. Borders can be used to provide
structure to a spreadsheet, to indicate where data should be
entered or just for decoration.
In this session you will:
gain an understanding of borders
learn how to apply a border to a cell
learn how to apply a border to a range
learn how to apply a bottom border
learn how to apply top and bottom borders
learn how to remove borders
gain an understanding of the More Borders option
learn how to create custom borders.
INFOCUS
WPL_E822

Microsoft Excel 2010 - Level 2
© Watsonia Publishing Page 58 Applying Borders
UNDERSTANDING BORDERS
Borders are lines that are placed around the
edges of individual cells or ranges. The lines may
be thin, thick, solid, dashed, black or coloured, or
even double lines. The reason for using borders
is that the lines can be used to group together data
or indicate totals, or to draw the user’s attention to
critical cells that may need special data entry. Here
are some examples.
A Worksheet Without and With Borders
Borders can be used to apply a structure. Here’s the same worksheet shown without borders and
then with borders applied. The use of borders helps to highlight the totals and separate them from
the other data.
Border Variations
Borders can be applied to all four sides of a cell, or to individual sides of a cell. The following
examples show a cell without a border, with an outside border and a top and double bottom border.
Microsoft Excel 2010 - Level 2
© Watsonia Publishing Page 59 Applying Borders
APPLYING A BORDER TO A CELL
Try This Yourself:
Open
File
Before starting this exercise
you MUST open the file E822
Applying Borders_1.xlsx...
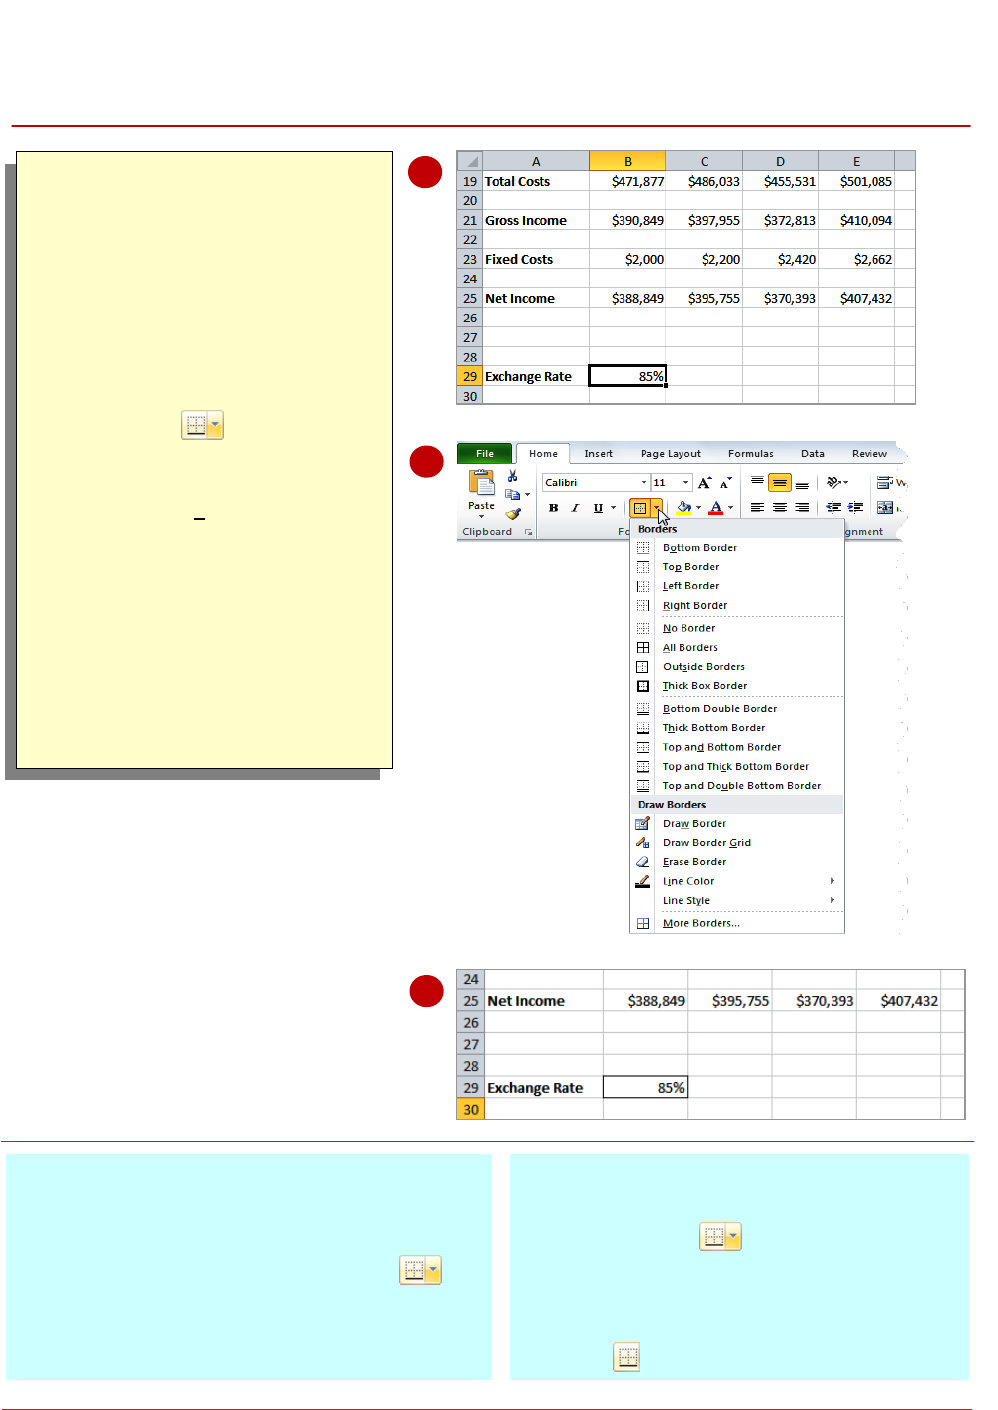
Click on cell B29
Click on the Home tab and
click on the drop arrow for
Borders in the Font
group to display the available
settings
Select Outside Borders to
apply the border
At the moment the border is
obscured by the cell pointer...
Click away from the cell to see
the effect more clearly
The border is now visible
For Your Reference…
To apply a border to a cell:
1. Click in the cell
2. Click on the drop arrow for Borders in
the Font group on the Home tab
3. Click on the border option of your choice
Handy to Know…
By default, Borders is represented by
Bottom Border on the tool. However,
each time you apply a different border
format, the appearance of the button
changes to reflect the most recently used
format. You can then click directly on the
button to apply the format.
1
2
Individual cells can be formatted with their own
borders. This allows you to draw attention to
important cells in a worksheet that affect the
totals, such as tax rates or percentage increases.
By applying a border to a single cell, you help to
guide the user to the data so that they can change
it if necessary.
4

Microsoft Excel 2010 - Level 2
© Watsonia Publishing Page 60 Applying Borders
APPLYING A BORDER TO A RANGE
Try This Yourself:
Same
File
Continue using the previous
file with this exercise, or open
the file E822 Applying
Borders_2.xlsx...
Select the range A5:A11
Click on the drop arrow for
Borders and select
Outside Borders
Click away from the range to
see the border
An outline has been placed
around the cells...
Repeat steps 1 and 2 to apply
an outline border to each of
the following ranges in the
order that they are listed:
B5:B11, C5:C11, D5:D11,
E5:E11, F5:F11, G5:G11,
H5:H11, I5:I11, A5:I5,
A11:I11
A13:A19, B13:B19, C13:C19,
D13:D19, E13:E19, F13:F19,
G13:G19, H13:H19, I13:I19,
A13:I13, A19:I19
You can hold down and
select several of these ranges
at once before applying the
border...
Click away from the last
selected range to see the
result
For Your Reference…
To apply a border to a range:
1. Select the range
2. Click on the drop arrow for Borders in
the Font group on the Home tab
3. Click on the border option of your choice
Handy to Know…
You can copy a border between cells, for
example, from one table to another, using
Paste Special. Select the cells, click on
Copy , click on the first cell of the second
range and click on the drop arrow for Paste
. Select Paste Special, click on
Formats and then click on [OK].
1
3
You can apply a border to a range of cells. This
allows you to place an outline around them to
indicate that the cells are somehow related to
each other, or to place borders between cells to
indicate that they are in separate groups. Borders
can be used in ranges of cells to create a more
form-like appearance. The borders available for
single cells can also be applied to ranges.
5

Microsoft Excel 2010 - Level 2
© Watsonia Publishing Page 61 Applying Borders
APPLYING A BOTTOM BORDER
Try This Yourself:
Same
File
Continue using the previous
file with this exercise, or open
the file E822 Applying
Borders_3.xlsx...
Select the range A23:I23
Click on the drop arrow for
Borders and select
Bottom Border
Click away from the range to
deselect it
For Your Reference…
To apply a bottom border:
1. Select the cell or range
2. Click on the drop arrow for Borders in
the Font group and select Bottom Border
Handy to Know…
You can apply borders to each of the four
sides of a cell or range individually. These
borders are called Bottom Border, Top
Border, Left Border and Right Border
respectively.
1
3
Bottom borders are applied across the bottom
edge of the currently selected cells. Bottom
borders are often used to mark the end of data,
the presence of totals or can be used to underline
headings as a form of graphical element. Bottom
borders can be applied to single cells, ranges or
several non-contiguous cells all at once.

Microsoft Excel 2010 - Level 2
© Watsonia Publishing Page 62 Applying Borders
APPLYING TOP AND BOTTOM BORDERS
Try This Yourself:
Same
File
Continue using the previous
file with this exercise, or open
the file E822 Applying
Borders_4.xlsx...
Select the range B21:I21
Click on the drop arrow for
Borders and select Top
and Bottom Border
Select the range B25:I25
Click on the drop arrow for
Borders and select Top
and Double Bottom Border
Click away from the range to
see the formatting
For Your Reference…
To apply a top and bottom border:
1. Select the cell or range
2. Click on the drop arrow for Borders in
the Font group and select Top and Bottom
Border
Handy to Know…
There are several top and bottom border
combinations to select from, including Top
and Bottom Border, Top and Thick
Bottom Border and Top and Double
Bottom Border.
1
5
One variation of borders is to apply top and
bottom borders. This places a line across the
top edge and the bottom edge of a cell or group
of cells. If more than one row is selected, the
borders will be placed along the top edge and the
bottom edge of the range, not on the top and
bottom edges of every cell in the range. Top and
bottom borders are often used for totals.

Microsoft Excel 2010 - Level 2
© Watsonia Publishing Page 63 Applying Borders
REMOVING BORDERS
Try This Yourself:
Same
File
Continue using the previous
file with this exercise, or open
the file E822 Applying
Borders_5.xlsx...
Select the range A23:I23
These cells have a single
bottom border...
Click on the drop arrow for
Borders and select No
Border
Click away from the range to
see the result
For Your Reference…
To remove borders:
1. Select the cells
2. Click on the drop arrow for Borders in
the Font group and select No Border
Handy to Know…
You can’t remove a border by applying
another default setting which includes
missing borders. You must apply No Border.
1
3
Not every border that you apply will look exactly
the way you expect it to. Sometimes, if too many
borders are used, they can make the
spreadsheet difficult to read. In other
circumstances you may find that you need to
remove borders from existing worksheets created
by other people. Borders can be removed by
applying no borders.

Microsoft Excel 2010 - Level 2
© Watsonia Publishing Page 64 Applying Borders
THE MORE BORDERS OPTIONS
1
The options available in the Borders tool
are just a range of presets that you can use to
apply borders quickly and easily. To have total
control over borders, such as the weight, pattern
and colour, you use the More Borders option on
the menu. This gives you access to the Format
Cells dialog box and all of the border controls.
They are listed and detailed below.
Border Options
Style
Style controls the pattern of the line that is used for the border. The full list of
options is what you can see displayed and includes thick, thin, solid, dotted and
dashed lines.
Colour
Colour gives you access to the theme colours, the standard colour and the full
colour palette so that you can mix your own colours.
Presets
The preset options of None, Outline and Inside are provided to speed up the
process of creating a border. Inside is only available if more than one cell is
selected.
Border
Preview
This shows you the borders as they are applied so that you can get an idea of
how the finished border will appear. This section includes eight preset buttons to
use: Top, Middle, Bottom, Diagonal Right, Left, Centre, Right and Diagonal
Left. You can also click in this preview area to apply a border. The key is to
select the style and colour settings before applying a border to the preview area.
2
3
4

Microsoft Excel 2010 - Level 2
© Watsonia Publishing Page 65 Applying Borders
USING THE MORE BORDERS OPTION
Try This Yourself:
Open
File
Before starting this exercise
you MUST open the file E822
Applying Borders_6.xlsx...
Click on B29 to select the cell
Click on the drop arrow for
Borders and select More
Borders to display the Format
Cells dialog box
Click on the thickest black line
under Style then click on the
drop arrow for Colour to
display the options
Click on Orange, Accent 6,
Darker 50% then click on the
top and bottom borders of the
preview cell to apply the new
border
Click twice on the left and
right borders of the preview
cell
The first click will apply the
colour and the second click will
remove the border...
Click on [OK] to apply the
border settings then click away
from the cell to see the
formatting
You should have a thick dark
orange line across the top and
bottom of the cell
For Your Reference…
To use the More Borders option:
1. Select the cell or range
2. Click on the drop arrow for Borders
and select More Borders
3. Select the settings then apply the border
4. Click on [OK]
Handy to Know…
By applying top and bottom borders to B29,
you automatically apply a border to the
adjacent cells. The cell above, B28, will have
a bottom border and the cell below, B30, a
top border.
2
5
The More Borders menu option displays the
Format Cells dialog box which can be used to
adjust the line pattern, colour and position of a
border. It includes a series of line patterns to
choose from, a set of colours and access to the
colour palette. Additionally, the Format Cells
dialog box offers preset buttons that can be used to
create custom borders.

Microsoft Excel 2010 - Level 2
© Watsonia Publishing Page 66 Applying Borders
NOTES:
1
4
