
ii ·
Table of Contents
Table of Contents ............................................................................................ii
A Guided Tour of Doc-To-Help.......................................................................... 1
Converting Projects to Doc-To-Help 2006 .................................................................... 1
Using Microsoft Word............................................................................................... 10
Using HTML Source Documents............................................................................... 40
Using the Doc-To-Help Project .................................................................................. 64

Converting Projects to Doc-To-Help 2006 · 1
A Guided Tour of Doc-To-Help
Welcome to the ComponentOne Doc-To-Help 2006 Guided Tour! If you are an experienced Doc-To-Help user, this
latest version includes many new design features bundled with the functionality you are familiar with from previous
versions of this product. If you are a new user, Doc-To-Help provides an effortless way to create professional looking
online Help from your existing Microsoft Word and HTML documents.
The purpose of this guided tour is to give you a “quick start” understanding of the features incorporated into the new
version of Doc-To-Help. By working through the tutorial procedures, you will learn the fundamentals of producing
printed manuals and online Help systems using Doc-To-Help.
The Doc-To-Help guided tour assumes a level of familiarity with Microsoft Word and FrontPage and Help authoring
in general. Before beginning the guided tour, you may wish to read the sections on Help Authoring Basics and Doc-To-
Help Markup Language (D2HML). Additionally, it may be helpful for you to familiarize yourself with the Doc-To-Help
project editor and toolbar by reading The Doc-To-Help Project Editor.
Tutorial Conventions
• Instructions to select submenu items are given in the Menu | Submenu format.
• Throughout the tutorial, dialog box names, control labels and controls are formatted in a bold font.
• The tutorial instructions assume that you installed Doc-To-Help in the default location. If you installed in
another location, you must navigate to files in that location instead of the location specified in the
instructions.
• The tutorial instructions use Microsoft Windows XP, Microsoft Word 2003 and Microsoft FrontPage
2003 for all explanations. If you are using a different operating system or a different version of Word or
FrontPage, your commands and dialog boxes may vary somewhat.
• The terms, “make target”, “rebuild target”, and “compile” are used throughout the tutorials. If you are
unfamiliar with how these terms are used in relation to Doc-To-Help 2006, please read Understanding the
Doc-To-Help Build Options.
Converting Projects to Doc-To-Help 2006
Converting a RoboHelp HTML Project to Doc-To-Help 2006
This tutorial uses a RoboHelp project for which the Microsoft HTML Help layout has already been generated. This
HTML Help project (.hhp) is used by the Doc-To-Help RoboHelp converter and it must be generated before
conversion can take place.
1. Open Doc-To-Help 2006 and click Convert RoboHelp(R) HTML Project.

2 · A Guided Tour of Doc-To-Help
2. Select an .xpj project file and click Open.
3. Review the location and click Next.

Converting Projects to Doc-To-Help 2006 · 3
4. Enter the name of the Doc-To-Help project to be created in the Name text box and browse for a location for the
new project.
5. Click the Convert button to begin the conversion. A window appears showing the conversion process.
6. Once the conversion is complete, click OK.
7. Click the Close button to close the Convert dialog box. Your new Doc-To-Help project opens in the Doc-To-Help
project editor. You can begin customizing and building your help files.

4 · A Guided Tour of Doc-To-Help
Converting an HTML Help Project to Doc-To-Help 2006
The HTML Help project used in this tutorial is located in the C:\Program
Files\ComponentOne\DocToHelp\Tutorial\IceCream\HTML-Compiled-0 folder.
1. Open Doc-To-Help 2006 and click Convert HTML Help Project.
2. Browse to the C:\Program Files\ComponentOne\DocToHelp\Tutorial\IceCream\HTML-Compiled-0 folder
and select the icecream.hhp file.
3. Click Open.
4. Review the location and click Next.
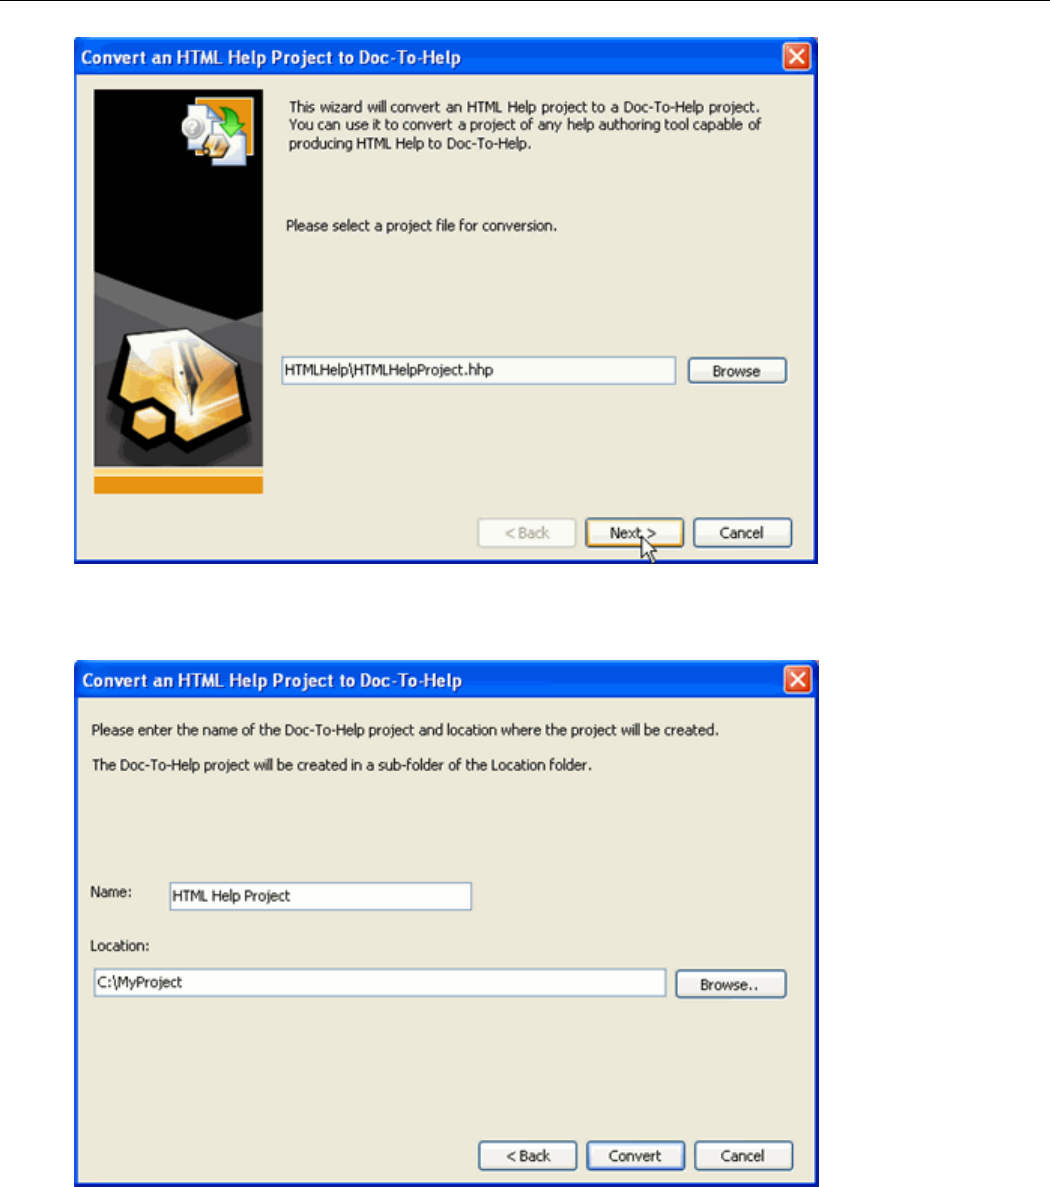
Converting Projects to Doc-To-Help 2006 · 5
5. Enter the name of the Doc-To-Help project to be created in the Name text box.
6. Browse for a location for the new project.
7. Click the Convert button to begin the conversion. A window appears showing the conversion process.
8. Once the conversion is complete, click OK.

6 · A Guided Tour of Doc-To-Help
9. Click the Close button to close the Convert dialog box. Your new Doc-To-Help project opens in the project editor.
You can begin customizing and building your help files.
Converting a RoboHelp Word Project to Doc-To-Help 2006
1. Open Doc-To-Help 2006 and click Convert RoboHelp(R) Word Project.
2. Browse, select an .hpj project file and click Open.

Converting Projects to Doc-To-Help 2006 · 7
3. Review the location and click Next.
4. Enter the name of the Doc-To-Help project to be created in the Name text box and browse for a location for the
new project.
5. Click the Convert button to begin the conversion. A window appears showing the conversion process.
6. Once the conversion is complete, click OK.

8 · A Guided Tour of Doc-To-Help
7. Click the Close button to close the Convert dialog box. Your new Doc-To-Help project opens in the Doc-To-Help
project editor. You can begin customizing and building your help files.
Converting a WinHelp Project to Doc-To-Help 2006
1. Open Doc-To-Help 2006 and click Convert WinHelp Project.

Converting Projects to Doc-To-Help 2006 · 9
2. Browse, select an .hpj project file and click Open.
3. Review the location and click Next.
4. Enter the name of the Doc-To-Help project to be created in the Name text box.
5. Browse for a location for the new project.
6. Click the Convert button to begin the conversion. A window appears showing the conversion process.
7. Once the conversion is complete, click OK.

10 · A Guided Tour of Doc-To-Help
8. Click the Close button to close the Convert dialog box. Your new Doc-To-Help project opens in the project editor.
You can begin customizing and building your help files.
Using Microsoft Word
Before beginning this tour, it may be helpful for you to familiarize yourself with the Doc-To-Help toolbar by reading
Exploring the Doc-To-Help Toolbar for Microsoft Word. Using the Doc-To-Help toolbar is just one option when formatting
your Word source documents. You can also use the D2HML Styles toolbar and dialog boxes to create Doc-To-Help
Markup Language (D2HML). D2HML is the preferred and recommended method for formatting source documents.
For more information, see Doc-To-Help Markup Language (D2HML) and the D2HML tutorial Using D2HML with
Microsoft Word.
Starting a New Help Project
The first steps in starting a new Help project are to name the project file and select a folder where it will reside. Doc-To-
Help 2006 provides you with an “all in one” project editor which allows you to create and edit source documents, add
Help features, and build Help files for any platform.
1. Open the Doc-To-Help program. You are presented with the Doc-To-Help start page. From here you can choose
some of your most recent projects, open an existing project, convert an older Doc-To-Help project, convert a
RoboHelp or HTML Help project, or create a new project.

Using Microsoft Word · 11
2. Click Create New Project. The first screen of the New Project Wizard opens.
3. Click Browse. The New Project dialog box opens as shown below.
4. Open the C:\Program Files\ComponentOne\DocToHelp\Tutorial\StyleGuide folder.
5. Type StyleGuide.d2h in the File name textbox, then click Save.
6. Click Next.

12 · A Guided Tour of Doc-To-Help
7. Select Microsoft Word documents as the type of source documents to use in your project and click Next.
Note: You can change the type of source documents your project uses at any time by changing the
DocumentType property under Project Settings.
8. From the drop-down list, choose the template that you wish to attach to your new project. In this case, make sure
that Normal 8.5” x 11” Template is selected.
9. Click Next.
10. From the list, choose your default Help target. Make sure that HTML Help 1.x is selected.

Using Microsoft Word · 13
Note: Though you can build any Help target for this project, this selection determines which Help target your
project compiles initially.
11. Click Next.
12. Review your directory location and file name and click Finish. The Doc-To-Help Wizard produces a new Help
project and opens the project editor. A blank "start up" and glossary document are automatically created in a
WordDocuments folder within your project folder, and they are added to your project. The "start up" document
has the same name as your project, StyleGuide in this case, and is automatically opened in Word.
Exploring the Doc-To-Help Toolbar for Microsoft Word
Doc-To-Help installs two global templates named C1D2HAuthor.dot and C1D2HEngine.dot into the Microsoft Office
startup directory. These templates add the ComponentOne Doc-To-Help toolbar to Microsoft Word, which allows
you to edit many of the Help authoring aspects of your source documents.
The D2HML Styles toolbar below is also added to your source document, but we will discuss this later in the
documentation.
For additional information, see Doc-To-Help Markup Language (D2HML).

14 · A Guided Tour of Doc-To-Help
Toolbar Components
Show Project Editor
Maximizes the Doc-To-Help project editor. For more
information, see The Doc-To-Help Project Editor.
Heading 1 Style
Formats the specified text with the Heading 1 paragraph style.
For more information, see Working with Styles in Word.
Heading 2 Style
Formats the specified text with the Heading 2 paragraph style.
For more information, see Working with Styles in Word.
Heading 3 Style
Formats the specified text with the Heading 3 paragraph style.
For more information, see Working with Styles in Word.
Heading 4 Style
Formats the specified text with the Heading 4 paragraph style.
For more information, see Working with Styles in Word.
Body Text Style
Formats the specified text with the Body Text paragraph style.
For more information, see Working with Styles in Word.
C1H Number Style
Formats the specified text with the C1H Number paragraph
style. For more information, see Working with Styles in Word.
C1H Number 2 Style
Formats the specified text with the C1H Number 2 paragraph
style. For more information, see Working with Styles in Word.
C1H Bullet Style
Formats the specified text with the C1H Bullet paragraph style.
For more information, see Working with Styles in Word.
C1H Bullet 2 Style
Formats the specified text with the C1H Bullet 2 paragraph
style. For more information, see Working with Styles in Word.
C1H Bullet 2A Style
Formats the specified text with the C1H Bullet 2A paragraph
style. For more information, see Working with Styles in Word.
C1H Continue List
Formats the specified text with the C1H Continue paragraph
style. For more information, see Working with Styles in Word.
Space Before
Adds or subtracts space before the current paragraph.
Space After
Adds or subtracts space after the current paragraph.
Special Bold
Formats the specified text with the Special Bold character style.
Apply Default Page Setup
Automatically sets your page formatting to match the template
attached to the document.
Standard Table
Inserts the standard Doc-To-Help table at the cursor location.
For more information, see Inserting Standard Tables with Doc-To-
Help.
Margin Note
Inserts a margin note table adjacent to the active paragraph.
Creates a hyperlink between the highlighted text and a margin
note. For more information, see Using Margin Notes in Word.
Image Map Editor
Opens the Image Map Editor Utility. For more information,
see Using the Image Map Editor in Microsoft Word.
Insert Cross-reference
Inserts a cross reference hyperlinks for online Help and page
references for print manuals. For more information, see
Creating Cross References.
Complete Cross-reference
Completes the cross reference. For more information, see
Creating Cross References.

Using Microsoft Word · 15
Add Topic Link
Creates a hyperlink between highlighted text and a Help topic
heading. For more information, see Using the Add Topic Link
Dialog Box.
Add Dynamic Link
Creates a hyperlink between the highlighted text and a index
keyword or group of index keywords. For more information,
see Using Dynamic Links.
Apply Conditional Text
Creates conditional text from highlighted text or graphics. For
more information, see Specifying Conditional Text.
View Conditional Text
Modify the conditional text colors and determine which text is
viewable in the source document. For more information, see
Viewing Classic Doc-To-Help Conditional Text.
Add Topic
Add a topic to your project without rebuilding your source
documents. For more information, see Using the Topic Tools in
Word.
Rename Topic
Rename a topic to your project without rebuilding your source
documents. For more information, see Using the Topic Tools in
Word.
Delete Topic
Delete a topic to your project without rebuilding your source
documents. For more information, see Using the Topic Tools in
Word.
Add Glossary Terms
Inserts glossary terms into the glossary source document. For
more information, see Using the Add Glossary Terms Tool in
Word.
Sort Glossary
Sorts the glossary entries in the glossary document
alphabetically. For more information, see Sorting Glossary
Entries in Word.
Insert Help Macro
Inserts a WinHelp macro into your source document. For more
information, see Using WinHelp Macros in Word.
Insert HTML ActiveX
Control
Inserts an HTML ActiveX control into your document. For
more information, see Using HTML Help Object Tags in Word.
View Field Codes
Toggles the field codes in Microsoft Word so that they are
visible.
Make Target
Compiles the currently selected Help target type. For more
information, see Building the Current Help Target.
View Target
Activates the currently selected Help target. For more
information, see Viewing the Current Help Target.
Help
Opens the Doc-To-Help online Help.
Adding the Toolbar to Custom Templates
The ComponentOne Doc-To-Help toolbar and the D2HML Styles toolbar for Microsoft Word reside in individual user
templates, such as C1H_NORM.DOT. Therefore, these toolbars are only initially available in source documents that
have a Doc-To-Help template attached. If you would like to use these toolbar with your own custom templates, you
can copy them using Word's Organizer dialog box.

16 · A Guided Tour of Doc-To-Help
To copy the toolbars to your template:
1. Open your template in Word, and select Tools | Templates and Add-Ins.
2. Click the Organizer button and select the Toolbars tab in the Organizer dialog box.
3. Click the Close File button on the right-hand side, and click the button again when it changes to Open File.
4. Find and select the C1H_NORM.DOT or another Doc-To-Help template, and then click Open.
5. Select the desired toolbars on the right-hand side and click Copy to copy the toolbars to your custom template.
Working with the First Source File
You are now ready to start writing your first Help document. The default document in Microsoft Word contains a
Chapter 1 placeholder where you can start entering your text.
Before working in the document, you may want to set Doc-To-Help and Word preferences to make your work easier.
If you do not want to change your Word options, skip Setting Word Preferences and start with Entering Text in the
Document.
Setting Word Preferences
1. If it is not already open, double-click the StyleGuide.doc in the project editor to open it in Word.
2. Select Tools | Options to open the Options dialog box.
3. Select the View tab.
4. In the Formatting marks area, select All to display nonprinting characters.
5. In the Show area, select HiddenText if you want to view Word {XE} fields.
6. Click OK.
For more information, see Word Source Documents.
Entering Text in the Document
1. Highlight the Chapter 1 placeholder.
2. Change the text to “Style Guide” and then press Enter.
Notice that the next paragraph has been formatted as heading 2 and has a line above it.
3. Type “Introduction” and press Enter.
You should now have a heading 1 and a heading 2, followed by a third empty paragraph formatted as body text.
You can delete the Topic 1 heading and the body text below it.
Inserting a File
It’s time to add some text to your source document. To save time, we will insert a file containing the remaining style
guide documentation.
1. With your cursor in the body text paragraph, select Insert | File.
The Insert File dialog box opens.
2. Locate the file C:\Program Files\ComponentOne\DocToHelp\Tutorial\StyleGuide\StyleGuideContents.doc.

Using Microsoft Word · 17
3. Select the file and click Insert. Doc-To-Help inserts the text for the style guide.
Saving the Document and Building a Help File
It is time to save your first source document and build a Help file. As you will see, Doc-To-Help allows you to build
multiple Help files in multiple formats using your existing source documents.
Saving the Document
1. Select File | Save.
The first source document is saved to the WordDocuments folder with the same name as the project (in this case,
StyleGuide.doc).
2. Close the StyleGuide document.
After closing the document, you will notice that the right pane of the project editor contains options for making
and viewing the Help target and links to each of the current project documents (Glossary.doc and StyleGuide.doc).
An empty Glossary.doc file is automatically produced when Doc-To-Help creates your Help project. Later in the
tutorial, you will learn more about using glossaries.
Building a Help File
1. If necessary, select View Toolbars | Project to display the Project toolbar.
2. Verify that StyleGuide HTML Help appears in the Help Target toolbar drop-down list.
The Help Target drop-down list allows you to select from a wide range of Help targets including a Manual option.
3. To build the HTML Help file, click the Make Target button
or the Make Help Target link in the right Help
pane. The right pane of the Doc-To-Help project editor shows the status of the Help file as it builds and compiles.

18 · A Guided Tour of Doc-To-Help
4. After the project compiles, you can examine your work by clicking the View Target button on the tool bar.
5. When you are finished, close the Help file.
For more information on Help targets, see Working with Projects.
Using Styles to Enhance a Help Project
By customizing the properties of paragraph and character styles in Doc-To-Help, you can easily define and control the
behavior of the compiled Help.
Doc-To-Help supplies templates and style sheets for you to author your source document in Word or HTML and to
create output target Help files. Generally, the styles contained in the templates and style sheets will fill most of your
needs, but you can further customize the Help behavior by adding your own styles to these files.
Creating a new style (whether paragraph or character) for your Help system is a 3 step process:
• Create a new style in Word or HTML - with properties to suit your formatting/appearance requirement for
your source document.
• Create a like-named style in your output Help target template file (e.g., C1H_HTML.DOT for HTML and
HTML Help output targets) or style sheet (e.g., C1H_HTML_full.css). This is to control how your Help
output will appear/look in your Help target.
• Create a like-named style in Doc-To-Help – with properties to define the compiled Help behavior.
The sections below demonstrate the basic techniques to apply and create paragraph and character styles in Doc-To-
Help.
Applying Paragraph Styles
The following steps guide you through the process of applying existing Doc-To-Help paragraph styles to create Help
contents topics.
1. Click the View Target button.
2. Click the StyleGuide contents topic, then Introduction. Note that the “Introduction” topic is the lowest Help
level.
3. Close the Help file.
4. From the Icon Bar, select Project.
5. In the left pane, select Documents.
6. In the right pane select StyleGuide.doc, right-click and select Open from the shortcut menu.
7. Under the “Introduction” section, find the “How can we be better writers?” text.
8. Place your cursor anywhere in that line.
9. Apply the Heading 3 style to that line.
10. Save and close Word and return to the Project Editor.
11. Click the Make Target button.

Using Microsoft Word · 19
12. Click the View Target button. Note that the “How can we be better writers?” text is now a topic sub-heading
under the “Introduction” heading.
For more information on Help targets, see Applying Paragraph Styles in Microsoft Word.
Defining a Style in Word
Doc-To-Help provides a wide variety of styles that can be used to format your source documents. In rare cases, these
existing styles may not be exactly what you need. If necessary, you can define a new style (paragraph or character) and
add it to your “source” template. Please note that creating styles is an advanced feature and is not necessary in most
cases.
1. In the Icon Bar, click Project.
2. In the left pane, select Templates.
3. In the right pane select C1H_NORM.DOT, right-click and select Open from the Shortcut menu. This opens the
C1H_NORM template that is used as the default template for formatting the source documents in Doc-To-Help.
Note that the following message explaining the Doc-To-Help digitally signed template displays when you open any
of the preloaded templates.
4. Scroll down to the bottom of the template file and place your cursor on an empty line.
5. Select Format | Styles and Formatting. The Styles and Formatting window opens.
6. Click New Style.
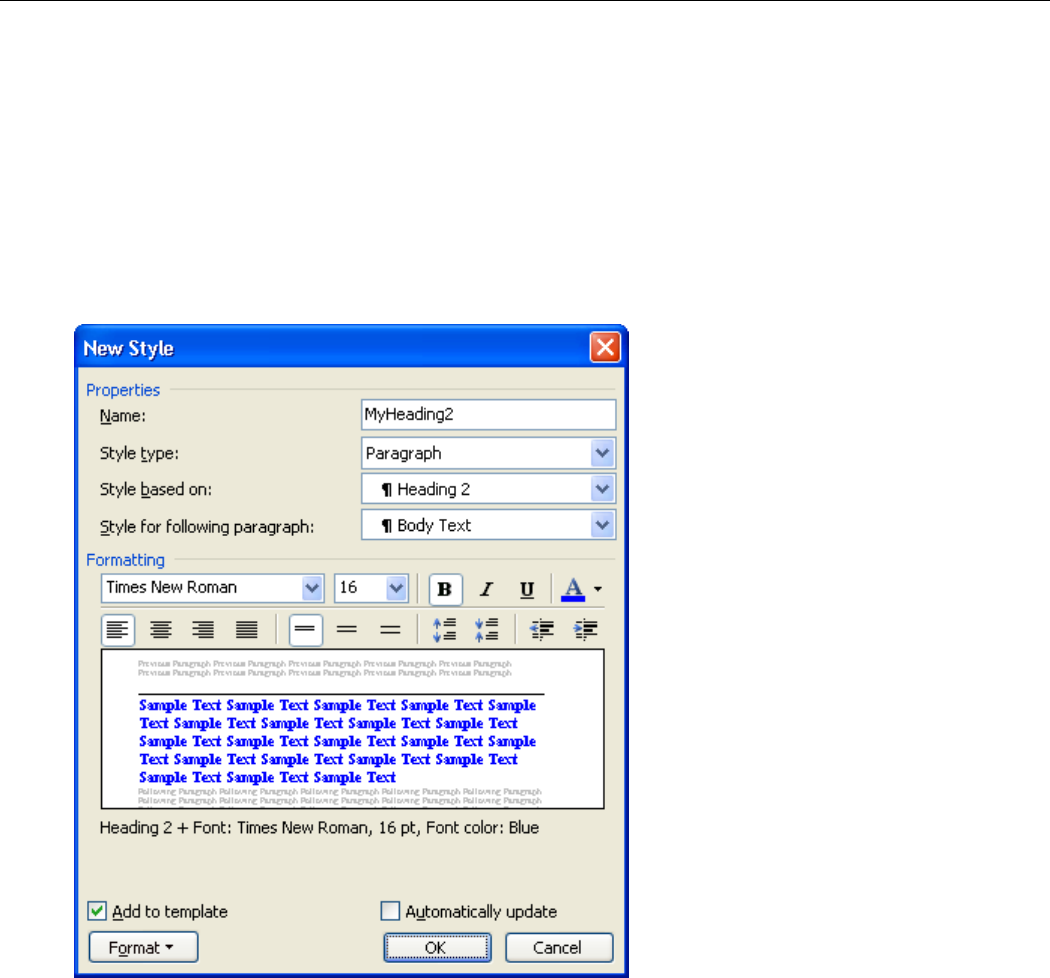
7. From the New Style dialog box, type My Heading 2 in the Name textbox.
20 · A Guided Tour of Doc-To-Help
8. From the Style based on drop-down, select the Heading 2 style.
9. From the Style for following paragraph drop-down list, select the Body Text style.
10. Check the Add to template checkbox.
11. Click the Format button and select Font.
12. Set the font to Times New Roman.
13. Set the font size to 16.
14. From the Font Color drop-down list, select the color blue.
15. Click OK. Your New Style dialog box should look like this.
16. Click OK.
17. Click the style name to apply the new style.
18. Select File | Save.
19. At this point, do not close the template. We will start from here with our next lesson.
For more information on Help targets, see Working with Styles in Word.
Using the Organizer to Copy a Style
After defining a new style in your “source” template, you need to add the same style to the template that your Help
target will use. To do this, you will use the “Organizer” utility within Microsoft Word. In the example below our Help
target is HTML Help.
1. If you have closed the C1H_NORM.DOT template, open it by following steps 1-3 in the previous lesson.
2. From the C1H_NORM.DOT template, select Tools | Templates and Add-ins.

Using Microsoft Word · 21
3. Click the Organizer button. The Organizer dialog box opens. Note that the left side of the organizer contains the
styles from the currently opened template, while the right side contains the Normal.dot template.
4. Close the Normal.dot by clicking Close File on the right side of the organizer.
5. To select the HTML Help template (C1H_HTML.DOT), click the Open File button on the right side of the
organizer.
6. Select the C1H_HTML.DOT template from the Open dialog box and click Open.
7. In the In C1H_NORM.DOT listbox, select My Heading 2.
8. Click the Copy button
to copy the style to C1H_HTML.DOT.
9. Click the Close File button for the C1H_HTML.DOT.
10. You are prompted “Do you want to save changes to C1H_HTML.DOT?”, click Yes.
11. Close the organizer and close the C1H_NORM.DOT file.
Defining Styles in Doc-To-Help
After creating a new paragraph style in your source template and copying it to your Help target template, the next step
is to create a matching paragraph style in Doc-To-Help to control your Help system behavior.
1. If necessary, open the Doc-To-Help project editor.
2. In the Icon Bar, click Project.
3. In the left pane, select Paragraph Styles.
4. In the right pane, right-click and select New.
5. Type My Heading 2 in the name column and press Enter.
6. In the property pane, change the Type property to Level 2.
7. To allow this topic to be included in the navigation sequence, set the AutoNavigate property to True.

22 · A Guided Tour of Doc-To-Help
For more information on Help targets, see Using Styles in Doc-To-Help.
Applying a User Defined Style
Applying user-defined paragraph styles is performed in the same manner as applying built-in styles. The steps below
demonstrate how to apply the paragraph style we defined above in our source file.
1. In the Icon Bar, click Project.
2. In the left pane, click Documents.
3. In the right pane select StyleGuide.doc, right-click and select Open from the shortcut menu.
4. Scroll down to find the “Engage Your Readers” section, find the “How can you engage your readers?” text.
5. Place your cursor anywhere in that line.
6. Apply the My Heading 2 style to that line. Note that if the style does not appear in the Styles and Formatting
window, select Tools |Templates and Add-Ins, and check the Automatically update document styles checkbox. Click
OK to close the window.
7. Save and close Word and return to the Project Editor.
8. Click the Make Target button.
9. Click the View Target button.
10. Click the “Engage Your Readers” Topic.
11. Click the “How can you engage your readers?” sub-topic. Note that the “How can you engage your readers?” font
has changed to reflect your custom style.
12. When you’re finished, close the Help file.
Adding Multiple Word Source Documents to a Help Project
One of the features of Doc-To-Help is the ability to add and easily manipulate separate Word and HTML source
documents in a Help project. One of the advantages of using separate source documents for each major “Heading 1”
topic is that it provides you with the flexibility of having several authors working on the project simultaneously.
Additionally, when changes are made to the documents, Doc-To-Help only needs to compile the source documents
that have been modified, greatly reducing the compile time. Let’s add a second source document to our StyleGuide
Help project.
1. In the Icon Bar, click the Project icon.
2. In the left pane of the project editor, select Documents. The right pane shows the project documents, while the
properties pane shows the properties for the highlighted project document.

Using Microsoft Word · 23
3. Select Project | Add Documents. The Add Documents dialog box opens.
4. Locate the file C:\Program Files\ComponentOne\DocToHelp\Tutorial\StyleGuide\Techniques.doc.
5. Select the file and click Open. Notice that the Techniques.doc has been added to the document list in the right
upper pane of project editor. The order of the documents in your Help file is noted by the order property in the
properties pane. To change the order of the documents, simply select the document you wish to move and use the
Move Up or Move Down arrows located on the Documents toolbar.
Note: When a document resides outside the project folder, Doc-To-Help displays the full path to the
document. Adding a document to a project does not move it to the project folder. If you want the
document to reside in the project folder, move it to the project folder before adding it to the
project.
6. Add the new document to the Help file by clicking the Make Target button.

24 · A Guided Tour of Doc-To-Help
7. After the Help file is compiled, click the View Target button. Notice that the new documentation has been added
to your Help file.
8. When you are finished, close the Help file.
For more information on Help targets, see Adding a Document to a Project.
Adding Tables in Doc-To-Help
In many cases, it is necessary to use a table to clarify complex lists of information. With Doc-To-Help, you can use
Word’s table feature to include formatted tables in your documentation. In this section, you will format existing text as
a table and include it in your project.
1. Right-click the StyleGuide.doc and select Open from the shortcut menu.
2. Scroll down the document until you locate the “Use tables” section.
3. Highlight the tab-separated text.
4. Select Table | Convert | Text to Table. The Convert Text to Table dialog box opens.
5. Select the AutoFit to contents option from the dialog box.
6. Select Separate Text at Tabs.
7. Click OK.
8. Highlight the top row of the new table.
9. Select Format | Borders and Shading.
10. Select the Shading tab and change the Fill to pale blue.
11. Click OK.
12. Save and close the StyleGuide document.
13. Click the Make Target button.
14. Click the View Target button.
15. View the table. Note that the colored table header was carried into your help file.

Using Microsoft Word · 25
Note: Table formatting is not available in WinHelp. Although the WinHelp compiler supports Word
tables, it does not support table borders or shaded cell backgrounds. For more information on
adding custom tables to a WinHelp file, see Inserting Objects to Create Special Effects in Word
Documents.
16. When you’re finished, close the Help file.
For more information on inserting and formatting standard tables, see Inserting Standard Tables with Doc-To-Help.
Adding Topic Links and Jumps
One of the keys to a good Help file is providing the reader with auxiliary information on specific topics by using links
and jumps. With the click of a mouse, the reader can view additional reference materials on any number of related
subjects.
Using Doc-To-Help Markup Language (D2HML) is the recommended way for creating topic links and jumps. An
alternative method in Word is to use the Add Topic Link dialog box. The steps below demonstrate how to create
several jumps, including pop-ups and jumps to separately defined windows using both methods.
Adding a Jump
Using D2HML
Using D2HML, you can create a topic link, or jump, by clicking the Jump Topic Link button on the D2HML Styles
toolbar.
1. In the Icon Bar, click the Topics icon.
2. In the right pane topics list scroll down until you find the Identify your audience topic.
3. Select it; then right-click the Identify your audience topic and select Open from the shortcut menu to open the
StyleGuide.doc in Word at that topic.
4. Select the text audience as shown below.

26 · A Guided Tour of Doc-To-Help
5. On the D2HML Styles toolbar, click the Jump Topic Link button
to open the Topic Link dialog box.
Note: If the topic you are linking to matches the link text, you can simply click OK and the link is created.
6. Click the Browse button next to the Topic text box. The Select Topic window appears.
7. Select Address your readers and their interests.

Using Microsoft Word · 27
8. Click OK to close the Select Topic window, and click OK again to close the Topic Link dialog box.
Using Add Topic Link
You also have the option of using the Add Topic Link button in Word to create a topic link or jump. You must use the
Add Topic Link dialog box to select a topic, unlike D2HML, where you can simply click the Jump Topic Link button
and click OK if the link text matches the topic to which you are linking.
1. In the Icon Bar, click the Topics icon.
2. In the right pane topics list scroll down until you find the Identify your audience topic.
3. Select, then right-click the Identify your audience topic and select Open from the shortcut menu to open the
StyleGuide.doc in Word at that topic.
4. Highlight the word “audience” as shown below.
5. On the Doc-To-Help toolbar in Word, click the Add Topic Link button
to open the Add Topic Link dialog
box.
6. In the Title column, select the Address your readers and their interests topic.
7. Select Jump from the Link Type drop-down.
8. Select Main from the Window: drop-down.
9. Click OK.

28 · A Guided Tour of Doc-To-Help
Note: If your hidden text is turned on, you will notice that Doc-To-Help places a [Help1] comment
beside the word you had highlighted.
Adding a Popup
Using D2HML
1. Within the StyleGuide document, locate the topic How can you engage your readers.
2. In the paragraph that follows How can you engage your readers, select the text directly and clearly as shown below.
3. Click the Popup Topic Link button to open the Popup Link dialog box.

Using Microsoft Word · 29
4. Click the Browse button next to the Topic text box, and the Select Topic dialog box appears.
5. Select the Use the active voice topic.
6. Click OK to close the Select Topic window, and click OK again to close the Popup Link dialog box.
Using Add Topic Link
1. Within the StyleGuide document, locate the paragraph with the title, “How can you engage your readers?”
2. In the paragraph that follows, highlight the phrase “directly and clearly” as show below.

30 · A Guided Tour of Doc-To-Help
3. Click the Add Topic Link button.
4. Select the Use the active voice topic.
5. Select Popup from the Link Type drop down and click OK.
6. Save the StyleGuide.doc and close Word.
Viewing the Hyperlinks
1. Restore the project editor and click the Make Target button.
2. Once the compile is complete, click the View Target button.
3. Choose the “How can you engage your readers?” topic and click the directly and clearly hyperlink. A pop-up
window displays the “Use the active voice” topic text.
4. Click outside the pop-up to close it.
5. In the Help contents pane, select the “Identify your audience” subtopic.
6. Click the audience hyperlink to open the Address your readers and their interests topic in the right Help pane.
7. When you’re finished, close the Help file.
For more information, see Doc-To-Help Markup Language (D2HML) and Links and Hot Spots.
Adding Graphics
When using Doc-To-Help 2006, it is no longer necessary to scale an image in a graphics package then insert it into the
Help document. Doc-To-Help allows you to scale your graphics by using the functionality contained within Microsoft
Word.

Using Microsoft Word · 31
You may have noticed that we start with a blank Help window pane whenever we open the Help file. We can modify
this by changing one of the topics to the Default Topic.
In the following steps, let’s add a graphic, scale it and set our Style Guide topic as the default topic.
Inserting Graphics
1. Click the Project icon.
2. In the left pane, select Documents.
3. Select StyleGuide.doc, right-click, and select Open from the shortcut menu.
4. Place your cursor at the end of the Heading 1 topic “Style Guide” and press Enter.
5. Format the new paragraph as Body Text.
6. Select Insert | Picture | From File.
7. Locate the file C:\Program Files\ComponentOne\DocToHelp\Tutorial\StyleGuide\StyleGuide.jpg.
8. Select the file, then click Insert.

32 · A Guided Tour of Doc-To-Help
Scaling Graphics
1. Select the graphic you just inserted, right-click, and select Format Picture from the shortcut menu.
2. Select the Size tab.
3. In the Scale area, change Height and Width to 75%.
4. Click OK.
5. Save and close the Word document.
6. In the Project Editor, click the Project icon.
7. Select Help Targets from the left pane.
8. Select the correct Help Target from the right pane. In the property pane, verify that the ScaleGraphics property is
set to Scale in build.
9. Select Paragraph Styles from the left pane.
10. Select Heading 1 from the right pane.
11. In the property pane, set the TopicType property of Heading 1 from Contents to Conceptual.
The Contents topic type limits text formatted with a Heading 1 style to the table of contents pane of your Help
target. By selecting Conceptual, you can view your Heading 1 topics and the related text and graphics in the same
manner as your would view any of your topics.
12. Click the Make Target button to compile the Help target.
13. Open the “Style Guide” topic in the Help file to view the scaled topic.
14. When you’re finished, close the Help file.
Working With Margin Notes
The Margin Note drop down contains a variety of commands that allow you to create and format your margin notes.
For this tutorial we will use the Create Margin Note and Set Link commands to produce a margin note with
hyperlink.
The Create Margin Note command allows you to place text or graphics in the left margin, next to the main body of
the text. Margin notes do not appear in the Help unless you explicitly link them to the text, in which case they become
pop-ups. Text is automatically formatted to appear in Margin Note style, smaller than Body Text and italicized.
The Set Link command creates a hyperlink between the text or graphic in the right cell and the margin note in the left
cell. If you're linking the margin note to text, that text appears underlined and blue in Help. When the blue, underlined
text or the selected graphic is clicked, the margin note displays in a pop-up window.
Creating a Margin Note
1. Click the Project icon.
2. Select Documents from the left pane.
3. Select StyleGuide.doc from the right pane, right-click and select Open from the shortcut menu.
4. Place your cursor anywhere in the first paragraph after the “Introduction” heading.
5. Click the Margin Note button
on the Doc-To-Help toolbar.
6. Select Create from the drop-down menu.
Doc-To-Help inserts a two-column table with the existing text in the right table cell.
Note: If Gridlines is selected in the Table menu, you'll see a dotted outline of the table, but these
gridlines do not print.

Using Microsoft Word · 33
7. In the left cell, type the margin note “Heading 1 topics can now have text!”.
Linking a Margin Note
1. In the right cell, highlight the “communicate clearly” body text at the end of the paragraph.
2. Click the Margin Note button on the Doc-To-Help toolbar.
3. Select Set Link from the drop-down menu. The Margin Note Link box opens. If you have more than one margin
note, you can select the note you want by using the Previous and Next icons.
4. Since we only have only one margin note, click the Set Link icon. Doc-To-Help places a Word comment next to
the link text.
5. Save and close the Word document.
6. Click the Make Target button.
7. After the target is compiled, click the View Target button.
8. Open the “Introduction” topic, then click the communicate clearly hyperlink to see the pop-up.
9. When you’re finished, close the Help file.

34 · A Guided Tour of Doc-To-Help
For more information, see Using Margin Notes in Word.
Adding Glossary Terms
To assist in developing an online and printed glossary, Doc-To-Help automatically creates an empty glossary
document whenever a new project is created. If you format your glossary entries with the Glossary Heading paragraph
style, Doc-To-Help examines the project documents for text that matches the glossary entries, converting these matches
into hyperlinks when you build your Help target. Whenever the user clicks on one of the hyperlinks, a pop-up opens
containing the corresponding glossary entry description.
By opening and adding entries to the glossary document within Doc-To-Help, you can quickly create and update your
glossary as needed.
1. If necessary, click the Project icon.
2. Select Documents from the left pane.
3. Select Glossary.doc from the right pane, right-click and select Open from the shortcut menu.
4. Add the following text in the glossary document beneath the Glossary heading:
5. Format “active voice” and “jargon” with the Glossary Heading style.
Note: The Glossary Heading and Glossary Heading (no auto links) paragraph styles are reserved for
glossary entries.
6. Format the other text with the C1H Popup Topic Text style.
When steps 4 – 6 are complete, the glossary text should look like the following example.
7. Save and close the Word document.
8. Restore the project editor.
9. Select Build | Rebuild Target.
Note: The Make Target command compiles only the source documents that have been modified since
the last build. The Rebuild Target compiles all source documents. By selecting Rebuild Target,
Doc-To-Help scans all source documents for the new glossary terms.
10. After the target is compiled, click the View Target button.
Wherever the Help text matches your glossary entries (Glossary Heading), Doc-To-Help has formatted the text as
a pop-up.

Using Microsoft Word · 35
11. When you’re finished, close the Help file.
For more information, see Creating a Glossary.
Adding Conditional Text
The conditional text feature allows you to determine the conditions under which certain text or graphics are
incorporated into your Help targets.
When defining conditional text, Doc-To-Help provides three target options; Platforms, Help Targets and Attributes.
Platforms
This option allows you to incorporate conditional text into any Help file
defined with a specific platform.
Help Targets
This option allows you to incorporate conditional text into a specific
default or user defined Help target.
Attributes
This option allows you to incorporate conditional text into a specific
version of a Help file.
Applying Conditional Text to Printed Manuals
1. Select StyleGuide.doc from the right pane, right-click and select Open from the shortcut menu.
2. Copy the last paragraph of the Introduction topic and insert it beneath the existing last paragraph so that you have
two duplicate paragraphs as shown below.

36 · A Guided Tour of Doc-To-Help
3. Highlight the first duplicate paragraph.
4. Click the Conditional Text button
on the D2HML Styles toolbar. The Condition dialog box opens.
5. From the Platform pane, select Printed Manual then click OK. Doc-To-Help places a conditional text D2HML
comment note after the first paragraph.
Applying Conditional Text to Online Help
Next, you’ll change the second duplicate paragraph so that it will “fit” better as part of the online Help.
1. Change the second paragraph from:
The next several pages summarize some of the best techniques to achieve these three goals. Following
the summary, you'll find detailed suggestions for applying these techniques to your writing.
To:
The following three topics summarize some of the best techniques to achieve these three goals.
Following the summary topics, you'll find detailed suggestions for applying these techniques to your
writing.
2. Highlight the modified paragraph.
3. Click the Online Text button
on the D2HML Styles toolbar. Doc-To-Help places another conditional text
D2HML comment after the second paragraph.
Applying Conditional Text with Attributes
In some cases you may have two Help files using the same Help target, but with somewhat different text. To do this,
you can set the conditional text by attribute.
1. Create an empty paragraph immediately above the “Introduction” topic.
2. Place your cursor in the empty paragraph, and type “Version History”.
3. Apply the Heading 2 style to the “Version History” text.
4. Highlight the “Version History” heading.

Using Microsoft Word · 37
5. Click the Conditional Text button on the D2HML Styles toolbar. The Condition window appears.
6. In the Criteria: pane, click the Attributes icon.
7. From the Value pane, select Internal.
8. Click OK.
9. Save and close the Word document.
Building the Conditional Help
In the following steps, you will set the Help project properties and attributes, and compile your source documents for
both HTML and HTML Help.
1. If necessary, click the Project icon.
2. Select the Help Targets item in the left pane.
3. Choose the StyleGuide NetHelp target from the right pane.
4. In the StyleGuide NetHelp properties pane, make sure that the DynamicTOC is set to True.
Though this property is not necessary to create the conditional text, it provides a Dynamic HTML table of contents
for our NetHelp target. Note that this feature is only supported by Internet Explorer.
5. Click the View Attribute icon
in the StyleGuide NetHelp properties pane.
6. In the Value column, select Internal.

38 · A Guided Tour of Doc-To-Help
7. Click the Make Target button to build the HTML target.
8. After the NetHelp target is compiled, select StyleGuide HTML Help from the Help Target drop-down list.
9. Click the Make Target button again. In this way, you have made sure that both the NetHelp and HTML Help
targets have been compiled.
10. After both targets are compiled, click the View Target button to open the HTML Help file.
Notice that the online Help no longer contains the paragraph marked as manual or the Version History topic. If we
were to build the printed manual Help target, the paragraph marked manual would be used and the paragraph
marked online and the Version History topic would be omitted.
11. Close the HTML Help.
12. Select StyleGuide NetHelp from the Help Target drop-down list.
13. Click the View Target button. The Help file opens in your browser. By examining the NetHelp file you will notice
that the Version History topic and the paragraph marked online are included. The left pane contains a Dynamic
HTML table of contents with books containing subtopics.
For more information, see Conditional Text and Attributes.
Applying Lists in Doc-To-Help
To assist in developing lists, Doc-To-Help provides six list styles to allow you to create nested lists in your
documentation.
Creating a Bulleted List
1. On the Icon bar, click Project.
2. In the left pane, select Documents.
3. Select and right-click StyleGuide.doc from the right pane, and select Open from the shortcut menu.
4. Scroll down the document until you locate the “Use vertical lists” section.
5. Highlight the text as show below.
6. On the Doc-To-Help toolbar, click the C1H Bullet Style button
. Doc-To-Help applies a bulleted list as shown
below.

Using Microsoft Word · 39
Nesting a Bulleted List
1. Place your cursor at the end of the second bulleted line and press Enter.
2. On the new line, type Step One is first and press Enter.
3. On the second new line, type Step Two is second and press Enter.
4. On the third new line, type This is how you get “nested” lists. You should have a bulleted list that looks like the
figure below.
5. Highlight the lines that read “Step One is first” and “Step Two is second”.
6. Click the C1H Number 2 Style button
. Doc-To-Help applies a nested numbered list as show below.
7. Highlight the line that reads “This is how you get nested lists”.
8. Click the Continue List button
. Doc-To-Help applies an unnumbered list at the same level as the previous
numbered list.

40 · A Guided Tour of Doc-To-Help
9. Save and close the StyleGuide document.
10. Click the Make Target button.
11. After the target is compiled, click the View Target button.
12. Open the “Use vertical lists” topic to see your finished nested list.
13. When you’re finished, close the Help file.
For more information, see Using List Styles in Microsoft Word.
Using HTML Source Documents
Any HTML editor can be used to format your HTML source documents, but the guided tour uses Microsoft FrontPage
2003. The steps may be slightly different, depending on the HTML editor you are using.
This tour assumes the new project will be in a folder called "c:\GuidedTour". Create this folder, or you may use a
different folder if you prefer.
Starting a New Help Project
The first step in starting a new Help project is to name the project file and select a folder where it will reside. Doc-To-
Help 2006 provides you with an “all in one” project editor which allows you to create and edit source documents, add
Help features, and build Help files for any platform.
1. Open the Doc-To-Help program. You are presented with the Doc-To-Help start page. From here you can choose
some of your most recent projects, open an existing project, convert an older Doc-To-Help project, convert a
RoboHelp or HTML Help project, or create a new project.

Using HTML Source Documents · 41
2. Click Create New Project. The first screen of the New Project Wizard opens.
3. Click Browse. The New Project dialog box opens as shown below.
4. Open the C:\GuidedTour folder.
5. Type Scuba Dive.d2h in the File name textbox, then click Save.
6. Click Next.

42 · A Guided Tour of Doc-To-Help
7. Select HTML documents as the type of source documents to use in your project and click Next.
Note: You can change the type of source documents your project uses at any time by changing the
DocumentType property under Project Settings.
8. You are prompted to select the Doc-To-Help Style Sheets you want to use with the HTML documents. Select Full
set of styles to use all the styles provided with Doc-To-Help and click Next.
9. From the list, choose your default Help target and click Next. Make sure that HTML Help 1.x is selected.

Using HTML Source Documents · 43
Note: Though you can build any Help target for this project, this selection determines which Help target your
project compiles initially.
10. Review your directory location and file name and click Finish.
The Doc-To-Help Wizard produces a new Help project and opens the project editor. A New Document dialog box
appears, and Scuba Dive.htm appears in the File name text box.
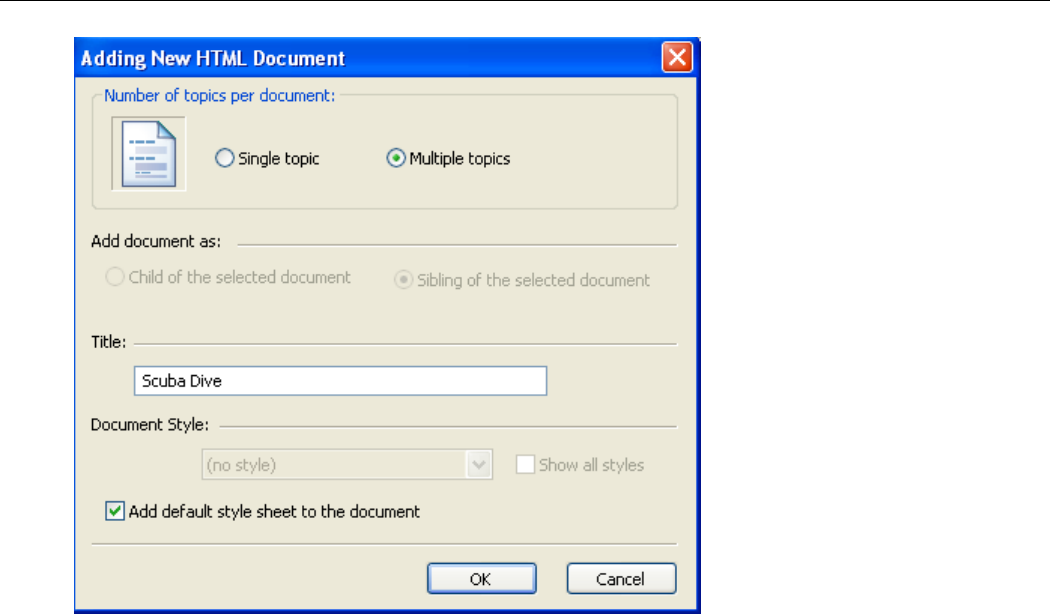
11. Click Save. The Adding New HTML Document dialog box appears.
44 · A Guided Tour of Doc-To-Help
• Select Multiple topics if it is not already selected.
• Enter Scuba Dive in the Title text box, which specifies the first topic in the document.
• Add default style sheet to the document is checked by default. Make sure it is selected.
12. Click OK to accept the settings.
The Scuba Dive.htm page is opened in your default HTML editor and you can begin adding content to the project.
You can close this document for now; we will open it again in a later section.
Adding Content to the Project
The Doc-To-Help project editor lists all of the documents within your project in the document tree in the right pane.
You will see the Scuba Dive.htm document and a Glossary.htm document that was automatically added when the
project was created. We are going to add some additional documents.
1. If necessary, click the Project icon and select the Documents item from the left pane Tree View.
2. Right-click anywhere in the right pane and select New Document.
3. Enter Learn to Dive in the File name text box and click Save. The Adding New HTML Document dialog box
appears.
4. Select Multiple topics under the Number of topics per document if it is not already selected.

Using HTML Source Documents · 45
5. Click OK to accept the remaining default properties for the document and add it to the project.
6. Repeat this process to add another file to the project. Name it Equipment. At this point, the project contains four
empty documents.
Note: You can change the order of the documents by dragging them up and down the list or by using the
arrow buttons above the list.
Project Contents and Structure
Doc-to-Help projects may contain two types of documents:
• Multiple-Topic documents
Multiple-topic documents have an internal hierarchy determined by the styles used in the document. They
should start with a "Heading 1" title, followed by other headings and body text. Each paragraph formatted
with a heading is displayed as a separate topic in the help system.
Multi-topic documents are always at the top level in the project hierarchy. They cannot be moved to deeper
levels.
• Single-Topic documents
Single-topic documents have no internal hierarchy. Each file is displayed as a single topic in the help system.
The position and hierarchy of the topic within the project is determined by its position in document tree and
by the style assigned to the document in the project (the styles actually used in single-topic documents do not
affect the structure of the help system, only the appearance of the topic).
For additional information, see Single and Multiple Topic Documents.
Changing a document from single to multi topic (or vice versa) is easy, but it affects the overall structure of the help
system. So it is a good idea to plan the project structure before you start adding content to the documents.

46 · A Guided Tour of Doc-To-Help
The decision between using single and multi-topic documents is up to you. If you prefer to work with a few large
documents, and the structure of the help system is relatively static, multi-topic documents are better. If you prefer to
work with small files and to manage the structure of the help system from Doc-to-Help, then single-topic documents
are a better choice.
You may combine single and multi-topic documents in a single project to get the best of both worlds. That is the
approach we will take here.
Now let's add some content to our project. Instead of actually writing each topic, copy all of the HTML files from the
tutorial folder into the new project folder.
• Copy all HTML files from the tutorial folder (c:\Program
Files\ComponentOne\DocToHelp\Tutorial\ScubaDive\HTMLDocuments) to the project folder
(c:\Guided Tour\HTMLDocuments). Replace any existing files.
The files you just copied contain enough content to get the help system started. We will enhance them later with
additional formatting, images, links, and more.
Building the Project
Before we start enhancing the "Scuba Dive" help system, let's build the project to see what it looks like now.
To build the project, follow these steps:
1. If necessary, select View Toolbars | Project to display the Project toolbar in the Doc-To-Help project editor.
2. Check that the Help Target list has the type of target you want (we will use HTML Help, but there are many other
options).
3. Click the Make Target
button.
4. After the project compiles, you can examine your work by click the View Target
button on the toolbar.
You should now be looking at the initial version of the help file.
The Contents tab shows the topic hierarchy. The Index tab is limited at this point (we will add an index later). The
Search tab is fully functional.
We got a simple but functional help system just by adding some regular Html files to the project and building it. Close
the help file when you are finished viewing it.
Before moving on, let's examine the structure of the content files.
Document Structure and Styles
In the Doc-To-Help project editor, double-click the Learn To Dive.htm file to open it in your default HTML editor.
The file starts with a "Heading 1" title, immediately followed by a "Heading 2" title, and then some body text. The
structure of the help system is determined by the heading styles. By default, the following conventions apply:
Heading 1
Creates a "book" entry in the help Contents tab. This entry contains sub-
topics, but no topic content of its own.
Headings 2, 3
Creates a topic with contents and possibly more sub-topics. If there are
sub-topics, Doc-to-Help automatically adds links after the regular content.
Heading 4, 5
Similar to Heading 2, except the topic title is not added to the "Contents"
tree and the content is shown in a separate window.
Glossary Heading
Reserved for glossary entries.
You can edit these conventions by changing the properties of the paragraph styles and topic types.
The same style conventions apply to HTML and Microsoft Word files.

Using HTML Source Documents · 47
Adding Single-Topic Documents
Multiple topic documents are convenient when you want to organize hierarchical information in a single document.
In some cases, though, it may be more convenient to work with multiple small documents. For example, if your help
system contains an FAQ (frequently asked questions) section, you may have a team of contributors submitting content.
Rather than consolidate all the information into a single file, it may be more convenient to keep it in separate files.
To demonstrate this, let's add some single-topic documents to our project.
1. In the document tree, right-click the Equipment.htm file.
2. Select Add Documents. The Add Documents dialog box appears.
3. Select FAQs.htm and click Open.
4. Select Single topic under Number of topics per document if it is not already selected.
5. Click OK to accept the settings and add the document to the project.
6. Right-click the FAQs.htm and select Add Documents.
7. In the Add Documents dialog box, select all files that start with "FAQ" and click Open (there should be nine files).
8. In the Adding HTML Documents dialog box, select the option of adding the files as "Children of the Selected
Document" and click OK. The document tree should now look like this:

48 · A Guided Tour of Doc-To-Help
Let's rebuild the project to see the new topics:
1. Click the View Target button.
2. Click Yes when prompted to rebuild the help file. Notice how the FAQs are now displayed in the help system.
Note: The Contents pane shows the Title assigned to each single-topic document. The initial value used is
the file name, which is a logical choice but may not work in all cases. To change the titles, select the
document in the document tree, and enter a title next to the Title property in the Property Pane.
Because we are using single-topic documents in this part of the help project, adding new FAQs to the project amounts
to adding individual files to the project. You don't have to modify any of the existing files.
Before moving on to the next topic, let's explore the document tree a little more. Try selecting one of the FAQ
documents and moving it deeper into the tree hierarchy.
Now try rebuilding the project. Doc-to-Help will display a warning stating that the Style property of some documents
doesn't match their position in the tree. To fix this, you can either:
• Drag the document back to its original position OR
• Use the Move Left arrow on the Documents toolbar.
Using Styles to Enhance the Help project
One of the nice things about using powerful HTML editors such as Microsoft FrontPage or Dreamweaver is all the
formatting abilities these editors offer. You can easily create bulleted and numbered lists, change fonts and colors, add
borders, spell-check your document, and so on. You can pretty much forget you are working on a help system and
concentrate on the documents.
In addition to using regular in-line formatting, you can use cascading style sheets to define and use custom styles. Style
sheets are great because they guarantee consistency and separate formatting from content. If you decide to change the
way your document should look, just change the style sheet and rebuild the help system. You don't have to touch the
content at all.
Getting back to our tour, let's create a style sheet with a couple of styles and use them to enhance the appearance of our
content using Microsoft FrontPage (if you are using a different editor, the steps will be slightly different, but the main
mechanisms will be the same).
1. Create a new text file and save it as ScubaStyles.css in the folder that contains all the tutorial content.
2. In the Doc-To-Help project editor, click the Project icon and select the Documents item from the left pane Tree
View.
3. Double-click the Scuba Dive.htm document to open it in FrontPage or your default HTML editor.

Using HTML Source Documents · 49
4. In FrontPage, select the Format | Style Sheet Links menu option. The Link Style Sheet dialog box opens.
5. Click the Add button and use the Look in drop-down to locate the ScubaStyles.css file we created in step 1.
6. Select the file and click OK.
7. Repeat the last steps to add the new style sheet to the Learn to Dive and Equipment documents.
The new style sheet has been added to the documents. The HTML header in each file should now have a line that
looks like this:
<link rel="stylesheet" type="text/css" href="ScubaStyles.css">
The documents look exactly the same, because the new style sheet is empty. You can now use FrontPage to add
styles to the css file and to modify the appearance of the styles associated with HTML styles.
We will now create a new paragraph style called "Important" and modify the styles associated with the "UL" and "LI"
Html tags to customize the appearance of bullet lists.
1. In FrontPage, select the Format | Style Sheet Links menu option again.
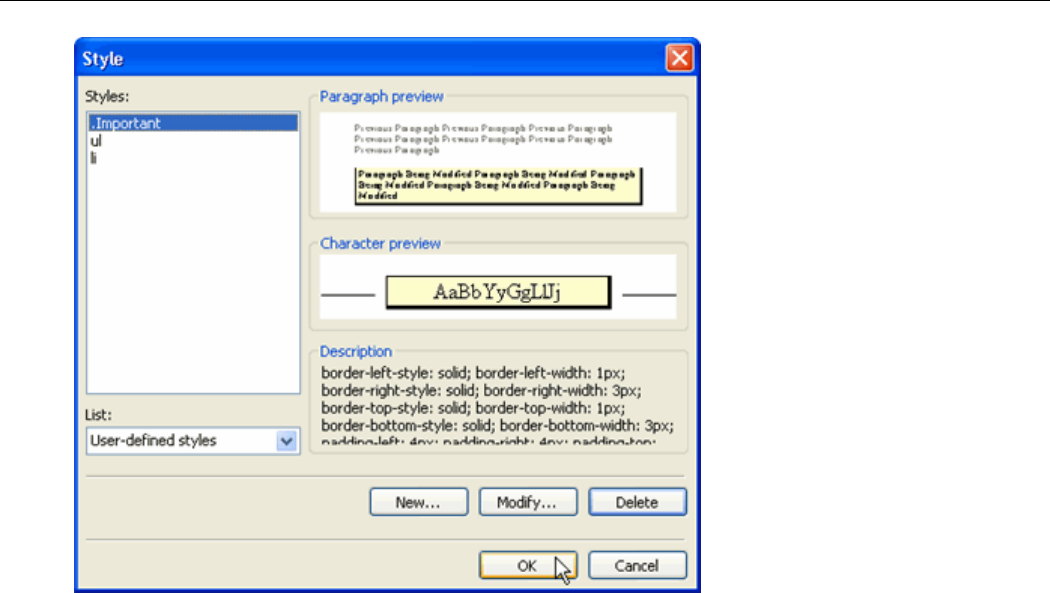
2. In the dialog box, select the ScubaStyles.css file and click Edit.
3. In the Style toolbar, click the Style button
. In the Style dialog, click New to create the new style.
4. Enter the new style name Important and use the Format button to customize the border, background color, and
font for the new style (use any options you want for now). Click OK to close the New Style dialog box when you
are finished.
50 · A Guided Tour of Doc-To-Help
5. Back in the Style dialog box, select HTML Tags from the List drop-down.
6. Select the UL item (unordered list) from the list of styles and click Modify to customize the style. Repeat the
process to customize the LI (list item) style.
7. Save and close the ScubaStyle.css file.
That's how you create and customize css styles. If you want to keep your document consistent with the tutorial, copy
the ScubaStyles.css file from the tutorial folder into your working folder.
The styles associated with HTML tags are applied automatically. The custom style Important needs to be applied
manually, by selecting a paragraph in FrontPage and picking the style from the style drop-down list. This was already
done for you in the tutorial files, but feel free to highlight more items as Important if you want.
Before rebuilding the project to see the changes, let's also change the built-in theme.
1. In the Doc-To-Help project editor, click the Project icon and select the Help Targets item from the left pane Tree
View.
2. Make sure the HTML Help target is selected in the right pane.
3. Click the Theme property in the Properties Pane. The Theme Preview window appears.
4. Select Nonscrolling from the Theme drop-down.

Using HTML Source Documents · 51
5. Click OK to close the Theme Preview window.
6. Build and view the target.
The help file should now look like this:
Notice the blue non-scrolling title that was defined by the new theme, and the highlighted information formatted with
the Important style.
Navigate the help system to see the appearance of the bullet lists, which now have a background and a border.
Making help content look good is easy with Doc-to-Help (and a good HTML editor).
Note: Doc-to-Help doesn't know about the custom .css file, so it won't detect changes and automatically
offer to re-build the help file. You may have to use the Rebuild Target button to force an update and
see the changes.

52 · A Guided Tour of Doc-To-Help
Adding Hyperlinks
Our help system already has a Contents pane that allows users to see the structure of the system and navigate it. It also
has a Search pane that can locate topics that contains certain terms.
The next step in enhancing help navigation is the addition of hyperlinks, allowing users to click on certain parts of the
document and automatically jump to other topics or show additional information.
There are several types of hyperlink mechanisms in help systems. All links are defined by special styles which are
contained in Doc-to-Help style sheets and are automatically available in your source documents.
You can create links using Doc-To-Help Markup Language (D2HML). Doc-To-Help provides the D2HML Styles toolbar
and dialog boxes that integrate with FrontPage, Dreamweaver and Microsoft Word.
To create links, all you have to do is select the text, click a button in the D2HML Styles toolbar, and make a few
choices in a dialog box.
After you have added a link, the changes are visible in the source HTML, so you can see exactly how it is done, edit
the HTML markup, or create your own links without using the toolbar at all if you prefer.
The image below shows the Doc-to-Help D2HML Styles toolbar as it appears in FrontPage:
Topic Links
The first button in the toolbar creates the most common type of link, called a Topic Link or Jump Link. Some text is
highlighted in the document, and when the user clicks it, a different topic appears.
Let's add a few jump links to our project.
1. In the Doc-To-Help project editor, double-click the Equipment document to open it in FrontPage.
2. Scroll down the document until you see the table that contains equipment prices.
3. Double-click the first item, Mask, to select it, and click the Jump Link button
in the toolbar. The Topic Link
dialog box opens.

Using HTML Source Documents · 53
4. Click the Browse button next to the Topic text box to see a list of available topics.
5. Select the topic Masks from the topic list and click OK.
6. Click OK to close the dialog box.
7. Save the document.
8. Repeat the process to add links to the other topics on the table (except Booties & gloves, which doesn't have a
separate topic).
Before you rebuild the project, take a look at the HTML source code for the links. The Masks link we just added
should look like this:
D2HML syntax: Adding Topic Links
<span class="C1HJump"><b>Mask</b>
<span style="display:none">|tag=Masks</span></span>
The button added a <span> tag around the link text and a hidden <span> that contains the name of the target topic.
This is simple plain HTML. Doc-to-Help will turn this into a link when it builds the help project.
If you want to test the links, this is a good time to rebuild the project and try them out.
Note: After adding hyperlinks, it is good practice to rebuild the project and check the Errors and
Unresolved Links lists in the Doc-to-Help Build tab.
Picking topics from a list reduces the chances of mistakes, but eventually you may change some
topics names and that could break a few links.
Pop-up Links
The next button in the toolbar is used to create pop-up links.
Pop-up links are similar to topic links, except they show the target topic in a pop-up window. They are useful for
reference material, things a user may want to take a quick look at in the context of the current topic.
For example, in our equipment page, a user may be looking at an individual item wondering how important that item
is in the overall picture. He would like to take a quick look at the price table. This is a perfect application for a pop-up
link.
1. If it not already open, double-click the Equipment document in the Doc-To-Help project editor to open it in
FrontPage.
2. Scroll down the document to bottom of the Masks topic.
3. Add a paragraph with some descriptive text like View retail prices.
4. Highlight the new paragraph and click the Popup Link button
in the toolbar. The Popup Link dialog box
opens.

54 · A Guided Tour of Doc-To-Help
5. Click the Browse button
next to the Topic text box to see a list of available topics.
6. Select the topic So, What's This Going to Cost Me on the topic list and click OK.
Check the HTML source code to see what the link looks like in HTML. It's almost the same as the topic link we added
before, except for the style name.
D2HML syntax: Adding Popup Links
<span class="C1HPopup">View retail prices.
<span style="display:none">|tag=So, What's This Going to Cost Me?</span></span>
For consistency, copy this link to the bottom of the other equipment topics. Then rebuild the project and try out the
pop-up links.

Using HTML Source Documents · 55
Here's what they look like:
Keyword Links (KLinks)
The topic and pop-up links we discussed above are one-to-one links. They take the reader from the current topic
directly to another.
Keyword links are one-to-many links. They may take the reader from the current topic to any topic that contains the
keyword specified by the link. (When the user clicks the link, a dialog box appears listing all the available destinations.)
So before we add any keyword links to our sample project, we need some keywords to link to.
1. Open the Learn to Dive document in your HTML editor.
2. Find the PADI Scuba Experiences for Kids topic.
3. Select SASY, the first word in the topic text.
4. Click the Keyword button
in the toolbar. The Keyword dialog box opens.
5. Click the Add button in the dialog and type the keyword Kids.
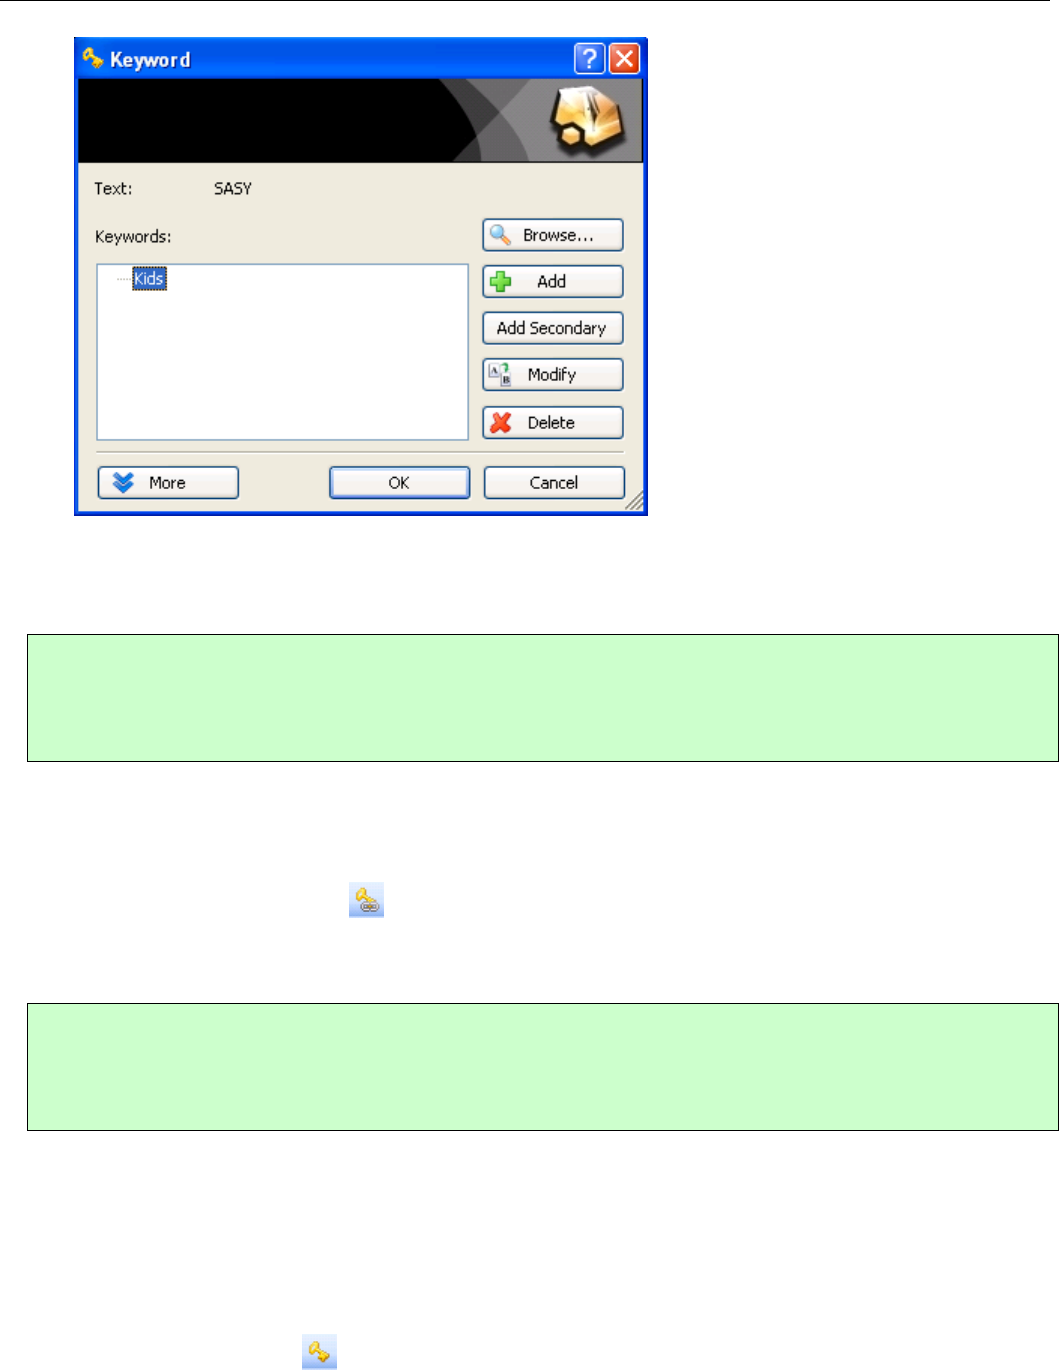
56 · A Guided Tour of Doc-To-Help
6. Click OK to close the dialog box.
The keyword Kids is now associated with the PADI Scuba Experiences for Kids topic. Look at the HTML source and
notice how that was done. As before, it is just a <span> tag with a special Doc-to-Help style (C1HIndex).
D2HML syntax: Adding Keywords
<span class="C1HIndex">SASY</span>
<span class="C1HIndex">SASY
<span style="display:none">|keyword=Kids</span></span>
Now that we have a keyword defined, let's create a link to it.
1. Scroll back to the top of the document and locate the Starting the Adventure topic.
2. Select the word Kids in the second paragraph (Kids are welcome too).
3. Click the Keyword Link button
in the toolbar. The Keyword Link dialog box opens.
4. Click OK to accept the default and use the selected text as a target keyword.
5. Close the file.
D2HML syntax: Adding Keyword Links
<span class="C1HKeywordLink">Kids</span>
<span class="C1HKeywordLink">Kids
<span style="display:none">|keyword=Kids</span></span>
So far we have added a new keyword to the document (it will appear in the Index tab in the help system) and we have
also added a link to it.
This is not very interesting because the keyword is associated with a single topic. To create a one-to-many link as we
described above, let's assign the Kids keyword to a different topic.
1. Open the FAQ Age Requirements document in your HTML editor.
2. Select 12 years old in the topic text.
3. Click the Keyword button
in the toolbar. The Keyword dialog box appears.

Using HTML Source Documents · 57
4. Click the Add button in the dialog and type the keyword Kids again.
5. Click OK to close the dialog box.
6. Save and close the file.
D2HML syntax: Adding Keywords
<span class="C1HIndex">12 years old</span>
<span class="C1HIndex">12 years old
<span style="display:none">|keyword=Kids</span></span>
Now rebuild the help file and open it.
Select the Starting the Adventure topic and click the keyword link Kids we just added.
A dialog box will pop up showing the two topics that were assigned the keyword Kids, as shown below.
Keyword links are closely related to the help system's index, an important feature we will discuss later. For now, it is
enough to remember that a keyword may be associated with one or more topics, and that a keyword link will take the
reader to any of those topics.
Group Links (ALinks)
Group links are also known as ALinks (for associative links). They are similar to keyword links in the way that they are
created and used, except for one important difference: keywords appear in the index, and groups don't.
To see the difference, let's create a new topic group called PADI and add a group link to show how it works.
1. Open the Learn to Dive document in your HTML editor.
2. Select the word PADI in the third topic title, PADI Open Water Diver course.
3. Click the Group button
in the toolbar. The Group dialog box opens.

58 · A Guided Tour of Doc-To-Help
4. Click OK to accept the selected text as the new group name.
5. Repeat this procedure for all other topics in the file that start with the word "PADI" (or do only three or four; there
are ten).
D2HML syntax: Adding Groups
<span class="C1HGroup">PADI</span>
<span class="C1HGroup">PADI
<span style="display:none">|group=PADI</span></span>
Now that the new group has been created and assigned to a few topics, let's create the group link.
1. Scroll to the top of the document and select the word PADI in the second paragraph ("certifications offered by
PADI").
2. Click the Group Link button
in the toolbar. The Group Link dialog box opens.
3. Click OK to accept the selected text as the name of the target group.
D2HML syntax: Adding Group Links
<span class="C1HGroupLink">PADI</span>
<span class="C1HGroupLink">PADI
<span style="display:none">|group=PADI</span></span>
To see the new group link in action, rebuild the document and navigate to the second topic, Learn to Dive. Click the
PADI link and you will see a list with the ten topics that belong to the group.

Using HTML Source Documents · 59
Notice in the image below that the group name "PADI" doesn't appear in the index.
Group links are especially useful in situations where you are merging a collection of help files. For more details about
groups, please see the Doc-to-Help reference.
Adding Image Maps
Image maps allow you to define areas within images and use each area as a hyperlink. They are more effective than
menus when the options can be presented logically in an image.
For example, in our sample help project, an image map would be ideal to let the user explore the different types of
diving equipment by clicking the image of a diver.
If you are creating your help content with Microsoft Word, you can create image maps using the Image Map Editor
provided with Doc-to-Help. For more information, see Using the Image Map Editor in Microsoft Word.
If you are using HTML, you can draw a hot spot and then use D2HML to create the link.
Follow the steps below to add an image map to our sample project (we are using Microsoft FrontPage, the steps will be
slightly different with other editors).
1. Open the Equipment document.
2. Move the cursor to the end of the first topic and add a new empty paragraph.
3. Select the Insert | Picture | From File menu and insert the Equipment.png file from the C:\Program
Files\ComponentOne\DocToHelp\Tutorial\ScubaDive\HTMLDocuments folder.
4. Select View | Toolbars | Pictures to make sure the Pictures toolbar is visible in FrontPage.
5. Select the image, click the Polygonal Hotspot button and draw an area around the diver's fins (see picture below).
When you close the polygon, the Insert Hyperlink dialog box appears.
6. Enter Fins in the Address text box and click the ScreenTip button to enter a tooltip. Then click OK to close the
dialog boxes.
7. Repeat this process and add hotspots around the mask, wetsuit, and dive computer on the diver's wrist (see picture
below). Enter the following, corresponding names for each in the Address text box:

60 · A Guided Tour of Doc-To-Help
• Mask
• Wetsuit
• Dive Computer
8. Select the Fins hot spot and click the Jump Link button
on the D2HML Styles toolbar. The Links in a
Picture with Area Hotspots dialog box appears.
9. Select Fins in the Hyperlink column and click Create Area Hotspot. The Topic Link D2HML dialog box
appears.
10. Click the Browse button and select Fins in the Select Topic dialog box.
11. Click OK to close the Select Topic and Topic Link dialog boxes.
12. Create an area hotspot for all of the hot spots in the Hyperlink column and link to the following, corresponding
topics:
• Masks
• Exposure Protection Suits
• Dive Computers
13. Click OK to close the Links in a Picture with Area Hotspots dialog box.

Using HTML Source Documents · 61
14. Close the editor and rebuild the help file to test the image map. Moving the mouse over the image will show
tooltips, if you provided them, and clicking the hotspots will take you directly to the topic with tips about each type
of equipment.
Adding Pop-Up and Drop-Down Text
Sometimes you may want to attach additional content to explain a term, but don't want to create a whole new topic for
that short explanation. There are several ways to do that using Doc-to-Help.
Inline pop-ups
Inline pop-ups show additional content in a pop-up window. They look like pop-up links, except the content is not a
separate topic.
To add inline pop-ups to your document, use the Inline Popup button
in the D2HML Styles toolbar:
Select the text to which you want to attach more information and click the Inline Popup button. Then type the text
that should be displayed in the pop-up and click OK to create the pop-up.
To add an inline pop-up to our sample project, follow these steps:
1. Open the Scuba Dive.htm document.
2. Copy the Copyright Notice paragraph and paste a new copy in the document.
3. Cut the text after the Copyright Notice title to the clipboard.
4. Select the Copyright Notice title and click the Inline Popup button. The Inline Popup Link dialog box appears.
5. Paste the text into the dialog box and click OK.
Note: The dialog box only allows you to enter plain text. However, once the text has been added to the
document, it's HTML as usual. You can edit the text and add custom formatting as usual.
D2HML syntax: Adding an Inline Popup
<span class="C1HInlinePopup"><b>Copyright Notice (pop-up):</b></span>
<span class="C1HPopupText">Substantial …<br>
<a href="http://www.padi.com/">www.padi.com</a><br>
<a href="http://www.scubadiving.com/">www.scubadiving.com</a><br>
<a href="http://www.newscuba.com">www.newscuba.com</a></span>
Inline drop-downs and expands
Inline drop-downs and expands are similar to inline pop-ups, except the additional text is displayed within the
document instead of in a pop-up.
Drop-downs show the additional text below the selection, as a paragraph that can be expanded or collapsed. Expands
show the additional text within the current paragraph.
Creating inline drop-downs and expands is similar to creating inline pop-ups, except you will use different buttons in
the toolbar.

62 · A Guided Tour of Doc-To-Help
These examples have already been created for you in the Scuba Dive.htm document:
D2HML syntax: Adding an Inline Dropdown
<span class="C1HInlineDropdown"><b>Copyright Notice (drop-down):</b>
</span><span class="C1HDropdownText">Substantial …<br>
<a href="http://www.padi.com/">www.padi.com</a><br>
<a href="http://www.scubadiving.com/">www.scubadiving.com</a><br>
<a href="http://www.newscuba.com">www.newscuba.com</a></span>
D2HML syntax: Adding an Inline Expand
<span class="C1HInlineExpand"><b>Copyright Notice (pop-up):</b>
</span><span class="C1HExpandText">Substantial …<br>
<a href="http://www.padi.com/">www.padi.com</a><br>
<a href="http://www.scubadiving.com/">www.scubadiving.com</a><br>
<a href="http://www.newscuba.com">www.newscuba.com</a></span>
Glossary popups
Glossary popups can be created automatically by Doc-to-Help. They are based on a word list and apply to the first
instance of a glossary term in each topic throughout the Help system. For more information, see Creating a Glossary.
Creating a Glossary
A glossary is a list of specialized words with their definitions, often placed at the end of a book.
Doc-to-Help enhances this concept by compiling this word list and, if you choose, automatically attaching a pop-up
with the definition wherever the words appear in the help system. You can also create glossary pop-ups manually.
Creating a glossary in Doc-to-Help is extremely easy, and we have already added one to our sample project.
Open the Glossary.htm document to see how it's done. This glossary is simply a list containing the terms, all formatted
with the Glossary Heading style, followed by their definition, formatted as C1H Popup Topic Text.
Our sample glossary contains about 20 terms, and can be seen as a regular help topic. If you navigate around the help
system, you will notice that the first instance of each word in a topic that matches a glossary term has a pop-up that
shows the definition.
That was done automatically by Doc-to-Help, all we had to do was create and format the word list.
Creating an Index
An index is a searchable list of keywords, each of which corresponds to one or more topics. When building an index,
you should anticipate which words and phrases the reader is likely to look for and associate them with matching Help
topics.
In an online Help system, selecting a keyword displays a list of the associated topics. In a printed manual, the index at
the end of the book shows the page numbers that correspond to each keyword.
If you have been following all the steps in this QuickStart, you already know the easiest way to quickly add a keyword
while you are editing help content. Simply select a word in your HTML editor and click the Keyword icon in the Doc-
to-Help toolbar.
This method is great when you are working on individual topics, but it is not convenient when working with the overall
help system. For that, Doc-to-Help has an Index view that shows all the keywords and their topics, and allows you to
edit the keywords using drag and drop.

Using HTML Source Documents · 63
The image below shows Doc-to-Help's Expert mode Index view.
The index view shows a list with all keywords currently defined in the project. When you select a keyword on the list,
all topics currently assigned to that keyword appear on the list below. You can add topics to the list by dragging them
from the list on the right.
You can also use the context menus to add, rename, and remove keywords and topics assigned to them.
Before you start working on the index, drag the Style column to the top of the topic list. This will group topics by
heading and will make it easier for you to find them.
Now let's add some keywords to our help system.
1. Right-click the keyword list and select New, then type the new keyword Equipment and press Enter to create the
new keyword.
2. Select each of the topics directly related to equipment on the topic list and drag them to the list below the
keywords. There are at least eight topics, from "Buoyancy Compensators" to "Where Should You Buy Your
Gear?".
3. Repeat the steps above to create the keywords Professional Diving and Frequently Asked Questions.
4. Rebuild the project and select the Index tab to see the new index.

64 · A Guided Tour of Doc-To-Help
Doc-to-Help supports advanced indexing features such as multi-level keywords and automated index generation using
scripts. These topics are useful in large help systems. See Building an Index for additional information.
Using the Doc-To-Help Project
Open the StyleGuide.d2h project file that you created in the Using Microsoft Word section of this tour. It should be
located in the C:\Program Files\ComponentOne\DocToHelp\Tutorial folder. This project will be used to
demonstrate working with topics, indexing and creating printed manuals.
Navigating Large Projects
Large projects provide a special challenge when attempting to find a specific topic. Doc-To-Help’s Topic view lets you
find, sort, and open topics.
Sorting Topics For Easy Viewing
With Doc-To-Help, the Help author can modify the topic view by using the enhanced topic display and sorting
capabilities in the convenient outlook style grouping feature. By simply dragging any of the topic headings (Title,
Document or Style) into the grouping area located at the top of the topic list pane, Doc-To-Help sorts automatically by
that heading.

Using the Doc-To-Help Project · 65
1. In the Icon Bar, click the Topics icon.
2. To sort by style, simply select the Style column and while holding the mouse button down, drag its header to the
column grouping area as shown below.
3. Release the mouse button. Note the change in the Doc-To-Help topic list pane. The rows are now sorted by the
Style headings.

66 · A Guided Tour of Doc-To-Help
4. Select the Document column and drag its header to the column group area. The topics are now sorted by Style
then Document as shown below.
5. To return to the default view, drag the headers back into the header bar.
Filtering Topics
Doc-To-Help provides the author with topic filtering capabilities by using the filter boxes located beneath the headers
in the topic list pane on the right. By simply choosing one or more of the drop down filtering options or by entering text
in the topic textbox, you can filter the topics in any fashion you like.
1. If necessary, select the Topics icon to switch to topics view.
2. Click in the textbox under the Title header, type Identify and press Enter. The Topics list displays topics that
contain the word Identify somewhere within the title.
3. To filter by Document, click the arrow under the Document header and select Techniques. The Topics list now
only displays the topics containing the word Identify in the Techniques document.

Using the Doc-To-Help Project · 67
By combining the Title, Document and Style filtering options, you can sort by almost any combination you like.
Choosing a Default Topic
You may have noticed that we start with a blank Help window pane whenever we open the Help file. We can modify
this by changing one of the topics to the Default Topic.
To set the Style Guide topic as the default topic:
1. Click the Topics icon.
2. Select the topic Style Guide.
3. Right-click the topic, then select the Default Topic option from the shortcut menu. Note that your selection is now
displayed in a bold font to indicate that it is the default topic.
4. Click the Make Target button to compile the Help target.
5. After the target is compiled, click the View Target button. Notice that the Style Guide topic opens in the right
Help pane by default.

68 · A Guided Tour of Doc-To-Help
6. When you’re finished, close the Help file.
Indexing in Doc-To-Help
The Doc-To-Help Project Editor provides an additional interface for associating index keywords (KLinks) or named
groups (ALinks) with specific Help topics. By creating keywords and associating topics with them, or by choosing a
topic and associating a keyword with that topic, you can develop an index for your Help file in the Project Editor. Of
course, you can still use Word’s {XE} fields to create index entries for print and keywords for Help targets if you
prefer.
Examining the Index View
1. From the Icon Bar, select the Index icon.
• The upper left pane displays the index keywords and secondary keywords.
• The lower left pane displays the topics indexed to a selected keyword.
• The right pane shows the list of topics generated by your styles.
2. In the left upper index keyword pane, scroll down to the keyword entry words.
3. To see the secondary keywords, expand the tree view by clicking the
next to words.
4. Select the secondary keyword, archaic. The lower left hand pane contains the topics associated with the secondary
keyword.

Using the Doc-To-Help Project · 69
5. Place your cursor between the top of the Title column and the Document column and drag the Document column
to the right until it is wide enough to read the Topic Titles.
Adding Primary and Secondary Keywords
Now you will add the index keyword expressions and the secondary keyword archaic to the index keyword list.
1. Select any primary keyword in the upper left pane.
2. Select Project | New | Keyword.

70 · A Guided Tour of Doc-To-Help
3. Replace <new> with expressions.
4. Press Enter to insert “expressions” into the list of keywords alphabetically.
5. While the keyword “expressions” is still highlighted in the upper left pane, click the Show Secondary button
.
Note: Clicking the Show Secondary button changes the options on the Index toolbar, disabling some
options and enabling others. It also activates the Index Elements text box.
6. Click anywhere in the Index Elements drop-down.
7. Type archaic and press Enter. Doc-To-Help adds the secondary keyword to the keyword list.
Associating Topics with a Keyword
1. Select the “expressions” keyword.
2. In the right pane, select the topic title Avoid archaic words and expressions.
3. Right-click the topic and select Index from the shortcut menu.
4. Select the secondary keyword archaic.
5. In the right pane, select the topic title Avoid archaic words and expressions.
6. Right-click the topic and select Index from the shortcut menu. The topic has been associated with the both the
primary and secondary keywords.

Using the Doc-To-Help Project · 71
Associating Keywords with Topics
In the previous steps, you learned how to create an index keyword and associate it with a topic. Another method of
indexing is to select a topic and associate keywords with that topic. This “topic to keyword” workflow makes it easier
to create index keywords based on the existing topic titles.
1. Click the Topics icon.
2. Make the Title column as wide as necessary to view the list.
3. In the right pane, highlight Avoid archaic words and expressions.
4. In the property pane, click the Collections button
.
5. Choose Keyword from the collections drop-down.

72 · A Guided Tour of Doc-To-Help
6. Type archaic into the keyword textbox and press Enter. Doc-To-Help adds archaic to the list of keywords for this
topic.
7. Type archaic expressions into the keyword textbox and press Enter.
8. Select StyleGuide HTML Help from the Help Target drop-down on the Project toolbar.
9. Click the Make Target button.
10. After the target is compiled, click the View Target button.
11. Choose the Index tab to view your new index entries. The secondary keyword archaic and the primary keywords
expressions and archaic expressions have been added to the index and are associated with the correct topic.
12. When you’re finished, close the Help file.
For more information, see Building an Index.
Creating Printed Manuals
One of the features included in Doc-To-Help is the ability to produce a “Printed Manual” in the same manner as you
produce any other Help target. The compiled Printed Manual Help target includes all of the source document content,
a table of contents, an index and customizable “front page”. By setting the ByLine, SuperTitle and Title properties you
can customize the front page of your manual with any text you like. Additionally, Doc-To-Help supports live links in
your manual Word document; live links are working links in the PDF generated from your manual document.
Examining the Printed Manual
1. Select StyleGuide Manual from the Project toolbar drop-down.

Using the Doc-To-Help Project · 73
2. Click the Make Target button.
3. Click the View Target button. The front page of your printed manual contains the default ByLine, SuperTitle and
Title.
4. Scroll down to see that Doc-To-Help has automatically included a table of contents.
5. Scroll down to the “Introduction” heading. The graphic and the margin note are included in the printed manual.
Note that the bulleted items under the heading “How can we be better writers?” have page numbers in place of the
hyperlinks in the online Help file and the “printed manual” conditional text is included.
6. Scroll to the end of the printed manual. Doc-To-Help has automatically included an index at the end of the printed
manual.
7. When you’re finished, close the printed manual.
Modifying the Front Page of the Printed Manual
The next step is to change the defaults of the ByLine, SuperTitle and Title properties to suit the StyleGuide document.
By default the ByLine property is set to “By ComponentOne LLC", the SuperTitle property is set to “Doc-To-Help”,
and the Title property is set to “Standard Template”.
1. Select the Project icon.
2. In the left pane, click Help Targets.
3. Select StyleGuide Manual from the right pane.
4. In the properties pane, select the ByLine Property.
5. Highlight the By ComponentOne LLC text and type My Company, Inc..
6. Select the SuperTitle property.
7. Highlight the Doc-To-Help text and type Becoming a Better Writer.
8. Select the Title property.

74 · A Guided Tour of Doc-To-Help
9. Highlight the Standard Template text and type Style Guide.
10. Click the Make Target button.
11. Click the View target button. Doc-To-Help has converted your title page to match the changes you made to the
properties.
12. When you’re finished, close the printed manual.
Creating Live Links
Doc-To-Help creates links in the Word document created when you build a Manual target. If you convert the resulting
document to a PDF, these links become live, or working, links in the PDF. Simply set the LiveLinks property to True
for the Manual target. All topic links, except pop-up links, regardless of the way they are specified in the source
document, become Word hyperlinks in the manual document. When the document is converted to a PDF, the
hyperlinks are live PDF links.
Note: Pop-up links do not become live links in the Manual target and PDF because neither Word nor
Acrobat PDF has a pop-up feature.
The Concatenate property must be set to True in order for the LiveLinks property to take effect.
There is an issue with the Adobe Acrobat PDF converter when Enable accessibility and reflow with Tagged PDF is checked
in Adobe Acrobat, including the latest version 7. When the PDF is produced and the Word hyperlinks are converted to
PDF links, the links jump to the top of the page containing the destination topic instead of jumping to the desired topic
location. To fix this problem, uncheck the Enable accessibility and reflow with Tagged PDF checkbox in Adobe Acrobat
before creating a PDF or use a PDF converter other than Adobe Acrobat.
To Create Live Links:
1. Select the Project icon.
2. In the left pane, click Help Targets.
3. Select StyleGuide Manual from the right pane.
4. In the properties pane, click the drop-down arrow next to the LiveLinks property and select True.

Using the Doc-To-Help Project · 75
5. Click the Make Target button.
6. Click the View Target button.
7. Scroll down to the “Introduction” heading. Note that the bulleted items under the heading “How can we be better
writers?” are now links in addition to having page reference numbers.
If the links are clicked, they jump to the appropriate topic. If the master document is converted to a PDF, the links
jump to the appropriate topic in the PDF.
8. When you are finished, close the printed manual.
Creating a PDF
When you build a Printed Manual target, you have the option of creating a Word document or printing directly to a
PDF. You can also choose to create an outline, or bookmarks which appear in the table of contents pane on the left
side of the PDF viewer, which link to topics in the PDF.
1. Select the Project icon.
2. In the left pane, click Help Targets.
3. Select StyleGuide Manual from the right pane.
4. In the properties pane, click the drop-down arrow next to the GeneratePDF property and select True.
5. Click the drop-down arrow next to the OutlineInPDF property and select True.
6. Click the Make Target button.

76 · A Guided Tour of Doc-To-Help
7. Click the drop-down arrow next to the View Target button and select View PDF Target. This option is also
available on the Build menu when a manual target is selected in the Help Target drop-down list.
Note: Although Doc-To-Help now supports PDF generation, if you need more control over advanced PDF
features, you may want to continue using a third-party PDF generator to convert the Word document
generated for the Manual target to PDF.
Congratulations, you have completed the Doc-To-Help Guided Tour!
