
®
IBM Training
Course Exercises
IBM Control Desk 7.6 Service Request
Management Fundamentals
Course code TP362 ERC 1.0
September 2016 edition
NOTICES
This information was developed for products and services offered in the USA.
IBM may not offer the products, services, or features discussed in this document in other countries. Consult your local IBM
representative for information on the products and services currently available in your area. Any reference to an IBM product, program,
or service is not intended to state or imply that only that IBM product, program, or service may be used. Any functionally equivalent
product, program, or service that does not infringe any IBM intellectual property right may be used instead. However, it is the user's
responsibility to evaluate and verify the operation of any non-IBM product, program, or service.
IBM may have patents or pending patent applications covering subject matter described in this document. The furnishing of this
document does not grant you any license to these patents. You can send license inquiries, in writing, to:
IBM Director of Licensing
IBM Corporation
North Castle Drive, MD-NC119
Armonk, NY 10504-1785
United States of America
The following paragraph does not apply to the United Kingdom or any other country where such provisions are inconsistent with local
law: INTERNATIONAL BUSINESS MACHINES CORPORATION PROVIDES THIS PUBLICATION "AS IS" WITHOUT WARRANTY OF
ANY KIND, EITHER EXPRESS OR IMPLIED, INCLUDING, BUT NOT LIMITED TO, THE IMPLIED WARRANTIES OF
NON-INFRINGEMENT, MERCHANTABILITY OR FITNESS FOR A PARTICULAR PURPOSE. Some states do not allow disclaimer of
express or implied warranties in certain transactions, therefore, this statement may not apply to you.
This information could include technical inaccuracies or typographical errors. Changes are periodically made to the information herein;
these changes will be incorporated in new editions of the publication. IBM may make improvements and/or changes in the product(s)
and/or the program(s) described in this publication at any time without notice.
Any references in this information to non-IBM websites are provided for convenience only and do not in any manner serve as an
endorsement of those websites. The materials at those websites are not part of the materials for this IBM product and use of those
websites is at your own risk.
IBM may use or distribute any of the information you supply in any way it believes appropriate without incurring any obligation to you.
Information concerning non-IBM products was obtained from the suppliers of those products, their published announcements or other
publicly available sources. IBM has not tested those products and cannot confirm the accuracy of performance, compatibility or any other
claims related to non-IBM products. Questions on the capabilities of non-IBM products should be addressed to the suppliers of those
products.
This information contains examples of data and reports used in daily business operations. To illustrate them as completely as possible,
the examples include the names of individuals, companies, brands, and products. All of these names are fictitious and any similarity to
the names and addresses used by an actual business enterprise is entirely coincidental.
TRADEMARKS
IBM, the IBM logo, and ibm.com are trademarks or registered trademarks of International Business Machines Corp., registered in many
jurisdictions worldwide. Other product and service names might be trademarks of IBM or other companies. A current list of IBM
trademarks is available on the web at “Copyright and trademark information” at www.ibm.com/legal/copytrade.shtml.
Adobe, the Adobe logo, PostScript, and the PostScript logo are either registered trademarks or trademarks of Adobe Systems
Incorporated in the United States, and/or other countries.
Cell Broadband Engine is a trademark of Sony Computer Entertainment, Inc. in the United States, other countries, or both and is used
under license therefrom.
Intel, Intel logo, Intel Inside, Intel Inside logo, Intel Centrino, Intel Centrino logo, Celeron, Intel Xeon, Intel SpeedStep, Itanium, and
Pentium are trademarks or registered trademarks of Intel Corporation or its subsidiaries in the United States and other countries.
IT Infrastructure Library is a Registered Trade Mark of AXELOS Limited.
ITIL is a Registered Trade Mark of AXELOS Limited.
Java and all Java-based trademarks and logos are trademarks or registered trademarks of Oracle and/or its affiliates.
Linear Tape-Open, LTO, the LTO Logo, Ultrium, and the Ultrium logo are trademarks of HP, IBM Corp. and Quantum in the U.S. and
other countries.
Linux is a registered trademark of Linus Torvalds in the United States, other countries, or both.
Microsoft, Windows, Windows NT, and the Windows logo are trademarks of Microsoft Corporation in the United States, other countries,
or both.
UNIX is a registered trademark of The Open Group in the United States and other countries.
© Copyright International Business Machines Corporation 2016.
This document may not be reproduced in whole or in part without the prior written permission of IBM.
US Government Users Restricted Rights - Use, duplication or disclosure restricted by GSA ADP Schedule Contract with IBM Corp.

Course materials may not be reproduced in whole or in part without the prior written permission of IBM.
© Copyright IBM Corp. 2016
iii
Contents
Unit 1 Overview exercises . . . . . . . . . . . . . . . . . . . . . . . . . . . . . . . . . . . . . . . . . . . . . . . . . . . . . . . . . 1-1
Exercise 1 Logging in to the operating system . . . . . . . . . . . . . . . . . . . . . . . . . . . . . . . . . . . . . . . . . . . . . 1-1
Exercise 2 Verifying image network configuration . . . . . . . . . . . . . . . . . . . . . . . . . . . . . . . . . . . . . . . . . . . 1-2
Exercise 3 Starting IBM Control Desk . . . . . . . . . . . . . . . . . . . . . . . . . . . . . . . . . . . . . . . . . . . . . . . . . . . . 1-4
Unit 2 Service management exercises . . . . . . . . . . . . . . . . . . . . . . . . . . . . . . . . . . . . . . . . . . . . . . . 2-1
This unit has no student exercises.
Unit 3 The Service Desk exercises . . . . . . . . . . . . . . . . . . . . . . . . . . . . . . . . . . . . . . . . . . . . . . . . . .3-1
Exercise 1 Simple informational service request . . . . . . . . . . . . . . . . . . . . . . . . . . . . . . . . . . . . . . . . . . . . 3-1
Logging in . . . . . . . . . . . . . . . . . . . . . . . . . . . . . . . . . . . . . . . . . . . . . . . . . . . . . . . . . . . . . . . . . . . . . . . . 3-2
Set a default Start Center . . . . . . . . . . . . . . . . . . . . . . . . . . . . . . . . . . . . . . . . . . . . . . . . . . . . . . . . . . . . 3-2
Creating a service request . . . . . . . . . . . . . . . . . . . . . . . . . . . . . . . . . . . . . . . . . . . . . . . . . . . . . . . . . . . 3-3
Checking the queue . . . . . . . . . . . . . . . . . . . . . . . . . . . . . . . . . . . . . . . . . . . . . . . . . . . . . . . . . . . . . . . . 3-5
Taking ownership . . . . . . . . . . . . . . . . . . . . . . . . . . . . . . . . . . . . . . . . . . . . . . . . . . . . . . . . . . . . . . . . . . 3-6
Marking ticket as In Progress . . . . . . . . . . . . . . . . . . . . . . . . . . . . . . . . . . . . . . . . . . . . . . . . . . . . . . . . . 3-7
Categorizing and prioritizing . . . . . . . . . . . . . . . . . . . . . . . . . . . . . . . . . . . . . . . . . . . . . . . . . . . . . . . . . . 3-7
Informing the requester . . . . . . . . . . . . . . . . . . . . . . . . . . . . . . . . . . . . . . . . . . . . . . . . . . . . . . . . . . . . . . 3-8
Verifying resolution . . . . . . . . . . . . . . . . . . . . . . . . . . . . . . . . . . . . . . . . . . . . . . . . . . . . . . . . . . . . . . . . . 3-8
Resolving ticket . . . . . . . . . . . . . . . . . . . . . . . . . . . . . . . . . . . . . . . . . . . . . . . . . . . . . . . . . . . . . . . . . . . . 3-9
Resolving the ticket . . . . . . . . . . . . . . . . . . . . . . . . . . . . . . . . . . . . . . . . . . . . . . . . . . . . . . . . . . . . . . . . 3-10
Exercise 2 Solution lookup . . . . . . . . . . . . . . . . . . . . . . . . . . . . . . . . . . . . . . . . . . . . . . . . . . . . . . . . . . . 3-12
Creating a service request . . . . . . . . . . . . . . . . . . . . . . . . . . . . . . . . . . . . . . . . . . . . . . . . . . . . . . . . . . 3-12
Taking ownership . . . . . . . . . . . . . . . . . . . . . . . . . . . . . . . . . . . . . . . . . . . . . . . . . . . . . . . . . . . . . . . . . 3-12
Marking ticket as In Progress . . . . . . . . . . . . . . . . . . . . . . . . . . . . . . . . . . . . . . . . . . . . . . . . . . . . . . . . 3-13
Entering basic information . . . . . . . . . . . . . . . . . . . . . . . . . . . . . . . . . . . . . . . . . . . . . . . . . . . . . . . . . . . 3-13
Searching for the solution . . . . . . . . . . . . . . . . . . . . . . . . . . . . . . . . . . . . . . . . . . . . . . . . . . . . . . . . . . . 3-14
Linking the global issue . . . . . . . . . . . . . . . . . . . . . . . . . . . . . . . . . . . . . . . . . . . . . . . . . . . . . . . . . . . . . 3-16
Resolving the ticket . . . . . . . . . . . . . . . . . . . . . . . . . . . . . . . . . . . . . . . . . . . . . . . . . . . . . . . . . . . . . . . . 3-17
Exercise 3 Creating a solution . . . . . . . . . . . . . . . . . . . . . . . . . . . . . . . . . . . . . . . . . . . . . . . . . . . . . . . . . 3-19
Creating a service request . . . . . . . . . . . . . . . . . . . . . . . . . . . . . . . . . . . . . . . . . . . . . . . . . . . . . . . . . . 3-19
Searching for a solution . . . . . . . . . . . . . . . . . . . . . . . . . . . . . . . . . . . . . . . . . . . . . . . . . . . . . . . . . . . . . 3-20
Verifying the resolution . . . . . . . . . . . . . . . . . . . . . . . . . . . . . . . . . . . . . . . . . . . . . . . . . . . . . . . . . . . . . 3-21
Creating a solution . . . . . . . . . . . . . . . . . . . . . . . . . . . . . . . . . . . . . . . . . . . . . . . . . . . . . . . . . . . . . . . . 3-21
Complete the ticket . . . . . . . . . . . . . . . . . . . . . . . . . . . . . . . . . . . . . . . . . . . . . . . . . . . . . . . . . . . . . . . . 3-22
Exercise 4 Changing requests . . . . . . . . . . . . . . . . . . . . . . . . . . . . . . . . . . . . . . . . . . . . . . . . . . . . . . . . . 3-23
Indicating the asset . . . . . . . . . . . . . . . . . . . . . . . . . . . . . . . . . . . . . . . . . . . . . . . . . . . . . . . . . . . . . . . . 3-23
Informing requester of status . . . . . . . . . . . . . . . . . . . . . . . . . . . . . . . . . . . . . . . . . . . . . . . . . . . . . . . . . 3-25
Starting a workflow . . . . . . . . . . . . . . . . . . . . . . . . . . . . . . . . . . . . . . . . . . . . . . . . . . . . . . . . . . . . . . . . 3-25
Exercise 5 Working with existing tickets . . . . . . . . . . . . . . . . . . . . . . . . . . . . . . . . . . . . . . . . . . . . . . . . . 3-27
Contents
Course materials may not be reproduced in whole or in part without the prior written permission of IBM.
© Copyright IBM Corp. 2016
iv
V7.0
Uempty
Checking the inbox and work view . . . . . . . . . . . . . . . . . . . . . . . . . . . . . . . . . . . . . . . . . . . . . . . . . . . . 3-27
Search for new unassigned service requests . . . . . . . . . . . . . . . . . . . . . . . . . . . . . . . . . . . . . . . . . . . . 3-27
Opening the ticket . . . . . . . . . . . . . . . . . . . . . . . . . . . . . . . . . . . . . . . . . . . . . . . . . . . . . . . . . . . . . . . . . 3-28
Viewing existing information . . . . . . . . . . . . . . . . . . . . . . . . . . . . . . . . . . . . . . . . . . . . . . . . . . . . . . . . . 3-29
Exercise 6 Transferring a ticket . . . . . . . . . . . . . . . . . . . . . . . . . . . . . . . . . . . . . . . . . . . . . . . . . . . . . . . . 3-32
Transferring the ticket . . . . . . . . . . . . . . . . . . . . . . . . . . . . . . . . . . . . . . . . . . . . . . . . . . . . . . . . . . . . . . 3-32
Resolving the request . . . . . . . . . . . . . . . . . . . . . . . . . . . . . . . . . . . . . . . . . . . . . . . . . . . . . . . . . . . . . . 3-33
Closing the ticket . . . . . . . . . . . . . . . . . . . . . . . . . . . . . . . . . . . . . . . . . . . . . . . . . . . . . . . . . . . . . . . . . . 3-34
Viewing the email . . . . . . . . . . . . . . . . . . . . . . . . . . . . . . . . . . . . . . . . . . . . . . . . . . . . . . . . . . . . . . . . . 3-35
Exercise 7 Handling a complex issue (Part 1, service request) . . . . . . . . . . . . . . . . . . . . . . . . . . . . . . . . 3-36
Issue detection . . . . . . . . . . . . . . . . . . . . . . . . . . . . . . . . . . . . . . . . . . . . . . . . . . . . . . . . . . . . . . . . . . . 3-36
Documenting the issue . . . . . . . . . . . . . . . . . . . . . . . . . . . . . . . . . . . . . . . . . . . . . . . . . . . . . . . . . . . . . 3-38
Initial investigation . . . . . . . . . . . . . . . . . . . . . . . . . . . . . . . . . . . . . . . . . . . . . . . . . . . . . . . . . . . . . . . . . 3-41
Exercise 8 Combining Quick Insert and ticket templates . . . . . . . . . . . . . . . . . . . . . . . . . . . . . . . . . . . . . 3-45
Exercise 9 Solutions application search . . . . . . . . . . . . . . . . . . . . . . . . . . . . . . . . . . . . . . . . . . . . . . . . . 3-46
Exercise 10 Creating a stand-alone solution . . . . . . . . . . . . . . . . . . . . . . . . . . . . . . . . . . . . . . . . . . . . . . 3-47
Attaching an image to the solution . . . . . . . . . . . . . . . . . . . . . . . . . . . . . . . . . . . . . . . . . . . . . . . . . . . . 3-48
Exercise 11 Keywords . . . . . . . . . . . . . . . . . . . . . . . . . . . . . . . . . . . . . . . . . . . . . . . . . . . . . . . . . . . . . . . 3-49
Removing keywords . . . . . . . . . . . . . . . . . . . . . . . . . . . . . . . . . . . . . . . . . . . . . . . . . . . . . . . . . . . . . . . 3-49
Searching the text fields . . . . . . . . . . . . . . . . . . . . . . . . . . . . . . . . . . . . . . . . . . . . . . . . . . . . . . . . . . . . 3-50
Searching by using keywords . . . . . . . . . . . . . . . . . . . . . . . . . . . . . . . . . . . . . . . . . . . . . . . . . . . . . . . . 3-50
Unit 4 Service requests, incidents, and problems exercises . . . . . . . . . . . . . . . . . . . . . . . . . . . . . 4-1
Exercise 1 Handling a complex issue (Part 2, incident) . . . . . . . . . . . . . . . . . . . . . . . . . . . . . . . . . . . . . . . 4-1
The hardware team receives the incident . . . . . . . . . . . . . . . . . . . . . . . . . . . . . . . . . . . . . . . . . . . . . . . . 4-1
Opening the incident . . . . . . . . . . . . . . . . . . . . . . . . . . . . . . . . . . . . . . . . . . . . . . . . . . . . . . . . . . . . . . . . 4-1
Working with an incident . . . . . . . . . . . . . . . . . . . . . . . . . . . . . . . . . . . . . . . . . . . . . . . . . . . . . . . . . . . . . 4-2
Resolving the incident . . . . . . . . . . . . . . . . . . . . . . . . . . . . . . . . . . . . . . . . . . . . . . . . . . . . . . . . . . . . . . . 4-2
Adding a work log entry . . . . . . . . . . . . . . . . . . . . . . . . . . . . . . . . . . . . . . . . . . . . . . . . . . . . . . . . . . . . . . 4-3
Creating a problem ticket . . . . . . . . . . . . . . . . . . . . . . . . . . . . . . . . . . . . . . . . . . . . . . . . . . . . . . . . . . . . 4-3
Viewing related records . . . . . . . . . . . . . . . . . . . . . . . . . . . . . . . . . . . . . . . . . . . . . . . . . . . . . . . . . . . . . . 4-4
Exercise 2 Automated solution handling . . . . . . . . . . . . . . . . . . . . . . . . . . . . . . . . . . . . . . . . . . . . . . . . . . 4-6
Verifying that the ad hoc solution was processed . . . . . . . . . . . . . . . . . . . . . . . . . . . . . . . . . . . . . . . . . . 4-6
Exercise 3 Searching external knowledge management systems . . . . . . . . . . . . . . . . . . . . . . . . . . . . . . . 4-8
Exercise 4 Handling a complex issue (Part 3, problem) . . . . . . . . . . . . . . . . . . . . . . . . . . . . . . . . . . . . . 4-10
Problem analysts receive the problem ticket . . . . . . . . . . . . . . . . . . . . . . . . . . . . . . . . . . . . . . . . . . . . . 4-10
Opening the problem . . . . . . . . . . . . . . . . . . . . . . . . . . . . . . . . . . . . . . . . . . . . . . . . . . . . . . . . . . . . . . . 4-10
Working with a problem . . . . . . . . . . . . . . . . . . . . . . . . . . . . . . . . . . . . . . . . . . . . . . . . . . . . . . . . . . . . . 4-10
Exercise 5 Performing the work . . . . . . . . . . . . . . . . . . . . . . . . . . . . . . . . . . . . . . . . . . . . . . . . . . . . . . . . 4-13
Performing the work and close the activity . . . . . . . . . . . . . . . . . . . . . . . . . . . . . . . . . . . . . . . . . . . . . . 4-13
Exercise 6 Closing the problem . . . . . . . . . . . . . . . . . . . . . . . . . . . . . . . . . . . . . . . . . . . . . . . . . . . . . . . . 4-14
Entering the solution information for this problem . . . . . . . . . . . . . . . . . . . . . . . . . . . . . . . . . . . . . . . . . 4-14
Exercise 7 Using known errors to narrow down solutions . . . . . . . . . . . . . . . . . . . . . . . . . . . . . . . . . . . . 4-15
Unit 5 The Service Catalog exercises . . . . . . . . . . . . . . . . . . . . . . . . . . . . . . . . . . . . . . . . . . . . . . . .5-1
Exercise 1 Ordering an offering . . . . . . . . . . . . . . . . . . . . . . . . . . . . . . . . . . . . . . . . . . . . . . . . . . . . . . . . . 5-1
Browsing the catalog . . . . . . . . . . . . . . . . . . . . . . . . . . . . . . . . . . . . . . . . . . . . . . . . . . . . . . . . . . . . . . . . 5-3
Ordering from the catalog . . . . . . . . . . . . . . . . . . . . . . . . . . . . . . . . . . . . . . . . . . . . . . . . . . . . . . . . . . . . 5-4
Contents
Course materials may not be reproduced in whole or in part without the prior written permission of IBM.
© Copyright IBM Corp. 2016
v
V7.0
Uempty
Exercise 2 The fulfillment process . . . . . . . . . . . . . . . . . . . . . . . . . . . . . . . . . . . . . . . . . . . . . . . . . . . . . . . 5-6
Approval . . . . . . . . . . . . . . . . . . . . . . . . . . . . . . . . . . . . . . . . . . . . . . . . . . . . . . . . . . . . . . . . . . . . . . . . . 5-6
Fulfillment . . . . . . . . . . . . . . . . . . . . . . . . . . . . . . . . . . . . . . . . . . . . . . . . . . . . . . . . . . . . . . . . . . . . . . . . 5-7
Exercise 3 Checking the progress of a request . . . . . . . . . . . . . . . . . . . . . . . . . . . . . . . . . . . . . . . . . . . . . 5-9
Unit 6 Self-service exercises . . . . . . . . . . . . . . . . . . . . . . . . . . . . . . . . . . . . . . . . . . . . . . . . . . . . . . . 6-1
Exercise 1 Finding solutions with the self-service tools . . . . . . . . . . . . . . . . . . . . . . . . . . . . . . . . . . . . . . . 6-1
Searching for solutions . . . . . . . . . . . . . . . . . . . . . . . . . . . . . . . . . . . . . . . . . . . . . . . . . . . . . . . . . . . . . . 6-1
Rating a solution . . . . . . . . . . . . . . . . . . . . . . . . . . . . . . . . . . . . . . . . . . . . . . . . . . . . . . . . . . . . . . . . . . . 6-2
Exercise 2 Creating a service request by using self-service . . . . . . . . . . . . . . . . . . . . . . . . . . . . . . . . . . . 6-3
Searching for a solution . . . . . . . . . . . . . . . . . . . . . . . . . . . . . . . . . . . . . . . . . . . . . . . . . . . . . . . . . . . . . . 6-3
Creating a service request . . . . . . . . . . . . . . . . . . . . . . . . . . . . . . . . . . . . . . . . . . . . . . . . . . . . . . . . . . . 6-3
Finding the service request . . . . . . . . . . . . . . . . . . . . . . . . . . . . . . . . . . . . . . . . . . . . . . . . . . . . . . . . . . . 6-5
Unit 7 Workflows exercises . . . . . . . . . . . . . . . . . . . . . . . . . . . . . . . . . . . . . . . . . . . . . . . . . . . . . . . . 7-1
Exercise 1 Using workflows to successfully resolve a service request . . . . . . . . . . . . . . . . . . . . . . . . . . . 7-1
Routing a workflow . . . . . . . . . . . . . . . . . . . . . . . . . . . . . . . . . . . . . . . . . . . . . . . . . . . . . . . . . . . . . . . . . 7-1
Entering basic information . . . . . . . . . . . . . . . . . . . . . . . . . . . . . . . . . . . . . . . . . . . . . . . . . . . . . . . . . . . . 7-2
Exercise 2 Reviewing a workflow . . . . . . . . . . . . . . . . . . . . . . . . . . . . . . . . . . . . . . . . . . . . . . . . . . . . . . . 7-5
Opening SR_V3 in the Workflow Designer . . . . . . . . . . . . . . . . . . . . . . . . . . . . . . . . . . . . . . . . . . . . . . . 7-5
Opening SR_REC3 in the Workflow Designer . . . . . . . . . . . . . . . . . . . . . . . . . . . . . . . . . . . . . . . . . . . .7-5
Unit 8 Service level agreements exercises . . . . . . . . . . . . . . . . . . . . . . . . . . . . . . . . . . . . . . . . . . . . 8-1
Exercise 1 Enabling SLA Hold . . . . . . . . . . . . . . . . . . . . . . . . . . . . . . . . . . . . . . . . . . . . . . . . . . . . . . . . . . 8-1
Enabling SLA Hold . . . . . . . . . . . . . . . . . . . . . . . . . . . . . . . . . . . . . . . . . . . . . . . . . . . . . . . . . . . . . . . . . 8-1
Exercise 2 Creating a new SLA . . . . . . . . . . . . . . . . . . . . . . . . . . . . . . . . . . . . . . . . . . . . . . . . . . . . . . . . . 8-3
Creating an SLA . . . . . . . . . . . . . . . . . . . . . . . . . . . . . . . . . . . . . . . . . . . . . . . . . . . . . . . . . . . . . . . . . . . 8-3
Defining a commitment . . . . . . . . . . . . . . . . . . . . . . . . . . . . . . . . . . . . . . . . . . . . . . . . . . . . . . . . . . . . . . 8-3
Defining an escalation . . . . . . . . . . . . . . . . . . . . . . . . . . . . . . . . . . . . . . . . . . . . . . . . . . . . . . . . . . . . . . . 8-4
Defining a notification . . . . . . . . . . . . . . . . . . . . . . . . . . . . . . . . . . . . . . . . . . . . . . . . . . . . . . . . . . . . . . . 8-5
Configuring the second commitment . . . . . . . . . . . . . . . . . . . . . . . . . . . . . . . . . . . . . . . . . . . . . . . . . . . . 8-5
Configuring the third commitment . . . . . . . . . . . . . . . . . . . . . . . . . . . . . . . . . . . . . . . . . . . . . . . . . . . . . . 8-5
Validating the escalation . . . . . . . . . . . . . . . . . . . . . . . . . . . . . . . . . . . . . . . . . . . . . . . . . . . . . . . . . . . . . 8-6
Exercise 3 Applying the SLA . . . . . . . . . . . . . . . . . . . . . . . . . . . . . . . . . . . . . . . . . . . . . . . . . . . . . . . . . . . 8-7
Creating a service request . . . . . . . . . . . . . . . . . . . . . . . . . . . . . . . . . . . . . . . . . . . . . . . . . . . . . . . . . . . 8-7
Applying the SLA . . . . . . . . . . . . . . . . . . . . . . . . . . . . . . . . . . . . . . . . . . . . . . . . . . . . . . . . . . . . . . . . . . . 8-7
Verifying the SLA . . . . . . . . . . . . . . . . . . . . . . . . . . . . . . . . . . . . . . . . . . . . . . . . . . . . . . . . . . . . . . . . . . . 8-7
Change the ticket status . . . . . . . . . . . . . . . . . . . . . . . . . . . . . . . . . . . . . . . . . . . . . . . . . . . . . . . . . . . . . 8-8
Exercise 4 Pausing the clock with SLA Hold . . . . . . . . . . . . . . . . . . . . . . . . . . . . . . . . . . . . . . . . . . . . . . 8-10
Creating a service request . . . . . . . . . . . . . . . . . . . . . . . . . . . . . . . . . . . . . . . . . . . . . . . . . . . . . . . . . . 8-10
Applying the SLA . . . . . . . . . . . . . . . . . . . . . . . . . . . . . . . . . . . . . . . . . . . . . . . . . . . . . . . . . . . . . . . . . . 8-11
Verifying SLA times . . . . . . . . . . . . . . . . . . . . . . . . . . . . . . . . . . . . . . . . . . . . . . . . . . . . . . . . . . . . . . . . 8-11
Turning on SLA Hold . . . . . . . . . . . . . . . . . . . . . . . . . . . . . . . . . . . . . . . . . . . . . . . . . . . . . . . . . . . . . . . 8-12
Unit 9 Surveys exercises . . . . . . . . . . . . . . . . . . . . . . . . . . . . . . . . . . . . . . . . . . . . . . . . . . . . . . . . . . 9-1
Survey forms . . . . . . . . . . . . . . . . . . . . . . . . . . . . . . . . . . . . . . . . . . . . . . . . . . . . . . . . . . . . . . . . . . . . . . . . 9-1
Survey creation overview . . . . . . . . . . . . . . . . . . . . . . . . . . . . . . . . . . . . . . . . . . . . . . . . . . . . . . . . . . . . . . . 9-1
Exercise 1 Creating question and answer sets . . . . . . . . . . . . . . . . . . . . . . . . . . . . . . . . . . . . . . . . . . . . . 9-2
Contents
Course materials may not be reproduced in whole or in part without the prior written permission of IBM.
© Copyright IBM Corp. 2016
vi
V7.0
Uempty
Creating the first question . . . . . . . . . . . . . . . . . . . . . . . . . . . . . . . . . . . . . . . . . . . . . . . . . . . . . . . . . . . . 9-2
Creating the second question . . . . . . . . . . . . . . . . . . . . . . . . . . . . . . . . . . . . . . . . . . . . . . . . . . . . . . . . . 9-3
View the questions . . . . . . . . . . . . . . . . . . . . . . . . . . . . . . . . . . . . . . . . . . . . . . . . . . . . . . . . . . . . . . . . . 9-4
Exercise 2 Creating a survey . . . . . . . . . . . . . . . . . . . . . . . . . . . . . . . . . . . . . . . . . . . . . . . . . . . . . . . . . . . 9-5
Creating a new survey . . . . . . . . . . . . . . . . . . . . . . . . . . . . . . . . . . . . . . . . . . . . . . . . . . . . . . . . . . . . . . . 9-5
Exercise 3 Previewing the survey . . . . . . . . . . . . . . . . . . . . . . . . . . . . . . . . . . . . . . . . . . . . . . . . . . . . . . . 9-8
Previewing tracked surveys . . . . . . . . . . . . . . . . . . . . . . . . . . . . . . . . . . . . . . . . . . . . . . . . . . . . . . . . . . . 9-8
Previewing untracked surveys . . . . . . . . . . . . . . . . . . . . . . . . . . . . . . . . . . . . . . . . . . . . . . . . . . . . . . . . . 9-9
Exercise 4 Sending surveys manually . . . . . . . . . . . . . . . . . . . . . . . . . . . . . . . . . . . . . . . . . . . . . . . . . . . 9-10
Sending a tracked survey . . . . . . . . . . . . . . . . . . . . . . . . . . . . . . . . . . . . . . . . . . . . . . . . . . . . . . . . . . . 9-10
Sending an untracked survey . . . . . . . . . . . . . . . . . . . . . . . . . . . . . . . . . . . . . . . . . . . . . . . . . . . . . . . . 9-12
Exercise 5 Viewing the number of survey responses received . . . . . . . . . . . . . . . . . . . . . . . . . . . . . . . . 9-13
Exercise 6 Taking the surveys . . . . . . . . . . . . . . . . . . . . . . . . . . . . . . . . . . . . . . . . . . . . . . . . . . . . . . . . . 9-14
Taking a tracked survey . . . . . . . . . . . . . . . . . . . . . . . . . . . . . . . . . . . . . . . . . . . . . . . . . . . . . . . . . . . . 9-14
Taking an untracked survey . . . . . . . . . . . . . . . . . . . . . . . . . . . . . . . . . . . . . . . . . . . . . . . . . . . . . . . . . 9-15
Exercise 7 Viewing the number of survey responses received . . . . . . . . . . . . . . . . . . . . . . . . . . . . . . . . 9-17
Exercise 8 Viewing survey results . . . . . . . . . . . . . . . . . . . . . . . . . . . . . . . . . . . . . . . . . . . . . . . . . . . . . . 9-18
Exercise 9 Sending a survey automatically . . . . . . . . . . . . . . . . . . . . . . . . . . . . . . . . . . . . . . . . . . . . . . . 9-19
Creating the escalation . . . . . . . . . . . . . . . . . . . . . . . . . . . . . . . . . . . . . . . . . . . . . . . . . . . . . . . . . . . . . 9-19
Creating the notification . . . . . . . . . . . . . . . . . . . . . . . . . . . . . . . . . . . . . . . . . . . . . . . . . . . . . . . . . . . . . 9-21
Creating the service request . . . . . . . . . . . . . . . . . . . . . . . . . . . . . . . . . . . . . . . . . . . . . . . . . . . . . . . . . 9-22
Exercise 10 Creating a survey template . . . . . . . . . . . . . . . . . . . . . . . . . . . . . . . . . . . . . . . . . . . . . . . . . 9-25
Testing the template . . . . . . . . . . . . . . . . . . . . . . . . . . . . . . . . . . . . . . . . . . . . . . . . . . . . . . . . . . . . . . . 9-26
Exercise 11 Associating a survey to a ticket . . . . . . . . . . . . . . . . . . . . . . . . . . . . . . . . . . . . . . . . . . . . . . 9-28
Unit 10 Reporting exercises . . . . . . . . . . . . . . . . . . . . . . . . . . . . . . . . . . . . . . . . . . . . . . . . . . . . . . . 10-1
Exercise 1 Service requests Created By Catalog Orders report . . . . . . . . . . . . . . . . . . . . . . . . . . . . . . . 10-1
Exercise 2 Total number of incidents by internal priority report . . . . . . . . . . . . . . . . . . . . . . . . . . . . . . . . 10-5

About this book
Background
In the exercises for this course, you use IBM Control Desk to manage the operations of
the service desk of a fictional company. Several employees of the company are involved
in the exercises, and their roles are defined in the following table.
User ID
Role
bob
Self-service user and service requester
fred
User manager
jane
Service Desk manager
maxadmin
Account used to configure the system
nancy
Incident analyst
schroeder
Service Catalog designer (not used in these exercises)
scott
Service Desk analyst
steve
User and service requester
Passwords for all accounts on this image are object00.
Image Information
This course includes two virtual images. One has IBM Control Desk installed. This
image is a 64-bit Microsoft Windows 2012 Standard Server. The second image is a 64-
bit Red Hat Enterprise server which acts as a mailserver. If you need help starting the
guests or accessing the operating system login screen, ask your instructor, or consult
the instructions you received when you registered for this course.
Course materials may not be reproduced in whole or in part without the prior written permission of IBM.
© Copyright IBM Corp. 2016
vii

©Copyright IBM Corp. 2016viic
About this book
Course materials may not be reproduced in whole or in part without the prior written permission of IBM.
Note: When running this image locally, the host computer must support 64-bit virtual machines.
Most new computers can support 64-bit virtual machines. However, you might have to enable
the
virtualization technology in your BIOS. For more details, refer to the following website:
VMware Knowledge Base article - http://kb.vmware.com/selfservice/microsites/
search.do?language=en_US&cmd=displayKC&externalId=1003944

Course materials may not be reproduced in whole or in part without the prior written permission of IBM.
© Copyright IBM Corp. 2016
1-1
Unit 1 Overview exercises
In these exercises, you ensure that the lab environment is operational by logging in, checking the
network settings, and starting IBM Control Desk.Next, you use the features of the Service Desk to
resolve various issues.
Note: Your environment might differ slightly from the one shown in the screen captures that are
used in this exercise book. Sometimes your results might not exactly match the book, but the
results should be similar.
Exercise 1 Logging in to the operating system
Your first step is logging in to the operating system of the lab machine.
1. Ensure that your virtual machine image is running
Note: You might use a different key sequence or menu selection, depending on your
environment. For example, when running a virtual machine on a Windows host, you might press
Ctrl+Alt+Insert to access the login screen on the virtual machine.
2. Click the left mouse button anywhere in the screen two or three times to display the login
screen. The login screen defaults to Administrator as the user.
3. Enter the password ob
ject00.
4. Press the Enter key to log in to Windows 2012.

Unit 1 Overview exercises
Exercise 2 Verifying image network configuration
Course materials may not be reproduced in whole or in part without the prior written permission of IBM.
© Copyright IBM Corp. 2016
1-2
V7.0
Uempty
Exercise 2 Verifying image network
configuration
The image for this course is designed to use the static IP address of 192.168.1.210 with the host
name itracr12.tiv.ibm.com. Changing the IP address or host name can cause the software to not
operate properly. In this exercise, you verify the network configuration of the system you are using.
1. Click the Windows Start icon in the lower left corner of the screen. A screen similar to the o
ne
shown below is displayed:
2. Single Click the Command Prompt icon. The main desktop is displayed and a command
win
dow is active.
3. Type the following command:
ping -4 itracr12.tiv.ibm.com
4. Verify that the fully qualified host name can be resolved. Y
ou receive a reply from the system by
using
the host name.

Unit 1 Overview exercises
Exercise 2 Verifying image network configuration
Course materials may not be reproduced in whole or in part without the prior written permission of IBM.
© Copyright IBM Corp. 2016
1-3
V7.0
Uempty
5. Repeat the test by running the following commands. All commands must receive a reply.
ping -4 itracr12
ping 192.168.1.210
Note: If you do not receive a reply, your operating system is not configured properly, either by a
misconfigured network card or IP stack. Correct the virtual machine configuration. If you are using
this system in a classroom or supported lab environment, contact your instructor or lab support
personnel.

Unit 1 Overview exercises
Exercise 3 Starting IBM Control Desk
Course materials may not be reproduced in whole or in part without the prior written permission of IBM.
© Copyright IBM Corp. 2016
1-4
V7.0
Uempty
Exercise 3 Starting IBM Control Desk
The IBM Control Desk services are configured for to automatically start the class image. Batch files
are provided to start and stop the services as needed. The batch file starts WebSphere Application
Server, and the IBM Control Desk application server (MXServer). In this exercise, you locate and
review the start and stop batch files.
Note: Do not execute the batch scripts. IBM Control Desk is already running. The purpose of this
exercise is to show you a method of starting and stopping the system manually.
1. Right-click the Start IBM Control Desk shortcut on the desktop and select Edit. When you
complete your re
view, close the Notepad without saving the file.
2. Repeat Step 1 for the S
top IBM Control Desk shortcut.

Course materials may not be reproduced in whole or in part without the prior written permission of IBM.
© Copyright IBM Corp. 2016
2-1
Unit 2 Service management exercises
This unit has no student exercises.

Course materials may not be reproduced in whole or in part without the prior written permission of IBM.
© Copyright IBM Corp. 2016
3-1
Unit 3 The Service Desk exercises
The purpose of these exercises is to show you the details and purpose behind many of the tasks
that are done inside IBM Control Desk. In a production environment, you would expect many of
these tasks to be automatically performed by templates, workflows, or customizations.
Note: Your environment might differ slightly from the one shown in the screen captures that are
used in this exercise book. Sometimes your results might not exactly match the book, but the
results should be similar.S
Exercise 1 Simple informational service
request
In this exercise, Scott, a service desk analyst, receives a call from Bob, who cannot print from
Notepad. Scott can resolve this call without needing to look up a solution or reference any other
source of information.
Scott starts Firefox and logs in.

Unit 3 The Service Desk exercises
Exercise 1 Simple informational service request
Course materials may not be reproduced in whole or in part without the prior written permission of IBM.
© Copyright IBM Corp. 2016
3-2
V7.0
Uempty
Logging in
1. Start Firebox by clicking the icon on the Windows desktop. Firefox starts and shows the IBM
Control Desk login screen.
Note: Depending on the processor speed and installed memory in the machine running the
itracr12 virtual image, the amount of time that is required, after starting the virtual machine and
when the environment is fully operational varies. If you open Firefox and receive an error
indicating the Welcome screen is unavailable, this could be the cause. Generally, waiting between
5 and 10 minutes after starting the image is sufficient. If the welcome screen is not displayed after
15 minutes, ensure that the IBM WebSphere services are showing as “Started.” If they are not,
attempt to start them manually. The Windows Services application is available by selecting
Administrative Tools from the Windows Start menu and selecting Services.
2. Sign in as Scott with the user name scott and the password object00.
Set a default Start Center
When Scott logs in, he is shown the All Users Start Center tab. the default tab is editable by an
administrator in the security settings, or by an individual user. Since Scott is spending most of his
time by performing Service Desk duties, he customizes his own environment.

Unit 3 The Service Desk exercises
Exercise 1 Simple informational service request
Course materials may not be reproduced in whole or in part without the prior written permission of IBM.
© Copyright IBM Corp. 2016
3-3
V7.0
Uempty
3. Click the Display Settings icon in the upper right of the screen.
4. Select the Service Desk Analyst tab as default.
5. Click OK.
6. Verify that the Se
rvice Desk Analyst Start Center is shown.
Creating a service request
Scott receives a telephone call from Bob. He wrote a short note in Windows Notepad, but he does
not know how to print it. For Scott, this issue is a simple informational request that he can resolve
by using his own knowledge.
The first step is to create a service request ticket to d
ocument the contact between Bob and the
Service Desk.
7. Create a Service
Request by clicking the New SR Lite link in the Quick Insert portlet.
The Create Service Request application opens.

Unit 3 The Service Desk exercises
Exercise 1 Simple informational service request
Course materials may not be reproduced in whole or in part without the prior written permission of IBM.
© Copyright IBM Corp. 2016
3-4
V7.0
Uempty
8. In the Reported By field, enter Bob, and press Tab.
.
Bob’s contact information from his person record fills the phone and email fields.
9. Enter bob in the Affec
ted User field and press the Tab key.
10. Click the Select V
alue icon (magnifying glass) beside the Reported Priority field.
Scott asks Bob how important his printing job is. He replies that it is important because he must
print several notes.
11. Click the number 3 beside Medium.
Unit 3 The Service Desk exercises
Exercise 1 Simple informational service request
Course materials may not be reproduced in whole or in part without the prior written permission of IBM.
© Copyright IBM Corp. 2016
3-5
V7.0
Uempty
12. Scroll down to the Request Description section, and enter the following information into the
appropriate fields:
Summary: prin
t from Notepad
Details: Bob n
eeds to know how to print a document from Notepad.
13. In the Reque
st Category section, click the Detail Menu (double arrows) beside the
Classification field and select Suggest Classification.
14. Select 2
10204 (IT Issue \ Software \ Other Software) and click Select Classification.
15. Click Submit.
A dialog that shows the Service
Request number is shown. Make a note of the SR number.
_____________________________________________
16. Click Return to Start Center.
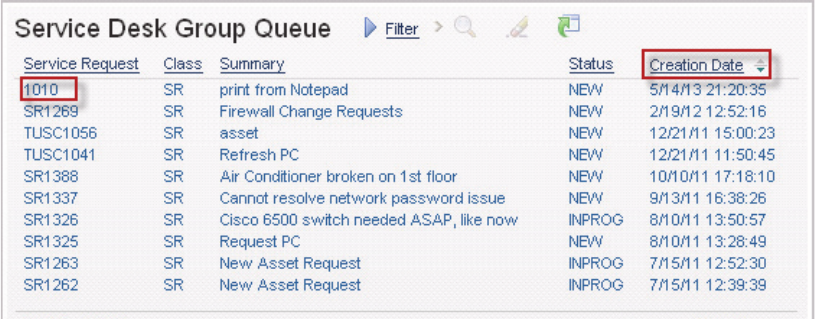
Checking the queue
During a regular work day, Scott and the other Service Desk personnel work many tickets. New
tickets appear in the Service Desk Group Queue until an agent takes ownership of them.
17. Locate the Service
Desk Group Queue on the Start Center and sort it by descending date by
clicking the Creation Date twice.
18. Find the service request that you created and select it.

Unit 3 The Service Desk exercises
Exercise 1 Simple informational service request
Course materials may not be reproduced in whole or in part without the prior written permission of IBM.
© Copyright IBM Corp. 2016
3-6
V7.0
Uempty
The Service Requests application opens.
Notice that the ticket number, description, and status are clearly visible.
Taking ownership
19. Take ownership by clicking Take Ownership in the navigation bar under Common Actions.
Notice that taking ownership completes the Owner field and changes the status to Queued.
Scott is now indicated in the Owner field as the person that is managing the service request
process for this ticket.

Unit 3 The Service Desk exercises
Exercise 1 Simple informational service request
Course materials may not be reproduced in whole or in part without the prior written permission of IBM.
© Copyright IBM Corp. 2016
3-7
V7.0
Uempty
Marking ticket as In Progress
20. Change the status to In Progress by clicking Change Status on the navigation bar.
21. Set the new status to In Progress and click OK.
Categorizing and prioritizing
Scott must ensure that the ticket has both a category and a priority that is assigned to it. He already
used the suggested category when he initially created the ticket, but if he had not, he could easily
enter that information in the next step.

Unit 3 The Service Desk exercises
Exercise 1 Simple informational service request
Course materials may not be reproduced in whole or in part without the prior written permission of IBM.
© Copyright IBM Corp. 2016
3-8
V7.0
Uempty
The phone conversation with Bob, in addition to the level Scott selected for the reported priority,
helps Scott decide what impact and urgency to give the request. Bob is the only one affected, and
he already stated that it is important. Therefore, Scott determines that the impact is low, and
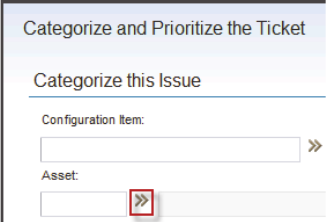
urgency is medium.
22. Scroll to Service Req
uest Details and click the Categorize and Prioritize icon.
23. Enter a 4 for impact and a 3 for urgency in the appropriate fields. The Internal Priority field
automatically displays a 4 based on the other values that were provided.
Scott could enter an affected asset or other information here, but none of the fields are relevant to
the current issue.
24. Click OK.
Informing the requester
All the basic fields are completed, and it is time to resolve the request. Without looking up anything,
Scott knows how to print from Notepad. In fact, he believes that this information is so common that
he does not check to see whether there is an existing solution. Normally, if there were no existing
solution, Scott would create one.
Scott tells Bob to click File > Print.
The solution works for Bob. Bob tells Scott that he can now print
from Notepad.
Verifying resolution
Scott confirms with Bob that his issue is resolved. Bob tells Scott that he needs no additional help.
Unit 3 The Service Desk exercises
Exercise 1 Simple informational service request
Course materials may not be reproduced in whole or in part without the prior written permission of IBM.
© Copyright IBM Corp. 2016
3-9
V7.0
Uempty
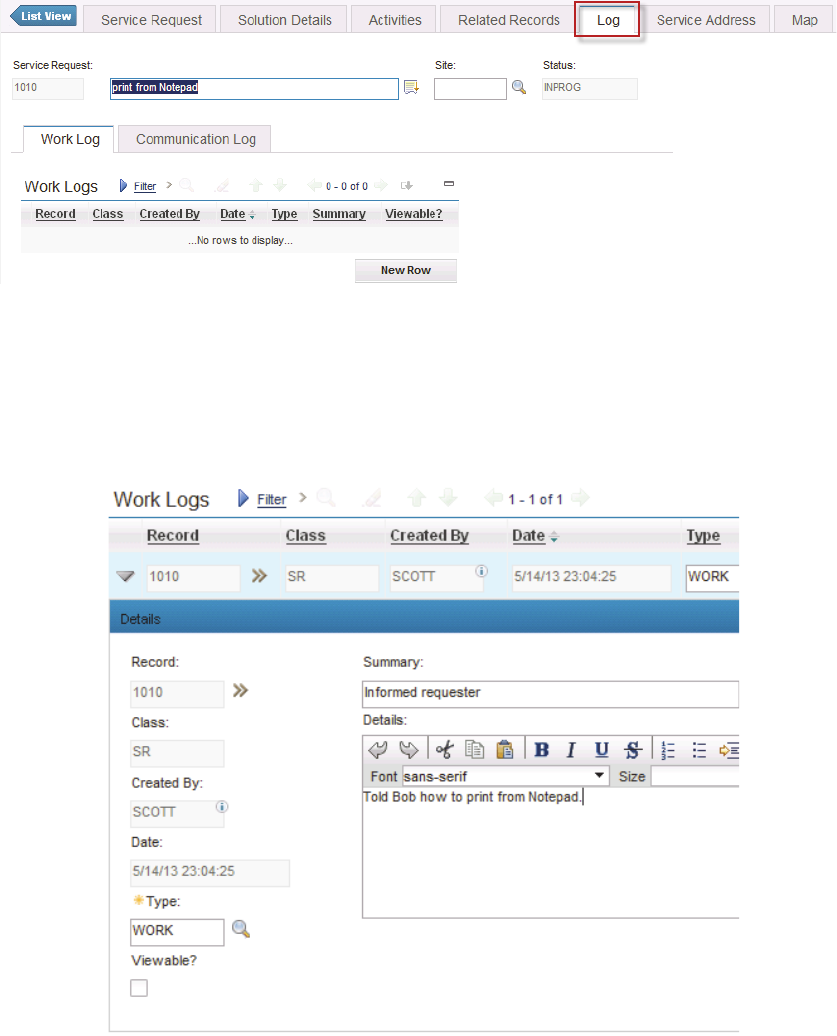
Resolving ticket
Scott now indicates what was done and resolves the ticket.
Creating work log entry
Scott writes what he did on the ticket so that any other agent who views the ticket knows how it was
resolved.
25. Click the Log ta
b.
26. With the Work Log subtab selected, click New Row.
27. Change the Ty
pe field to Work.
28. In the Summary field, type Info
rmed requester.
29. In the Det
ails field, type Told Bob how to print from Notepad.

Unit 3 The Service Desk exercises
Exercise 1 Simple informational service request
Course materials may not be reproduced in whole or in part without the prior written permission of IBM.
© Copyright IBM Corp. 2016
3-10
V7.0
Uempty
30. Click the Save Service Request icon at the top of the page.
Note: You can also save the service request by using the Common Actions menu on the
navigation bar.
Resolving the ticket
31. Resolve the ticket by changing the status to Resolved. If you cannot remember how to change
the status, see step Step
20 on page 3-7.
Note: Control Desk automatically completed the Actual Finish field of the Key Dates section, but
you must go to the Service Request tab to see the change.
32. Click the Service Request tab.
33. Verify that the Ac
tual Finish time has been entered.
34. Verify the progress bar indicates that the ticket is Resolved.

Unit 3 The Service Desk exercises
Exercise 1 Simple informational service request
Course materials may not be reproduced in whole or in part without the prior written permission of IBM.
© Copyright IBM Corp. 2016
3-11
V7.0
Uempty
35. Return to the Start Center.

Unit 3 The Service Desk exercises
Exercise 2 Solution lookup
Course materials may not be reproduced in whole or in part without the prior written permission of IBM.
© Copyright IBM Corp. 2016
3-12
V7.0
Uempty
Exercise 2 Solution lookup
Scott receives a call from Steve, who is having slow network performance while accessing a server.
He simply wants to know whether this slowness is a known problem. An existing solution exists that
Scott must search for.
Creating a service request
Scott starts the Service Request from the Start Center.
1. Take a minute to look at the categories of information Scott has access to from the start center.
See
whether any of the portlets have a possible solution to this problem. Do not spend too
much time looking until you create a service request.
2. In the Quick Insert section, click Ne
w SR Full.
Notice that this time the Service Requests application immediately opens and creates a new
service request without first prompting you for initial information.
Taking ownership
3. Take ownership by clicking Take Ownership in the navigation bar under Common Actions.
Scott is now indicated in the Ow
ner field as the manager of the service request process for this
ticket. The status changes to Queued.

Unit 3 The Service Desk exercises
Exercise 2 Solution lookup
Course materials may not be reproduced in whole or in part without the prior written permission of IBM.
© Copyright IBM Corp. 2016
3-13
V7.0
Uempty
Marking ticket as In Progress
4. Change the status to In Progress by clicking Change Status on the navigation bar.
5. Set the status to In
Progress and click OK.
Entering basic information
Entering the Reported By person
6. Click the Detail Menu (double arrow) icon beside the Reported By field, and choose Select
Value.
7. Filter the Person field for ST, and select STEVE.
8. The User Informatio
n section fields are completed.
Entering the summary
9. Type Slow network.
Entering the details
10. Type Steve is getting slow performance while reaching a remote server. He wants to
know whether the slow performance is a known issue.
Entering the classification
You learned how to enter a classification in the previous exercise. However, in this exercise you use
the Categorize and Prioritize feature.
11. Click the Categ
orize and Prioritize icon beside Internal Priority.
12. Beside the Class
ification field, click the Select Value icon.

Unit 3 The Service Desk exercises
Exercise 2 Solution lookup
Course materials may not be reproduced in whole or in part without the prior written permission of IBM.
© Copyright IBM Corp. 2016
3-14
V7.0
Uempty
13. In the Description filter field, type performance and press Enter.
14. Click the 21
030301 IT Issue \ Networks \ Wan \ Performance entry.
Indicating impact and urgency
Steve is the only one affected as far as Scott knows, and he already stated that it is important. Scott
determines that the impact is Medium and urgency is High.
15. Enter a 3 for
impact, a 2 for urgency, and a 2 for reported priority in the appropriate fields. The
Internal Priority field automatically displays a 2.
16. Click OK.
Searching for the solution
Scott filled out the basic information for this ticket, but he now must research the problem further.
17. Click the Search
For Solutions icon on the navigation bar under Common Actions.
18. Enter a search term of slow and click Se
arch.
19. One solution is displayed. Expand the solution.
20. Scroll down, if necessary, and view the contents of the Symptom, Cause, and Resolution
fields.
The information presented sounds like it
might match this issue.

Unit 3 The Service Desk exercises
Exercise 2 Solution lookup
Course materials may not be reproduced in whole or in part without the prior written permission of IBM.
© Copyright IBM Corp. 2016
3-15
V7.0
Uempty
Trying the solution
Scott asks Steve some more questions about the location of the server he is trying to reach, and
about his network performance on the LAN. He runs some diagnostics to be sure. After a few
minutes, it is apparent that the solution matches his issue. Because this solution matched the
request, Scott applies the solution to the ticket.
Using the solution
21. Click Use Solution on the left under the solution number.
A brief message at the top of the screen indicates that the solution is applied.
22. Click the Solution Details tab to view the applied solution.
The solution is now under consideration. When more information is known, the status can be
changed to successful or failed.
23. Click the Servic
e Request tab to return to the main service request screen.

Unit 3 The Service Desk exercises
Exercise 2 Solution lookup
Course materials may not be reproduced in whole or in part without the prior written permission of IBM.
© Copyright IBM Corp. 2016
3-16
V7.0
Uempty
Linking the global issue
Scott must associate this service request with the existing global issue.
24. Click the Global I
ssue icon.
From the Global Issues window, you can specify a ticket as the root cause of a global issue, or
to specify a global ticket as the cause for this ticket. In this case, you specify another ticket as
the cause.
25. Click the Det
ail Menu icon beside Global Ticket, and click Select Value.
26. Click PM100
7 Network Slow.
27. Click OK.
The ticket is automatically saved, and the global issue icon changes.
28. Click the Relat
ed Records tab.

Unit 3 The Service Desk exercises
Exercise 2 Solution lookup
Course materials may not be reproduced in whole or in part without the prior written permission of IBM.
© Copyright IBM Corp. 2016
3-17
V7.0
Uempty
29. Click the Detail Menu icon for the problem record and select Go To Problems.
30. Click the Related Records tab for the problem.
Notice that a change order is associated with this problem. CM
1152 is In Progress.
31. Click Re
turn at the upper right of the page to go back to the service request.
Resolving the ticket
Scott shares the news with Steve, and tells him that the change CM1152 was entered, and is in
progress. Steve is satisfied with the answer. Scott asks if he can open an incident to resolve the
issue, but Steve declines because he is satisfied that a change is being worked. Steve asks Scott to
close the ticket, and they end their call. Scott indicates what was done and resolves the ticket.
Creating a work log entry
Scott must write what he did on the ticket so that any other agent who views the ticket knows how it
was resolved. It might be obvious from the fact that a solution was applied, but Scott’s company
wants all the information to be recorded to avoid confusion.
32. Click the Log t
ab. Notice that an associated client note from Problem record PM1007 exists in
the log.
33. With the W
ork Log subtab selected, click New Row.
34. Change T
ype to Work.
35. In the Summary field, type Informed requester of open change record.
36. In the Det
ails field, type Told Steve that there is an open change record to address this
known problem.
37. Save the record.
Unit 3 The Service Desk exercises
Exercise 2 Solution lookup
Course materials may not be reproduced in whole or in part without the prior written permission of IBM.
© Copyright IBM Corp. 2016
3-18
V7.0
Uempty
Resolving the ticket
38. Change the status of the ticket to Resolved.
39. Return to the Start Center.

Unit 3 The Service Desk exercises
Exercise 3 Creating a solution
Course materials may not be reproduced in whole or in part without the prior written permission of IBM.
© Copyright IBM Corp. 2016
3-19
V7.0
Uempty
Exercise 3 Creating a solution
In this exercise, Scott receives another call from Bob, who cannot print from another application,
PayrollMaster. There is no existing solution, so Scott must create one. Printing from PayrollMaster
sounds like a simple informational request, and Scott is familiar with the PayrollMaster program.
However, it is not something that everyone is familiar with.
Scott asks Bob how important his printing job is. He replies that it is important. There is no other
way of get
ting the information out of the application, and he needs the document for a meeting.
However, the meeting is not until next week.
Creating a service request
1. Click the Service Requests option in the Service Desk Applications portlet.
2. Click New Service Request in the Common Actions section of the navigation bar.
Note: As a Service Desk Analyst, you used three different methods of creating a service request:
Quick inserts New SR Lite and New SR Full, and New Service Request from within the Service
Requests application.
Recording the initial information
3. Record the following fields:
– Source: PHONECALL
– Reported By: BO
B
– Common Requests: {leave blank}
– Reported Priority: 2
–Summary: Printing from
PayrollMaster
– Details: Bob d
oes not know how to print from PayrollMaster.
Unit 3 The Service Desk exercises
Exercise 3 Creating a solution
Course materials may not be reproduced in whole or in part without the prior written permission of IBM.
© Copyright IBM Corp. 2016
3-20
V7.0
Uempty
4. Click Submit Now.
Taking ownership
5. Take ownership by clicking Common Actions > Take Ownership.
Marking the ticket as In Progress
6. Change the status to In Progress.
Categorizing and prioritizing
The phone conversation with Bob, in addition to the level Scott selected for the reported priority,
helps Scott decide what impact and urgency to give the request.
Because Bob is the only one affected, and he already stated that the print job is important, Scott
determines that the impact is high. However, because he does not need to print for at least a week,
Scott believes the urgency to be medium.
7. Click Categorize and Prioritize.
8. For the Classification, enter 4107.
9. Enter a 2 for impact and a 3 for urgency.
10. Click OK.
Searching for a solution
Scott knows how to print from the PayrollMaster application, but he understands that not everyone
does. He must make sure that there is an existing solution; if none exists, he must create one.
11. Click Common Actions > Search For Solutions on the navigation bar.
12. Enter a search term of PayrollMaster and click Search.
No solutions are shown. Try widening the search.

Unit 3 The Service Desk exercises
Exercise 3 Creating a solution
Course materials may not be reproduced in whole or in part without the prior written permission of IBM.
© Copyright IBM Corp. 2016
3-21
V7.0
Uempty
13. Click Clear Fields, then click Search.
A few solutions are shown, but none tells how to print from PayrollMaster.
14. Press Close.
Because you know the answer to Bob’s request, you tell him to print
by using the Reporting >
Print
menu item in the PayrollMaster application. He tries this solution and is able to print.
Verifying the resolution
Scott verifies with Bob that his issue is resolved. Bob says that he needs no additional help.
Creating a solution
Scott creates a solution so that the next time this problem occurs, the agent that answers the
telephone knows how to handle it.
15. Click the Solution Det
ails tab.
16. In the Resolution
field, type To print from PayrollMaster, click Reporting > Print.
17. Use the text markup tools to make Reporting > Print show up in bo
ld print.
18. To make the solution visible to Bob if he reviews the service request himself, se
lect the
Self-Service
Access option. You might need to scroll up.
19. Save the ticket.
Currently, the solution applies only to, and is only visible from, this service req
uest. This type of
solution is known as an ad hoc solution. However, an automated process goes through all of the ad
hoc solutions in service requests and creates stand-alone solutions from them.
Unit 3 The Service Desk exercises
Exercise 3 Creating a solution
Course materials may not be reproduced in whole or in part without the prior written permission of IBM.
© Copyright IBM Corp. 2016
3-22
V7.0
Uempty
Complete the ticket
20. Create a work log with this information:
–Summary: Informed requester how to print
– Details: Told Bob how to print a PayrollMaster document, and created a solution since
none existed
.
21. Save the ticket.
22. Change the ticket status to Resolved.
23. Return to the Start Center.
Unit 3 The Service Desk exercises
Exercise 4 Changing requests
Course materials may not be reproduced in whole or in part without the prior written permission of IBM.
© Copyright IBM Corp. 2016
3-23
V7.0
Uempty
Exercise 4 Changing requests
In this exercise, Steve walks to the support department and asks to have his desktop computer
replaced. It is too old and slow to do the work he needs. Computers three years and older can be
replaced under company policy.
As Scott, you create a service request.
1. Start the Se
rvice Requests application by clicking the navigation bar Go To Applications >
Service Desk > Service Requests.
This sequence is another method of starting applications, and is useful if the application you
want
to use is not in the portlets on your Start Center.
2. Click Ne
w Service Request.
3. Enter the source. Remember that Steve walked up to the support department.
4. Enter S
teve in the Reported by field.
5. Enter an appropriate value for the reported priority.
6. Enter a summary of Us
er requires a new desktop computer.
7. Give the ticket details of your own choosing. Make sure to
mention that the requester says that
his computer is over three years old and he would like it replaced.
8. Click Submit Now.
9. Take ownership.
10. Click Co
mmon Actions > Service Request in progress then click OK.
This sequence is an alternate way to quickly change the status of the ticket.
11. Click Ca
tegorize and Prioritize.
Indicating the asset
Because this issue is about a specific item, Scott must list the asset.
12. Select an asset by clicking the Deta
il Menu icon after the Asset field and selecting Select
Value.

Unit 3 The Service Desk exercises
Exercise 4 Changing requests
Course materials may not be reproduced in whole or in part without the prior written permission of IBM.
© Copyright IBM Corp. 2016
3-24
V7.0
Uempty
The window shows all assets that belong to Steve.
13. Select T
USC1057.
Scott must verify that the computer is over three years old.
14. Using the Det
ail Menu icon again, select Go To Assets. View the installed date to ensure that
it is at least three years ago.
The date is well over three years ago.
15. At the upper right corner of the screen, click Ret
urn.
16. Enter a classification / class description of 20104 - Request for Service \ IT \ New Asset
Request.
Scott asks Steve how important getting the computer replaced is. Steve states that he cannot
do
his work any longer on it, and he has a deadline that is coming up. Many people depend on
his prompt work.
17. Enter the impact and urgency you feel the issue deserves.
18. Click OK.

Unit 3 The Service Desk exercises
Exercise 4 Changing requests
Course materials may not be reproduced in whole or in part without the prior written permission of IBM.
© Copyright IBM Corp. 2016
3-25
V7.0
Uempty
Informing requester of status
Everything looks correct, so Scott tells Steve that he is putting in a request to have the computer
changed.
Starting a workflow
Because other people use this ticket to help resolve the request, Scott double-checks it to ensure
that it has all the necessary information.
19. Verify that the following fields are complete
. Provide any missing information.
– Reported By
–Summary
– Details
– Classification
–Priority
–Asset
20. Create a work log entry with the following information:
–Summary: S
tarting workflow to obtain a new IT asset.
– Details: Checked that computer was over three years old. After verifying the age of
the
computer, I started the new IT asset workflow.
21. Save the ticket.
22. Click the Route W
orkflow icon.
23. Select the process ITNEWASSET and click OK.
24. In the More
Actions section of the navigation bar, click Workflow >View Workflow
Assignments.
25. Click V
iew Workflow Map.
26. Verify that the service request is waiting fo
r management approval (MGRAPPR).
27. Click OK.
28. Return to the S
tart Center.
Unit 3 The Service Desk exercises
Exercise 4 Changing requests
Course materials may not be reproduced in whole or in part without the prior written permission of IBM.
© Copyright IBM Corp. 2016
3-26
V7.0
Uempty
The request is entered, and the ticket now follows the processes that are detailed for IT asset
management. Additional information about managing IT assets is detailed in the course IBM
Control Desk 7.5 IT Asset Management Fundamentals.
Unit 3 The Service Desk exercises
Exercise 5 Working with existing tickets
Course materials may not be reproduced in whole or in part without the prior written permission of IBM.
© Copyright IBM Corp. 2016
3-27
V7.0
Uempty
Exercise 5 Working with existing tickets
In addition to calls that come in, agents must look for existing tickets that they can resolve. These
tickets can come from self-service, other agents, or automated processes. Because agents transfer
ownership of tickets, it is vitally important for agents to leave well-written, complete work logs.
Checking the inbox and work view
1. From the Service Desk Analyst tab, check the Inbox / Assignments for anything that must be
worked on.
There is a problem with Steve’s request. It should have been transferred to Steve’s manager for
approval, but Steve’s person record does not have a valid entry for supervisor. Scott fixes the
issue by routing the request to Steve’s manager. He can ask HR to fix the person record later.
2. Click Route.
3. Click Reassign.
4. Click Select Value.
5. Find and click Fred.
6. In the Memo field enter: Steve’s person record is missing manager.
7. Click Ok.
8. Return to the Start Center.
9. Verify that the inbox is empty.
Search for new unassigned service requests
10. Check for any new unassigned service requests. Open the Service Requests application by
using either of the following methods:
– The Service Requests item in the Service Desk Applications portlet
– The item in the Go To Applications navigation bar

Unit 3 The Service Desk exercises
Exercise 5 Working with existing tickets
Course materials may not be reproduced in whole or in part without the prior written permission of IBM.
© Copyright IBM Corp. 2016
3-28
V7.0
Uempty
11. Filter for queued tickets by typing que into the Status field and pressing Enter.
There are several tickets open from Bob. They seem to be related to assets, and Jake is
already working with Bob. So everything seems to be under control. Look for new tickets next.
12. Try filtering for new tickets by typing new into the S
tatus field and pressing Enter.
As Scott is reviewing the new ticket list, he notices that one of them has an internal priority of 1.
Because this request is urgent, he opens the ticket and prepares to work the issue.
Opening the ticket
13. Open the high-priority ticket by clicking the ticket number.
The ticket opens with the Service Req
uest tab selected.
Do not take ownership of the ticket yet. Scott must determine what is going on first.

Unit 3 The Service Desk exercises
Exercise 5 Working with existing tickets
Course materials may not be reproduced in whole or in part without the prior written permission of IBM.
© Copyright IBM Corp. 2016
3-29
V7.0
Uempty
Viewing existing information
Scott looks over the existing fields in the ticket, especially the Summary, Details, and Reported
Date. There is little information in this ticket.
Note: Because the class demonstration data was created in the past, the reported date is old
compared to the date when you take this course. For the exercise, assume that the reported date
was only a few minutes ago.
Scott then looks at the solution details and related records but finds nothing there. The only item
that is left is the work log.
14. View the work log.
Scott sees that Fred reported this issue a few minutes ago but had to end the call abruptly
because of a meeting. Scott wants to check whether a followup email was sent.
15. Look at the communication log.
There are no entries, so nothing was sent. The work log says that no other information is
available, so this lack of documentation is expected.
If Scott needed more information, he could look at the ownership and status history of the ticket.
16. Click More Actio
ns > View History.
Scott can see that nobody has owned the ticket, and
it has been only in the New status.
17. Click OK.
Scott knows that if the requester is unwilling or unable t
o work the ticket that the priority must be
lowered. He decides to take ownership of the ticket and work the issue.
18. Take ownership of the ticket.

Unit 3 The Service Desk exercises
Exercise 5 Working with existing tickets
Course materials may not be reproduced in whole or in part without the prior written permission of IBM.
© Copyright IBM Corp. 2016
3-30
V7.0
Uempty
19. Set the status to In Progress.
20. Click Co
mmon Actions > Search For Tickets.
21. Search for tickets with the same classification, 210
701.
Note: The fastest way to enter the classification from the ticket is to click the icon to the right of
the Detail Menu arrows, which is Copy from Ticket. It pulls the classification from the
classification field in the service request and places it, with the proper search value in the
classification field.
The system shows all tickets that share a classification. There are many tickets with similar
issues, but some are old and others are already resolved.
22. Add a filter to the results to remove resolved issues and issues before Fred reported his
pro
blem.
–Status:!
=resolved
– Status Changed: >12/17
/11
23. Press Enter to refresh the results.
24. Switch between the tabs for Se
arch Incidents, Search Service Requests, and Search
Problems. The search parameters are retained, but the type of tickets that are shown is
filtered.

Unit 3 The Service Desk exercises
Exercise 5 Working with existing tickets
Course materials may not be reproduced in whole or in part without the prior written permission of IBM.
© Copyright IBM Corp. 2016
3-31
V7.0
Uempty
25. Open the details of one of the tickets by clicking the triangle beside the ticket number.
26. Click the Detail Menu icon for the ticket and select Go To Problem, Go To Incidents, or Go To
Service Request depending on the ticket you chose.
27. Review the details; then, return to the list.
Scott determines that these tickets are not related.
28. Click Re
turn, then click Close to stop searching.
29. Click the Servic
e Request tab.
Scott calls Fred and asks to work the service re
quest. Fred indicates that he is in the meeting
for the rest of the day, and that he can wait until tomorrow to try the financial web page again.
They both agree to lower the urgency to a 3, and impact to a 2.
30. Change the Impact, Urgency, and Reported Priority to match Scott’s conversation with Fred.
31. Create a work log detailing the phone conversation with Fred. Include the changes that are
made to
the record in your details.
32. Save the record.
33. Change the status to pen
ding.
When Fred calls back to work the problem, they perform initial troubleshooting and might open
related
Incident and Problem records, or associate this Service Request with a global issue.
34. Return to the S
tart Center.

Unit 3 The Service Desk exercises
Exercise 6 Transferring a ticket
Course materials may not be reproduced in whole or in part without the prior written permission of IBM.
© Copyright IBM Corp. 2016
3-32
V7.0
Uempty
Exercise 6 Transferring a ticket
In this exercise, Scott receives a call from Fred. Fred is away at a meeting, but he must give a
visiting contractor access to a secure room to replace a notebook part. The contractor must have
access because no computers are allowed to leave the secure area. Scott says that he will handle
it and hangs up.
Scott calls the secure room and discovers that Nancy is there and can facilitate Fred’s request. He
decides to transfer the ticket to Nancy so that she can follow up with Fred after the contractor
leaves.
1. Open the Service Requests application.
2. Click the New Service Request icon.
3. For Common Requests, enter SDAREQFAC Request Facility Access.
Note: When you enter information into the Common Requests field, you are choosing a template
that is applied to the ticket. Ticket templates allow you to quickly enter data for a common type of
ticket. For instance, the SDAREQFAC template assigns an owner group, sets a classification, and
sets an internal priority and summary.
4. Complete the fields for Source, Reported By, Summary, and Details.
5. Enter a reported priority of 1 because the contractor can leave if he is not allowed access to the
room and bill the company for his time.
6. Click Submit Now.
7. Enter an impact and urgency.
8. In the Specifications section, enter appropriate values for both attributes.
9. Enter a work log stating the work that must be done and that Fred must be contacted with the
results after the contractor leaves.
Transferring the ticket
Because all the basic fields are completed, Scott can transfer the request.
10. Click Common Actions > Select Owner.

Unit 3 The Service Desk exercises
Exercise 6 Transferring a ticket
Course materials may not be reproduced in whole or in part without the prior written permission of IBM.
© Copyright IBM Corp. 2016
3-33
V7.0
Uempty
11. Open the Persons filter, enter person group srmdesk and person nan, and press Enter.
12. Select Nancy. Notice that the status has changed to Queued and Nancy is listed as the owner.
13. Return to the Start Center.
14. Sign out.
Resolving the request
Next, you sign in as Nancy, work the service request, and send Fred a confirmation email.
15. Sign in as Nanc
y Incident Analyst with the user name nancy and the password object00.
16. Open the Service Re
quests application.
Nancy is looking for the new service
request that Scott is sending her. She decides to use the
query All open service requests that are owned or controlled by the logged in user to
quickly find it.
17. Click the query and open the service request.
Note: Clicking the Available Queries heading minimizes the other sections. If you need more
room horizontally, you can click and drag the right border to resize the menu.

Unit 3 The Service Desk exercises
Exercise 6 Transferring a ticket
Course materials may not be reproduced in whole or in part without the prior written permission of IBM.
© Copyright IBM Corp. 2016
3-34
V7.0
Uempty
18. Read the ticket fields and the work log. From what Scott entered earlier, Nancy can figure out
what must be done.
19. Change the status to In Progress.
If you do not see the option that you are looking fo
r, you might need to click the Common
Actions heading.
Shortly after putting the request in progress, the contractor knocks o
n the door, and Nancy escorts
him to the broken notebook. He replaces the system board, and Nancy verifies that the notebook is
working properly. She escorts him out of the secure room. Now that the notebook is repaired, send
Fred a confirmation email.
20. Click the Servic
e Request tab.
21. Click Send Email af
ter the Reported By field.
22. Select the Detail Menu next to the Template field at the top of the screen. Locate and select
the template that is named SRRESRB -
23. Enter a message detailing that the contractor made the necessary repairs and that Nancy
verified the
work. Also, state that this request is now considered to be resolved.
24. Click Send to send the email.
Closing the ticket
Nancy must indicate what was done and resolve the ticket.
25. Create a work log entry that describes wh
at you did to resolve the request.
26. View the sent email by clicking the Commu
nication Log subtab.

Unit 3 The Service Desk exercises
Exercise 6 Transferring a ticket
Course materials may not be reproduced in whole or in part without the prior written permission of IBM.
© Copyright IBM Corp. 2016
3-35
V7.0
Uempty
27. Set the ticket status to Resolved.
28. Sign out.
Viewing the email
29. Start Mozilla Thunderbird. Use the icon to the right of the Windows Start icon.
Select Fred’s profile and click Start Thunderbird.
The email looks similar to the following example.
30. Close Mozilla Thunderbird.

Unit 3 The Service Desk exercises
Exercise 7 Handling a complex issue (Part 1, service request)
Course materials may not be reproduced in whole or in part without the prior written permission of IBM.
© Copyright IBM Corp. 2016
3-36
V7.0
Uempty
Exercise 7 Handling a complex issue (Part 1,
service request)
This three-part exercise familiarizes you with service request management process by guiding you
through the tasks of processing a service request, incident, and problem.
Scenario: Bob Endu
ser notices that his computer is running slowly. Finally, he reboots,
defragments the hard drive, and decides to call the help desk.
– Part 1: As Scott, a Service Desk representative, you h
andle the initial call from Bob. You
create a service request, create an incident from the service request, and transfer the
incident to an incident analyst.
– Part 2: As Incident Analyst Nancy
, you manage this incident through its resolution, create a
problem, and create a workaround solution for this issue in the future.
– Part 3: Nancy also acts as a Problem Analyst. As Na
ncy, you troubleshoot the issue and
complete the work that is required to resolve the issue.
In this first part of the exercise, a Service Desk agent creates a service request ticket that is based
on
the call.
Issue detection
Bob is experiencing slow performance when using the custom billing application. He tries rebooting
his notebook and defragmenting the hard disk, but nothing helps. He searches for a solution before
calling the help desk to open a ticket.
1. Log in as Bob with user name bob and
password object00.
Note: You can see that Bob’s Start Center is different than the others you used. This screen is the
Self Service Center.
2. Click Browse Solutions.
3. Expand the navigation tree to review the solution categories that are presented by default.

Unit 3 The Service Desk exercises
Exercise 7 Handling a complex issue (Part 1, service request)
Course materials may not be reproduced in whole or in part without the prior written permission of IBM.
© Copyright IBM Corp. 2016
3-37
V7.0
Uempty
There are currently no hardware-related solutions.
4. In the search bar, search for slow.
.
5. Click Network Slow Response at Southern Sites.
Bob reviews the solution and decides it does not apply.
6. Review the solution details; then, click No - Return to Solution Search. The solution does not
match Bob’s issue exactly but it gives him some ideas. He decides to call the help desk to ask
some questions and report the issue.
7. Sign out.
Unit 3 The Service Desk exercises
Exercise 7 Handling a complex issue (Part 1, service request)
Course materials may not be reproduced in whole or in part without the prior written permission of IBM.
© Copyright IBM Corp. 2016
3-38
V7.0
Uempty
Allowing users to search for solutions is part of the self-service features of IBM Control Desk. In
many cases, users find their own solutions, and resolve the problem without having to ever contact
the service desk.
Documenting the issue
The initial call
Bob calls the company support line and explains the issue to Scott, the Service Desk analyst. After
talking with Bob, Scott realizes that the notebook computer might be experiencing a hardware,
software, or networking issue and more work is required to determine which. Scott knows that the
first step in fixing the issue is to create a service request ticket.
8. Sign in as Scott with user name scott and password object00.
9. From the Quick Insert portlet, click New SR Lite.
10. In the Reported By and Affected User fields, enter Bob.
11. Click the Select Value icon beside Reported Priority.
Scott asks Bob to rate, on a scale of 1 to 5, with 1 the highest, what he believes the priority to
be. Because Bob must access the billing application for a special project, Bob rates it a 1, which
is urgent.
12. Select 1 for the Reported Priority.
13. In the Summary field, enter notebook computer running slowly.
14. In the Details field, enter Bob reports that his notebook is running slowly.
15. Click the Detail Menu button beside Classification, and select Classify.

Unit 3 The Service Desk exercises
Exercise 7 Handling a complex issue (Part 1, service request)
Course materials may not be reproduced in whole or in part without the prior written permission of IBM.
© Copyright IBM Corp. 2016
3-39
V7.0
Uempty
16. Until some additional troubleshooting is done, Scott decides to classify the issue as it was
reported. Expand the classification menu and select the blue box beside 210102 Laptop
Hardware Issue.
17. Click Submit.
18. Click Return to S
tart Center.
Taking ownership
Scott goes about his other duties, and eventually must work with the service request that he
created for Bob. He starts by opening the Service Requests application.
19. From the navigation bar, click Go
To Applications > Service Desk > Service Requests.
20. Press Enter to list all the records.

Unit 3 The Service Desk exercises
Exercise 7 Handling a complex issue (Part 1, service request)
Course materials may not be reproduced in whole or in part without the prior written permission of IBM.
© Copyright IBM Corp. 2016
3-40
V7.0
Uempty
21. Hover the cursor over the Service Request record number you created for Bob.
Information about the ticket is displayed. This information is helpful for scanning tickets without
having to open each one individually.
22. Click the record number to open.
23. Take a minute to review the record.
24. Take ownership of the ticket.
25. Set the status to In
Progress.
Selecting the asset
Note: To locate the asset in the classroom database, change the Filter By field to All in the next
step, and click Refresh. All assets are displayed.
26. Click the Detail Menu button at the end of the Asset field, and click Select Value.
Scott verifies with Bob that the affected asset is ITAM1004.
27. Select I
TAM1004.
28. Save the service request.

Unit 3 The Service Desk exercises
Exercise 7 Handling a complex issue (Part 1, service request)
Course materials may not be reproduced in whole or in part without the prior written permission of IBM.
© Copyright IBM Corp. 2016
3-41
V7.0
Uempty
Initial investigation
The basic information is entered. Scott searches through all existing solutions to try to solve this
issue as soon as possible. However, Scott can already tell that this issue requires an incident.
Searching existing solutions
Note: In this scenario, Scott uses the search feature to look for an existing solution, but there is
not a matching solution in the database. Do not be alarmed because the purpose is to
demonstrate the method of searching, not to quickly resolve the issue.
29. In the navigation bar, click Common Actions > Search For Solutions.
30. In the Search Terms (optional) field, enter slow and press Enter.
Bob already viewed this solution.
31. Search one more time for hardware.
One result is shown, but it does not match the situation.
32. Try a few terms of your own, such as performance or notebook, or clear the Search Terms
field completely.
33. Because none of the solutions matches this issue, return to the service request by clicking
Close. Another method that Scott can try is to look for tickets that are similar to this ticket.
Perhaps this issue has occurred before and no one created a solution for it.
Search for tickets
34. From the navigation bar, select Common Actions > Search for Tickets.
35. Click the Search Service Requests tab.
36. Enter slow in the Search Terms field and click Search.
Some Service Requests are found.
37. Review ticket SR1053 by clicking the view details (triangle) icon.
38. Click the Detail Menu button beside SR1053 and select Go To Service Requests to open the
result in its parent application in preview mode.
Scott reviews the service request and determines that it is not the same issue that Bob is
experiencing. continues to search for a solution.
39. Click Return at the top of the page.

Unit 3 The Service Desk exercises
Exercise 7 Handling a complex issue (Part 1, service request)
Course materials may not be reproduced in whole or in part without the prior written permission of IBM.
© Copyright IBM Corp. 2016
3-42
V7.0
Uempty
40. Click the tabs for Search Incidents and Search Problems.
One problem contains the term slow, but it is not a match for this issue.
41. Close the Search For Tickets window.
Note: Search results are live, and details of the search hits can be viewed without opening the
related application.
Scott is unable to find a quick solution to this issue, and must escalate this issue to a higher level of
support.
Scott tells Bob that support will fix the issue as soon as possible, and gives him the service request
ticket number for his reference.
42. Write the service request number that is shown in the upper left corner of the Service Request
tab in your notes.
Categorizing and prioritizing
Before Scott escalates the issue, he must assign impact and urgency values to the issue.
43. From the navigation bar, click Common Actions > Categorize and Prioritize.
Bob’s information, which is combined with Scott’s own knowledge and experience, leads Scott
to agree that the issue is high priority.
44. Enter a 2 for impact and a 1 for urgency in the appropriate fields.
45. Click OK.
Adding a work log entry
Scott must enter a short message that explains what was done so far. This information is important
for the next level of support to know.
46. Create a work log entry with Contacted requester in the Summary field. In the Details field,
type I spoke with Bob on the phone. His notebook is running slowly when accessing the
billing application. He has tried defragging his hard disk and rebooting.
47. Scott determines that there is no need for Bob to be able to read this log, because it is a
communication between Service Desk analysts. Leave the Viewable check box cleared.
48. Save the service request.

Unit 3 The Service Desk exercises
Exercise 7 Handling a complex issue (Part 1, service request)
Course materials may not be reproduced in whole or in part without the prior written permission of IBM.
© Copyright IBM Corp. 2016
3-43
V7.0
Uempty
Creating an incident
Scott now must create an incident ticket so that higher levels of support can work on the issue. He
creates it from inside the service request to create a relationship between the two tickets.
49. From the navigation bar, click Common Ac
tions > Create Incident.
50. A short message indicates that an incident was crea
ted, and the Service Request changes
status to Queued.
Viewing related records
51. To see the incident that was created, select the Related Records tab.
Scott can see the new incident, which has a status of Queued and a relationship to the service
req
uest of Followup.
This relationship is important for two reasons:
– It links all of the tickets together.
– When the status of the incident is changed, the status of the service request also changes.
52. Click the Detail Menu af
ter the Related Record Key field of the new incident and select Go To
Incidents.
Many fields were carried over from the service
request.
53. Verify that the information from the Service Request was transferred to the new Incident. Check
the
contact information and internal priority.
54. From the navigation bar, click Common
Actions > Select Owner.
The Select Owner window opens.
If Scott wanted to delegate the ticket to a specific person, the delegation could be performed here.
However
, Scott just wants to transfer the incident to anyone in the Incident group.
55. Open the Person Group
s tab and select Service Request Management Hardware Group
(SRMHARD).
Note: If you do not see your selection on the first page, use the filter or the navigation arrows to
see other choices.
Unit 3 The Service Desk exercises
Exercise 7 Handling a complex issue (Part 1, service request)
Course materials may not be reproduced in whole or in part without the prior written permission of IBM.
© Copyright IBM Corp. 2016
3-44
V7.0
Uempty
Scott’s name is removed from the Owner field, and SRMHARD is now in the Owner Group
field. Also, the status of both the incident and the originating service request are set to Queued.
56. Click Return from the menu bar.
57. Return to the Start Center.

Unit 3 The Service Desk exercises
Exercise 8 Combining Quick Insert and ticket templates
Course materials may not be reproduced in whole or in part without the prior written permission of IBM.
© Copyright IBM Corp. 2016
3-45
V7.0
Uempty
Exercise 8 Combining Quick Insert and ticket
templates
Now, instead of looking at scenarios of the Service Desk, the following exercises look at a few
individual features of IBM Control Desk. These features are designed to save time and make
common tasks easier.
In previous exercises, you created a service request and t
hen applied a ticket template to it. For
cases where a particular type of record was frequently created, it is easier if both of these tasks
were done at the same time.
1. When the cursor hovers over a portlet, more too
ls become available. Edit the Quick Insert
portlet.
2. Click Select Actions.
3. Select the New Se
rvice Request (SR) action and click OK.
A new action is created at the top of the list.
4. Change the description to New Printer Issue SR.
5. Enter SDAPrinter for t
he Template ID.
6. Click Finishe
d.
7. Click Ne
w Printer Issue SR in the Quick Insert portlet. Notice how it creates a new service
request with basic information completed.
8. Return to the Start Center. Do not save the new service request.

Unit 3 The Service Desk exercises
Exercise 9 Solutions application search
Course materials may not be reproduced in whole or in part without the prior written permission of IBM.
© Copyright IBM Corp. 2016
3-46
V7.0
Uempty
Exercise 9 Solutions application search
When you search for solutions by using the Solutions application, a rating is assigned to each
match. Ranking is provided in the left margin by each solution. Self-service users can provide
solution feedback as ranking and comments.
The ranking feedback indicates the number of stars the feedback receives:
• Five stars: Excellent
• Four stars: Very Good
• Three stars: Good
• Two stars: Fair
• One star: Average
This rating displays the quality of the match. Factors that are used for the ranking include the
following ite
ms:
• Average rank
• Number of times viewed
• Number of times applied by Service Desk agents and by self-service users
To test the ranking system, imagine you have an issue
with the billing system where the system
starts running slowly and then gives you error 34. Look for any existing solutions to this issue.
1. Open the Solutions applica
tion.
You can click Go T
o Applications > Service Desk > Solutions, or use the Solutions link on
the Start Center.
2. Type bi
lling in the Description field and press Enter to display a list of all matching solutions.
Notice that only one solution is ranked highly. The same solution is available to self-service
users.
3. Which solution would you try first, and why?
_____________________________________________
_____________________________________________
Remain in the Solutions application to continue with the next exercise.

Unit 3 The Service Desk exercises
Exercise 10 Creating a stand-alone solution
Course materials may not be reproduced in whole or in part without the prior written permission of IBM.
© Copyright IBM Corp. 2016
3-47
V7.0
Uempty
Exercise 10 Creating a stand-alone solution
In this exercise, you create a solution that is not tied to a ticket. This solution covers the way to
remove the cover of a particular server. Typically, a solution like this applies to all servers, but this
particular server has specific requirements.
1. If you have not already, start the Solutions application.
2. Click the New Solution ic
on.
3. Use the following information:
– Description: Server will not power up
– Include this solution in the Self Service Center?: [Sel
ected]
– Classification: 2101
0406 (Server Power/Battery issue)
– Asset: ITAM4001.
–Keywords: p
ower, keywordtest, C2, security
– Symptom: Server will not p
ower up
– Cause: C2 Secu
rity switch
– Resolution: Th
e access panel on this server is connected to a C2 security switch that
does not allow the server to power up after it has been opened. To start the server
after tripping the switch, use the maintenance key to reset the switch.

Unit 3 The Service Desk exercises
Exercise 10 Creating a stand-alone solution
Course materials may not be reproduced in whole or in part without the prior written permission of IBM.
© Copyright IBM Corp. 2016
3-48
V7.0
Uempty
Attaching an image to the solution
You can attach and display an image on the solution record. This feature is in addition to the
existing attachment’s functions.
Note: You can attach only a single image.
4. Click More Actio
ns > Add/Modify Image.
5. Click Browse a
nd select C:\labfiles\ServiceRequest\IBMLogo.jpg.
In the production environment, your image might display something more specific to the
situat
ion, like a diagram that shows the switch location.
6. Click OK.
You can see the image that you attached at the top of the solution.
7. Save the solution if necessary.
Note: This solution is not available for use until it is marked Active by a knowledge administrator.
Scott has the authority to create solutions, but does not have the authority to change the status.
these roles can be configured to fit your environment.
8. Sign out.

Unit 3 The Service Desk exercises
Exercise 11 Keywords
Course materials may not be reproduced in whole or in part without the prior written permission of IBM.
© Copyright IBM Corp. 2016
3-49
V7.0
Uempty
Exercise 11 Keywords
Keywords can help users find solutions, but keywords exist separately from solutions.
When keywords are created inside solutions, they are added to the keyword index. From the
keywords database, the list of keywords can be updated across all solutions.
Note: Keywords are not searchable by using the Global Search window. They can be found only
by searching in the Self Service Center or Self Service Global Search.
Typically, the knowledge administrator approves stand-alone solutions. The knowledge
administrator in this demonstration is
Nancy.
Removing keywords
1. Sign in as Nancy with the user name nancy and the password object00.
2. Start the Solutions application by clicking the Go To Applications navigation bar and selecting
Service Desk > Solutions.
3. Press Enter to view the list of solutions.
4. While viewing the list of solutions, click More Actions > Add Delete Keywords.
A list of all keywords that are used in all solutions is displayed.
The knowledge administrator is responsible for approving the keywords that are used in solutions.
The department has a policy that all keywords must be at least 3 characters long, so the term c2
must be deleted.
5. Click the Mark row for delete icon (trash can) beside the keyword c2.
6. Click Yes to confirm the deletion.
7. Click OK.
8. Find and open the solution that you created about the C2 security switch.
Notice that the keyword c2 is no longer present.
9. On the navigation bar under Common Actions, click Change Status.
10. Set the new status to Active and click OK.

Unit 3 The Service Desk exercises
Exercise 11 Keywords
Course materials may not be reproduced in whole or in part without the prior written permission of IBM.
© Copyright IBM Corp. 2016
3-50
V7.0
Uempty
Searching the text fields
11. Start the Global Search application by clicking Go To Applications on the navigation bar and
selecting Service Desk > Global Search.
12. In the Search T
erms field, type power, security, and press Enter.
Two solutions are shown.
Note: A cron task PmObjSearchCron is responsible for indexing the contents of solutions, and
this cron task defaults to run once per day. In your lab environment, the time was shortened to
every 5 minutes. If you do not see the expected results, wait a few minutes and try again.
13. Click to view the details for solution SPOC1039.
The solution was found because the search terms match the text fields.
14. Search for keyword
test.
Searching by using keywords
15. Start the Self Service Global Search application by clicking Go To Applications on the
navigation bar and selecting Self Service > Self Service Global Search.
16. In the Find
field, type keywordtest and click the Find icon (magnifying glass).
17. Click to view the details for th
e solution you created.
The solution matches the keyword that you entered.
18. Repeat your previous search terms: power and s
ecurity.
19. Sign out.
You have reached the end of the exercises.
Inform your instructor that you have completed
the exercises in this unit.

Course materials may not be reproduced in whole or in part without the prior written permission of IBM.
© Copyright IBM Corp. 2016
4-1
Unit 4 Service requests, incidents, and
problems exercises
These exercises continue the handling of a complex issue.
Exercise 1 Handling a complex issue (Part 2,
incident)
The hardware team receives the incident
Incident Analyst Nancy takes ownership of the incident Scott created: Bob’s notebook is running
slowly. She troubleshoots the issue, resolves the incident, and creates a problem ticket.
Remember that at the incident stage, the emphasis is on getting the user up and running rather
than solving the root issue.
Opening the incident
1. Sign in as Nancy with user name nancy and password object00.
2. Click the Incident Analyst tab.
Nancy notices that there is a new high-priority incident in her group work view. Notice that the
incident is displayed in the group work view of everyone that belongs to the SRMHARD group.
3. Open the incident by clicking the Incident number, and take ownership.
Note: Because Nancy takes ownership of the incident, it no longer is displayed in anyone else’s
work view. Nancy must take ownership as soon as she decides to work on a ticket so that no other
SRMHARD group member tries to work on it.
4. Change the status of this incident to In Progress.
Unit 4 Service requests, incidents, and problems exercises
Exercise 1 Handling a complex issue (Part 2, incident)
Course materials may not be reproduced in whole or in part without the prior written permission of IBM.
© Copyright IBM Corp. 2016
4-2
V7.0
Uempty
Working with an incident
Gathering background information
Nancy looks over the incident to learn the details of the issue and to determine what was done so
far.
Look at all the fields of the incident, paying particular attention to the Details field.
5. Review the Work Log and Communication Log sections and see whether there are any
entries.
It looks like some basic troubleshooting was done.
6. Click the Related Records tab and look at the service request. You must go to the Service
Requests application by clicking Detail Menu.
7. Look at the service request to pick up any information that was not on the incident.
8. Click Return.
Because this notebook problem affects only one user, Nancy does not mark this ticket as a
global issue.
9. Go to the Incident tab and verify that the Global Issue icon is not active. Hovering the mouse
cursor over the icon creates a pop-up window.
10. Save the incident if necessary.
From looking at the service request and incident, it seems that the Service Desk agent already
performed basic troubleshooting. Nancy must get the user back to work by using a workaround.
She talks to Bob and tries to find a workaround for the problem.
Resolving the incident
Providing the requester with a workaround
Nancy contacts Bob on the telephone and verifies with him that the notebook still has slow
performance. Nancy guides Bob through some more diagnostic steps and discovers that the
notebook performs slowly only when using the billing application. Other applications work fine, but
Bob had only used billing today. Also, Bob is using a backup server instead of the main billing
server.
Nancy asks Bob to configure his connection to use the main server. After the change in
configuration, everything is working properly again. Nancy asks if he is satisfied that the issue is
resolved. Bob confirms that it is.
Unit 4 Service requests, incidents, and problems exercises
Exercise 1 Handling a complex issue (Part 2, incident)
Course materials may not be reproduced in whole or in part without the prior written permission of IBM.
© Copyright IBM Corp. 2016
4-3
V7.0
Uempty
Although Bob’s incident is resolved, Nancy decides to open a problem ticket to fix the backup
server. Nancy creates a problem ticket to troubleshoot the server, and marks the incident as
Resolved.
Sending a communication
Even though Nancy talked to Bob on the phone, company policy states that when an incident is
resolved, a communication must be sent.
11. Click the Send Email icon at the end of the Reported By field on the Incident tab.
The Create Communication application starts.
12. Open the Template Selection screen by clicking the Detail Menu icon at the end of the
Template field and clicking Select Value.
The list of templates is displayed.
INCRESRB - Incident resolved (to requester) might apply to the situation.
13. Select the INCRESRB template.
14. Send the email message by clicking Send.
15. Confirm that the email is added to the communication log of the ticket by reviewing the
Communication Log section.
Adding a work log entry
Nancy creates a work log entry to describe what she found and did.
16. Create a work log entry and enter the following information.
– Type: WORK
–Summary: Changed billing server
– Details: Bob’s notebook is now using the primary billing server.
17. Save the incident record.
Creating a problem ticket
Nancy now must create a problem ticket to fix the backup server. She creates it from inside the
incident record to create a relationship between the two tickets.
18. From the More Actions menu, click Create > Problem.
A message at the top of the screen indicates that a problem was created.

Unit 4 Service requests, incidents, and problems exercises
Exercise 1 Handling a complex issue (Part 2, incident)
Course materials may not be reproduced in whole or in part without the prior written permission of IBM.
© Copyright IBM Corp. 2016
4-4
V7.0
Uempty
Viewing related records
19. To see the problem that was created, click the Related Records tab.
Nancy can see the new problem, which has a status of QUEUED and a relationship to the
incident of FOLLOWUP.
20. Click the Detail Menu button after the Related Record field of the new problem and select Go
To Problems.
The Problems application opens.
Many fields were carried over from the incident to the problem.
Nancy thinks about what priority to assign. Bob’s connection is working now, so the urgency is
lower than the 1 assigned to the incident. However, the backup server needs to be fixed in case
the primary server goes down.
21. Remove Bob’s name from the Affected Person field.
22. In the Priority fields, enter a 3 for Impact and a 2 for Urgency.
23. What priority was automatically inserted into the Internal Priority field?
24. Change the summary to Billing server slow performance.
25. Change the details to The backup billing server is performing slowly. The primary server is
ok.
26. On the Asset field, click the Detail Menu icon, and then Select Value.
27. Change the asset to ITAM4001. The description should show up as IBM 8303 Server.
Note: The assets are filtered by User/Custodian. You need to remove this filter to see the correct
server. Change the filter to All and click Refresh.
A system message asks if you would like to update the location.
28. Click Yes.
29. Change the classification to 210104 IT Issue \ Hardware \ Server. Remember that you can
filter the description for server.
30. Save the problem.
Nancy could assign this new problem to the appropriate group for the next available person to
handle, but she already knows the situation and decides to keep ownership of this issue.
31. Click Return from the menu bar.
Because the incident is resolved, Nancy must close the ticket.
Unit 4 Service requests, incidents, and problems exercises
Exercise 1 Handling a complex issue (Part 2, incident)
Course materials may not be reproduced in whole or in part without the prior written permission of IBM.
© Copyright IBM Corp. 2016
4-5
V7.0
Uempty
32. Set the status of the incident to Resolved by using the Resolve Incident action, and clicking
OK in th
e Change Status dialog.
Notice that the status of the originating Service
Request is automatically changed to
RESOL
VED, but the Problem remains QUEUED.
Nancy’s work with the incident is finished.
33. Return to the Start Center.
Unit 4 Service requests, incidents, and problems exercises
Exercise 2 Automated solution handling
Course materials may not be reproduced in whole or in part without the prior written permission of IBM.
© Copyright IBM Corp. 2016
4-6
V7.0
Uempty
Exercise 2 Automated solution handling
When working with a customer on a ticket, an agent might not find an existing solution to the issue.
After the issue is resolved, the agent will complete the fields of the Solution t
ab, stating what was
don to resolve the problem. This type of solution is known as an ad hoc solution.
IBM Control Desk automates the processing of these ad
hoc solutions into the formal solution base
as new draft solutions. When these solutions are in the formal solution base, the knowledge
administrator can review all the new draft solutions and make the relevant ones active.
1. Logged in as Nancy, start the Incidents application by clicking the Go To
Applications navigation bar and selecting Service Desk > Incidents.
2. Click the New Incident icon.
3. Give the incident a summary of ad hoc solution test.
4. Click Submit Now.
5. Go to the Solution Details page by clicking the Solution Details tab.
6. Do not type anything into the Solution field. It is automatically completed later.
7. In the Symptom field, type ad hoc symptom.
8. In the Cause field, type ad hoc cause.
9. In the Resolution field, type ad hoc resolution.
10. Save the incident.
Currently, the solution information is only used inside this single incident.
By default, IBM Control Desk performs these tasks once per day:
• Detects the ad hoc solution that you created earlier
• Creates a solution record with a system-generated ID number and in a Draft status
• Copies over the fields from the incident ticket Solution Details tab
• Copies the new solution ID number to the incident ticket Solution Details tab
IBM Control Desk performs the last task so that the next time the process is run, it does not try to
red
o this process on the ad hoc solution. Therefore, instead, the ad hoc solution has an ID number
and is a stand-alone solution. In your classroom environment, these tasks are run every 5 minutes.
Verifying that the ad hoc solution was processed
11. Wait a few minutes and click the List View tab. Reopen the ticket that is created in the first part
of this
exercise. Hint: summary = Ad hoc solution test.

Unit 4 Service requests, incidents, and problems exercises
Exercise 2 Automated solution handling
Course materials may not be reproduced in whole or in part without the prior written permission of IBM.
© Copyright IBM Corp. 2016
4-7
V7.0
Uempty
12. Click the Solution Details tab and note the following details:
– The Solution
field is populated with the formal solution number. The next time that the cron
task runs, it will not attempt to process this solution again.
– The Det
ails field is populated with the Details field from the incident ticket.
If you do not see a solution number, wait a few minutes more. If you still do not see it, return to
the Start Center, reopen the Incidents application, and try again.
13. View the formal solution by clicking the Det
ail Menu icon after the Solution field and selecting
Go To Solutions.
You can see the newly created solution record. Notice that the status is Draft.
Knowledge administrators review these draft solutions and activate the ones that should be
available in the knowledge base.
14. Click Re
turn to return to the Incidents application.
15. Return to the S
tart Center.

Unit 4 Service requests, incidents, and problems exercises
Exercise 3 Searching external knowledge management systems
Course materials may not be reproduced in whole or in part without the prior written permission of IBM.
© Copyright IBM Corp. 2016
4-8
V7.0
Uempty
Exercise 3 Searching external knowledge
management systems
In IBM Control Desk, when a global search is initiated, you can search multiple external knowledge
management tools on websites in addition to the IBM Control Desk database. The user is spared
the effort of going to multiple tools and searches.
You can configure external sites for yo
ur environment, for example:
• IBM TechDev
• Yahoo
• Google
• Bing
A new browser window opens for each external knowledge management tool result.
Note: This process might not show working sites, depending on whether you have an Internet
connection. By default, your virtual machine is not configured for Internet access. Also, you can
configure the sites that are opened on an external search.
1. While still logged in as Nancy, open the Global Search application by selecting Service Desk >
Global Search from the navigation bar at the left..
2. Add the term print to
the Search Terms field.
3. Click the Search
External Knowledge Base tab.
4. Select all of the available knowledge bases, and click Search.

Unit 4 Service requests, incidents, and problems exercises
Exercise 3 Searching external knowledge management systems
Course materials may not be reproduced in whole or in part without the prior written permission of IBM.
© Copyright IBM Corp. 2016
4-9
V7.0
Uempty
Note: Depending on the browser you choose to use, the screen that is displayed varies. In the
first example, Internet Explorer displays the Internet Explorer cannot display the webpage
me
ssage. Mozilla Firefox behaves in a different manner. Initially, you might receive an error that
indicates an SQL error, followed shortly by the second message shown, which indicates an
inability to connect.
Notice that a browser is opened to search each external site.
5. Close the new browser windows.
6. Return to the S
tart Center.

Unit 4 Service requests, incidents, and problems exercises
Exercise 4 Handling a complex issue (Part 3, problem)
Course materials may not be reproduced in whole or in part without the prior written permission of IBM.
© Copyright IBM Corp. 2016
4-10
V7.0
Uempty
Exercise 4 Handling a complex issue (Part 3,
problem)
Problem analysts receive the problem ticket
As an incident analyst, Nancy was responsible for finding a quick workaround for the incident that
Scott created for Bob. Now that the workaround is in place, Nancy is also going to work the problem
ticket for a permanent solution as a problem analyst.
Opening the problem
1. If you are logged out, sign in as Nancy with the user name nancy and the password object00.
2. Click the Inc
ident Analyst tab on Nancy’s Start Center.
Nancy finds some time to work on the new proble
m ticket and finds it in the Known Problems
portlet. The description is Billing server slow performance.
Because Nancy became the problem owner when she created it, she does not have to take
ownership.
3. Open the problem by clicking the problem number.
4. Change the status of this problem to In
Progress.
Working with a problem
Gathering background information
Nancy was working on other higher priority issues recently and decides to review the ticket details
to refresh her memory.
5. Read the details and log entries that are associated
with the problem ticket.
From the details in the incident ticket, Nancy knows
to check the backup billing server. She runs
some diagnostic tests, checks the log files, and examines the running applications. When she is
finished, she determines that the Java virtual machine is out of date and must be upgraded.

Unit 4 Service requests, incidents, and problems exercises
Exercise 4 Handling a complex issue (Part 3, problem)
Course materials may not be reproduced in whole or in part without the prior written permission of IBM.
© Copyright IBM Corp. 2016
4-11
V7.0
Uempty
Nancy creates an activity to define what work to do, which asset requires the update, and who is to
perform the work.
Note: In a corporate production environment, Nancy would complete a change request and get
approval before performing any work. For this lab exercise, assume that the change process was
completed. A lab on Change Management is available if you would like more information.
Creating the activity
Nancy adds an activity to upgrade the Java software on the server.
6. Access the Activities t
ab and add a new row to the Activities table.
A new activity record is created by using information from the problem as its basis.
7. Write the activity number in your notes.
_____________________________________________
Nancy notices that the description that was copied over from the problem does not match what
needs to be done.
8. Change the Su
mmary of the activity to Upgrade Java.
9. Click Ac
tivity Processing at the bottom of the Activity section and click Select Owner.
10. Use the filter on the Person field to search for Nancy.

Unit 4 Service requests, incidents, and problems exercises
Exercise 4 Handling a complex issue (Part 3, problem)
Course materials may not be reproduced in whole or in part without the prior written permission of IBM.
© Copyright IBM Corp. 2016
4-12
V7.0
Uempty
Note: The search results display multiple entries because Nancy is a member of many person
groups, but they all refer to the same person. You can filter by group, person, or a combination of
the two.
11. In the Select Owner window, select any one of the records for Nancy in the person column.
12. Click OK to close the system message window.
The activity status currently is WAPPR (Waiting on Approval). Nancy must
approve the activity
before any work can be done.
13. Click Ac
tivity Processing and select Change Status.
14. Select Approv
ed and click OK.
15. Click OK to close the
system message.
The problem ticket is now waiting on the Java upgrade.
16. Change the problem status to Pending.

Unit 4 Service requests, incidents, and problems exercises
Exercise 5 Performing the work
Course materials may not be reproduced in whole or in part without the prior written permission of IBM.
© Copyright IBM Corp. 2016
4-13
V7.0
Uempty
Exercise 5 Performing the work
Nancy must log on to the server, upgrade the Java software, and close the activity.
1. Change the activity status to In Progress by clicking
Activity Processing > Change Status.
2. Close the system message.
Performing the work and close the activity
Nancy logs on to the server. She shuts down the Java services, installs the updated software,
checks the new version number, and restarts the services.
She ensures that the billing application is working properly a
nd then logs out. Now it is time to finish
the paperwork.
3. Create a work log entry that details the Java update by clicking the Detail Menu icon
after the
Activity field, selecting Go To Activities and Tasks, and clicking the Log tab.
4. Click New Row to create a work entry.
Use your own words to describe the Java update.
5. Save the activity.
6. Return to the problem.
7. Change the status of the activity to Com
pleted.
8. Click OK to close the
system message.
Note: If you are unable to find Completed you may be looking at the Problem, rather than the
activity. To change the status of the Activity, click Activity Processing, then select Change
Status. Completed is one of the options from the drop down menu.

Unit 4 Service requests, incidents, and problems exercises
Exercise 6 Closing the problem
Course materials may not be reproduced in whole or in part without the prior written permission of IBM.
© Copyright IBM Corp. 2016
4-14
V7.0
Uempty
Exercise 6 Closing the problem
Entering the solution information for this problem
Nancy enters details about how this issue was solved.
Follow these steps to create a solution for this specific problem:
1. Click the Soluti
on Details tab.
2. Enter the following information.
3. Now that the problem has a solution, you can mark it as a known error. On the Problem tab,
select the Is Known Error check box.
4. Change the status of the problem to Resolved.
5. Sign out.
Field Value
Solution [Leave this field blank. This information is entered automatically if you use
an existing applicable solution.]
Symptom Backup billing server running slowly
Cause Java software was back-level
Resolution Updated Java

Unit 4 Service requests, incidents, and problems exercises
Exercise 7 Using known errors to narrow down solutions
Course materials may not be reproduced in whole or in part without the prior written permission of IBM.
© Copyright IBM Corp. 2016
4-15
V7.0
Uempty
Exercise 7 Using known errors to narrow down
solutions
Setting a problem to Known Error can be helpful. To see how, you act as a Service Desk agent who
works an issue that was reported: Oracle Financials Issues.
1. Sign in as Scott
with the user name scott and the password object00.
2. Start the Service Requests application by clicking
the Go To Applications navigation bar and
selecting Service Desk > Service Requests.
3. Click Ne
w Service Request.
4. Click Submit Now.
5. Set the classification to 21070
1 (Oracle Financials Issue).
You can view similar tickets to see whether an
y others deal with similar issues.
6. Click Common Actions > Search For Tickets.
7. Beside the Class
ification field, click the Copy from ticket icon.
8. Click Search.
9. Click each of the tabs for Inciden
ts, Service Requests, and Problems.
You see many tickets from each category. A typ
ical service desk, after a few months, can have
thousands of tickets. These tickets can take a while to go through, and most of them record only
the issue, not what was done to correct it.
Looking through similar tickets can help a Service Desk agen
t find solutions.
10. While on the Se
arch Problems tab, select the Only show active known errors option, and
click Search.
Now only the problems that contain a verified erro
r (and probably the solution) are shown.
11. Select the ticket by selecting the check box at the left, and click Rel
ate Selected Tickets.
Unit 4 Service requests, incidents, and problems exercises
Exercise 7 Using known errors to narrow down solutions
Course materials may not be reproduced in whole or in part without the prior written permission of IBM.
© Copyright IBM Corp. 2016
4-16
V7.0
Uempty
12. Click Close, then click the Related Records tab.
Notice that the Problem record and the corresponding Solution are now related to the current
record.
13. Sign out.
You have reached the end of the exercises. Inform your instructor that you have completed the
exercises in this unit.

Course materials may not be reproduced in whole or in part without the prior written permission of IBM.
© Copyright IBM Corp. 2016
5-1
Unit 5 The Service Catalog exercises
In these exercises, you follow an offering from ordering to fulfillment.
• As a self-service user (Bob), you purchase an offering.
• As a line manager (Fre
d), you approve the request.
• As an operations specialist (Nanc
y), you fulfill the request.
Exercise 1 Ordering an offering
In this exercise, you look for services in both the Self Service Center and the Service Catalog.
1. Sign in as Bob wit
h the user name bob and the password object00.
2. Click Frequent Requ
ests from the Self Service Center.
Notice the choices that are listed here. There are options for system-wide frequent requests,
and Bob’s personal most frequent requests.

Unit 5 The Service Catalog exercises
Exercise 1 Ordering an offering
Course materials may not be reproduced in whole or in part without the prior written permission of IBM.
© Copyright IBM Corp. 2016
5-2
V7.0
Uempty
3. Click My Frequent Requests to see what Bob uses most frequently.
4. Go back to the Self Service Center home page by clicking either the Home icon or the word
Home in the breadcrumbs.
5. Click Report an Issue, IT Issue, and Network Connectivity.
The Report an Is
sue window opens.
6. Add this offering to Bob’s favorites list by clicking Add to
Favorites.
7. Click OK on
the system message window.
Notice that Add to Fa
vorites changed to Delete from Favorites.
8. Click Ca
ncel on the Report an Issue window.
9. Click the Self Service Center Home ic
on.
10. Click Frequent Requ
ests.
Notice that the Network Connectivity choice was added to the Frequent Requests list.
11. Click the Self Service Center Home ic
on.

Unit 5 The Service Catalog exercises
Exercise 1 Ordering an offering
Course materials may not be reproduced in whole or in part without the prior written permission of IBM.
© Copyright IBM Corp. 2016
5-3
V7.0
Uempty
12. Click Request a new Service.
There are many categories and offerings available
here. Bob has several options for choosing
what he is looking for.
13. Click Co
mposite Services.
14. One of the offerings that Bob is interested in is Bu
ild New Server with Middleware. Instead of
clicking it, search for middleware in the search bar.
If you know what you are looking for, the search bar can bring results quickly without requiring
navigation of categories.
Browsing the catalog
Sometimes Bob likes to look through the Self Service Center. Sometimes he prefers to search for
the offering that he is looking for. But sometimes he wants to use the full Service Catalog interface.
15. Click the Go T
o icon > Self Service > Catalog Requests > Offering Catalog.
16. In the Browse by Catalog navigation bar, click IT Services > Composite Services.

Unit 5 The Service Catalog exercises
Exercise 1 Ordering an offering
Course materials may not be reproduced in whole or in part without the prior written permission of IBM.
© Copyright IBM Corp. 2016
5-4
V7.0
Uempty
Clicking Composite Services presents you with the same choices that you found in the Self
Service Center.
17. Click View All Offerings in the search bar.
18. Scroll down and view all the offerings that come with Service Catalog.
Ordering from the catalog
Bob is now ready to place his order to build a new server with middleware.
19. Use any method that you like to find and select the offering Build New Server with
Middleware.
20. Enter the following information for the new server:
Field Value
Host Name BOB-SRV1
IP address 10.10.10.10
Operating System PMSC_WINXP1

Unit 5 The Service Catalog exercises
Exercise 1 Ordering an offering
Course materials may not be reproduced in whole or in part without the prior written permission of IBM.
© Copyright IBM Corp. 2016
5-5
V7.0
Uempty
21. Click Continue.
22. Select the Inst
all DB option.
23. Click Co
ntinue.
24. In the Summary sec
tion, click Submit Request.
A window opens.
25. Make a note of the newly created request number.
_____________________________________________
26. Click View Your Request.
On this page, you can review the status, details, and history of the catalog request.
27. Sign out.
Network Zone corporate
Expected Release Date {one week from today}
User IDs none
Project Name Project Demo
Field Value
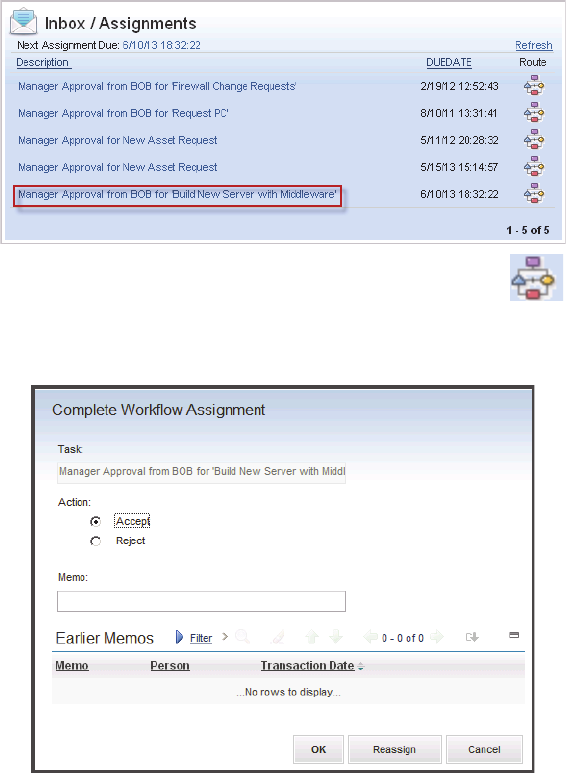
Unit 5 The Service Catalog exercises
Exercise 2 The fulfillment process
Course materials may not be reproduced in whole or in part without the prior written permission of IBM.
© Copyright IBM Corp. 2016
5-6
V7.0
Uempty
Exercise 2 The fulfillment process
There are two steps in the fulfillment process:
• Approval: The re
quest is approved or denied.
• Ful
fillment: If approved, the order is fulfilled.
Approval
Line manager approval
The first step in the approval process is for the cart submitter’s supervisor to approve or deny the
request. In this example, Bob’s supervisor is Fred.
1. Log in as Fred with the
user name fred and the password object00.
A new I
nbox assignment requires manager approval.
2. Start the workflow by clicking the Route icon beside the assignment.
The service request that contains the order open and a Complete Workflow Assignment
window opens.

Unit 5 The Service Catalog exercises
Exercise 2 The fulfillment process
Course materials may not be reproduced in whole or in part without the prior written permission of IBM.
© Copyright IBM Corp. 2016
5-7
V7.0
Uempty
Note at the top of your screen that the service request status is New.
3. Leave Accept selected and click OK.
The window closes, leaving the service request open
. Notice that the service request has a
status of Queued.
4. Sign out.
Fulfillment
When approval occurred, work orders were created from the job plan in the service request.
5. Sign in as Nancy with the user name nancy a
nd the password object00.
6. Click the Operations
Specialist tab.
7. Find and select the service request in the Group
SR Queue.
8. Take ownership of the service request.
9. Click the Activities t
ab.
10. Select the Det
ail Menu icon of the Activity field and select Go To Activities and Tasks.
11. Click the Plans tab.

Unit 5 The Service Catalog exercises
Exercise 2 The fulfillment process
Course materials may not be reproduced in whole or in part without the prior written permission of IBM.
© Copyright IBM Corp. 2016
5-8
V7.0
Uempty
Here you can see the various tasks that are created to fulfill the request that is made by the
user.
12. Click Return at the top of the screen.
13. Sign out.
Typically, the work would be done and
the request would be fulfilled.
However, fulfillment does not always occur immedia
tely. In the following exercise, you learn how
users can see the progress of their requests.

Unit 5 The Service Catalog exercises
Exercise 3 Checking the progress of a request
Course materials may not be reproduced in whole or in part without the prior written permission of IBM.
© Copyright IBM Corp. 2016
5-9
V7.0
Uempty
Exercise 3 Checking the progress of a request
1. Sign in as Bob with the user name bob and the password object00.
On the Se
lf Service Center, Bob can see the status of his request.
2. Click the service request to see the details.
If you want to communicate any information to the people who fulfill your request, you can
create a service request log entry.
3. Click the Log
tab.
4. Click Ad
d Log Entry.
5. For the summary, enter Need m
ore RAM.

Unit 5 The Service Catalog exercises
Exercise 3 Checking the progress of a request
Course materials may not be reproduced in whole or in part without the prior written permission of IBM.
© Copyright IBM Corp. 2016
5-10
V7.0
Uempty
6. For the details, enter I need to install another application that requires 16 GB of extra RAM.
The note is added to the service request and is handled by the fulfillment team.
7. Click OK on
the View Service Request window.
8. Sign out.
You have reached the end of the exercises. Inform your instructor that you have completed the
exercises in
this unit.

Course materials may not be reproduced in whole or in part without the prior written permission of IBM.
© Copyright IBM Corp. 2016
6-1
Unit 6 Self-service exercises
The exercises for this unit introduce you to the Self Service Center and show you how a typical user
searches solutions, checks status, and orders services with it. You also use the email interface to
request a service.
Exercise 1 Finding solutions with the
self-service tools
Bob cannot log in to Oracle Financials. He is getting Error 404. Before he calls the Service Desk,
Bob attempts to find the answer himself using the self-service tools.
Searching for solutions
1. Log in as Bob with the user name bob and the password object00.
2. Enter oracle 404 in the search bar and press Enter.

Unit 6 Self-service exercises
Exercise 1 Finding solutions with the self-service tools
Course materials may not be reproduced in whole or in part without the prior written permission of IBM.
© Copyright IBM Corp. 2016
6-2
V7.0
Uempty
3. Click the first entry to view it.
Bob reads the solution and tries it, and it works.
The next step is to rate the solution.
Rating a solution
4. In the User Feedback tab, select the Rank the Solution button, select Excellent.
5. In the comments field, type This worked pe
rfectly the first time!
6. Submit your rating and comments by clicking OK.
7. Click Ye
s to answer the Did this solution help you resolve your issue? question at the
bottom of the page.
Notice that a resolved service request was created and it has the same summary as the applied
solution. This record is the one that Bob used from the Service Desk to resolve his issue, and it
is in the My Requests portlet.

Unit 6 Self-service exercises
Exercise 2 Creating a service request by using self-service
Course materials may not be reproduced in whole or in part without the prior written permission of IBM.
© Copyright IBM Corp. 2016
6-3
V7.0
Uempty
Exercise 2 Creating a service request by using
self-service
Bob just got a new personal smartphone, and he needs help configuring it for use on the corporate
network. Rather than call the service desk immediately, he searches for the answer himself using
the Self Service Center.
Searching for a solution
1. If you are not at the Self Service Center, return to it by clicking the Go To Applications
navigation bar and selecting Self Service > Self Service Center.
2. Enter the terms phone c
orporate network in the search field and see if any FAQs match Bob’s
issue.
3. Press Enter to show the results in the main interface.
Creating a service request
There are several matches, and two of them look promising. Bob can choose between Network
Connectivity or Phone Not Working.
4. Click Ne
twork Connectivity.

Unit 6 Self-service exercises
Exercise 2 Creating a service request by using self-service
Course materials may not be reproduced in whole or in part without the prior written permission of IBM.
© Copyright IBM Corp. 2016
6-4
V7.0
Uempty
5. Complete the details of the service request as you think Bob might enter them, for example:
– Details: My new sma
rtphone can not access the corporate network. I cannot connect
to the access point.
–Priority: 2
– Was the access denied? Ye
s
– Error Message if any? Cont
act your administrator
– What type of network access? Intranet
– How are you accessing the network? Wi
reless
6. Because the asset belongs to Bob, leave that field blank.
Notice that the T
icket Type is already filled out.
7. Click Submit Now.
8. Click OK.

Unit 6 Self-service exercises
Exercise 2 Creating a service request by using self-service
Course materials may not be reproduced in whole or in part without the prior written permission of IBM.
© Copyright IBM Corp. 2016
6-5
V7.0
Uempty
Finding the service request
9. Find the new service request in the My Requests portlet and click it.
From the View Service Request screen, Bob has Read access to much of the ticket. He can also
add logs and attachments, or read logs and solutions posted by the help desk.
10. Close Mozill
a Thunderbird
You have reached the end of the exercises.
Inform your instructor that you have completed
the exercises in this chapter.

Course materials may not be reproduced in whole or in part without the prior written permission of IBM.
© Copyright IBM Corp. 2016
7-1
Unit 7 Workflows exercises
These exercises continue the handling of a complex issue.
Exercise 1 Using workflows to successfully
resolve a service request
In this scenario, a call comes in with a simple request. You search for and find a solution, and then
resolve the request.
This exercise shows you how using workflows can help you work faster and more consistently.
Routing a workflow
Steve calls the help desk to report slow network performance. He talks to Scott, who opens a
service request. In this exercise, Scott routes the service request through the SR_V3 workflow,
which enforces a process for service requests. Finally, the workflow ensures that required fields are
completed before proceeding. It prompts the service desk analyst to search for a solution, and
prompts the analyst to complete processing of the ticket. In a production environment, the workflow
enforces proper ticket handling processes.
1. Sign in as Scott with
the user name scott and the password object00.
2. Click the New SR
Full item in the Quick Insert portal.
3. Before doing anything else, click the Route W
orkflow icon.

Unit 7 Workflows exercises
Exercise 1 Using workflows to successfully resolve a service request
Course materials may not be reproduced in whole or in part without the prior written permission of IBM.
© Copyright IBM Corp. 2016
7-2
V7.0
Uempty
4. Select the SR_V3 workflow and click OK. It might take a minute or so to start the workflow the
first time.
As you can see from the message, the workflow verifies that certain fields are completed before
you continue.
5. Click Close to close the message window.
Entering basic information
6. Enter the following information.
Field Value
Source PHONECALL
Reported by Steve
Summary {Workflow} Network performance is slow
Details Workflows make processes easier.
Site PMSCRTP

Unit 7 Workflows exercises
Exercise 1 Using workflows to successfully resolve a service request
Course materials may not be reproduced in whole or in part without the prior written permission of IBM.
© Copyright IBM Corp. 2016
7-3
V7.0
Uempty
7. Save the ticket.
8. Click the Route W
orkflow icon.
9. Select T
ake Ownership and click OK.
10. Click the Route Workflow icon again.
The workflow opens the Se
arch For Solutions application for you.
11. Enter search terms netwo
rk slow and click Search.
12. View the details of the discovered solu
tion by clicking the gray triangle.
Scott verifies with Steve that this solution answers his question.
13. Click Us
e Solution.
14. Click the Route W
orkflow icon.
15. Select A so
lution was found and click OK.
Scott asks if there is anything else he can help S
teve with. Steve says no and asks to close the
ticket.
16. Select T
he service request has been fulfilled and click OK.
The status of the ticket is automatically changed to Closed.
You can see how the workflow process automates step
s and verifies that fields are correctly
completed.
Reported Priority 1
Impact 2
Urgency 1
Classification 2103 - IT Issue \ Networks
Field Value

Unit 7 Workflows exercises
Exercise 1 Using workflows to successfully resolve a service request
Course materials may not be reproduced in whole or in part without the prior written permission of IBM.
© Copyright IBM Corp. 2016
7-4
V7.0
Uempty
Note: Companies customize workflows before using them. Business requirements dictate what
actions the workflows perform. For example, the workflow can be changed to set the ticket to
Resolved, or require other fields to be completed.

Unit 7 Workflows exercises
Exercise 2 Reviewing a workflow
Course materials may not be reproduced in whole or in part without the prior written permission of IBM.
© Copyright IBM Corp. 2016
7-5
V7.0
Uempty
Exercise 2 Reviewing a workflow
In this exercise, you open the SR_V3 workflow in the Workflow Designer application and review
some of the details.
Opening SR_V3 in the Workflow Designer
1. Select Go To Applications > System Configuration > Platform Configuration > Workflow
Designer.
2. Find and select SR
_V3.
Notice that the workflow contains a start node, a stop node, and three subprocesses.
3. Double-click SR_REC3.
The title and description of the subprocess are shown here, but to get details or make changes,
you must o
pen the subprocess in the Workflow Designer.
4. Click OK.
Opening SR_REC3 in the Workflow Designer
5. Click List View to return to the workflow list.
6. Find and select SR
_REC3.
7. Review the properties for conditional node REC
_SR.
This condition ensures that particula
r fields are completed before continuing the workflow.
Review the SQL expression to see which fields are required. If the statement evaluates to
FALSE, the negative (red dashed) line is followed.
8. Click OK to close the
node properties.
9. Review the properties for interaction node MSG
1.
This message is displayed when the req
uired fields are not completed.
10. Click OK to close the
node properties.
11. Repeat this process to review the properties for the remaining nodes.
12. Sign out.
You have reached the end of the exercises.Inform your in
structor that you have completed the
exercises in this unit.

Course materials may not be reproduced in whole or in part without the prior written permission of IBM.
© Copyright IBM Corp. 2016
8-1
Unit 8 Service level agreements
exercises
Exercise 1 Enabling SLA Hold
By default, SLA Hold is disabled, but you can enable it in the Organizations application. In this
exercise, you enable SLA Hold.
Enabling SLA Hold
1. Sign in as maxadmin with the password object00.
2. Start the Organizations application by clicking the Go To Applications navigation bar and
selecting Administratio
n > Organizations.
3. Press Enter to see the list of organizations.
4. Click the PMS
CIBM organization.
5. On the navigation bar in the More Actio
ns section, click SLA Options.
6. Select the option Allow SLA Hold to be
specified on SLAs.
Unit 8 Service level agreements exercises
Exercise 1 Enabling SLA Hold
Course materials may not be reproduced in whole or in part without the prior written permission of IBM.
© Copyright IBM Corp. 2016
8-2
V7.0
Uempty
7. Review the other options available when configuring SLAs.
8. Click OK.

Unit 8 Service level agreements exercises
Exercise 2 Creating a new SLA
Course materials may not be reproduced in whole or in part without the prior written permission of IBM.
© Copyright IBM Corp. 2016
8-3
V7.0
Uempty
Exercise 2 Creating a new SLA
In this exercise, you create an SLA for service requests.
Creating an SLA
1. Start the Service Level Agreements for Service Providers application by clicking the Go To
Applications navigation bar and selecting Service Level > Service Level Agreements (SP).
2. In the Common Actions list, click New SLA.
3. Enter the following values:
Defining a commitment
4. In the Commitments section, click New Row.
5. Enter the following details for the new commitment:
– Description: Contact within 1 hour
– Type: Contact
– Value: 1
– Units of Measure: hours
Field Value
Description Demo SLA for Service Requests
Applies To SR
Enable SLA Hold? selected
Ranking 100
Start Date {today}
End Date {one year from today}
Review Date {six months from today}
Ticket Organization PMSCIBM
Ticket Site PMSCRTP

Unit 8 Service level agreements exercises
Exercise 2 Creating a new SLA
Course materials may not be reproduced in whole or in part without the prior written permission of IBM.
© Copyright IBM Corp. 2016
8-4
V7.0
Uempty
Defining an escalation
6. Click the Define Escalation icon.
The Escalation tab opens.
7. Click the se
t schedule icon.
8. Set the schedule to every 10 minutes.
9. Click OK.
10. Under Escalatio
n Points, set the elapsed time interval to 30 minutes.
11. Save the escalation.

Unit 8 Service level agreements exercises
Exercise 2 Creating a new SLA
Course materials may not be reproduced in whole or in part without the prior written permission of IBM.
© Copyright IBM Corp. 2016
8-5
V7.0
Uempty
Defining a notification
12. Below the Escalations section, click the Notifications sub-tab.
13. Click New Row in the Notifications area.
14. Click the Detail Menu icon beside Template and click Select Value.
15. Click SRTGTEMP.
16. Save the escalation.
Note: In a customer or production environment, a communication template would be created for
SLA purposes. Creating communication templates is beyond the scope of this class, and this
template is being used only because one is required for the escalation.
Configuring the second commitment
17. Return to the Service Level Agreement tab.
18. In the Commitments section, click New Row.
19. Enter the following details for the new commitment:
– Description: Response within 12 hours
– Type: Response
– Value: 12
– Units of Measure: hours
20. Click the Define Escalation icon for the new commitment.
21. Under Escalation Points, set the elapsed time interval to 6 hours.
22. Click New Row in the Notifications area.
23. Click the Detail Menu icon beside Template and click Select Value.
24. Click SRTGTEMP.
Configuring the third commitment
25. Return to the Service Level Agreement tab.
26. In the Commitments section, click New Row.

Unit 8 Service level agreements exercises
Exercise 2 Creating a new SLA
Course materials may not be reproduced in whole or in part without the prior written permission of IBM.
© Copyright IBM Corp. 2016
8-6
V7.0
Uempty
27. Enter the following details for the new commitment:
– Description: Re
solution within 24 hours
– Type: Resolution
– Value: 24
– Units of Measure: hours
28. Click the Define
Escalation icon for the new commitment.
29. Under Escalation Points, set the elapsed time interval to 12
hours.
30. Click Ne
w Row in the Notifications area.
31. Click the Detai
l Menu icon beside Template and click Select Value.
32. Click SRTGTEMP.
33. Save the SLA record.
Validating the escalation
34. Return to the Service Level Agreement tab.
35. In the More
Actions section of the navigation bar, click Escalation > Validate Escalation.
A message states the validation was successful.
36. Click Co
mmon Actions > Change Status.
37. Change the status to Active and click OK.
The SLA is now activated and ready to b
e applied to a Service Request.

Unit 8 Service level agreements exercises
Exercise 3 Applying the SLA
Course materials may not be reproduced in whole or in part without the prior written permission of IBM.
© Copyright IBM Corp. 2016
8-7
V7.0
Uempty
Exercise 3 Applying the SLA
In this exercise, you apply an SLA to a ticket and process the ticket before the SLA is broken.
Creating a service request
1. Start the Service Requests application by clicking the Go To Applications navigation bar and
selecting Service Desk > Service Requests.
2. Click Ne
w Service Request and enter the following information:
– Reported by: Bob
– Reported Priority: 1
–Summary: SLA Demo
3. Click Submit Now.
4. Scroll down to the Service Request Details section and enter a Site of PMSCRTP.
Applying the SLA
5. In the More Actions section of the navigation bar, click Apply SLA.
6. Scroll down to the Key Dates sec
tion.
Notice that the SL
A Applied check box is selected.
Verifying the SLA
7. Click View SLAs.

Unit 8 Service level agreements exercises
Exercise 3 Applying the SLA
Course materials may not be reproduced in whole or in part without the prior written permission of IBM.
© Copyright IBM Corp. 2016
8-8
V7.0
Uempty
8. Verify that the target contact date is 1 hour after the reported date.
9. Verify that the target start is 12 hours after the reported date
10. Verify that the target finish is 24 hours after the reported date.
11. Click OK to close the Vi
ew SLAs dialog box.
Change the ticket status
12. Take ownership of the ticket. Notice that the status changed to Queued, but there was no
change to any of the date fields.
13. Change the ticket status to In Progress a
nd click View SLAs.
Notice that the Ac
tual Start field automatically displays the time that the status was changed.
14. Is the Actu
al Start earlier than the Target Start?
Yes, it is. You met the 12-hour response commitment.
15. Click OK to close the Vi
ew SLAs dialog box.
16. Change the ticket status to Pending.
Did any date fields change?
No, no date fields changed because the Pe
nding status does not set a date field.
17. Click OK to close the Vi
ew SLAs dialog box.
18. Set the ticket status to Resol
ved.
Notice that the Actual Finish time auto
matically displays the time that the status was changed.
19. Is the Actu
al Finish time earlier than the Target Finish?
Yes, it is. You successfully met the one-day resolution commitment.
Unit 8 Service level agreements exercises
Exercise 3 Applying the SLA
Course materials may not be reproduced in whole or in part without the prior written permission of IBM.
© Copyright IBM Corp. 2016
8-9
V7.0
Uempty
20. Click OK to close the View SLAs dialog box.

Unit 8 Service level agreements exercises
Exercise 4 Pausing the clock with SLA Hold
Course materials may not be reproduced in whole or in part without the prior written permission of IBM.
© Copyright IBM Corp. 2016
8-10
V7.0
Uempty
Exercise 4 Pausing the clock with SLA Hold
Use SLA Hold to pause an SLA when, for reasons beyond your control, you cannot work on a
ticket.
Creating a service request
1. If you are not in the Service Requests application, click the Go To Applications navigation bar
and select Service Desk > Service Requests.
2. Click the New Service Req
uest icon.
3. Enter the following information:
– Reported by: Bob
– Reported Priority: 2
–Summary: SLA Hold Demo
4. Click Submit Now.
5. Enter the following extra information:
– Classification: 2103
02 (IT Issue \ Networks \ LAN)
–Site: PMSCRTP
6. Click the Save
Service Request icon.
7. Click the Chang
e Status icon. View the ticket statuses that are available and notice that there
is no SLA Hold status.
8. Click Cancel.

Unit 8 Service level agreements exercises
Exercise 4 Pausing the clock with SLA Hold
Course materials may not be reproduced in whole or in part without the prior written permission of IBM.
© Copyright IBM Corp. 2016
8-11
V7.0
Uempty
Applying the SLA
9. In the More Actions section of the navigation bar, click Apply SLA.
Notice that two check boxes are now selected: SL
A Applied and SLA Hold Enabled.
Also, notice that a new ticket section was added to the right of the Dates section.
Verifying SLA times
10. Verify that the correct SLA response and resolution times are shown. The adjusted contact is
the current time plus 1 hour; the adjusted start is the current time plus 12 hours; the adjusted
finish is the current time plus 24 hours.
Because SLA hold is not in effect, notice that Accumulated Hold Time (HH:MM) is 0:00.:

Unit 8 Service level agreements exercises
Exercise 4 Pausing the clock with SLA Hold
Course materials may not be reproduced in whole or in part without the prior written permission of IBM.
© Copyright IBM Corp. 2016
8-12
V7.0
Uempty
Turning on SLA Hold
11. Click the Change Status icon. Change the ticket status from New to SLA Hold. Control Desk
added this status after you applied the SLA Hold service level agreement.
12. Wait at least 1 minute.
Note: While the ticket has a status of SLA Hold, no SLA escalations can fire.
13. Check the ticket status time by selecting More Action
s > View History. Note how much time is
shown in the Time Spent field of the SLAHOLD row.
Note: The Time Spent field is not completed until the ticket’s status is changed from SLA Hold.
The calculation does not occur until SLA Hold has been activated and deactivated.
14. Click OK to close the window.
15. Change the ticket status to Pending.

Unit 8 Service level agreements exercises
Exercise 4 Pausing the clock with SLA Hold
Course materials may not be reproduced in whole or in part without the prior written permission of IBM.
© Copyright IBM Corp. 2016
8-13
V7.0
Uempty
Notice that the time the ticket was in SLA Hold status is shown in the Accumulated Hold Time
(HH:MM) field.
This time (rounded to the nearest minute) was added to the Adjusted Start and Adjusted
Finish times.
Now the time the ticket was in the SLA Hold status is not counted against the SLA when
meeting commitments. Tickets can be moved into and out of SLA Hold status multiple times.
16. Return to the S
tart Center.
17. Sign out.
You have reached the end of the exercises. Inform your instructor that you have completed the
exercises in
this unit.
Important: When this exercise was written, the classroom image was misreporting SLA hold
time. The minutes the ticket was in SLA Hold status was being added as seconds to the Adjusted
Start and Adjusted Finish times. It was unclear at the time if the issue was with the product or with
the classroom image. Your instructor will update you regarding the current status. The exercise will
demonstrate the capability, however the actual times will be incorrect.

Course materials may not be reproduced in whole or in part without the prior written permission of IBM.
© Copyright IBM Corp. 2016
9-1
Unit 9 Surveys exercises
These exercises take you through the process of creating and sending surveys.
Survey forms
Surveys take different forms, depending on whether or not you want to know who is filling them out.
• Tracked: This form requires users to log in to complete the survey. The Survey application
tracks whom the survey is sent to and ensures that only those users can access and complete
the survey. To complete the survey, a user must sign in to IBM Control Desk. This survey type is
based on Maximo. You access it through the Survey Request self-service application.
• Untracked: These surveys do not track the users, so that users can complete surveys
anonymously. The user accesses these surveys through a direct link to the survey; there is no
requirement to log in to IBM Control Desk. This survey type is JavaServer Page (JSP) and is
browser-based.
Which form the user receives depends on the survey URL that is sent to them.
Survey creation overview
Surveys are created by using the following steps:
1. Create a set of questions in the Questions application.
2. (optional) Create a survey template in the Survey Template application.
3. Create a survey in the Survey application.
4. Assign the survey to a Maximo object.
5. Assign questions to the survey.
6. (optional) Apply a template.

Unit 9 Surveys exercises
Exercise 1 Creating question and answer sets
Course materials may not be reproduced in whole or in part without the prior written permission of IBM.
© Copyright IBM Corp. 2016
9-2
V7.0
Uempty
Exercise 1 Creating question and answer sets
You begin creating a survey by creating survey questions and their selectable answers. You can
then associate one or more of these questions to one or more surveys. The same question can be
associated to more than one survey.
Creating the first question
1. Sign in as Maxadmin with the user name maxadmin and the password object00.
2. On the navigation bar, click Go
To Applications > Administration > Survey Management >
Questions to open the Questions application.
3. Click the New Que
stion icon.
4. Type the following text in the question field: Rate your satisfaction with the service desk.
5. Beside the T
ype field, click the Select Value icon.
6. Select RADIO.
7. Create an answer for this question by clicking New Row.
8. Type an answer of Satisfied, a weight of
1, and an order of 1.
Order determine
s the arrangement of the answers in the survey. Use this setting to reorder
answers independent of the order in which they are shown in the Answer section.

Unit 9 Surveys exercises
Exercise 1 Creating question and answer sets
Course materials may not be reproduced in whole or in part without the prior written permission of IBM.
© Copyright IBM Corp. 2016
9-3
V7.0
Uempty
Weight defines a range of possible values, important for reporting. Weight is typically used for
satisfaction-type questions like this one. In this example, 1 represents Satisfied, and 3
represents Dissatisfied. After a report averages the responses, it is apparent that a 1.2 average
represents many satisfied customers, but a 2.6 average indicates many dissatisfied customers.
9. Create another answer of Neutral, a weight of 2, and an order of 2.
10. Create another answer of Dissa
tisfied, a weight of 3, and an order of 3.
11. Click the Save Question icon.
Notice that you can assign questions to a particular o
rganization or site if you want. Also, notice that
questions are created in an Active state by default.
Creating the second question
12. Click New Question.
13. Type the following question: What me
thods did you try to resolve the issue?
14. Beside the T
ype field, click the Select Value icon.
15. Click C
HECKBOX.
16. Create an answer for this question by clicking New Row.
17. Type an answer of Self s
ervice, a weight of 10, and an order of 1.
18. Create another answer of T
elephone support, a weight of 1000, and an order of 2.

Unit 9 Surveys exercises
Exercise 1 Creating question and answer sets
Course materials may not be reproduced in whole or in part without the prior written permission of IBM.
© Copyright IBM Corp. 2016
9-4
V7.0
Uempty
19. Create another answer of Other, a weight of 100000, and an order of 3.
20. Save the question.
View the questions
21. Click the All Records query.
IBM Control Desk comes with 20 predefined questions and shows 20 rows at a time. You must
go to the next page to see the new questions.
22. Click the Next Pa
ge icon.
The two new questions are visible.

Unit 9 Surveys exercises
Exercise 2 Creating a survey
Course materials may not be reproduced in whole or in part without the prior written permission of IBM.
© Copyright IBM Corp. 2016
9-5
V7.0
Uempty
Exercise 2 Creating a survey
You can create new surveys. manage existing surveys, and then send these surveys to users for
their responses. A survey must have one or more questions that are associated with it. You can use
the same questions in more than one survey.
After the questions are created, open the Survey Management application and relate the
questions.
The sequence of status change for the survey is Draft, Active, and Closed.
• When the status is Draft, users can continue to update the survey contents (questions and
answers).
• When the status of the survey is changed to Active, the survey is ready to be published to
customers. In the Active state, the survey cannot be changed back to Draft, and the survey
questions and answers cannot be updated.
• To make updates to an active survey, you must change the status to Closed, Then you can
duplicate the original survey. The new duplicate survey starts in Draft state and you can make
updates. The duplicate survey is independent of the original survey. When the survey state is
Active, the attributes on the record are changed to read-only.
Creating a new survey
1. Open the Surveys application (On the navigation bar, click Go To Applications >
Administration > Survey Management > Surveys).
2. Press Enter to list the default surveys.
Note: Basic surveys are included with IBM Control Desk for Service Catalog, Service Requests,
Incidents, and Problems.
3. Click the New Survey icon.
4. Complete the following fields:
–Survey: SRM Survey
– Description: Demo SR Survey

Unit 9 Surveys exercises
Exercise 2 Creating a survey
Course materials may not be reproduced in whole or in part without the prior written permission of IBM.
© Copyright IBM Corp. 2016
9-6
V7.0
Uempty
5. Set the Applies To object to SR.
Note: the Applies To field is used when automatically sending a survey, which is done through an
escalation. The object that is specified in the Applies To field is the type of object that triggers the
escalation. If you plan to send a survey manually only, you would set the Applies To object to
Default.
As soon as you enter the Applies To object, the Tracked URL and UnTracked URL fields are
automatically completed.
6. Try saving the survey. Does it work?
7. Click OK.
8. Click Select Questio
ns in the Select Questions for Survey section.

Unit 9 Surveys exercises
Exercise 2 Creating a survey
Course materials may not be reproduced in whole or in part without the prior written permission of IBM.
© Copyright IBM Corp. 2016
9-7
V7.0
Uempty
9. Select the questions that you created previously, as shown in the following graphic.
10. Click OK.
If you wanted, you could change the order o
f the questions by changing the Order fields.
11. Verify that the survey automatically saved.
You can save the survey by clicking the Save
Survey icon.

Unit 9 Surveys exercises
Exercise 3 Previewing the survey
Course materials may not be reproduced in whole or in part without the prior written permission of IBM.
© Copyright IBM Corp. 2016
9-8
V7.0
Uempty
Exercise 3 Previewing the survey
Before deploying a survey, preview it to make sure that everything is correct. Surveys have two
different forms. The Tracked form is based on Tivoli’s process automation engine. The Untracked
form is based on a JavaServer Pages (JSP) browser. Each type of form is previewed differently.
Previewing tracked surveys
Preview tracked surveys, which are based on Tivoli’s process automation engine, by using the
Survey Preview tab.
1. Click the Survey
Preview tab.
Note: You can see how plain this survey is. You create a survey template in Exercise 10 on
page 9-25 that can add an image and some introductory text to your survey.

Unit 9 Surveys exercises
Exercise 3 Previewing the survey
Course materials may not be reproduced in whole or in part without the prior written permission of IBM.
© Copyright IBM Corp. 2016
9-9
V7.0
Uempty
Previewing untracked surveys
Preview untracked surveys, which are JSP browser-based, by using a browser.
1. Click Un
Tracked Survey Preview from the More Actions menu.
After a short delay, a new browser window opens, showing the previewed survey.
If the survey is not opened, verify that your browser allows pop-up windows.
Notice that the display of this untracked survey looks a little different from the tracked survey.
When you are satisfied with how the survey looks in bo
th the tracked and untracked forms, you
can make it active.
2. Close the UnT
racked Survey browser window.
3. Click Co
mmon Actions > Change Status.
4. Change the status of the survey to Active a
nd click OK.
A system message window opens.
5. Click Yes.

Unit 9 Surveys exercises
Exercise 4 Sending surveys manually
Course materials may not be reproduced in whole or in part without the prior written permission of IBM.
© Copyright IBM Corp. 2016
9-10
V7.0
Uempty
Exercise 4 Sending surveys manually
Surveys can be sent to users either manually or automatically:
• Manually: Surve
ys can be sent immediately after an interaction with the service desk.
• Automa
tically (by condition or escalation): Surveys can be sent after a number or days,
number of tickets, or other criteria. You try this method in Exercise
9, “Sending a survey
automatically,” on page 9-19.
The simplest method of sending surveys is by doing it
manually each time. You normally use this
method when you want to send a survey to customers immediately after taking care of their issue.
Note: Only surveys with a status of Active can be sent.
There are two survey communication templates that are preconfigured with IBM Control Desk.
You send the surveys to Bob, who represents a standard user.
Sending a tracked survey
1. Click the Survey tab.
2. Select the URL listed in the T
racked URL field, right-click it, and click Copy.
3. In the navigation bar under Mo
re Actions, click Send Survey.
4. Beside the Te
mplate field, click the Detail Menu icon and click Select Value.
5. Click the communication template titled SUR
VEYTRACKED. This template completes certain
fields with predetermined values.
Note: In a production environment, templates are customized to save time by completing fields
with appropriate information. In the lab exercises, these templates are not customized, and are for
demonstration only. You manually configure the communication to override the template. The
Send From, Subject, and Message fields are populated with data from the template. Updating
and using the template saves time when sending surveys.

Unit 9 Surveys exercises
Exercise 4 Sending surveys manually
Course materials may not be reproduced in whole or in part without the prior written permission of IBM.
© Copyright IBM Corp. 2016
9-11
V7.0
Uempty
6. Replace the URL in the message field with the URL you copied in Step 2 on page 9-10.
7. Change the Su
bject field to Tracked Survey.
8. Select who the survey is sent to by clicking the Se
lect Value icon beside the To field.
9. Click the Peop
le tab.
10. Filter on bob.
11. Select the To option for
Bob.
12. Click OK.
Bob’s email address, bob@itracma
il.tiv.ibm.com, is placed into the To field.
13. Change Send F
rom to [email protected].
14. Click Send.
A quick status message indicates that the communication was sent.
Unit 9 Surveys exercises
Exercise 4 Sending surveys manually
Course materials may not be reproduced in whole or in part without the prior written permission of IBM.
© Copyright IBM Corp. 2016
9-12
V7.0
Uempty
Sending an untracked survey
15. Select the URL listed in the UnTracked URL field, right-click it, and click Copy.
16. On the navigation bar under More Actions, click Send Survey.
17. Select the communication template titled SURVEYUNTRACKED. This template completes
certain fields with predetermined values.
18. Replace the URL in the message field with the URL you copied in Step 15.
19. Change the Subject field to Untracked Survey.
20. Select bob as the person to send to, as you did in the previous section.
22. Click Send.

Unit 9 Surveys exercises
Exercise 5 Viewing the number of survey responses received
Course materials may not be reproduced in whole or in part without the prior written permission of IBM.
© Copyright IBM Corp. 2016
9-13
V7.0
Uempty
Exercise 5 Viewing the number of survey
responses received
1. Return to the list view, and press Enter to view all records.
2. Look at the row that contains the survey that you created and at the last column, Respons
e
Received.
This column shows that you did not receive any responses to the survey you sent out.
3. Sign out.
4. Close the browser.

Unit 9 Surveys exercises
Exercise 6 Taking the surveys
Course materials may not be reproduced in whole or in part without the prior written permission of IBM.
© Copyright IBM Corp. 2016
9-14
V7.0
Uempty
Exercise 6 Taking the surveys
Taking a tracked survey
When users click this type of URL from their email, they are taken to the IBM Control Desk login
page. Upon successful authentication, the new Survey Request application automatically opens
and users see the survey.
1. Open the Mozill
a Thunderbird email application by clicking the icon beside the Windows Start
button.
2. Choose the Bob profile.
3. There are now two new emails. If there are not, click Get Mail until the emails arrive.
4. Open the Tracked Survey email.
5. Click the link. A browser window opens, prompting you to sign in to IBM Control Desk. If you
cannot click the link, you must copy and paste it into the browser window manually.
6. Sign in as bob with password object00.

Unit 9 Surveys exercises
Exercise 6 Taking the surveys
Course materials may not be reproduced in whole or in part without the prior written permission of IBM.
© Copyright IBM Corp. 2016
9-15
V7.0
Uempty
IBM Control Desk opens to the Survey Request application. The survey that is referenced in
the email is displayed.
7. Complete the survey with the following selections:
– Satisfied
–Self service
8. Scroll down and click Submit Survey.
9. Sign out of IBM Control Desk and close the browser.
Taking an untracked survey
10. Open the Untracked Survey email.
11. Click the link that is contained in the message. If you cannot click the link, you must copy and
paste it into the browser window manually.
A browser window opens, displaying the survey.
Unit 9 Surveys exercises
Exercise 6 Taking the surveys
Course materials may not be reproduced in whole or in part without the prior written permission of IBM.
© Copyright IBM Corp. 2016
9-16
V7.0
Uempty
12. Complete the survey by using the following selections:
– Neutral
– Self service, Telephone support
13. Scroll down and submit the survey.
A confirmation message is displayed.
14. Close the browser window.
15. Close Mozilla Thunderbird.

Unit 9 Surveys exercises
Exercise 7 Viewing the number of survey responses received
Course materials may not be reproduced in whole or in part without the prior written permission of IBM.
© Copyright IBM Corp. 2016
9-17
V7.0
Uempty
Exercise 7 Viewing the number of survey
responses received
1. Open a browser window and sign in to IBM Control Desk as maxadmin with the user name
maxadmin and the password object00.
2. On the navigation bar, click Go
To Applications > Administration > Survey Management >
Surveys to open the Surveys application.
3. Press Enter to display all records.
4. Look at the row that contains the survey that you created and at the last column, Respons
e
Received.
This column shows the responses that are received for all surveys. You can see that two responses
to your survey were received.

Unit 9 Surveys exercises
Exercise 8 Viewing survey results
Course materials may not be reproduced in whole or in part without the prior written permission of IBM.
© Copyright IBM Corp. 2016
9-18
V7.0
Uempty
Exercise 8 Viewing survey results
The Survey application displays simple statistics for the selected survey.
1. Click the survey that you created, SRM Survey.
2. Click the Survey Results tab.
You can see how many email invitations were sent, how many times the survey was viewed, and
the number of responses submitted.
Each question is shown with how the question was answered, broken down into a discrete count
an
d percentage. Freeform type questions list the answer that each respondent submits.

Unit 9 Surveys exercises
Exercise 9 Sending a survey automatically
Course materials may not be reproduced in whole or in part without the prior written permission of IBM.
© Copyright IBM Corp. 2016
9-19
V7.0
Uempty
Exercise 9 Sending a survey automatically
Using escalations, you can send a survey to a particular user or a group of users automatically
when a particular condition is met. The Escalation section in the Survey application lists the set of
escalation records that are defined for this survey. Use this section to define escalation records.
You can define one or more escalations for one survey.
To enable a survey to be sent automatically after a
service request is closed, complete the following
steps.
Creating the escalation
1. Click the Survey tab.
2. In the Esca
lation section, click New Row. Scroll down if necessary.
3. Enter the description After SR Closed in the new row.
4. Click the Create Es
calation icon.
A new escalation is created in the Escalation application and an Escalation ID is displayed in
the Escalation field.
5. Click OK to close the
notification.
6. Click the Det
ail Menu (>>) next to the Escalation field and click Go To > Escalations. The
Escalation application opens.
Note: The escalation Description and Applies To fields from the main table were carried over to
the escalation.

Unit 9 Surveys exercises
Exercise 9 Sending a survey automatically
Course materials may not be reproduced in whole or in part without the prior written permission of IBM.
© Copyright IBM Corp. 2016
9-20
V7.0
Uempty
7. Enter the condition: STATUS in (select value from synonymdomain where domainid =
'SRSTATUS' and maxvalue in ('CLOSED'))
Note: The SQL statement for the previous step checks the service request status and escalates
only if the status is CLOSED.
8. Select Create Successful Execution Entry option.
9. Click Ne
w Row in the Escalation Points section.
Create an escalation point with the following attributes:
– Elapsed Time Attribute: REPORTDATE
– Escalation Point Condition: ST
ATUS in (select value from synonymdomain where
domainid = 'SRSTATUS' and maxvalue in ('CLOSED'))
Note: The SQL statement for the previous step causes the escalation point to act when the
service request status is CLOSED. The escalation point determines when the escalation condition
is checked.

Unit 9 Surveys exercises
Exercise 9 Sending a survey automatically
Course materials may not be reproduced in whole or in part without the prior written permission of IBM.
© Copyright IBM Corp. 2016
9-21
V7.0
Uempty
Attention: The use of proper syntax within the Condition fields is critical to the success of this
exercise. If the syntax is incorrect when the escalation runs, results are unpredictable. Each of the
condition text boxes has an icon centered to its right. When selected, the icon will display a
validation dialog for the command within the box. Select the icon, then select the Test Expression
button in the lower left. If the syntax is reported as correct, select OK. to continue. If the syntax is
incorrect, you may be required to select Cancel to exit the application. Locate the error in the
syntax and retest it until the test passes.
10. Save the escalation.
Creating the notification
11. Create a notification by selecting the Notifications sub-tab at the bottom of the page and
clicking New Row.
12. In the Template field, enter ESCSRSURVEY.
13. Click the Det
ail Menu icon after the Template field and select Go To Communication
Templates.
14. When the communication template opens, scroll down to the Me
ssage field.
15. Review the message, ensuring the email will be sent b
y [email protected].ibm.com;
and that the url points to localhost:9080.
16. Click the Save
Communication Template icon.
17. Click Return with V
alue to return to the main escalation screen and automatically update the
notification field.
18. Beside the Sched
ule field, click the Set Schedule icon.
19. Change the schedule to be 2 minu
tes rather than the 1 hour that it currently is, and click OK.
20. Save the escalation.

Unit 9 Surveys exercises
Exercise 9 Sending a survey automatically
Course materials may not be reproduced in whole or in part without the prior written permission of IBM.
© Copyright IBM Corp. 2016
9-22
V7.0
Uempty
21. In the navigation bar under More Actions, click Validate to make sure that the condition is
correct.
22. Click OK to close the system message.
23. In the navigation bar under More Actions, click Activate
/Deactivate Escalation.
Notice that the Ac
tive option is now selected.
24. Click Re
turn.
25. Save the survey.
26. Sign out.
Creating the service request
27. Sign in as Scott with the user name scott and the password object00.
28. Click Ne
w SR Full in the Quick Insert portal.
29. Enter the following information:
– Reported By: bob
–Summary: Automati
c Survey Test
30. Save the service request.
31. Select Cha
nge Status from the Common Actions menu.
32. Change the status to Closed.
This step triggers the escalation.

Unit 9 Surveys exercises
Exercise 9 Sending a survey automatically
Course materials may not be reproduced in whole or in part without the prior written permission of IBM.
© Copyright IBM Corp. 2016
9-23
V7.0
Uempty
33. Sign out of IBM Control Desk.
34. Close the browser.
35. Open the Mo
zilla Thunderbird email application. The icon is on the Windows Start bar.
36. Choose the Bob profile.
37. There is a new email. If not, wait 2 or 3 minutes and click Get Mail.
38. Open the new message.
39. Click the link. A browser window opens, prompting
you to sign in to IBM Control Desk.
Note: If the link in the email did not work, you can try copying the text of the link into the address
bar of the browser.
40. Sign in as bob with the password object00.
IBM Control Desk opens to the self-service Survey Request application.
41. Press Enter to list the available surveys Bob can respond to.
The survey that is referenced in the email is visible.
42. Click the survey to display it.
Unit 9 Surveys exercises
Exercise 9 Sending a survey automatically
Course materials may not be reproduced in whole or in part without the prior written permission of IBM.
© Copyright IBM Corp. 2016
9-24
V7.0
Uempty
43. Complete the survey however you would like.
44. Scroll down and click Submit Survey.
The survey is no longer shown in the list.
45. Sign out of IBM Control Desk.
46. Close Mozilla Thunderbird.

Unit 9 Surveys exercises
Exercise 10 Creating a survey template
Course materials may not be reproduced in whole or in part without the prior written permission of IBM.
© Copyright IBM Corp. 2016
9-25
V7.0
Uempty
Exercise 10 Creating a survey template
You can create survey templates to be used when creating a survey. These templates automatically
complete certain survey fields with predefined values, saving you time when creating surveys.
The Survey T
emplates application is used to define these templates. Use this application to define
the following fields:
• Heade
r defines the survey heading.
• Sub Hea
der defines description or custom messages the user can read before completing the
final survey.
• Foo
ter defines a custom footer message after the user completes the survey.
• Ima
ge is used to show a company logo or image in the final survey.
To create a survey template, complete the following steps:
1. Sign in to IBM Control Desk as Ma
xadmin with the user name maxadmin and the password
object00.
2. On the navigation bar, click Go
To Applications > Administration > Survey Management >
Survey Templates to open the Survey Templates application.
3. Click the New Survey T
emplate icon.
4. Enter the following values:
– Template Name: Demo SR Survey Template
– Header: Service Request Survey
– Sub Header: Dear Custo
mer, Please complete the attached survey. Your responses
are used to improve our service to you.
– Footer: If y
ou have any questions, please contact us at 555-1234.
5. On the navigation bar under More Actions, click Add/Modify Image.
6. Browse to C:\labfi
les\servicerequest and select IBMLogo.jpg.
7. Click OK.

Unit 9 Surveys exercises
Exercise 10 Creating a survey template
Course materials may not be reproduced in whole or in part without the prior written permission of IBM.
© Copyright IBM Corp. 2016
9-26
V7.0
Uempty
8. To add the image to the survey, select the Show Image option.
9. To see the image in a larger size, click the image.
10. Close the preview.
11. Click Save Survey
Template.
After you define and create a survey template, you can app
ly it to a survey by completing the
Template ID field in the Survey application.
Testing the template
To see the template in a survey, complete the following steps:
12. On the navigation bar, click Go
To Applications > Administration > Survey Management >
Surveys to open the Surveys application.
13. Click Ne
w Survey.
14. Complete the following fields:
–Survey: Template Test
– Description: T
emplate Test
– Applies To: SR
15. Click Select Questio
ns, select the first available question, SRM1016, and click OK.
16. Click the Survey
Preview tab and view the survey.
Note the empty space above the question.
17. Go back to the Survey ta
b.
18. In the T
emplate ID field, select the template that you created.
19. Save the survey.

Unit 9 Surveys exercises
Exercise 10 Creating a survey template
Course materials may not be reproduced in whole or in part without the prior written permission of IBM.
© Copyright IBM Corp. 2016
9-27
V7.0
Uempty
20. Look at the survey preview again and note the differences.
21. Return to the Start Center.

Unit 9 Surveys exercises
Exercise 11 Associating a survey to a ticket
Course materials may not be reproduced in whole or in part without the prior written permission of IBM.
© Copyright IBM Corp. 2016
9-28
V7.0
Uempty
Exercise 11 Associating a survey to a ticket
It is important to be able to look at a survey sent out at the closure of a ticket to gauge customer
satisfaction with the handling of the issue. With IBM Control Desk, surveys can be associated with
tickets.
1. Create a service request with the summary of Surve
y association test.
2. Submit the service request and make a note of the Service Request number.
_____________________________________________
3. Click Return to Start Center.
4. On the navigation bar, click Go T
o Applications > Service Desk > Service Requests to open
the Service Request application.
5. Open the service request that you created.
6. Click the Relat
ed Records tab.
Notice that there is nothing under the Re
lated Survey Record section.
7. Open the Surveys application.
8. Find and click the Survey ID for the
original SRM Survey you created.
9. Verify that the App
lies To object is SR (service request).
10. Copy the untracked URL from the UnT
racked URL field.
11. On the navigation bar under More Actions, click Send Survey.

Unit 9 Surveys exercises
Exercise 11 Associating a survey to a ticket
Course materials may not be reproduced in whole or in part without the prior written permission of IBM.
© Copyright IBM Corp. 2016
9-29
V7.0
Uempty
12. At the Template ID field, select the SURVEYUNTRACKED survey template.
13. Paste the URL from Step 8 on page 9-28 into the Message field.
14. Enter the ticket number of the ticket you want to associate to this survey. In this case, enter the
number you wrote down in Step
2 on page 9-28 after the text recordkey= at the end of the
URL.
The end of the URL looks similar to
the following example:
&recordclass=SR&recordkey=<YOUR SERVICE REQUEST NUMBER>&
15. Change the Subject field to UnTracked Survey Association Test.
16. Select who the survey is sent to by clicking the Se
lect Value icon at the end of the To field.
17. Click the Peop
le tab and find bob.
18. Select the To option for bob.
19. Click OK.
20. Change the Se
nd From field to [email protected].ibm.com
21. Click Send.
A quick status message indicates that the communication was sent.
22. Return to the S
tart Center.
23. Sign out.
24. Close the browser.
25. Open Mozilla Thunderbird with the bob pro
file and wait for the new email to arrive.
26. Click the link, answer the qu
estions (your choice), and submit the survey.
27. Close the newly created browser window that the survey opened in.
28. Close Mozilla Thunderbird.

Unit 9 Surveys exercises
Exercise 11 Associating a survey to a ticket
Course materials may not be reproduced in whole or in part without the prior written permission of IBM.
© Copyright IBM Corp. 2016
9-30
V7.0
Uempty
29. Open Internet Explorer, and sign in as Maxadmin with the user name maxadmin and the
password object00.
30. Reopen the Su
rvey association text service request.
31. Open the Related
Records tab and note the section Related Survey Record, below the
Solutions section.
32. Click the Survey ID detail menu (>>) and select Go to Surveys.
The related survey opens. Here you can look at the
details of the survey that was sent.
33. Click Re
turn.
34. Sign out.
You have reached the end of the exercises. Inform your instructor that you have completed the
exercises in
this unit.

Course materials may not be reproduced in whole or in part without the prior written permission of IBM.
© Copyright IBM Corp. 2016
10-1
Unit 10 Reporting exercises
The exercises in this unit familiarize you with navigation through the reporting module and provide
insight into the types of reports that are provided with a base installation of IBM Control Desk.
Additionally, you are exposed to methods used to request subsets of data based on a range of
dates or other criteria, depending on the flexibility built into the reports.
Exercise 1 Service requests Created By
Catalog Orders report
1. Sign in as Jane with the user name jane and the password object00.
Before you can generate a report, you must configure it.
Note: Methods of generating reports in IBM Control Desk version 7.6 vary slightly, depending on
the number of languages that have been selected during the product’s installation. The steps in
this exercise assume multiple languages. On a system with only a single language installed, the
Generate Request Page button is displayed next to the Preview button when the report is
selected from a list of reports.
2. From the Navigation Bar, click Go To Applications, and then Administration > Reporting >
Report Administration.
3. If the F
ilter fields are not visible, select the arrow next to the word Filter in the upper left portion
of the Reports application. In the Description field, filter for service requests created and
press enter.

Unit 10 Reporting exercises
Exercise 1 Service requests Created By Catalog Orders report
Course materials may not be reproduced in whole or in part without the prior written permission of IBM.
© Copyright IBM Corp. 2016
10-2
V7.0
Uempty
The report that is named sr_from_catalog_sc.rptdesign is the only result.
4. Click Gen
erate Request Page in the lower-right corner of the Settings section.
While the query runs in the background and the report is being generated, the Please wait icon and
message are displayed.
5. After the request page is generated, click Close on the system message. The report is ready to
run.

Unit 10 Reporting exercises
Exercise 1 Service requests Created By Catalog Orders report
Course materials may not be reproduced in whole or in part without the prior written permission of IBM.
© Copyright IBM Corp. 2016
10-3
V7.0
Uempty
6. Click Preview.
7. Leave all fields at their default, and click Submit.

Unit 10 Reporting exercises
Exercise 1 Service requests Created By Catalog Orders report
Course materials may not be reproduced in whole or in part without the prior written permission of IBM.
© Copyright IBM Corp. 2016
10-4
V7.0
Uempty
In a minute or two, a new browser window opens and the report opens.
8. Review the report, by using the arrow buttons to navigate pages.
9. Follow the hyperlink for one of the tickets and
review the details that are presented.
10. Close the report by closing the browser window.
Unit 10 Reporting exercises
Exercise 2 Total number of incidents by internal priority report
Course materials may not be reproduced in whole or in part without the prior written permission of IBM.
© Copyright IBM Corp. 2016
10-5
V7.0
Uempty
Exercise 2 Total number of incidents by
internal priority report
1. Click List View to return to the report list.
2. Clear the Description field, and select the Report Name filter field. Press Enter to open all
reports.
3. Filter the description for total number of incidents by.
4. Select tlsm_Total_Number_of_Tickets.rptdesign - Total number of incidents by internal
priority.
5. When the report has been generated, click Generate Request Page.
6. Close the system message.
7. Click the report name, and click Preview.
8. Enter a start date of January 1, 2000, and an end date of today.
9. Click Submit.
10. Review the report.
11. Close the report by closing the browser window.
12. When you are finished, sign out.
You have reached the end of the exercises. Inform your instructor that you have completed the
exercises in this unit.

V7.0
Uempty
IBM Training
®
© Copyright IBM Corporation 2016. All Rights Reserved.
